本篇討論的問題是對項目中遇到的難題進行技術穿刺。
做過項目的人都知道,在構思完一個項目的功能之后,緊接著的事情就是考慮這些構思的功能如何實現,對于自己不熟悉的領域,要進行技術穿刺。我的穿刺方法為先查找有無比較好的開源組件可用,如果沒有,就查找相關的文檔,自己編寫和測試代碼。
在這一篇,我主要解決三個問題。
1、解決字符串加密的問題,在前面一篇中,我們設計用戶模塊的時候,準備將用戶的密碼字段以MD5加密的方式保存,因此,這里需要寫一個對字符串加密生成MD5字符串的方法;
2、解決生成圖像縮略圖和生成驗證碼的問題;
3、解決url重寫的問題,之所以要用到url重寫,主要是為了讓用戶在訪問自己的主頁時,可以使用http://www.xkland.com/username或者http://username.xkland.com這樣的形式,而不是像http://www.xkland.com/index.jsp?username=xxx這樣難看的形式。
需要說明的是,要解決上面的三個問題,不是沒有開源的東西可用,而是我覺得每次都要整合不同的組件是在是太麻煩,而我們需要的功能也不是很復雜,我們不需要太通用的東西,只要能夠解決這里特定的問題就行了,因此不如自己動手實現,同時還可以獲得技術上的提高。
首先來看看MD5加密的問題,JDK中本來提供有數據加密的支持,其中java.security.MessageDigest類就可以實現MD5的加密,但是,加密后生成的數據是byte[]類型的,這里只需要寫一個方法將它轉換為字符串就行,代碼如下:
 package
?com.xkland.util;
package
?com.xkland.util;
import
?java.security.MessageDigest;
import
?java.lang.NullPointerException;
import
?java.security.NoSuchAlgorithmException;

 public
?
class
?StringUtil?
public
?
class
?StringUtil?
 {
{

 ?
public
?
static
?
char
[]?num_chars?
=
?
new
?
char
[]
{
'
0
'
,
?
public
?
static
?
char
[]?num_chars?
=
?
new
?
char
[]
{
'
0
'
,
 ??
'
1
'
,
'
2
'
,
'
3
'
,
'
4
'
,
'
5
'
,
'
6
'
,
'
7
'
,
'
8
'
,
??
'
1
'
,
'
2
'
,
'
3
'
,
'
4
'
,
'
5
'
,
'
6
'
,
'
7
'
,
'
8
'
,
 ??
'
9
'
,
'
A
'
,
'
B
'
,
'
C
'
,
'
D
'
,
'
E
'
,
'
F
'
}
;
??
'
9
'
,
'
A
'
,
'
B
'
,
'
C
'
,
'
D
'
,
'
E
'
,
'
F
'
}
;
?
?
public
?
static
?String?toMD5String(String?input)?
?
throws
?NullPointerException,NoSuchAlgorithmException
{
??
if
(input?
==
?
null
)?
throw
?
new
?NullPointerException();
??
char
[]?output?
=
?
new
?
char
[
32
];
??MessageDigest?md?
=
?MessageDigest.getInstance(
"
MD5
"
);
??
byte
[]?by?
=
?md.digest(input.getBytes());
??
for
(
int
?i
=
0
;i
<
by.length;i
++
)
{
???output[
2
*
i]?
=
?num_chars[?(by[i]?
&
?
0xf0
)?
>>
?
4
?];
???output[
2
*
i
+
1
]?
=
?num_chars[?by[i]?
&
?
0xf
?];
??}
??
return
?
new
?String(output);
?}
 }
}
下面是它的測試用例:
package
?com.xkland.util;
import
?junit.framework.TestCase;
public
?
class
?StringUtilTest?
extends
?TestCase?
{
?
public
?
void
?testToMD5String()?
{
??
try
{
???System.out.println(StringUtil.toMD5String(
"
abc
"
));
??}
catch
(Exception?e)
{
???
??}
?}
}
運行測試用例,輸出結果為:
900150983CD24FB0D6963F7D28E17F72
再來說說關于圖像縮略圖生成的問題,我準備將它設置為一個可以讓Spring管理的類,簡單的說,可以利用Spring的配置文件來設置該類的一些屬性,比如原圖像保存的目錄和目標圖像保存的目錄,生成的縮略圖的大小,生成縮略圖的方式。這里特別需要說明的就是這個生成縮略圖的方式,我們即可以指定它只簡單的執行縮放,也可以指定它進行剪裁以后再縮放。為什么要這么設計,請大家看看如下的效果圖,對于下面這兩張美女圖:


如果我們只通過簡單的縮放來生成縮略圖,那么在網頁上的布局效果為:
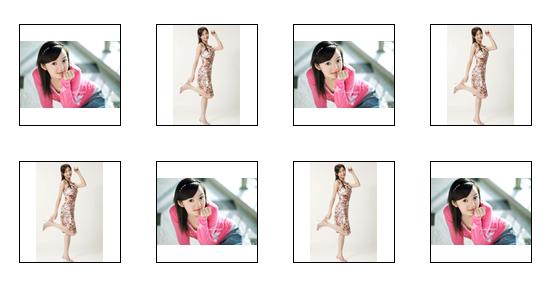
如果我們通過先剪切后縮放的效果來生成縮略圖,那么在網頁上布局的效果為:

可以看到通過第二種方式生成的縮略圖布局要漂亮一些,但是會損失圖片的信息。因此,兩種方式各有優劣。所以在設計的時候就設計為能夠讓用戶靈活配置。
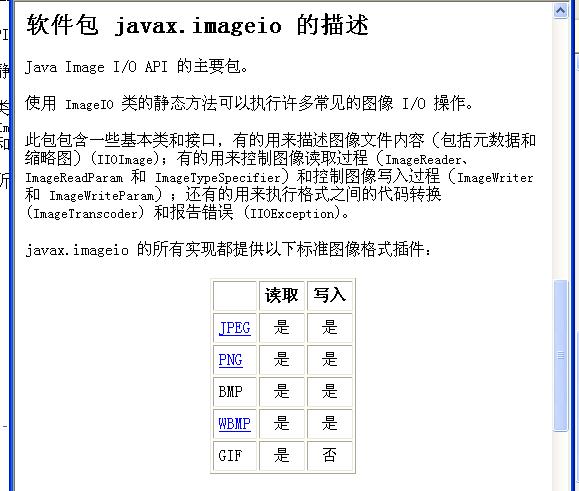
對于有些網友反映的gif動畫經過縮放以后就不能動了,這個問題的主要原因是因為Java SDK 1.4和1.5版本的ImageIO類只能讀gif格式的文件,而不能寫gif格式的文件,因此,對于gif格式的文件,生成的縮略圖只能用png格式代替,在我的設計中,我準備讓bmp格式的文件也讓png格式代替,因為png格式生成的文件更小,而且也不損失圖片質量。至于Java SDK 1.4和1.5版不支持寫gif格式的文件,可以查看Java文檔,下面是截圖:
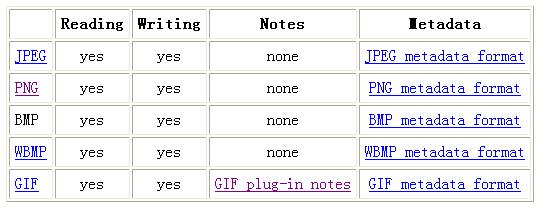
最新推出的Java SDK 6是可以寫gif格式的文件的,因此如果要解決這個問題,可以使用最新的JDK,下面是文檔截圖:
下面是我寫的生成縮略圖和生成驗證碼的ImageUtil類的源代碼:
package
?com.xkland.util;
import
?javax.imageio.ImageIO;
import
?java.awt.image.BufferedImage;
import
?java.io.File;
import
?java.awt.Image;
import
?java.awt.Graphics2D;
import
?java.util.Random;
import
?java.awt.Font;
import
?javax.servlet.http.HttpSession;
public
?
class
?ImageUtil?
{
????
private
?String?sourceDir;
//
圖片的存放路徑
????
private
?String?destinationDir;
//
縮略圖的存放路徑
????
private
?String?mode;
//
生成縮略圖的模式,可選ScaleOnly或ClipAndScale
????
private
?String?width;
//
縮略圖的寬度
????
private
?String?height;
//
縮略圖的高度
????
private
?String?characterStorage;
//
用來生成驗證碼的字符倉庫
????
????
//
以下代碼段是為了使用Spring注入屬性
????
public
?
void
?setCharacterStorage(String?characterStorage)?
{
????????
this
.characterStorage?
=
?characterStorage;
????}
????
public
?
void
?setDestinationDir(String?destinationDir)?
{
????????
this
.destinationDir?
=
?destinationDir;
????}
????
public
?
void
?setHeight(String?height)?
{
????????
this
.height?
=
?height;
????}
????
public
?
void
?setMode(String?mode)?
{
????????
this
.mode?
=
?mode;
????}
????
public
?
void
?setSourceDir(String?sourceDir)?
{
????????
this
.sourceDir?
=
?sourceDir;
????}
????
public
?
void
?setWidth(String?width)?
{
????????
this
.width?
=
?width;
????}
????
????
//
生成縮略圖的方法,默認縮略圖的文件名和原圖相同,存放路徑不同
????
public
?
void
?createMicroImage(String?fileName)
????
throws
?Exception
{
????????
//
判斷sourceDir的格式是否為以"\"結尾,并生成完整的路徑
????????String?sourceFileName;
????????String?destinationFileName;
????????
if
(sourceDir.lastIndexOf(
'
\\
'
)?
!=
?(sourceDir.length()
-
1
))
{
????????????sourceFileName?
=
?sourceDir?
+
?
"
\\
"
?
+
?fileName;
????????????destinationFileName?
=
?destinationDir?
+
?
"
\\
"
?
+
?fileName;
????????}
else
{
????????????sourceFileName?
=
?sourceDir?
+
?fileName;
????????????destinationFileName?
=
?destinationDir?
+
?fileName;
????????}
????????
????????
//
創建文件,并判斷原文件是否存在
????????File?sourceFile?
=
?
new
?File(sourceFileName);
????????
if
(
!
sourceFile.exists())
{
????????????
throw
?
new
?Exception();
????????}
????????
//
根據擴展名判斷原文件的格式
????????String?extension?
=
?fileName.substring(fileName.lastIndexOf(
'
.
'
)
+
1
);
????????
if
(
!
extension.equalsIgnoreCase(
"
jpg
"
)?
&&
?
!
extension.equalsIgnoreCase(
"
bmp
"
)
????????????????
&&
?
!
extension.equalsIgnoreCase(
"
gif
"
)?
&&
?
!
extension.equalsIgnoreCase(
"
png
"
))
{
????????????
throw
?
new
?Exception();
????????}
????????
????????
//
判斷縮略圖的寬度和高度是否正確,如果不能正確解析則拋出異常
????????
int
?destinationWidth?
=
?Integer.parseInt(width);
????????
int
?destinationHeight?
=
?Integer.parseInt(height);
????????
????????
//
判斷縮放模式是否正確,如果配置錯誤,則拋出異常
????????
if
(
!
mode.equalsIgnoreCase(
"
ScaleOnly
"
)
????????????????
&&
?
!
mode.equalsIgnoreCase(
"
ClipAndScale
"
))
{
????????????
throw
?
new
?Exception();
????????}
????????
????????
//
讀取圖像文件,并創建BufferedImage對象,如果不能讀取,則拋出異常
????????BufferedImage?image?
=
?
null
;
????????image?
=
?ImageIO.read(sourceFile);
????????
if
(image
==
null
)
{
????????????
throw
?
new
?Exception();
????????}
????????
????????
//
獲取原圖像文件的高度和寬度
????????
int
?sourceWidth?
=
?image.getWidth();
????????
int
?sourceHeight?
=
?image.getHeight();
????????
//
生成縮略圖
????????
if
(mode.equalsIgnoreCase(
"
ScaleOnly
"
))
{
????????????BufferedImage?destinationImage;
????????????
if
((
float
)sourceWidth
/
destinationWidth?
>
?(
float
)sourceHeight
/
destinationHeight)
{
????????????????Image?tempImage?
=
?image.getScaledInstance(destinationWidth,?(
int
)(destinationWidth
*
((
float
)sourceHeight
/
sourceWidth)),?Image.SCALE_DEFAULT);
????????????????destinationImage?
=
?
new
?BufferedImage(destinationWidth,?(
int
)(destinationWidth
*
((
float
)sourceHeight
/
sourceWidth)),BufferedImage.TYPE_INT_RGB);
????????????????Graphics2D?graphics?
=
?destinationImage.createGraphics();
????????????????graphics.drawImage(tempImage,
0
,
0
,
null
);
????????????????
????????????}
else
{
????????????????Image?tempImage?
=
?image.getScaledInstance((
int
)(destinationHeight
*
((
float
)sourceWidth
/
sourceHeight)),?destinationHeight,?Image.SCALE_DEFAULT);
????????????????destinationImage?
=
?
new
?BufferedImage((
int
)(destinationHeight
*
((
float
)sourceWidth
/
sourceHeight)),?destinationHeight,BufferedImage.TYPE_INT_RGB);
????????????????Graphics2D?graphics?
=
?destinationImage.createGraphics();
????????????????graphics.drawImage(tempImage,
0
,
0
,
null
);
????????????}
????
????????????
//
?如果是bmp或者gif,則縮略圖為png格式
????????????
if
(extension.equalsIgnoreCase(
"
bmp
"
)
||
extension.equalsIgnoreCase(
"
gif
"
))
{
????????????????extension?
=
?
"
png
"
;
????????????????destinationFileName?
=
?destinationFileName.substring(
0
,?destinationFileName.lastIndexOf(
'
.
'
))?
+
?
"
.
"
?
+
?extension;
????????????}
????????????File?destinationFile?
=
?
new
?File(destinationFileName);
????????????ImageIO.write(destinationImage,?extension,?destinationFile);
????????}
else
{
????????????BufferedImage?destinationImage;
????????????
if
((
float
)sourceWidth
/
destinationWidth?
>
?(
float
)sourceHeight
/
destinationHeight)
{
????????????????
//
先裁減
????????????????
int
?x?
=
?sourceWidth?
-
?(
int
)(sourceHeight
*
((
float
)destinationWidth
/
destinationHeight));
????????????????Image?clipedImage?
=
?image.getSubimage((
int
)(
0.5
*
x),?
0
,?(
int
)(sourceHeight
*
((
float
)destinationWidth
/
destinationHeight)),?sourceHeight);
????????????????
//
后縮放
????????????????Image?scaledImage?
=
?clipedImage.getScaledInstance(destinationWidth,?destinationHeight,?Image.SCALE_DEFAULT);
????????????????destinationImage?
=
?
new
?BufferedImage(destinationWidth,?destinationHeight,BufferedImage.TYPE_INT_RGB);
????????????????Graphics2D?graphics?
=
?destinationImage.createGraphics();
????????????????graphics.drawImage(scaledImage,
0
,
0
,
null
);
????????????????
????????????}
else
{
//
????????????????先裁減
????????????????
int
?y?
=
?sourceHeight?
-
?(
int
)(sourceWidth
*
((
float
)destinationHeight
/
destinationWidth));
????????????????Image?clipedImage?
=
?image.getSubimage(
0
,?(
int
)(
0.5
*
y),?sourceWidth,?(
int
)(sourceWidth
*
((
float
)destinationHeight
/
destinationWidth)));
????????????????
//
后縮放
????????????????Image?scaledImage?
=
?clipedImage.getScaledInstance(destinationWidth,?destinationHeight,?Image.SCALE_DEFAULT);
????????????????destinationImage?
=
?
new
?BufferedImage(destinationWidth,?destinationHeight,BufferedImage.TYPE_INT_RGB);
????????????????Graphics2D?graphics?
=
?destinationImage.createGraphics();
????????????????graphics.drawImage(scaledImage,
0
,
0
,
null
);
????????????}
????
????????????
//
?如果是bmp或者gif,則縮略圖為png格式
????????????
if
(extension.equalsIgnoreCase(
"
bmp
"
)
||
extension.equalsIgnoreCase(
"
gif
"
))
{
????????????????extension?
=
?
"
png
"
;
????????????????destinationFileName?
=
?destinationFileName.substring(
0
,?destinationFileName.lastIndexOf(
'
.
'
))?
+
?
"
.
"
?
+
?extension;
????????????}
????????????File?destinationFile?
=
?
new
?File(destinationFileName);
????????????ImageIO.write(destinationImage,?extension,?destinationFile);
????????}
????}
????
//
生成驗證碼的方法
????
public
?BufferedImage?createValidateImage(HttpSession?session)
{
????????BufferedImage?validateImage?
=
?
new
?BufferedImage(
80
,
20
,BufferedImage.TYPE_INT_RGB);
????????Graphics2D?graphics?
=
?validateImage.createGraphics();
????????
????????
//
從characterStorage中隨機抽取四個字符生成驗證碼
????????
int
?length?
=
?characterStorage.length();
????????
char
[]?chars?
=
?
new
?
char
[
4
];
????????Random?rand?
=
?
new
?Random();
????????
for
(
int
?i
=
0
;?i
<
4
;?i
++
)
{
????????????
int
?index?
=
?rand.nextInt(length);
????????????chars[i]?
=
?characterStorage.charAt(index);
????????}
????????String?str?
=
?
new
?String(chars);
????????
//
將字符串保存到Session中,以便于驗證
????????session.setAttribute(
"
validateString
"
,?str);
????????
//
畫字符串到圖片中
????????graphics.setFont(
new
?Font(
"
宋體
"
,Font.BOLD,
18
));
????????graphics.drawString(str,?
2
,?
16
);
????????
//
隨機畫干擾直線
????????
for
(
int
?i
=
0
;?i
<
5
;?i
++
)
{
????????????
int
?x1?
=
?rand.nextInt(
80
);
????????????
int
?y1?
=
?rand.nextInt(
20
);
????????????
int
?x2?
=
?rand.nextInt(
80
);
????????????
int
?y2?
=
?rand.nextInt(
20
);
????????????graphics.drawLine(x1,?y1,?x2,?y2);
????????}
????????
????????
return
?validateImage;
????}
}
寫得比較倉促,沒有進行重構,所以比較難看一點。下面是測試用例的代碼:
package
?com.xkland.util;
import
?junit.framework.TestCase;
import
?javax.imageio.ImageIO;
import
?java.awt.image.BufferedImage;
import
?java.io.File;
public
?
class
?ImageUtilTest?
extends
?TestCase?
{
????
public
?
void
?testCreateMicroImage()?
throws
?Exception?
{
????????ImageUtil?util?
=
?
new
?ImageUtil();
????????util.setSourceDir(
"
E:\\
"
);
????????util.setDestinationDir(
"
F:\\
"
);
????????util.setWidth(
"
100
"
);
????????util.setHeight(
"
100
"
);
????????
????????
//
以僅縮放的形式生成縮略圖
????????util.setMode(
"
ScaleOnly
"
);
????????
//
橫圖像
????????util.createMicroImage(
"
001.bmp
"
);
????????
//
豎圖像
????????util.createMicroImage(
"
002.jpg
"
);
????????
????????
//
以先裁減后縮放的形式生成縮略圖
????????util.setDestinationDir(
"
G:\\
"
);
????????util.setMode(
"
ClipAndScale
"
);
????????
//
橫圖像
????????util.createMicroImage(
"
001.bmp
"
);
????????
//
豎圖像
????????util.createMicroImage(
"
002.jpg
"
);
????}
????
????
public
?
void
?testCreateValidateImage()?
throws
?Exception
{
????????ImageUtil?util?
=
?
new
?ImageUtil();
????????util.setCharacterStorage(
"
ABCDEFGHIJKLMNOPQRSTUVWXYZ北冥有魚其名為鯤鯤之大不知其幾千里也化而為鳥其名為鵬鵬之背不知其幾千里也怒而飛其翼若垂天之云是鳥也海運則將徙于南冥南冥者天池也
"
);
????????BufferedImage?image?
=
?util.createValidateImage();
????????ImageIO.write(image,?
"
jpg
"
,?
new
?File(
"
F:\\validateImage.jpg
"
));
????}
}
運行該測試用例,可以成功的生成縮略圖,并且可以生成驗證碼,生成的驗證碼如下圖:

把以上代碼再修改再完善,就可以創建更漂亮一點的圖形了。
為了把上面這個ImageUtil類讓SpringSide管理起來,并進行靈活的配置,可以在src\main\resources\spring目錄下建立beans.xml文件,并如下配置:
<?
xml?version="1.0"?encoding="UTF-8"
?>
<!
DOCTYPE?beans?PUBLIC?"-//SPRING//DTD?BEAN?2.0//EN"?"http://www.springframework.org/dtd/spring-beans-2.0.dtd"
>
<
beans
>
????
<
bean?
id
="imageUtil"
?class
="com.xkland.util.ImageUtil"
>
????????
<
property?
name
="sourceDir"
>
????????????
<
value
>
E:\
</
value
>
????????
</
property
>
????????
<
property?
name
="destinationDir"
>
????????????
<
value
>
F:\
</
value
>
????????
</
property
>
????????
<
property?
name
="width"
>
????????????
<
value
>
100
</
value
>
????????
</
property
>
????????
<
property?
name
="height"
>
????????????
<
value
>
100
</
value
>
????????
</
property
>
????????
<
property?
name
="mode"
>
????????????
<
value
>
ScaleOnly
</
value
>
????????
</
property
>
????????
<
property?
name
="characterStorage"
>
????????????
<
value
>
ABCDEFGHIJKLMNOPQRSTUVWXYZ北冥有魚其名為鯤鯤之大不知其幾千里也化而為鳥其名為鵬鵬之背不知其幾千里也怒而飛其翼若垂天之云是鳥也海運則將徙于南冥南冥者天池也
</
value
>
????????
</
property
>
????
</
bean
>
</
beans
>
最后,我們再來看看url重寫的問題。俗話說得好:“會者不難,難者不會”,剛開始我為了實現文章開頭所說的url重寫功能,嘗試采用的是配置Servlet映射的方法,但是怎么都不成功,后來才想到使用Filter來實現。有時候開源的東西會直接影響人的思路,比如Struts 1.x采用的就是配置Servlet映射的方法,而到了2.0,也改成Filter了。
在Filter中實現url重寫比較簡單,無非就是分析字符串和替換字符串,這里我就不列代碼了。只有想不到,沒有做不到,想辦法實現我們設計的功能,這便是技術穿刺的作用。