Tomcat的源碼研讀怎么說都是一件恐怖的事情,代碼太多!不過管中窺豹,也可偶爾為之。誰讓我好讀書,不求甚解呢。前面對嵌入式Tomcat(Tomcat 4.0)進行了一個簡單的分析,見
在應用中使用嵌入式Tomcat。
今天的這篇文章對Tomcat的源碼進行了一些分析,主要是Tomcat啟動。
1、Bootstrap.java。正如OFBiz的啟動程序時Start.java,Tomcat的啟動程序是Bootstrap.java。OFBiz的Start.java做的事情最主要的就是加載相應的lib庫和啟動tomcat及其component。Tomcat的Bootstrap也是加載相應的lib庫和啟動Catalina
的process方法。Lib庫放置在common,server和share目錄中。
2、Catalina.java。這個類主要研究start方法,核心代碼如下:
1 Digester digester = createStartDigester();
2 File file = configFile();
3 try {
4 InputSource is =
5 new InputSource("file://" + file.getAbsolutePath());
6 FileInputStream fis = new FileInputStream(file);
7 is.setByteStream(fis);
8 digester.push(this);
9 digester.parse(is);
10 fis.close();
11 } catch (Exception e) {
12 System.out.println("Catalina.start using "
13 + configFile() + ": " + e);
14 e.printStackTrace(System.out);
15 System.exit(1);
16 }
主要是解析server.xml文件,采用的
Digester,非常著名的xml解析器。通過解析的源代碼分析,Tomcat將Engine,Host和Context當成Container,這是一個虛擬的概念,具體的容器都實現了Container, Lifecycle接口。所以Service不是直接引用一個Engine,而是一個Container。
在應用中使用嵌入式Tomcat的tomcat實現結構圖中都是相鄰層次之間都是雙向引用的,如Service引用上面的Server還有下級的Connector和Container。大致類圖如下:

Digester解析server.xml就是將這些實例初始化并且配置好相互的引用關系。Connector通過Container的invoke方法將接受到了請求交給Container最高層Engine處理:
CoyoteAdapter.java
connector.getContainer().invoke(request, response);
接下來就是初始化并啟動server:
// Start the new server
if (server instanceof Lifecycle) {
try {
server.initialize();
((Lifecycle) server).start();
try {
// Register shutdown hook
Runtime.getRuntime().addShutdownHook(shutdownHook);
} catch (Throwable t) {
// This will fail on JDK 1.2. Ignoring, as Tomcat can run
// fine without the shutdown hook.
}
// Wait for the server to be told to shut down
server.await();
} catch (LifecycleException e) {
System.out.println("Catalina.start: " + e);
e.printStackTrace(System.out);
if (e.getThrowable() != null) {
System.out.println("----- Root Cause -----");
e.getThrowable().printStackTrace(System.out);
}
}
}
server的初始化最終就是將connector進行初始化:
CoyoteConnector.java
/**
* Initialize this connector (create ServerSocket here!)
*/
public void initialize()
throws LifecycleException {
if (initialized)
throw new LifecycleException
(sm.getString("coyoteConnector.alreadyInitialized"));
this.initialized = true;
if( oname == null && (container instanceof StandardEngine)) {
try {
// we are loaded directly, via API - and no name was given to us
StandardEngine cb=(StandardEngine)container;
oname = createObjectName(cb.getName(), "Connector");
Registry.getRegistry(null, null)
.registerComponent(this, oname, null);
} catch (Exception e) {
log ("Error registering connector " + e.toString());
}
if(debug > 0)
log("Creating name for connector " + oname);
}
// Initialize adapter
adapter = new CoyoteAdapter(this);
protocolHandler.setAdapter(adapter);
IntrospectionUtils.setProperty(protocolHandler, "jkHome",
System.getProperty("catalina.base"));
// Configure secure socket factory
if (factory instanceof CoyoteServerSocketFactory) {
IntrospectionUtils.setProperty(protocolHandler, "secure",
"" + true);
CoyoteServerSocketFactory ssf =
(CoyoteServerSocketFactory) factory;
IntrospectionUtils.setProperty(protocolHandler, "algorithm",
ssf.getAlgorithm());
IntrospectionUtils.setProperty(protocolHandler, "ciphers",
ssf.getCiphers());
IntrospectionUtils.setProperty(protocolHandler, "clientauth",
ssf.getClientAuth());
IntrospectionUtils.setProperty(protocolHandler, "keystore",
ssf.getKeystoreFile());
IntrospectionUtils.setProperty(protocolHandler, "randomfile",
ssf.getRandomFile());
IntrospectionUtils.setProperty(protocolHandler, "rootfile",
ssf.getRootFile());
IntrospectionUtils.setProperty(protocolHandler, "keypass",
ssf.getKeystorePass());
IntrospectionUtils.setProperty(protocolHandler, "keytype",
ssf.getKeystoreType());
IntrospectionUtils.setProperty(protocolHandler, "protocol",
ssf.getProtocol());
IntrospectionUtils.setProperty(protocolHandler,
"sSLImplementation",
ssf.getSSLImplementation());
}
try {
protocolHandler.init();
} catch (Exception e) {
throw new LifecycleException
(sm.getString
("coyoteConnector.protocolHandlerInitializationFailed", e));
}
}
Protocol Handler初始化會初始化PoolTcpEndPoint,這個時候就會啟動Tomcat的端口了:
public void initEndpoint() throws IOException, InstantiationException {
try {
if(factory==null)
factory=ServerSocketFactory.getDefault();
if(serverSocket==null) {
try {
if (inet == null) {
serverSocket = factory.createSocket(port, backlog);
} else {
serverSocket = factory.createSocket(port, backlog, inet);
}
} catch ( BindException be ) {
throw new BindException(be.getMessage() + ":" + port);
}
}
if( serverTimeout >= 0 )
serverSocket.setSoTimeout( serverTimeout );
} catch( IOException ex ) {
throw ex;
} catch( InstantiationException ex1 ) {
throw ex1;
}
initialized = true;
}
初始化后整個tomcat就做好準備啟動,這時還不能處理客戶端的請求,必須啟動相關容器。與初始化相比,啟動的時候同時啟動Container和Connector。Container的啟動會將Engine,Host和Conext都啟動起來。
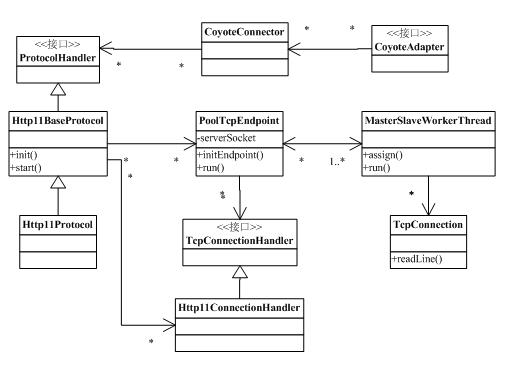
Connector啟動的時候就會啟動PoolTcpEndPoint,看看它的run方法就大概知道怎么回事了:
/**
* The background thread that listens for incoming TCP/IP connections and
* hands them off to an appropriate processor.
*/
public void run() {
// Loop until we receive a shutdown command
while (running) {
// Loop if endpoint is paused
while (paused) {
try {
Thread.sleep(1000);
} catch (InterruptedException e) {
// Ignore
}
}
// Allocate a new worker thread
MasterSlaveWorkerThread workerThread = createWorkerThread();
if (workerThread == null) {
try {
// Wait a little for load to go down: as a result,
// no accept will be made until the concurrency is
// lower than the specified maxThreads, and current
// connections will wait for a little bit instead of
// failing right away.
Thread.sleep(100);
} catch (InterruptedException e) {
// Ignore
}
continue;
}
// Accept the next incoming connection from the server socket
Socket socket = acceptSocket();
// Hand this socket off to an appropriate processor
workerThread.assign(socket);
// The processor will recycle itself when it finishes
}
// Notify the threadStop() method that we have shut ourselves down
synchronized (threadSync) {
threadSync.notifyAll();
}
}
MasterSlaveWorkerThread默認最大線程數是20,Tomcat優化時可以設置此線程數,見Tomcat優化方案。
MasterSlaveWorkerThread使用的是Guarded Suspension Pattern,如果有新的Socket分配,那么進行處理,available作為警戒條件:
synchronized void assign(Socket socket) {
// Wait for the Processor to get the previous Socket
while (available) {
try {
wait();
} catch (InterruptedException e) {
}
}
// Store the newly available Socket and notify our thread
this.socket = socket;
available = true;
notifyAll();
}
/**
* Await a newly assigned Socket from our Connector, or <code>null</code>
* if we are supposed to shut down.
*/
private synchronized Socket await() {
// Wait for the Connector to provide a new Socket
while (!available) {
try {
wait();
} catch (InterruptedException e) {
}
}
// Notify the Connector that we have received this Socket
Socket socket = this.socket;
available = false;
notifyAll();
return (socket);
}
public void run() {
// Process requests until we receive a shutdown signal
while (!stopped) {
// Wait for the next socket to be assigned
Socket socket = await();
if (socket == null)
continue;
// Process the request from this socket
endpoint.processSocket(socket, con, threadData);
// Finish up this request
endpoint.recycleWorkerThread(this);
}
// Tell threadStop() we have shut ourselves down successfully
synchronized (threadSync) {
threadSync.notifyAll();
}
}
下面一幅圖有助理解,Tomcat請求客戶端情況的具體分析后面再分析。