配置TELNET一定要映射端口
Posted on 27 八月 2011 by 柳城 ,閱讀 554
接上(虛擬機VirtualBox+Centos+NAT網絡的配置過程):裝好VirtualBox后,在XP下進入網絡鄰居,多了個VirtualBox Host-Only Network。可知:
Host機的IP
Host機的IP:192.168.56.1

虛擬機的IP
在CentOS查看虛擬機的IP:
ifconfig -a #查看IP
eth0 Link encap:Ethernet HWaddr 08:00:27:BE:80:A6 inet addr:10.0.2.15 Bcast:10.0.2.255 Mask:255.255.255.0 inet6 addr: fe80::a00:27ff:febe:80a6/64 Scope:Link UP BROADCAST RUNNING MULTICAST MTU:1500 Metric:1 RX packets:172 errors:0 dropped:0 overruns:0 frame:0 TX packets:119 errors:0 dropped:0 overruns:0 carrier:0 collisions:0 txqueuelen:1000 RX bytes:15640 (15.2 KiB) TX bytes:21109 (20.6 KiB) lo Link encap:Local Loopback inet addr:127.0.0.1 Mask:255.0.0.0 inet6 addr: ::1/128 Scope:Host UP LOOPBACK RUNNING MTU:16436 Metric:1 RX packets:0 errors:0 dropped:0 overruns:0 frame:0 TX packets:0 errors:0 dropped:0 overruns:0 carrier:0 collisions:0 txqueuelen:0 RX bytes:0 (0.0 b) TX bytes:0 (0.0 b)
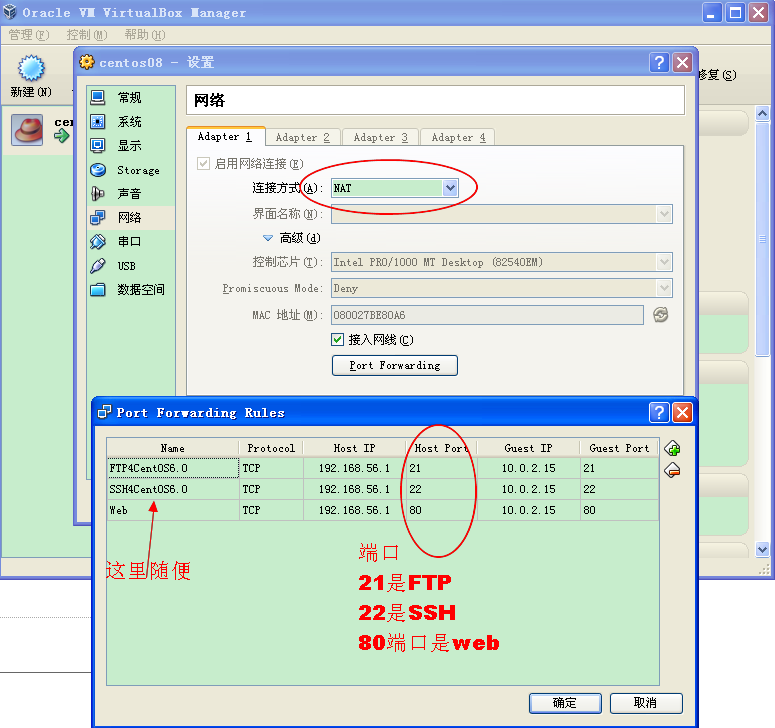
映射虛擬機和Host機的端口(用SSH登陸Centos)
虛擬機的IP是10.0.2.15,自動獲取的IP。接下來打開 VirtualBox,按下圖設置:
SSH的默認端口是22,填好HostIP及GuestIP就行了。這樣子就能通過putty等軟件SSH登陸了。
SSH IP: 192.168.65.1
帳號:CentOS設置的帳號,如root

web的80端口是為以后安裝apache用的。設置了這個后,Host機才能用http://IP/通過瀏覽器直接訪問。(還需要設置CentOS的防火墻不屏蔽80端口。以后再詳~)
CentOS yum鏡像
設置yum的鏡像,方便下載更新軟件。設置的方法參照:http://centos.ustc.edu.cn/
安裝地方設置為HTTP,Server ctos.ustc.edu.cn, 目錄 為centos/6/os/i386 或 centos/6/os/x86_64。
安裝后請按照以下步驟修改CenOS-Base.repo,以后就可以方便的用yum從本鏡像站點安裝、更新軟件。
CentOS6的安裝方法
cd /etc/yum.repos.d mv CentOS-Base.repo CentOS-Base.repo.save wget http://ctos.ustc.edu.cn/CentOS-Base.repo.6 wget http://ctos.ustc.edu.cn/epel.repo.6 mv CentOS-Base.repo.6 CentOS-Base.repo mv epel.repo.6 epel.repo
提醒:裝了centos的最小版本minimal之后,一開始沒有安裝wget了,所以就是需要配置SSH后,就能隨便上傳文件了。