Java的指針時(shí)鐘最基礎(chǔ)的原理和數(shù)字時(shí)鐘其實(shí)差不多,也是利用Swing的Timer計(jì)時(shí),每隔一定時(shí)間重新繪制組件,最后重寫paintComponent方法來更新界面.和之前介紹的時(shí)鐘一樣,為了保證時(shí)鐘的正確啟動和終止,需要重寫組件的addNotify和removeNotify方法,在方法內(nèi)加入Timer的啟動和終止;最后也要重寫組件getPreferredSize方法使組件的大小自動適應(yīng).
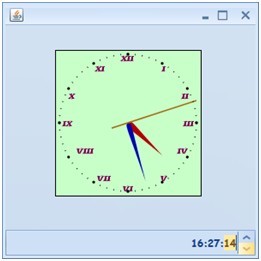
首先看最終的效果:

工程的目錄:
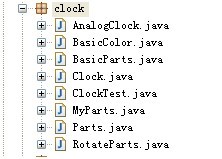
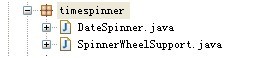
其中timespinner包是時(shí)間的微調(diào)組件,這兒只是為了顯示用的,和指針時(shí)鐘無關(guān),先不介紹了.
Clock包則是顯示指針時(shí)鐘的包,指針時(shí)鐘的組件類是AnalogClock,它繼承于Clock類,處理和數(shù)字時(shí)鐘的基本一致,先看Clock的:
/**
* This bean to define basic properties and
behaviors of a clock, concrete
* instances will be implemented by <code>DigitalClock</code> and
others.
*/
publicabstractclass Clock extends JComponent {
屬性也是:
/**
* Font rendering context - assumes no
default transform, anti-aliasing
* active and fractional
metrics allowed.
*/
publicstaticfinal FontRenderContext
frc = new FontRenderContext(null,
true, true);
/**
* The calendar instance
for this clock.
*/
protected Calendar calendar;
/**
* @see #getBgImage()
*/
protected Image bgImage;
和數(shù)字時(shí)鐘完全一樣,提供基本屬性和文本顯示和繪制的信息容器.
再看AnalogClock:
/**
* To implement a analog-type clock.
*/
publicclass AnalogClock extends Clock implements ActionListener {
它有兩個屬性:
/**
* Parts to construct this
clock.
*/
private Parts parts = null;
/**
* A timer to run in a
independent thread.
*/
private Timer timer = null;
一個是定時(shí)刷新時(shí)間的Timer,一個是時(shí)鐘的樣式.
具體方法有,
1.復(fù)寫addNotify和removeNotify方法控制Timer的啟動和終止.
/**
* @see
java.awt.Component#addNotify()
*/
@Override
publicvoid addNotify() {
super.addNotify();
timer.start();
}
/**
* @see
java.awt.Component#removeNotify()
*/
@Override
publicvoid removeNotify() {
timer.stop();
super.removeNotify();
}
2.復(fù)寫getPreferredSize方法使組件自動適應(yīng)大小.
/**
*/
@Override
public Dimension getPreferredSize() {
Dimension size = getSize();
size.width = parts.getSize().width;
size.height = parts.getSize().height + MARGIN;
return size;
}
3.復(fù)寫paintComponent使修正外觀
@Override
publicvoid paintComponent(Graphics g) {
4.實(shí)現(xiàn)Timer必須的actionPerformed方法,做定時(shí)任務(wù)
/**
* Do transformation based
on current precise time when display.
*/
@Override
publicvoid actionPerformed(ActionEvent e) {
主要操作是取得當(dāng)前時(shí)間,更新組件:
parts.doTransform(hour, minute, second, millisecond);
repaint();
// Resize this clock in time
setSize(getPreferredSize());
還有最主要的構(gòu)造函數(shù),組件的外觀通過它傳入,
/**
* Constructor:<br>
* Creates an analog-type clock by
using given parts.
*/
public AnalogClock(Parts parts) {
并且把Timer初始化:
timer = new Timer(1000, this);
到現(xiàn)在為止,和時(shí)間設(shè)置相關(guān)的已經(jīng)完成,剩下的就是傳入組件的表現(xiàn)Parts,使畫面呈現(xiàn)了.
指針時(shí)鐘的呈現(xiàn)主要使用了Parts、RotateParts、BasicParts和MyParts四個類,它們是繼承關(guān)系.
其中Parts是最基本的,它主要描繪指針時(shí)鐘最外層的邊框、指針時(shí)鐘顏色和大小,,并且提供了虛的 doTransform方法供子類實(shí)現(xiàn)繪制;
RotateParts在Parts的基礎(chǔ)上提供了圓心和半徑把數(shù)字時(shí)鐘最外層的圓的屬性提供出來,并提供了畫刻度的方法,沒有具體的繪制;
BasicParts是主要的繪制類,它完成了指針時(shí)鐘顯示的大部分工作,提供時(shí)鐘上的數(shù)字和時(shí)分秒指針以及指針的變換器這些基本屬性,并提供了繪制數(shù)字和指針在組件上的方法,簡單的繼承它就可以實(shí)現(xiàn)一個指針時(shí)鐘了,只是不夠美觀;
MyParts是繼承于BasicParts的類,它主要目的是把指針時(shí)鐘做的更美觀,并且定義時(shí)鐘的基本大小,顏色等,提供了更好的繪制鐘面上數(shù)字和指針的方法.
現(xiàn)在依次詳細(xì)看看這些類:
首先是最基本的Parts
/**
* To represent all modules which a analog-type clock consists
of.
*/
publicabstractclass Parts
extends JComponent {
再看看它的屬性:
/**
* Coloring scheme for the
parts.
*/
protected BasicColor colors;
/**
* Size of this parts.
*/
protected Dimension size;
/**
* Clock face.
*/
protected Shape dial;
分別控制時(shí)鐘的各個顏色,大小,和外觀樣式.
然后是方法,它提供一個虛方法給具體類實(shí)現(xiàn):
/**
*
Changes positions of hour hand, minute hand, second hand and * decisecond hand based on current time.
*/
publicabstractvoid doTransform(int hour, int minute, int second,
int millisecond);
這個方法主要是按給定的時(shí)間值得出指針在時(shí)鐘上的位置和角度.
接著是RotateParts類:
/**
* This class defines a classical clock
behavior by using rotation pattern, *as we all know in common sense.
*/
publicabstractclass RotateParts extends Parts {
再看看它的屬性:
/**
* X coordinate of the
center.
*/
protectedfloatx;
/**
* Y coordinate of the
center.
*/
protectedfloaty;
/**
* Radius of the clock
face.
*/
protectedfloatradius;
分別給定了指針時(shí)鐘的圓的圓心和半徑,沒有提供繪制方面的屬性.
然后是方法,它提供了幾個給定時(shí)間值換算為時(shí)鐘位置的方法:
/**
* a rotation instance from
12 o'clock direction.
*/
public AffineTransform getTransform() {
return AffineTransform.getRotateInstance(0, x, y);
}
這個方法是提供默認(rèn)的指針的位置,即繞圓心(0,0)點(diǎn)旋轉(zhuǎn)0度,即12點(diǎn)位置.
接著
/**
* Sets rotation algorithm
by given value.
*/
publicvoid setToRotation(AffineTransform af, double value, int grad) {
af.setToRotation(value * (2 * Math.PI / grad), x, y);
}
這個方法根據(jù)給定的具體值(這里可以理解為當(dāng)前具體時(shí)間的時(shí)、分或者秒)和總的時(shí)間劃分(12或者60)算出需要旋轉(zhuǎn)的角度,然后繞圓心(x,y)旋轉(zhuǎn).
最后是
/**
* Gets a rotation
transform by given parameters.
*/
public AffineTransform getRotateInstance(int grad, int seq) {
return getRotateInstance(x, y, grad, seq);
}
/**
* Get a rotation transform
by given parameters.
*/
publicstatic AffineTransform getRotateInstance(float x, float y, int grad, int seq) {
return AffineTransform.getRotateInstance((2
* Math.PI / grad) *
seq, x, y);
}
這個是根據(jù)指定的值和總值以及中心點(diǎn)取得映射變換的實(shí)例.
接著就是重要的BasicParts類了
/**
* To
implement a classical analog-type clock face, except definitely *describing the hands
shape.<br>
*/
publicabstractclass BasicParts
extends RotateParts {
它是鐘表刻度的繼承,繼承它就可以實(shí)現(xiàn)自己的指針鐘表了.
先看它的屬性:
/**
* Hour hand.
*/
protected Shape hourHand;
/**
* Minute hand.
*/
protected Shape minuteHand;
/**
* Second hand.
*/
protected Shape secondHand;
/**
* Hour hand behavior
controller.
*/
protected AffineTransform hourTransform;
/**
* Minute hand behavior
controller.
*/
protected AffineTransform minuteTransform;
/**
* Second hand behavior
controller.
*/
protected AffineTransform secondTransform;
這6個屬性提供時(shí)分秒三個時(shí)針的形狀和繪制映射類,通過它們可以對鐘表進(jìn)行繪制.
/**
* Moves all parts, to
leave some margin.
*/
protectedtransient AffineTransform trans;
這個屬性是在對時(shí)分秒指針繪制時(shí)提供變換的.
/**
* Arabic time punctualities.
*/
publicstaticfinal String[] ARABIC = { "12", "1", "2", "3", "4", "5", "6","7", "8", "9", "10", "11" };
/**
* Roman time punctualities.
*/
publicstaticfinal String[] ROMAN = { "XII", "I", "II", "III", "IV", "V","VI", "VII", "VIII", "IX", "X", "XI" };
這兩個常量是提供表盤的刻度顯示的,也可以自己定義一個12位的數(shù)組代替.
再看它的構(gòu)造函數(shù)
/**
* Constructor: Joins every
parts in a entire analog-type clock.
*/
protected BasicParts(Shape dial, Shape hourHand, Shape minuteHand,
Shape secondHand, String[] numbers, BasicColor colors)
throws Exception {
需要傳入外圍圖形、時(shí)分秒圖形、刻度數(shù)字和各部分顏色.當(dāng)然可以傳入new GeneralPath()
在以后再具體描繪它們.
/**
* Initializes hand
transformation.
*/
protectedvoid initTransform() {
hourTransform = getTransform();
minuteTransform = getTransform();
secondTransform = getTransform();
}
這個是初始化時(shí)分秒繪制映射類的.默認(rèn)讓它們都指向12點(diǎn)方向.
/**
* Default algorithm for
hands's action trace.
*/
@Override
publicvoid doTransform(int hour, int minute, int second, int millisecond) {
if (hourTransform != null && minuteTransform != null
&& secondTransform != null) {
setToRotation(hourTransform,
hour + (minute + second / 60.0) / 60.0, 12);
setToRotation(minuteTransform, minute + second / 60.0, 60);
setToRotation(secondTransform, second, 60);
}
}
這個是父類的虛函數(shù)的實(shí)現(xiàn),根據(jù)給定值旋轉(zhuǎn)指定角度呈現(xiàn)給畫面.
/**
* Draws a number at 12
o'clock.
*/
protectedvoid drawNumber(Graphics g, String number, Font font) {
BasicColor c = (BasicColor) colors;
AttributedString num = new AttributedString(number);
if (font != null) {
num.addAttribute(TextAttribute.FONT, font);
}
drawNumber(g,
num, x, y - radius, c.numbers);
}
/**
* Draws a number at 12
o'clock.
*/
publicstaticvoid drawNumber(Graphics g, AttributedString number, float x, float y, Color color) {
if (number != null) {
Graphics2D g2 = (Graphics2D) g;
g2.setPaint(color);
g2.drawString(number.getIterator(),
x, y);
}
}
是按指定的屬性在表盤上畫刻度的.
最后是重要的paintComponent方法了
@Override
publicvoid paintComponent(Graphics g) {
它按照屬性了上面取得的繪制映射類進(jìn)行繪制
首先是繪制外圍界面:
g2.setPaint(c.dail);
g2.fill(trans.createTransformedShape(dial));
g2.setPaint(Color.BLACK);
g2.draw(trans.createTransformedShape(dial));
然后繪制時(shí)分秒指針:
// Draw hour hand
g2.setPaint(c.hourHand);
g2.fill(trans.createTransformedShape(hourTransform
.createTransformedShape(hourHand)));
分秒基本和時(shí)的一樣.
最后要看的類就是自己實(shí)現(xiàn)的MyParts類了,其實(shí)這里簡單實(shí)現(xiàn)一個SimpleParts也可以的只是界面比較難看,如下圖:
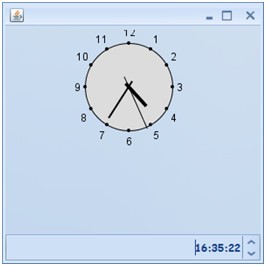
所以需要做漂亮點(diǎn)還是要自己去寫一部分代碼的.
先看繼承關(guān)系
/**
* A piece of sample code to show how to
develop a nice-looking
analog-type
* clock by using this API.
*/
publicfinalclass MyParts
extends BasicParts {
首先還是看它的屬性:
/**
* Radius of the clock
face.
*/
protectedfloatradius;
這個是定義鐘表的半徑.
/**
* 12 hour ticks.
*/
protected Shape tick;
/**
* Other 48 minute ticks
not at time punctualities.
*/
private GeneralPath smallTick;
這2個是定義鐘表的刻度,分別代表比較明顯的12個整點(diǎn)刻度,和其它48個不明顯的刻度.
/**
* X coordinate of left top
corner.
*/
privatestaticfloatxNW = 0;
/**
* Y coordinate of left top
corner.
*/
privatestaticfloatyNW = 0;
/**
* Width of the square.
*/
privatestaticfloatwidth = 170;
這2個屬性分別代表距離中心的坐標(biāo)和表的外圍大小.
/**
* Additional margin size
in proportion of radius by percentage.
*/
privatestaticfloatmarginOfRadius = 0.1f;
這個屬性代表空白區(qū)域的百分比.
然后是方法,先看畫刻度的方法:
/**
* Draws ticks.
*/
publicstaticvoid drawTicks(Graphics
g, Shape tick, int tickNumber,
float x, float y, AffineTransform trans, Color color) {
首先得到最基本的指針位置,默認(rèn)指向12點(diǎn)位置:
AffineTransform at = AffineTransform.getRotateInstance(0, x, y);
然后取得偏移的角度:
at = RotateParts.getRotateInstance(x, y, tickNumber, p);
最后是繪制:
g2.fill(trans.createTransformedShape(at
.createTransformedShape(tick)));
再看繪制指針的方法:
/**
* Generate hour hand and
minute hand shape.
*/
privatevoid createHand(Shape hand, float x, float y, float radius,
float widthPercent, float lengthPercent, float marginPercent,
float firstWidthPercent, float firstLengthPercent,
float secondWidthPercent, float secondLengthPercent) {
這個是繪制時(shí)針和分針的,形狀是尾部粗尖端細(xì)
h.moveTo(x, y);
h.curveTo(x - radius * (widthPercent / 2) * (firstWidthPercent / 2), y-
radius * marginPercent * (firstLengthPercent / 2), x – radius * (widthPercent /
2) * (secondWidthPercent / 2), y – radius * marginPercent *
(secondLengthPercent / 2), x, y – radius * lengthPercent);
/**
* Generates concrete hand
shape.
*/
publicstaticvoid createHand(Shape
hand, float x, float y, float radius, float widthPercent, float lengthPercent, float marginPercent) {
這個是繪制秒針的,粗細(xì)均勻,比較簡單
h.moveTo(x - radius *
(widthPercent / 2), y + radius * marginPercent);
h.lineTo(x + radius *
(widthPercent / 2), y + radius * marginPercent);
再看繪制表上數(shù)字的方法
/**
*
An algorithm to locate time punctualities numbers on a round clock *face
*/
privatevoid
drawNumbers(Graphics g, String[] numbers, float marginPercent, Font font) {
以3點(diǎn)舉例,先算角度:
float cZero1 = (float) Math.cos((2 * Math.PI / 12) * 3);
再把數(shù)字轉(zhuǎn)為屬性串,取得寬度:
num = new
AttributedString(numbers[p]);
num.addAttribute(TextAttribute.FONT, font);
layout = new
TextLayout(numbers[p], font, Clock.frc);
float width = layout.getBounds().getBounds().width;
然后算出坐標(biāo):
float px = (float) (x + trans.getTranslateX() + radius
* (1 + marginPercent) * sin);
最后調(diào)用父類繪制方法繪制:
super.drawNumber(g, num, px, py, color);
接著是初始化方法,它把指針和表盤大小,位置都進(jìn)行了初始化:
/**
* To initialize some
parameters and every parts shape.
*/
protectedvoid initialize() {
首先算圓心和半徑:
x = xNW + width / 2;
y = yNW + width / 2;
radius = width / 2 - 5;
然后畫時(shí)針:
設(shè)定各個百分比位置,然后調(diào)用時(shí)針方法
float hWidthOfRadius =
0.08f;
float hLengthOfRadius =
0.7f;
createHand(hourHand, x, y, radius, hWidthOfRadius, hLengthOfRadius,
hMarginOfRadius,
fstWidthOfRadius, fstLengthOfRadius,
sndWidthOfRadius,
sndLengthOfRadius);
其它指針也是類似畫出.
最后是復(fù)寫paintComponent方法,當(dāng)屬性變更時(shí)重新繪制指針時(shí)鐘:
/**
* Paint ticks and time punctualities.
*/
@Override
publicvoid paintComponent(Graphics g) {
在里面進(jìn)行了指針數(shù)字和刻度繪制方法的調(diào)用
// Draw 12 numbers by using
specific font
drawNumbers(g,
numbers, marginOfRadius, new Font("Ravie", Font.BOLD + Font.ITALIC, 8));
// Draw 12 hour ticks, here
use SimpleParts
drawTicks(g, tick, max, x, y, trans, c.tick);
// Draw 48 minute ticks, here
use SimpleParts
drawTicks(g, smallTick, 60, x, y, trans, c.tick);
這個繪制類就完成了.
到此為止,所有的指針時(shí)鐘的創(chuàng)立工作全部完成.
最后通過
/**
* This method shows how to
create a user defined analog-type clock
*/
private AnalogClock getColorfulClock() {
if (colorfulClock == null) {
try {
colorfulClock = new AnalogClock(new MyParts());
} catch (Exception e) {
e.printStackTrace();
}
}
returncolorfulClock;
}
就可以使用了.