======================================================================================
這僅僅是一個很簡單的醫院掛號系統,雖然涉及到一些C/S架構思想,但并沒有按照C/S架構去實現
還請大家見諒!!!
======================================================================================
**************************************************************************************
首先,新建一些輔助的類。
比如:Patients類,用于存放掛號的病人;Init類,用于預先存儲一些病人,這樣就可以方
便的測試Doctor類;還有一個Server類,相當于一個服務器。
**************************************************************************************
Patients類
package Queue;
/**
定義一個Patients類,這個類從寫了toString方法,可以方便的進行輸出!
*/
public class Patients {
private String name;
private String id;
public String getName() {
return name;
}
public void setName(String name) {
this.name = name;
}
public String getId() {
return id;
}
public void setId(String id) {
this.id = id;
}
//這里從寫了toString方法
public String toString(){
return "病人的ID是: " + this.id + " \n\n病人的姓名是: " + this.name;
}
}
Init類:
package Queue;
import java.util.HashMap;
import java.util.LinkedList;
import java.util.Map;
import java.util.Queue;
/**
*
* @author toveping
* 向一個隊列中加入一些病人,對醫生的客戶端進行測試!!!
*
*
*/
public class Init {
public Map init(String no){
Map<String, LinkedList<Patients>> queueSystem = new HashMap<String, LinkedList<Patients>>();
LinkedList<Patients> patQueue = new LinkedList<Patients>();
for(int i =0;i<20;i++){
Patients p = new Patients();
p.setId(i + "");
p.setName("A" + i);
patQueue.add(p);
}
queueSystem.put(no, patQueue);
return queueSystem;
}
}
Server類:
package Queue;
/**
定義一個Server類相當于服務器,掛號客戶端增加一個病人的話,相應的存儲在這里,可以供Doctor調用!!!
*/
import java.util.HashMap;
import java.util.LinkedList;
import java.util.Map;
import java.util.Queue;
public class Server {
//這是病人的隊列
Queue<Patients> patQueue = new LinkedList<Patients>();
//String 是醫生的代號 ;Queue 是病人的隊列
Map<String, Queue> queueSystem = new HashMap<String, Queue>();
public int serverAdd(String no){
Map<String, LinkedList<Patients>> queueSystem = new HashMap<String, LinkedList<Patients>>();
LinkedList<Patients> patQueue = new LinkedList<Patients>();
Patients p = new Patients();
p.setId(patQueue.size()+"");
patQueue.add(p);
queueSystem.put(no, patQueue);
return patQueue.size();
}
}
**************************************************************************************
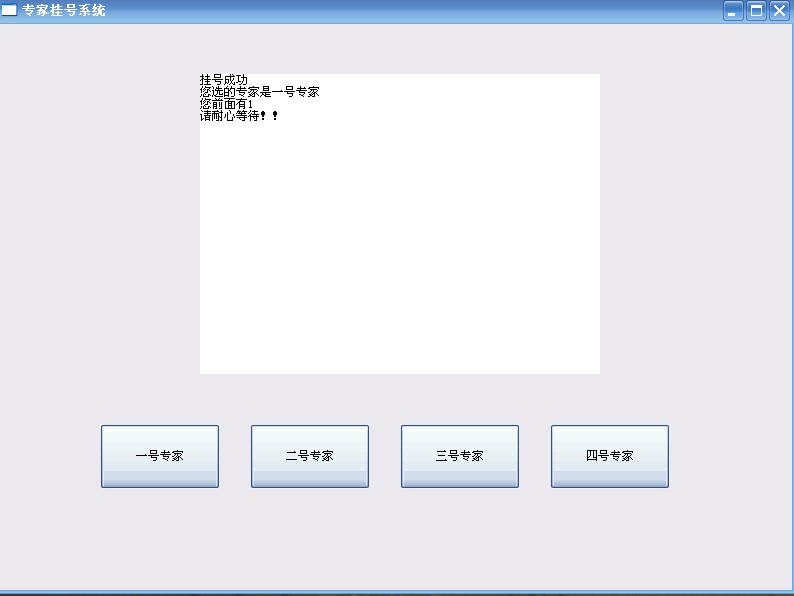
下面是掛號客戶端:
**************************************************************************************
package Queue;
/**
這是一個掛號客戶端,對會診的病人進行掛號,以及方便掛號的病人容易的掛到自己想要的專家!!!
*/
import org.eclipse.swt.SWT;
import org.eclipse.swt.events.SelectionAdapter;
import org.eclipse.swt.events.SelectionEvent;
import org.eclipse.swt.layout.FillLayout;
import org.eclipse.swt.widgets.Button;
import org.eclipse.swt.widgets.Display;
import org.eclipse.swt.widgets.Shell;
import org.eclipse.swt.widgets.Text;
public class Client {
public static void main(String[] args){
Display display = new Display();
Shell shell = new Shell(display);
shell.setLayout(new FillLayout());
shell.setText("專家掛號系統");
shell.open();
shell.setBounds(190, 100, 800, 600);
final Text txt = new Text(shell,SWT.MULTI);
txt.setBounds(200, 50, 400, 300);
Button firstButton = new Button(shell,SWT.NULL);
firstButton.setText("一號專家");
firstButton.setBounds(100, 400, 120, 65);
firstButton.addSelectionListener(new SelectionAdapter() {
Server ser = new Server();
int i = ser.serverAdd("1");
public void widgetSelected(SelectionEvent e) {
txt.setText("掛號成功\n" + "您選的專家是一號專家\n" + "您前面有" + i + "\n請耐心等待!!");
i++;
}
});
Button secondButton = new Button(shell,SWT.NULL);
secondButton.setText("二號專家");
secondButton.setBounds(250, 400, 120, 65);
secondButton.addSelectionListener(new SelectionAdapter() {
Server ser = new Server();
int i = ser.serverAdd("2");
public void widgetSelected(SelectionEvent e) {
txt.setText("掛號成功\n" + "您選的專家是二號專家\n" + "您前面有" + i + "\n請耐心等待!!");
i++;
}
});
Button thirdButton = new Button(shell,SWT.NULL);
thirdButton.setText("三號專家");
thirdButton.setBounds(400, 400, 120, 65);
thirdButton.addSelectionListener(new SelectionAdapter() {
Server ser = new Server();
int i = ser.serverAdd("3");
public void widgetSelected(SelectionEvent e) {
txt.setText("掛號成功\n" + "您選的專家是三號專家\n" + "您前面有" + i + "\n請耐心等待!!");
i++;
}
});
Button fourthButton = new Button(shell,SWT.NULL);
fourthButton.setText("四號專家");
fourthButton.setBounds(550, 400, 120, 65);
fourthButton.addSelectionListener(new SelectionAdapter() {
Server ser = new Server();
int i = ser.serverAdd("4");
public void widgetSelected(SelectionEvent e) {
txt.setText("掛號成功\n" + "您選的專家是四號專家\n" + "您前面有" + i + "\n請耐心等待!!");
i++;
}
});
while (!shell.isDisposed()) {
if (!display.readAndDispatch())
display.sleep();
}
display.dispose();
}
}
運行結果如下圖:
**************************************************************************************
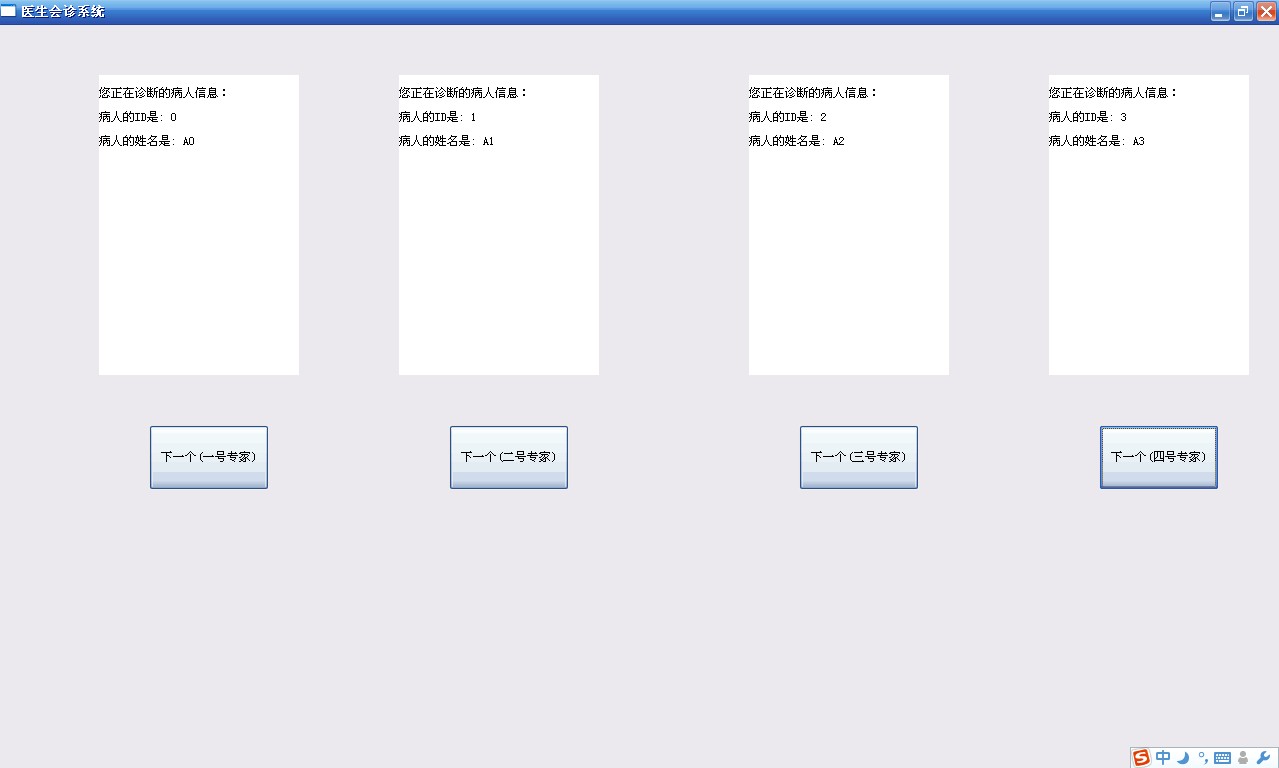
最后是Doctor的客戶端:
**************************************************************************************
package Queue;
/**
這里定義了Doctor使用的客戶端,用來顯示會診的一些基本信息!
*/
import java.util.LinkedList;
import org.eclipse.swt.SWT;
import org.eclipse.swt.events.SelectionAdapter;
import org.eclipse.swt.events.SelectionEvent;
import org.eclipse.swt.layout.FillLayout;
import org.eclipse.swt.widgets.Button;
import org.eclipse.swt.widgets.Display;
import org.eclipse.swt.widgets.Shell;
import org.eclipse.swt.widgets.Text;
public class Doctor {
public static void main(String[] args){
Display display = new Display();
Shell shell = new Shell(display);
shell.setLayout(new FillLayout());
shell.setText("醫生會診系統");
shell.open();
shell.setMaximized(true);
final Text firsttxt = new Text(shell,SWT.MULTI);
firsttxt.setBounds(100, 50, 200, 300);
Button firstButton = new Button(shell,SWT.NULL);
firstButton.setText("下一個(一號專家)");
firstButton.setBounds(150, 400, 120, 65);
firstButton.addSelectionListener(new SelectionAdapter() {
Init aInit = new Init();
LinkedList lin = (LinkedList) aInit.init("1").get("1");
public void widgetSelected(SelectionEvent e) {
firsttxt.setText("\n您正在診斷的病人信息:\n\n" + lin.remove());
}
});
final Text secondtxt = new Text(shell,SWT.MULTI);
secondtxt.setBounds(400, 50, 200, 300);
Button secondButton = new Button(shell,SWT.NULL);
secondButton.setText("下一個(二號專家)");
secondButton.setBounds(450, 400, 120, 65);
secondButton.addSelectionListener(new SelectionAdapter() {
Init aInit = new Init();
LinkedList lin = (LinkedList) aInit.init("2").get("2");
public void widgetSelected(SelectionEvent e) {
secondtxt.setText("\n您正在診斷的病人信息:\n\n" + lin.remove());
}
});
final Text thirdtxt = new Text(shell,SWT.MULTI);
thirdtxt.setBounds(750, 50, 200, 300);
Button thirdButton = new Button(shell,SWT.NULL);
thirdButton.setText("下一個(三號專家)");
thirdButton.setBounds(800, 400, 120, 65);
thirdButton.addSelectionListener(new SelectionAdapter() {
Init aInit = new Init();
LinkedList lin = (LinkedList) aInit.init("3").get("3");
public void widgetSelected(SelectionEvent e) {
thirdtxt.setText("\n您正在診斷的病人信息:\n\n" + lin.remove());
}
});
final Text fourthtxt = new Text(shell,SWT.MULTI);
fourthtxt.setBounds(1050, 50, 200, 300);
Button fourthButton = new Button(shell,SWT.NULL);
fourthButton.setText("下一個(四號專家)");
fourthButton.setBounds(1100, 400, 120, 65);
fourthButton.addSelectionListener(new SelectionAdapter() {
Init aInit = new Init();
LinkedList lin = (LinkedList) aInit.init("4").get("4");
public void widgetSelected(SelectionEvent e) {
fourthtxt.setText("\n您正在診斷的病人信息:\n\n" + lin.remove());
}
});
while (!shell.isDisposed()) {
if (!display.readAndDispatch())
display.sleep();
}
display.dispose();
}
}
運行的結果如下圖:
**************************************************************************************
讓大家見笑了!
posted on 2010-10-31 21:10
tovep 閱讀(379)
評論(0) 編輯 收藏