費了一番周折,把Tomcat6中JDBC數(shù)據(jù)源配置好了,這里把過程寫一下。感覺是某些網(wǎng)上的東西不可全信,還是官方文檔管用。
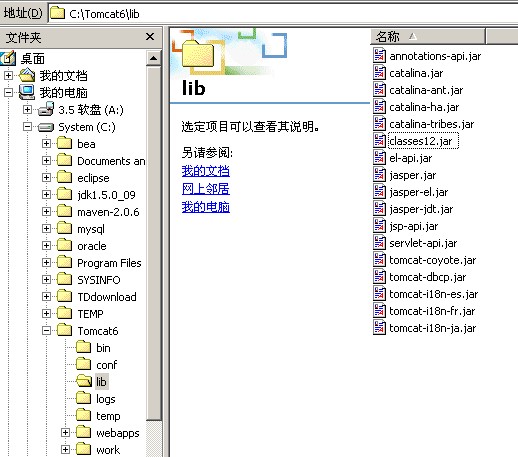
步驟一:將Oracle的數(shù)據(jù)庫驅(qū)動包classes12.jar拷貝到
$CATALINA_HOME/lib下,我的Tomcat6庫位置是C:\Tomcat6\lib,就拷貝到這里。
 步驟二
步驟二:改寫server.xml。
server.xml在
$CATALINA_HOME/conf下,打開它,找到你工程對應(yīng)的Context一段,在其中加入Resource節(jié)點,比如我的工程是DataSource,那么改寫后的Context節(jié)點為:
 <Context path="/DataSource" reloadable="true" docBase="E:\Program\Programs\DataSource" workDir="E:\Program\Programs\DataSource\work" >
<Resource name="jdbc/myoracle" auth="Container"
type="javax.sql.DataSource" driverClassName="oracle.jdbc.OracleDriver"
url="jdbc:oracle:thin:@192.168.104.173:1521:orcl"
username="hy" password="hy" maxActive="20" maxIdle="10"
maxWait="-1"/>
</Context>
干脆把server.xml全文貼一下以方便對照。
<!-- Note: A "Server" is not itself a "Container", so you may not
define subcomponents such as "Valves" at this level.
Documentation at /docs/config/server.html
-->
<Server port="8005" shutdown="SHUTDOWN">
<!--APR library loader. Documentation at /docs/apr.html -->
<Listener className="org.apache.catalina.core.AprLifecycleListener" SSLEngine="on" />
<!--Initialize Jasper prior to webapps are loaded. Documentation at /docs/jasper-howto.html -->
<Listener className="org.apache.catalina.core.JasperListener" />
<!-- JMX Support for the Tomcat server. Documentation at /docs/non-existent.html -->
<Listener className="org.apache.catalina.mbeans.ServerLifecycleListener" />
<Listener className="org.apache.catalina.mbeans.GlobalResourcesLifecycleListener" />
<!-- Global JNDI resources
Documentation at /docs/jndi-resources-howto.html
-->
<GlobalNamingResources>
<!-- Editable user database that can also be used by
UserDatabaseRealm to authenticate users
-->
<Resource name="UserDatabase" auth="Container"
type="org.apache.catalina.UserDatabase"
description="User database that can be updated and saved"
factory="org.apache.catalina.users.MemoryUserDatabaseFactory"
pathname="conf/tomcat-users.xml" />
</GlobalNamingResources>
<!-- A "Service" is a collection of one or more "Connectors" that share
a single "Container" Note: A "Service" is not itself a "Container",
so you may not define subcomponents such as "Valves" at this level.
Documentation at /docs/config/service.html
-->
<Service name="Catalina">
<!-- A "Connector" represents an endpoint by which requests are received
and responses are returned. Documentation at :
Java HTTP Connector: /docs/config/http.html (blocking & non-blocking)
Java AJP Connector: /docs/config/ajp.html
APR (HTTP/AJP) Connector: /docs/apr.html
Define a non-SSL HTTP/1.1 Connector on port 8080
-->
<Connector port="8088" protocol="HTTP/1.1"
maxThreads="150" connectionTimeout="20000"
redirectPort="8443" />
<!-- Define a SSL HTTP/1.1 Connector on port 8443
This connector uses the JSSE configuration, when using APR, the
connector should be using the OpenSSL style configuration
described in the APR documentation -->
<!--
<Connector port="8443" protocol="HTTP/1.1" SSLEnabled="true"
maxThreads="150" scheme="https" secure="true"
clientAuth="false" sslProtocol="TLS" />
-->
<!-- Define an AJP 1.3 Connector on port 8009 -->
<Connector port="8009" protocol="AJP/1.3" redirectPort="8443" />
<!-- An Engine represents the entry point (within Catalina) that processes
every request. The Engine implementation for Tomcat stand alone
analyzes the HTTP headers included with the request, and passes them
on to the appropriate Host (virtual host).
Documentation at /docs/config/engine.html -->
<!-- You should set jvmRoute to support load-balancing via AJP ie :
<Engine name="Standalone" defaultHost="localhost" jvmRoute="jvm1">
-->
<Engine name="Catalina" defaultHost="localhost">
<!--For clustering, please take a look at documentation at:
/docs/cluster-howto.html (simple how to)
/docs/config/cluster.html (reference documentation) -->
<!--
<Cluster className="org.apache.catalina.ha.tcp.SimpleTcpCluster"/>
-->
<!-- The request dumper valve dumps useful debugging information about
the request and response data received and sent by Tomcat.
Documentation at: /docs/config/valve.html -->
<!--
<Valve className="org.apache.catalina.valves.RequestDumperValve"/>
-->
<!-- This Realm uses the UserDatabase configured in the global JNDI
resources under the key "UserDatabase". Any edits
that are performed against this UserDatabase are immediately
available for use by the Realm. -->
<Realm className="org.apache.catalina.realm.UserDatabaseRealm"
resourceName="UserDatabase"/>
<!-- Define the default virtual host
Note: XML Schema validation will not work with Xerces 2.2.
-->
<Host name="localhost" appBase="webapps"
unpackWARs="true" autoDeploy="true"
xmlValidation="false" xmlNamespaceAware="false">
<!-- SingleSignOn valve, share authentication between web applications
Documentation at: /docs/config/valve.html -->
<!--
<Valve className="org.apache.catalina.authenticator.SingleSignOn" />
-->
<!-- Access log processes all example.
Documentation at: /docs/config/valve.html -->
<!--
<Valve className="org.apache.catalina.valves.AccessLogValve" directory="logs"
prefix="localhost_access_log." suffix=".txt" pattern="common" resolveHosts="false"/>
-->
<Context path="/DataSource" reloadable="true" docBase="E:\Program\Programs\DataSource" workDir="E:\Program\Programs\DataSource\work" >
<Resource name="jdbc/myoracle" auth="Container"
type="javax.sql.DataSource" driverClassName="oracle.jdbc.OracleDriver"
url="jdbc:oracle:thin:@192.168.104.173:1521:orcl"
username="hy" password="hy" maxActive="20" maxIdle="10"
maxWait="-1"/>
</Context>
<Context path="/MyTodoes" reloadable="true" docBase="E:\Program\Programs\MyTodoes" workDir="E:\Program\Programs\MyTodoes\work" />
</Host>
</Engine>
</Service>
</Server>
步驟三:改寫工程的web.xml,在其中增加resource-ref節(jié)點.
改寫后的web.xml全文如下:
<?xml version="1.0" encoding="UTF-8"?>
<web-app version="2.4" xmlns="http://java.sun.com/xml/ns/j2ee"
xmlns:xsi="http://www.w3.org/2001/XMLSchema-instance"
xsi:schemaLocation="http://java.sun.com/xml/ns/j2ee
http://java.sun.com/xml/ns/j2ee/web-app_2_4.xsd">
<!-- welcome.jsp -->
<welcome-file-list>
<welcome-file>/web/page/welcome.jsp</welcome-file>
</welcome-file-list>
<!-- datasource -->
<resource-ref>
<description>Oracle Datasource example</description>
<res-ref-name>jdbc/myoracle</res-ref-name>
<res-type>javax.sql.DataSource</res-type>
<res-auth>Container</res-auth>
</resource-ref>
</web-app>
步驟四:頁面調(diào)用示例.
<%@ page contentType="text/html; charset=UTF-8" %>
<%@ page import="java.sql.*"%>
<%@ page import="javax.sql.*"%>
<%@ page import="javax.naming.*"%>
<!DOCTYPE HTML PUBLIC "-//W3C//DTD HTML 4.0 Transitional//EN">
<html>
<head>
<title>DataSource Welcome Page</title>
<meta http-equiv="Content-Type" content="text/html; charset=UTF-8">
</head>
<body>
<table cellspacing="0" border=1>
<thead>
<tr>
<th>ID</th>
<th>Name</th>
<th>Age</th>
<th>Sex</th>
</tr>
</thead>
<tbody>
<%

 try
try  {
{
 InitialContext ctx = new InitialContext();
DataSource ds = (DataSource)ctx.lookup("java:comp/env/jdbc/myoracle");
Connection conn = ds.getConnection();
Statement stmt = conn.createStatement();
ResultSet rst = stmt.executeQuery(" select ID, NAME, AGE, SEX from EMPLOYEE");

 while (rst.next()) {
out.println("<tr>");
out.println("<td>"+rst.getString("ID")+"</td>");
out.println("<td>"+rst.getString("NAME")+"</td>");
out.println("<td>"+rst.getString("AGE")+"</td>");
out.println("<td>"+rst.getString("SEX")+"</td>");
out.println("</tr>");
 }
}
conn.close();
} catch (Exception e){
e.printStackTrace();
 }
}
%>
</tbody>
</table>
</body>
</html>
執(zhí)行效果:
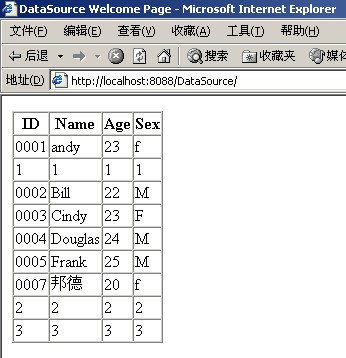
與數(shù)據(jù)庫數(shù)據(jù)比較一下:

源碼下載(注意在lib目錄中加入classes12.jar):
http://www.tkk7.com/Files/sitinspring/DataSource20080203111106.rar