<rt id="bn8ez"></rt>
<label id="bn8ez"></label>

  • <span id="bn8ez"></span>

    <label id="bn8ez"><meter id="bn8ez"></meter></label>

    當柳上原的風吹向天際的時候...

    真正的快樂來源于創造

      BlogJava :: 首頁 :: 聯系 :: 聚合  :: 管理
      368 Posts :: 1 Stories :: 201 Comments :: 0 Trackbacks

    #

    任務:數據庫中有六千余條目錄(id,pid,name)數據組成一棵目錄樹,需要通過WebService服務提供給客戶端顯示出來(Swing中的JTree)。

    實現功能的第一步:在客戶端的樹顯示時通過網絡得到頂層目錄,再根據用戶的點擊逐級展開下級目錄。此方案優點:實現簡單;缺點:點擊多次容易使人厭煩,速度不行。

    客戶端實現改善的第二步:啟動一個線程從服務器加載數據逐漸生成一個節點樹,再交給界面上的JTree命其更新。此舉對操作友好型有改進,速度上也有所提高。

    客戶端實現改善的第三步:先起線程從服務器端一次性下載完全部數據,而后置入內存,再以此為基礎構建樹。此舉對速度也有明顯提高。

    客戶端實現改善的第四步:將已經加載的節點從內存中刪除,使查找時間逐漸減小。此舉對速度有一定提高。

    服務器端實現改善的第四步:不使用Hibernate的對象映射而單獨遴選字段組建成一個包裝類,此舉對速度有一定提高。

    服務器端實現改善的第五步:直接采用優化的存儲過程將表中必要行集的數據在數據庫段形成大文本,一次性傳出,WS服務器端只負責傳輸,此舉對速度有明顯提高。

    通過以上措施,完成包括六千個節點的樹顯示速度數量級的提高,綜合評價一下,以上逐步中,第三步:在客戶端另起線程從內存加載數據形成一棵完整的節點樹再通知界面更新 和 第五步:通過存儲過程直接取得行集合并結果對提高速度幫助最大。


    posted @ 2010-01-08 22:20 何楊| 編輯 收藏

    編程中Java應用常需要訪問Tomcat,Weblogic等中間件,如果因為遠程機器沒有開機或是中間件服務未啟動而導致服務不可用,則程序會拋出異常。如果事先對這些端口進行檢測會更有利與我們診斷錯誤,下面就是一個診斷遠程端口的類:
    import java.io.FileInputStream;
    import java.io.FileNotFoundException;
    import java.io.IOException;
    import java.net.Socket;
    import java.util.ArrayList;
    import java.util.List;
    import java.util.Properties;
    import java.util.regex.Matcher;
    import java.util.regex.Pattern;

    import org.apache.log4j.Logger;

    import com.alpha.model.TPClientModel;
    import com.alpha.util.DlgUtil;

    /**
     * 這個類僅本類使用
     * 
    @author 何楊
     * @date 2009-11-5
     * @time 下午03:15:20
     
    */
    class IpPort{
        String ip;
        
    int    port;
    }

    /**
     * 遠程端口探測器,判斷遠程端口是否打開
     * 
     * 
    @author 何楊
     * @date 2009-11-5
     * @time 下午02:48:56
     
    */
    public class RemotePortTestor{    
        
    public static Logger logger = Logger.getLogger(TPClientModel.class);
        
        
    // 測試項目集合
        private List<IpPort> testItems;


    /**
         * 構造函數
         * 
         * 
    @param fileName
         * 
    @param keys
         
    */
        
    public RemotePortTestor(String fileName,List<String> keys){
            Properties prop
    =new Properties();
            
    try {
                prop.load(
    new FileInputStream(fileName));
                
                testItems
    =new ArrayList<IpPort>();
                
    for(String key:keys){
                    String value
    =prop.getProperty(key);
                    testItems.add(getIpPortAddr(value));
                }            
            } 
    catch (FileNotFoundException e) {
                logger.error(e);
                e.printStackTrace();
            } 
    catch (IOException e) {
                logger.error(e);
                e.printStackTrace();
            }
        }
        
        
    /**
         * 檢測遠端端口,全部通過返回真
         * 
         * 
    @return
         * 創建人:何楊
         * 創建日期:2009-11-5
         * 創建時間:下午03:32:34
         
    */
        
    public boolean testRemotePorts(){
            
    for(IpPort ipPort:testItems){
                
    if(testRemotePort(ipPort.ip,ipPort.port)==false){
                    
    return false;
                }            
            }
            
            
    return true;
        }
        
        
    /**
         * 從URL中得到IP地址和端口
         * 
         * 
    @param url
         * 
    @return
         * 創建人:何楊
         * 創建日期:2009-11-5
         * 創建時間:下午03:32:55
         
    */
        
    private IpPort getIpPortAddr(String url){
            IpPort ipPort
    =new IpPort();
            
            String ip
    =getMatchedString("(//)(.*)(:)",url);
            ipPort.ip
    =ip;
            
            String port
    =getMatchedString("(:)(\\d+)",url);
            ipPort.port
    =Integer.parseInt(port);
            
            
    return ipPort;
        }
        
        
    /**
         * 檢測端口是否能連接上
         * 
         * 
    @param ip
         * 
    @param port
         * 
    @return
         * 創建人:何楊
         * 創建日期:2009-11-5
         * 創建時間:下午03:33:20
         
    */
        
    public static boolean testRemotePort(String ip,int port){        
            
    try {
                Socket s
    =new Socket(ip,port);
                System.out.println(s.getLocalAddress()
    +"可以訪問"+ip+"上的端口"+port+"的服務.");
                s
    =null;
                
    return true;
            } 
    catch (Exception e) {
                System.out.println(
    "無法取得"+ip+"上的端口"+port+"的服務.");
                DlgUtil.popupErrorDialog(
    "無法取得"+ip+"上的端口"+port+"的服務!\r\n,請確認服務可用后再執行本程序!");
                            
                e.printStackTrace();
                logger.error(e);
                
    return false;
            }    
        }
        
        
    /**
         * 從target找到regex能代表的文字
         * 
         * 
    @param regex
         * 
    @param target
         * 
    @return
         * 創建人:何楊
         * 創建日期:2009-11-5
         * 創建時間:下午03:33:41
         
    */
        
    public static String getMatchedString(String regex,String target){
            Pattern pattern
    =Pattern.compile(regex, Pattern.CASE_INSENSITIVE);
            
            Matcher matcher
    =pattern.matcher(target);
            
            
    while(matcher.find()){
                
    return matcher.group(2);
            }
            
            
    return null;
        }
        
        
    /**
         * 測試入口
         * 
         * 
    @param args
         * 創建人:何楊
         * 創建日期:2009-11-5
         * 創建時間:下午03:34:06
         
    */    
        
    public static void main(String[] args){
            List
    <String> ls=new ArrayList<String>();
            ls.add(
    "webservice.url");
            ls.add(
    "jmsbroker.url");
            
            String properitesFile
    =TPClientModel.class.getResource("/remoteservice.properites").getFile().toString();
            RemotePortTestor rt
    =new RemotePortTestor(properitesFile,ls);
            System.out.println(rt.testRemotePorts());
        }
    }

    remoteservice.properites的內容如下:
    webservice.url=http://localhost:8080/SampleWebService/services/service
    jmsbroker.url=tcp://192.168.0.110:61616

    以上程序會自動從上述URL中找出IP地址和端口,然后用Socket連接過去看是否能聯通,主要使用了正則表達式和Socket,比較簡單,大家可自行閱讀理解。


    posted @ 2009-11-05 16:29 何楊| 編輯 收藏


    代碼如下:
    import java.net.Inet4Address;
    import java.net.InetAddress;
    import java.net.NetworkInterface;
    import java.util.Enumeration;

    /**
     * 此類用于取出本機的IP地址
     * 
     * 
    @author 何楊
     * @date 2009-11-5
     * @time 上午10:41:13
     
    */
    public class IPAddrFetcher{
        
    public String getIPInfo(){
            StringBuilder sb
    =new StringBuilder();
            
            
    try{
                Enumeration
    <NetworkInterface> interfaces=NetworkInterface.getNetworkInterfaces();
                
                
    while(interfaces.hasMoreElements()){
                    NetworkInterface ni
    =interfaces.nextElement();
                    
                    sb.append(
    "Interface "+ni.getName()+":\r\n");
                    
                    
                    Enumeration
    <InetAddress> inetAddresses=ni.getInetAddresses();
                    
                    
    while(inetAddresses.hasMoreElements()){
                        InetAddress address
    =inetAddresses.nextElement();
                        
                        sb.append(
    "Address");
                        
                        
    if(address instanceof Inet4Address){
                            sb.append(
    "(v4)");
                        }
                        
    else{
                            sb.append(
    "(v6)");
                        }
                        
                        sb.append(
    ":address="+address.getHostAddress()+" name="+address.getHostName()+"\r\n");
                    }
                }
            }
    catch(Exception ex){
                ex.printStackTrace();
            }
                    
            
    return sb.toString();
        }
        
        
    public static void main(String[] args){
            IPAddrFetcher iPAddrFetcher
    =new IPAddrFetcher();
            System.out.println(iPAddrFetcher.getIPInfo());
        }
    }


    posted @ 2009-11-05 16:21 何楊| 編輯 收藏

    JMS消息傳遞是一種異步過程,如果沒有接受者JMS Provider應該選擇將消息持久化,策略主要有文件持久化和基于數據庫的持久化兩種,下文是關于將未消費的消息持久化到MySql數據庫的。

    首先,我們要做的是將MySql數據庫的驅動包放置到ActiveMQ的安裝目錄下的lib里。

    其次,我們需要改寫activemq.xml文件,它在ActiveMQ的conf目錄中。具體修改部分請見下文中粗體部分:

    <!--
        Licensed to the Apache Software Foundation (ASF) under one or more
        contributor license agreements.  See the NOTICE file distributed with
        this work for additional information regarding copyright ownership.
        The ASF licenses this file to You under the Apache License, Version 2.0
        (the "License"); you may not use this file except in compliance with
        the License.  You may obtain a copy of the License at
       
        http://www.apache.org/licenses/LICENSE-2.0
       
        Unless required by applicable law or agreed to in writing, software
        distributed under the License is distributed on an "AS IS" BASIS,
        WITHOUT WARRANTIES OR CONDITIONS OF ANY KIND, either express or implied.
        See the License for the specific language governing permissions and
        limitations under the License.
    -->
    <beans
      
    xmlns="http://www.springframework.org/schema/beans"
      xmlns:amq
    ="http://activemq.apache.org/schema/core"
      xmlns:xsi
    ="http://www.w3.org/2001/XMLSchema-instance"
      xsi:schemaLocation
    ="http://www.springframework.org/schema/beans http://www.springframework.org/schema/beans/spring-beans-2.0.xsd
      http://activemq.apache.org/schema/core http://activemq.apache.org/schema/core/activemq-core.xsd"
    >

        
    <!-- Allows us to use system properties as variables in this configuration file -->
        
    <bean class="org.springframework.beans.factory.config.PropertyPlaceholderConfigurer">
            
    <property name="locations">
                
    <value>file:${activemq.base}/conf/credentials.properties</value>
            
    </property>      
        
    </bean>

        
    <!-- 
            The <broker> element is used to configure the ActiveMQ broker. 
        
    -->
        
    <broker xmlns="http://activemq.apache.org/schema/core" brokerName="localhost" dataDirectory="${activemq.base}/data">
            
            
    <!-- 
                The managementContext is used to configure how ActiveMQ is exposed in 
                JMX. By default, ActiveMQ uses the MBean server that is started by 
                the JVM. For more information, see: 
                
                http://activemq.apache.org/jmx.html 
            
    -->
            
    <managementContext>
                
    <managementContext createConnector="false"/>
            
    </managementContext>

            
    <!-- 
                Configure message persistence for the broker. The default persistence
                mechanism is the KahaDB store (identified by the kahaDB tag). 
                For more information, see: 
                
                http://activemq.apache.org/persistence.html 
            
    -->
            
    <persistenceAdapter>
                
    <jdbcPersistenceAdapter dataSource="#mysqlDataSource"/>
            
    </persistenceAdapter>        
            
    <!--
                For better performances use VM cursor and small memory limit.
                For more information, see:
                
                http://activemq.apache.org/message-cursors.html
                
                Also, if your producer is "hanging", it's probably due to producer flow control.
                For more information, see:
                http://activemq.apache.org/producer-flow-control.html
            
    -->
                  
            
    <destinationPolicy>
                
    <policyMap>
                  
    <policyEntries>
                    
    <policyEntry topic=">" producerFlowControl="true" memoryLimit="1mb">
                      
    <pendingSubscriberPolicy>
                        
    <vmCursor />
                      
    </pendingSubscriberPolicy>
                    
    </policyEntry>
                    
    <policyEntry queue=">" producerFlowControl="true" memoryLimit="1mb">
                      
    <!-- Use VM cursor for better latency
                           For more information, see:
                           
                           http://activemq.apache.org/message-cursors.html
                           
                      <pendingQueuePolicy>
                        <vmQueueCursor/>
                      </pendingQueuePolicy>
                      
    -->
                    
    </policyEntry>
                  
    </policyEntries>
                
    </policyMap>
            
    </destinationPolicy> 
     
             
    <!--
                The systemUsage controls the maximum amount of space the broker will 
                use before slowing down producers. For more information, see:
                
                http://activemq.apache.org/producer-flow-control.html
                 
            <systemUsage>
                <systemUsage>
                    <memoryUsage>
                        <memoryUsage limit="20 mb"/>
                    </memoryUsage>
                    <storeUsage>
                        <storeUsage limit="1 gb" name="foo"/>
                    </storeUsage>
                    <tempUsage>
                        <tempUsage limit="100 mb"/>
                    </tempUsage>
                </systemUsage>
            </systemUsage>
            
    -->
              
            
    <!-- 
                The transport connectors expose ActiveMQ over a given protocol to
                clients and other brokers. For more information, see: 
                
                http://activemq.apache.org/configuring-transports.html 
            
    -->
            
    <transportConnectors>
                
    <transportConnector name="openwire" uri="tcp://0.0.0.0:61616"/>
            
    </transportConnectors>

        
    </broker>

        
    <!-- MySql dataSource -->
        
    <bean id="mysqlDataSource" class="org.apache.commons.dbcp.BasicDataSource" destroy-method="close">
            
    <property name="driverClassName" value="com.mysql.jdbc.Driver"/>
            
    <property name="url" value="jdbc:mysql://localhost/test?relaxAutoCommit=true"/>
            
    <property name="username" value="root"/>
            
    <property name="password" value="hy"/>
            
    <property name="poolPreparedStatements" value="true"/>
        
    </bean>

        
    <!-- 
            Uncomment to enable Camel
            Take a look at activemq-camel.xml for more details
             
        <import resource="camel.xml"/>
        
    -->

        
    <!-- 
            Enable web consoles, REST and Ajax APIs and demos
            Take a look at activemq-jetty.xml for more details 
        
    -->
        
    <import resource="jetty.xml"/>
        
    </beans>


    如上,在persistenceAdapter節點中指定mySql數據源,在broker節點外配置了bean:

        <!-- MySql dataSource -->
        
    <bean id="mysqlDataSource" class="org.apache.commons.dbcp.BasicDataSource" destroy-method="close">
            
    <property name="driverClassName" value="com.mysql.jdbc.Driver"/>
            
    <property name="url" value="jdbc:mysql://localhost/test?relaxAutoCommit=true"/>
            
    <property name="username" value="root"/>
            
    <property name="password" value="hy"/>
            
    <property name="poolPreparedStatements" value="true"/>
        
    </bean>

    上面加粗的一句指明了消息存儲在mysql的test數據庫中,當然你可以指定成任何你想要的數據庫,注意在啟動ActiveMq之前這個數據庫是要存在的,否則報錯。另外需要贅述的一點是activemq.xml中不要有中文,看來白狗子對非英語的抵觸真是無處不在,我們所有中國人應該奮發圖強恢復漢唐明榮光,讓異族不得不仰視我們,當然這是后話。

    下面就可以啟動ActiveMQ了,向隊列發送幾條消息后,我們可以看看數據庫里發生了什么變化,如下:


    上圖是ActiveMQ為了持久化消息而設立的三張表。


    上圖是持久化到數據庫的未被消費掉的消息。

    如果這些待消費消息被接收后,這張表就會空空如也,如下:


    你可以使用這個程序(注意包要自己導入一下)來測試一下。

    以上就是將ActiveMQ中未消費的消息持久化到MySql數據庫的過程,但愿對你有所幫助。
    posted @ 2009-10-27 11:23 何楊| 編輯 收藏

         摘要: 如果需要將表數據轉化為XML形式數據的話,如果我們使用Spring的JDBC Template,那么常需要做的工作是創建一個RowMapper匿名類,在其中將字段與領域對象的某個屬性匹配上,然后得到領域對象鏈表形式的結果,此后展開這個集合,再將字段轉化為XML數據,其中進行了兩次名稱和值之間的匹配,硬編碼較多,比較費時間。如果我們利用Metadata(Metadata是解釋數據的數據,如果我們的研...  閱讀全文
    posted @ 2009-10-27 10:13 何楊| 編輯 收藏

         摘要: 相對于Weblogic這種大家伙來說,在ActiveMQ5.3.0上建立隊列和主題還是相對容易的,當然如果路沒走對也要費一番周折,本人在此寫出小文,希望能對ActiveMQ初學者有所裨益,順便感謝網絡上那些辛勤的有共享精神的ActiveMQ研究者和鄙視一下那些懶惰的有剽竊習慣的轉載者。 一.下載安裝ActiveMQ。 在http://activemq.apache.org/ 你可...  閱讀全文
    posted @ 2009-10-27 09:00 何楊| 編輯 收藏

    TimesTen是一種內存數據庫,與其它內存數據庫不同的是它依然使用SQL作為數據庫存取的手段,估計是考慮到對Oracle數據庫的兼顧和對象進出方式的不成熟。它既可以作為Oracle的前端緩存使用,也可以獨立使用。下面是將它作為獨立數據庫并使用java程序對其進行訪問的情況:

    一.安裝TimesTen數據庫
    到頁面“http://www.oracle.com/technology/global/cn/software/products/timesten/index.html”下載適合你的環境的安裝程序,并進行安裝。(注意需要注冊一個賬號)

    二.設置TimesTen環境變量
    在你機器上的[TimesTen的安裝目錄]\tt70_32\bin下找到ttenv。雙擊即可。如果要手工設置可以參見其幫助文檔,這里略過。

    三.建立一個TimesTen數據源
    1.打開“控制面板”->“管理工具”->“數據源”
    2.點擊“系統DSN”選項卡,點擊“添加”按鈕。
    3.找到“TimesTen Data Manager 7.0”一項,再點擊“完成”按鈕。
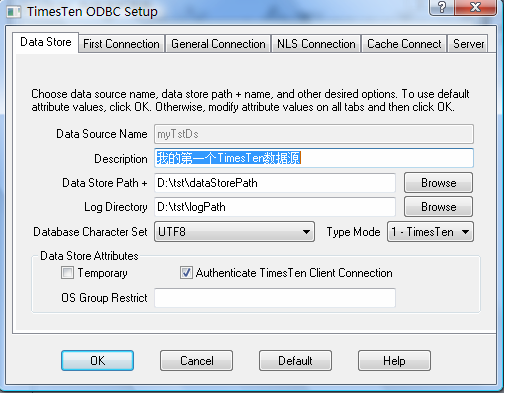
    4.在“Data Source  Name”一項中,填入數據源名;給 “Data Store Path”指定一個目錄,給“Log  Directory”指定另一個目錄;指定“DataBase Character Set”為UTF-8;指定“Type Mode”為“1-TimesTen”,這是不依賴Oracle數據庫的方式。具體設置請參考下圖:


    四.通過ttIsql建表
    ttIsql是TimesTen的管理控制臺,作用相當于MySql數據庫的“MySQL Command Line Client”或Oracle數據庫的“Sql Plus”,通過它我們可以連接到數據庫并執行Sql語句。
    在開始菜單中我們可以找到“ttIsql (Interactive SQL)”,點擊即打開管理控制臺窗口。
    窗口打開后,我們可以輸入命令“connect myTstDs”連接到剛才建立的數據源,之后可以輸入如下語句建立一張表:
    create table employee(
       id 
    CHAR(4primary key not null ,
       name 
    VARCHAR(200)
    )

    五.通過程序在employee表中建立一條記錄
    通過程序訪問一數據庫的庫我們需要找到種數據庫的驅動包,訪問TimesTen數據庫的驅動包是ttjdbc14.jar,你可以在[TimesTenan安裝目錄]"tt70_32"lib下找到它。

    以下是程序代碼,它能打開TimesTen數據庫,并向剛才創建的employee表中插入一條記錄:
    package com.heyang;

    import java.sql.Connection;
    import java.sql.PreparedStatement;

    import com.timesten.jdbc.TimesTenDataSource;

    /**
     * 程序入口點
     * 
    @author 何楊(heyang78@gmail.com)
     *
     * 
    @since 2009-10-17 下午07:17:11
     * 
    @version 1.00
     
    */
    public class Main {
      
    public static void main(String[] args) {
        
    try {
          Class.forName(
    "com.timesten.jdbc.TimesTenDriver");

          String url 
    = "jdbc:timesten:direct:dsn=myTstDs";

          TimesTenDataSource ds 
    = new TimesTenDataSource();
          ds.setUrl(url);
          Connection conn 
    = ds.getConnection();
          conn.setAutoCommit(
    false);
          String sql 
    = "insert into employee ( id, name ) values ( ?, ?);";

          PreparedStatement pstmt 
    = conn.prepareStatement(sql);
          pstmt.setString(
    1"002");
          pstmt.setString(
    2"heyang@gmail.com");
          pstmt.executeUpdate();
          conn.commit();

          conn.close();

        } 
    catch (Exception ex) {
          ex.printStackTrace();
        }
      }
    }


    posted @ 2009-10-18 07:50 何楊| 編輯 收藏

    1.Oracle官方的介紹網頁。

    2.Oralce TimeStan的安裝及體驗配置,可惜是Linux上的。

    3.Oracle官方TimeStan下載頁面

    4.一個簡單的訪問TimesTen數據庫的例程

    5.tst安裝指南。
    posted @ 2009-10-16 14:28 何楊| 編輯 收藏

    WebService的原始API直接書寫在代碼中有諸多不便,如果我們把其調用過程歸納成一個類,再用Spring把URI和方法名注入到實例中去,這樣就好些了。

    歸納出來的WebService調用類:
    package com.heyang;

    import java.net.MalformedURLException;
    import java.rmi.RemoteException;

    import javax.xml.rpc.ServiceException;

    import org.apache.axis.client.Call;
    import org.apache.axis.client.Service;

    /**
     * WebService統一調用類
     * 
    @author: 何楊(heyang78@gmail.com)
     * @date: 2009-10-10-下午11:47:56
     
    */
    public class WebService{
        
    private String endpoint;
        
        
    private String operationName;
        
        
    /**
         * 取得WebService調用的結果
         * 
    @param args
         * 
    @return
         * 
    @throws ServiceException
         * 
    @throws MalformedURLException
         * 
    @throws RemoteException
         
    */
        
    public Object getCallResult(Object[] args)throws ServiceException, MalformedURLException, RemoteException{
            
    // 創建 Service實例
            Service service = new Service();
            
            
    // 通過Service實例創建Call的實例
            Call call = (Call) service.createCall();
            
            
    // 將Web Service的服務路徑加入到call實例之中.
            call.setTargetEndpointAddress(new java.net.URL(endpoint));// 為Call設置服務的位置
            
            
    // 調用Web Service的方法
            call.setOperationName(operationName);
            
            
    // 調用Web Service,傳入參數
            return call.invoke(args);
        }

        
    public String getEndpoint() {
            
    return endpoint;
        }

        
    public void setEndpoint(String endpoint) {
            
    this.endpoint = endpoint;
        }

        
    public String getOperationName() {
            
    return operationName;
        }

        
    public void setOperationName(String operationName) {
            
    this.operationName = operationName;
        }
    }

    再在上下文中配置三個bean,這樣WebService的相關信息就變成可配置方式了:
    <?xml version="1.0" encoding="UTF-8"?>
    <!DOCTYPE beans PUBLIC "-//SPRING//DTD BEAN//EN" "http://www.springframework.org/dtd/spring-beans.dtd">

    <beans>
        
    <bean id="method_isExist" class="com.heyang.WebService" >    
            
    <property name="endpoint">
                
    <value>http://localhost:8080/UserLoginService/services/login</value>
            
    </property>
            
    <property name="operationName">
                
    <value>isExist</value>
            
    </property>
        
    </bean>
        
        
    <bean id="method_getUserRole" class="com.heyang.WebService" >    
            
    <property name="endpoint">
                
    <value>http://localhost:8080/UserLoginService/services/login</value>
            
    </property>
            
    <property name="operationName">
                
    <value>getUserRole</value>
            
    </property>
        
    </bean>
        
        
    <bean id="method_getUserTrade" class="com.heyang.WebService" >    
            
    <property name="endpoint">
                
    <value>http://localhost:8080/UserLoginService/services/login</value>
            
    </property>
            
    <property name="operationName">
                
    <value>getUserTrade</value>
            
    </property>
        
    </bean>
     
    </beans>

    調用因此也變得相對簡單:
    package com.heyang;

    import org.springframework.context.ApplicationContext;
    import org.springframework.context.support.ClassPathXmlApplicationContext;

    /**
     * 使用Spring的簡約式調用WebService
     * 
    @author: 何楊(heyang78@gmail.com)
     * @date: 2009-10-10-下午11:40:49
     
    */
    public class SpringTest{
        
    public static void main(String[] args){
            
    try{
                ApplicationContext appContext 
    = new ClassPathXmlApplicationContext("bean.xml");
                Object[] params
    =new Object[] { "MT001","123" };
                
                WebService ws1
    =(WebService)appContext.getBean("method_isExist");
                WebService ws2
    =(WebService)appContext.getBean("method_getUserRole");
                WebService ws3
    =(WebService)appContext.getBean("method_getUserTrade");
                
                System.out.println(ws1.getCallResult(params));
                System.out.println(ws2.getCallResult(params));
                System.out.println(ws3.getCallResult(params));
            }
            
    catch(Exception ex){
                ex.printStackTrace();
            }
        }
    }

    代碼下載(jar請從前面的程序里找,WebService即用上一篇文章中的UserLoginService):
    http://www.tkk7.com/Files/heyang/UserLoginServiceTest20091011082831.rar
    posted @ 2009-10-11 00:10 何楊 閱讀(4265) | 評論 (1)編輯 收藏

    參考文章一:
    使用Axis開發Web Service程序
    它對初學者有所幫助

    參考文章二:
    在axis中通過wsdd文件發布和卸載webservice
    這篇文章披露了一些wsdd文件的細節,有一定參考價值。

    下面是一個Axis的Web Service程序實例及測試程序:
    http://www.tkk7.com/Files/heyang/userloginWebService20091010232908.rar
    注意為了減少體積lib目錄中的jar都被刪除了,你可以從http://www.tkk7.com/Files/heyang/SerialNumber20090929130453.rar 這個工程的lib目錄中找到所需要的所有jar包。

    希望能對大家有所幫助。

    posted @ 2009-10-10 23:34 何楊| 編輯 收藏

    僅列出標題
    共28頁: First 上一頁 17 18 19 20 21 22 23 24 25 下一頁 Last 
    主站蜘蛛池模板: 91视频免费观看| 麻豆一区二区免费播放网站| 在线亚洲v日韩v| 亚洲精品无码久久久| 日本视频在线观看永久免费| 亚洲av无码电影网| 亚洲美女在线国产| 久久国产免费福利永久| 免费精品视频在线| 亚洲精品在线免费观看视频| 亚洲AV成人潮喷综合网| 33333在线亚洲| 亚洲中文字幕丝袜制服一区| 亚洲最大免费视频网| 日韩毛片在线免费观看| 久久精品a亚洲国产v高清不卡| 啊v在线免费观看| 久久久久高潮毛片免费全部播放| 亚洲成AV人片在线观看无码| 人人玩人人添人人澡免费| 亚洲国产成人久久一区二区三区| 亚洲成AV人片在线播放无码| 国产公开免费人成视频| 51在线视频免费观看视频| 乱淫片免费影院观看| 亚洲人成在线精品| 亚洲综合无码AV一区二区 | 夜夜爽免费888视频| 久久精品国产免费一区| 免费一区二区三区在线视频| 亚洲av永久无码嘿嘿嘿| 久久精品国产精品亚洲艾草网| 国产伦精品一区二区三区免费迷| 最刺激黄a大片免费网站| 久久av免费天堂小草播放| 美美女高清毛片视频黄的一免费 | 国色精品va在线观看免费视频| 亚洲精品午夜无码专区| 国产精品免费视频网站| a在线免费观看视频| 乱人伦中文视频在线观看免费|