一、使用場景
服務端獲得的DataTable轉化為Json格式后傳遞給客戶端dojo,dojo將json數據直接綁定在dojox.grid.DataGrid上
二、基本用法
1.客戶端頁面DataToJson.aspx返回一個Json數據
private void Json()
{
DataTable dt = this.GetData();
string str = JsonHelper.DateTableToJson(dt);
Response.Write(str);
Response.End();
}
2.利用ajax接受json數據
dojox.grid.DataGrid憑借dojo.data.ItemFileWriteStore可以輕松具有ajax功能
使用dojo.grid.DataGrid首先做如下準備工作
a.引入樣式表
<link rel="Stylesheet" href="dojo-re/dojox/grid/resources/soriaGrid.css" />
b.引入所需庫
dojo.require("dojo.parser");
dojo.require("dijit.form.Button");
dojo.require("dojox.grid.DataGrid");
dojo.require("dojo.data.ItemFileWriteStore");
dojo.require("dojox.layout.FloatingPane");
c.編寫代碼
<script type="text/javascript">
function Grid1() {
var data = new dojo.data.ItemFileWriteStore({
url: "DataToJson.aspx"
});
var structure = [
{ name: "用戶名", field: "userName", width: "120px" },
{ name: "密碼", field: "userPwd", width: "120px" },
{ name: "電子郵件", field: "email", width: "150px;" },
{ name: "博客", field: "blog", width: "150px" },
{ name: "生日", field: "birthday", width: "120px" },
{ name: "年齡", field: "age", width: "80px" },
{ name: "備注", field: "description", width: "120px" }
];
var grid = new dojox.grid.DataGrid({
store: data,
structure:structure
},"grid1");
grid.startup();
}
function ShowFloatingPane() {
var floatingPane = dijit.byId("dFloatingPane");
floatingPane.show();
Grid1();
}
</script>
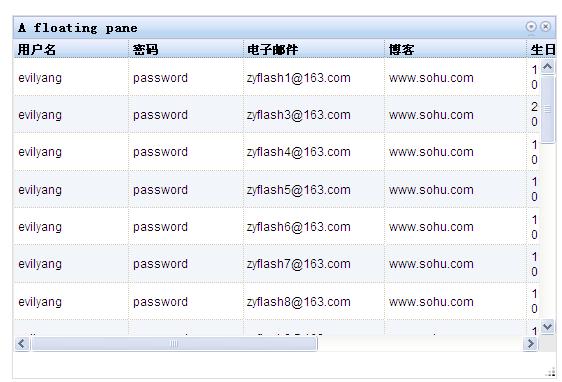
所需HTML
<div >
<div data-dojo-type="dojox.layout.FloatingPane" id="dFloatingPane"
title="A floating pane" data-dojo-props="resizable:true, dockable:true, title:'A floating pane'"
style="position:absolute;top:150px;left:400px;width:600px;height:400px; visibility:hidden">
<div id="grid1" style="width:450px; height:350px"></div>
</div>
</div>
<div data-dojo-type="dijit.form.Button" data-dojo-props="label:'Show me', onClick:ShowFloatingPane"></div>
d.運行結果如下:
三、繼續完善DataGrid功能
1,增加搜索條件
query:{userName:"evilyang",id:"*"},
2,隱藏一列,不顯示
{name:"密碼",field:"userPwd",width:"100px",hidden:"true"}
3,為某一列增加一個樣式名
<style type="text/css">
.name{ font-style:italic; font-size:14px; color:Red;}
</style>
{ name: "用戶名", field: "userName", width: "120px" ,classes:"name"}
4,為某一列直接增加一個樣式
{ name: "電子郵件", field: "email", width: "150px;",styles:"text-align:center;" },
5,固定前兩列
更改structure結構,加入noscroll屬性
var structure = [{
noscroll: true,
cells: [
{ name: "用戶名", field: "userName", width: "80px", classes: "name" },
{ name: "密碼", field: "userPwd", width: "80px", hidden: "true" },
{ name: "電子郵件", field: "email", width: "150px;", styles: "text-align:center;" }
]
}, {
cells: [
{ name: "博客", field: "blog", width: "120px" },
{ name: "生日", field: "birthday", width: "120px" },
{ name: "年齡", field: "age", width: "50px" },
{ name: "備注", field: "description", width: "120px" }
]
}];
6,cell中的樣式設置默認模式
defaultCell:{width:"80px",styles:"text-align:center;"},
這樣設置完后,每一列的屬性就不必單獨設置了
7, 其他屬性
selectionMode: "extended", //none,single,multiple
loadingMessage: "請等待,數據正在加載中......",
errorMessage: "對不起,你的請求發生錯誤!",
columnReordering:true//此屬性設置為true,可以拖拽標題欄,更換列順序
new dojox.grid.cells.RowIndex({ name: "編號", width: "20px" })//加入自編號
四、數據顯示高級功能
1, RowClick事件
grid.on("RowClick", function(evt) {
var idx = evt.rowIndex,
item = this.getItem(idx),
store = this.store;
content = dojo.byId("content");
content.innerHTML="you have clicked on rows " + store.getValue(item, "id");
}, true);
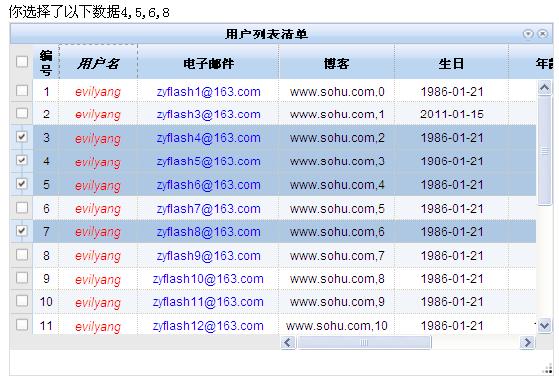
2,SelectionChanged事件
grid.on("SelectionChanged",dojo.hitch(grid, reportSelection), true);
function reportSelection() {
var items = this.selection.getSelected(),
msg = "你選擇了以下數據";
var tmp = dojo.map(items, function(item) {
return this.store.getValue(item, "id");
}, this);
var content = dojo.byId("content");
content.innerHTML = msg + tmp.join(",");
}
五、顯示效果如下圖: