<rt id="bn8ez"></rt>
<label id="bn8ez"></label>

  • <span id="bn8ez"></span>

    <label id="bn8ez"><meter id="bn8ez"></meter></label>

    gembin

    OSGi, Eclipse Equinox, ECF, Virgo, Gemini, Apache Felix, Karaf, Aires, Camel, Eclipse RCP

    HBase, Hadoop, ZooKeeper, Cassandra

    Flex4, AS3, Swiz framework, GraniteDS, BlazeDS etc.

    There is nothing that software can't fix. Unfortunately, there is also nothing that software can't completely fuck up. That gap is called talent.

    About Me


    Eclipse Rich Ajax Platform (RAP)開發環境的配置

    RAP is very similar to Eclipse RCP, but instead of being executed on a desktop computer RAP is run on a server and clients can access the application with standard browsers. This is mainly achieved by providing a special implementation of SWT (a subset of SWT API).


    Architecture

    RAP 開發環境的配置。

    .首先下載 rap-sdk-1.1-M3-site-20080407-1550.zip 和 rap-1.1.0-M3-target-3.3-20080407-1124.zip,以及Eclipse 3.3

    .把rap-sdk-1.1-M3-site-20080407-1550.zip解壓到Eclipse 3.3的eclipse目錄下,把rap-1.1.0-M3-target-3.3-20080407-1124.zip解壓到任何除eclipse目錄以外的地方

    .啟動eclipse,選擇 Window > Preferences, 選擇 Plug-in Development > Target Platform, Location選擇剛才解壓rap-1.1.0-M3-target-3.3-20080407-1124.zip的目錄,并選擇它的子目錄eclipse,最后點Reload

    4.新建ProjectNew Project (File > New > Project),選擇Plug-in Project,填入項目名稱例如:RapExample, 然后一直點Next,

       最后可以選擇RAP 的一些模板


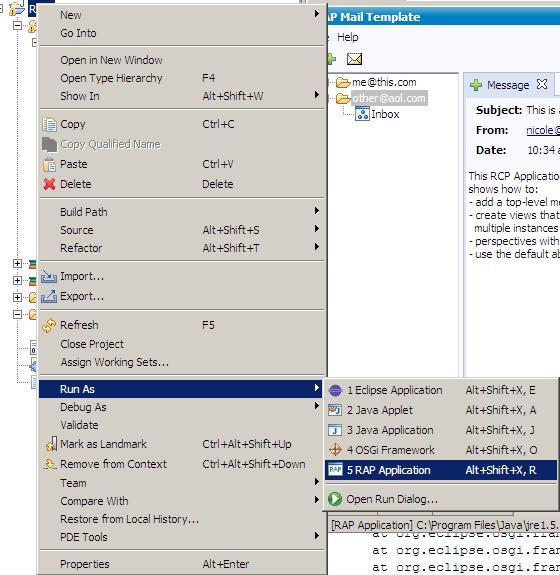
        運行選擇:Run as RAP Application


    posted on 2008-04-15 11:57 gembin 閱讀(3926) 評論(8)  編輯  收藏 所屬分類: AjaxEclipse RAP

    評論

    # re: Eclipse Rich Ajax Platform (RAP)開發環境的配置 2008-04-15 17:18 阿南

    是個不錯的東西吧?  回復  更多評論   

    # re: Eclipse Rich Ajax Platform (RAP)開發環境的配置 2008-04-15 22:03 gembin

    是啊,把Eclipse的界面風格以及其擴展性用在Web上了。原來做桌面開發的人也可以快速上手做Web開發了~~還可以很方便定制界面風格。
    嘗試了一下真的不錯,有時間得好好研究1下。  回復  更多評論   

    # re: Eclipse Rich Ajax Platform (RAP)開發環境的配置 [未登錄] 2008-05-12 17:56 knight

    請問該工程怎么脫離eclipse獨立運行呢?  回復  更多評論   

    # re: Eclipse Rich Ajax Platform (RAP)開發環境的配置 2008-05-13 15:55 gembin

    Web容器中部署RAP
    RAP的運行依賴于OSGI框架,而對于現有的JEE Web容器一般都不提供直接支持OSGI的能力。因此部署RAP的過程實際上相當與部署OSGI框架的過程。以下用Eclipse中集成的OSGI框架equinox為例介紹部署過程。

    1. 首先需要下載equinox和servlet容器集成的工具包org.eclipse.equinox.servletbridge。可以通過eclipse的cvs站點(http://www.eclipse.org/equinox/server/downloads/servletbridge-anon.psf)下載這個項目集;
    2. 針對RAP項目創建一個feature項目(過程同RCP);
    3. 根據RAP項目的依賴創建feature項目的插件依賴;
    為了讓OSGI框架和RAP應用能在應用服務器中部署運行,必須包含如下插件依賴:
    必須依賴插件

    <plugin
    id="org.eclipse.core.commands"
    download-size="0"
    install-size="0"
    version="0.0.0"
    unpack="false"/>
    <plugin
    id="org.eclipse.core.contenttype"
    download-size="0"
    install-size="0"
    version="0.0.0"
    unpack="false"/>
    <plugin
    id="org.eclipse.core.expressions"
    download-size="0"
    install-size="0"
    version="0.0.0"
    unpack="false"/>
    <plugin
    id="org.eclipse.core.jobs"
    download-size="0"
    install-size="0"
    version="0.0.0"
    unpack="false"/>
    <plugin
    id="org.eclipse.core.runtime"
    download-size="0"
    install-size="0"
    version="0.0.0"
    unpack="false"/>
    <plugin
    id="org.eclipse.equinox.app"
    download-size="0"
    install-size="0"
    version="0.0.0"
    unpack="false"/>
    <plugin
    id="org.eclipse.equinox.common"
    download-size="0"
    install-size="0"
    version="0.0.0"
    unpack="false"/>
    <plugin
    id="org.eclipse.equinox.http.registry"
    download-size="0"
    install-size="0"
    version="0.0.0"
    unpack="false"/>
    <plugin
    id="org.eclipse.equinox.http.servlet"
    download-size="0"
    install-size="0"
    version="0.0.0"
    unpack="false"/>
    <plugin
    id="org.eclipse.equinox.http.servletbridge"
    download-size="0"
    install-size="0"
    version="0.0.0"
    unpack="false"/>
    <plugin
    id="org.eclipse.equinox.preferences"
    download-size="0"
    install-size="0"
    version="0.0.0"
    unpack="false"/>
    <plugin
    id="org.eclipse.equinox.registry"
    download-size="0"
    install-size="0"
    version="0.0.0"
    unpack="false"/>
    <plugin
    id="org.eclipse.osgi"
    download-size="0"
    install-size="0"
    version="0.0.0"
    unpack="false"/>
    <plugin
    id="org.eclipse.osgi.services"
    download-size="0"
    install-size="0"
    version="0.0.0"
    unpack="false"/>
    <plugin
    id="org.eclipse.rap.jface"
    download-size="0"
    install-size="0"
    version="0.0.0"
    unpack="false"/>
    <plugin
    id="org.eclipse.rap.rwt"
    download-size="0"
    install-size="0"
    version="0.0.0"
    unpack="false"/>
    <plugin
    id="org.eclipse.rap.ui"
    download-size="0"
    install-size="0"
    version="0.0.0"
    unpack="false"/>
    <plugin
    id="org.eclipse.rap.ui.workbench"
    download-size="0"
    install-size="0"
    version="0.0.0"
    unpack="false"/>
    <plugin
    id="org.eclipse.update.configurator"
    download-size="0"
    install-size="0"
    version="0.0.0"
    unpack="false"/>

    版本號必須設置為0.0.0以便于pde工具導出依賴插件的時候能夠同步版本號。
    4. 在feature項目得根目錄創建script(存放構建腳本)文件夾和templates(存放標準Web應用格式文件)文件夾;
    5. 在script文件夾下創建一個ant構建文件;
    webappBuilder.xml

    <?xml version="1.0"?>
    <project name="project" default="default">
    <description>
    Example of a webapplication build script for RAP applications that use
    the equinox servlet bridge to run in a servlet container.
    </description>

    <!-- =================================
    target: init
    ================================= -->
    <target name="init">
    <property name="proj.dir" value="${basedir}/.." />
    <!--
    This script assumes that the servlet bridge project is available
    in the current workspace. Note: The location is hardcoded and must be
    adjusted to your needs.
    -->
    <property name="servletbridge.dir"
    value="D:/RAP/eclipse/workspace/org.eclipse.equinox.servletbridge" />
    <!--
    On windows be cautious about long file names for ${build.dir}
    These long path problems were resolved in JRE 1.5.0_08
    -->
    <property name="build.dir" value="${proj.dir}/build" />
    <property name="templates.dir" value="${proj.dir}/templates" />
    <property name="webapp.name" value="xwiki" />
    <property name="features" value="rcp.feature" />
    <!--
    If you are using this script in a head-less build define the following properties:
    "ignore.pdeExportFeatures" (available only in the IDE - do the feature export with PDE Build)
    "ignore.servletbridge.jar" (if you're compiling or extracting the jar yourself)
    -->
    </target>

    <!-- =================================
    target: prepare
    ================================= -->
    <target name="prepare" depends="init">
    <delete dir="${build.dir}/${webapp.name}" />
    <mkdir dir="${build.dir}/${webapp.name}/WEB-INF/lib" />
    </target>

    <!-- =================================
    target: default
    ================================= -->
    <target name="default"
    depends="copyResources, servletbridge.jar, pdeExportFeatures" />

    <!-- =================================
    target: copyResources
    ================================= -->
    <target name="copyResources" depends="prepare">
    <copy todir="${build.dir}/${webapp.name}">
    <fileset dir="${templates.dir}" />
    </copy>
    </target>

    <!-- =================================
    target: servletbridge.jar
    ================================= -->
    <target name="servletbridge.jar"
    depends="prepare"
    unless="ignore.servletbridge.jar">
    <antcall target="jar-servletbridge.jar" />
    <antcall target="copy-servletbridge.jar" />
    </target>

    <!-- =================================
    target: copy-servletbridge.jar
    ================================= -->
    <target name="copy-servletbridge.jar" if="servletbridge.jar-present">
    <copy todir="${build.dir}/${webapp.name}/WEB-INF/lib">
    <fileset file="${servletbridge.dir}/servletbridge.jar" />
    </copy>
    </target>

    <!-- =================================
    target: jar-servletbridge.jar
    ================================= -->
    <target name="jar-servletbridge.jar" unless="servletbridge.jar-present">
    <jar destfile="${build.dir}/${webapp.name}/WEB-INF/lib/servletbridge.jar">
    <fileset dir="${servletbridge.dir}/bin">
    <include name="**/*.class" />
    </fileset>
    </jar>
    </target>

    <!-- =================================
    target: pdeExportFeatures
    ================================= -->
    <target name="pdeExportFeatures"
    depends="prepare"
    unless="ignore.pdeExportFeatures">
    <!--
    Features get built asynchronously but this approach is sometimes convenient.
    So that the pde.exportFeatures task is available in the IDE select
    "Run in the same JRE as the workspace" from the JRE tab from "Run Ant.."
    -->
    <pde.exportFeatures features="${features}"
    destination="${build.dir}/${webapp.name}/WEB-INF/eclipse"
    exportType="directory"
    useJARFormat="true"
    exportSource="false" />
    </target>
    </project>

    6. 在templates文件夾下創建如下文件結構;

    WEB-INF
    |--eclipse
    | |--configuration
    | | |--config.ini
    | |--launch.ini
    |--web.xml

    launch.ini

    # Eclipse Runtime Configuration Overrides
    # These properties are loaded prior to starting the framework and can also be used to override System Properties
    # @null is a special value used to override and clear the framework's copy of a System Property prior to starting the framework
    # "*" can be used together with @null to clear System Properties that match a prefix name.

    osgi.*=@null
    org.osgi.*=@null
    eclipse.*=@null

    osgi.parentClassloader=app
    osgi.contextClassLoaderParent=app

    web.xml

    <?xml version="1.0" encoding="UTF-8"?>
    <!DOCTYPE web-app PUBLIC "-//Sun Microsystems, Inc.//DTD Web Application 2.2//EN" "http://java.sun.com/j2ee/dtds/web-app_2_2.dtd">
    <web-app id="WebApp">
    <servlet id="bridge">
    <servlet-name>equinoxbridgeservlet</servlet-name>
    <display-name>Equinox Bridge Servlet</display-name>
    <description>Equinox Bridge Servlet</description>
    <servlet-class>org.eclipse.equinox.servletbridge.BridgeServlet</servlet-class>
    <init-param>
    <param-name>commandline</param-name>
    <param-value>-console</param-value>
    </init-param>
    <init-param>
    <param-name>enableFrameworkControls</param-name>
    <param-value>true</param-value>
    </init-param>
    <!--
    org.eclipse.equinox.servletbridge and the Servlet API are exported automatically to the underlying OSGi framework.
    The extendedFrameworkExports parameter allows the specification of additional java package exports.
    The format is a comma separated list of exports as specified by the "Export-Package" bundle manifest header.
    For example: com.mycompany.exports; version=1.0.0, com.mycompany.otherexports; version=1.0.0
    -->
    <init-param>
    <param-name>extendedFrameworkExports</param-name>
    <param-value></param-value>
    </init-param>

    <!--
    You can specify your own framework launcher here.
    The default is: org.eclipse.equinox.servletbridge.FrameworkLauncher
    <init-param>
    <param-name>frameworkLauncherClass</param-name>
    <param-value>org.eclipse.equinox.servletbridge.FrameworkLauncher</param-value>
    </init-param>
    -->
    <load-on-startup>1</load-on-startup>
    </servlet>
    <servlet-mapping>
    <servlet-name>equinoxbridgeservlet</servlet-name>
    <url-pattern>/*</url-pattern>
    </servlet-mapping>
    <!--
    This is required if your application bundles expose JSPs.
    -->
    <servlet-mapping>
    <servlet-name>equinoxbridgeservlet</servlet-name>
    <url-pattern>*.jsp</url-pattern>
    </servlet-mapping>
    </web-app>

    7. 用ant執行script下的構建腳本;


    再用Ant執行腳本的時候,應當把JRE標簽下的"Run in the same JRE as the workspace"選中,否則PDE工具可能無法導出依賴插件。
    8. 編輯configration目錄下的config.ini文件,根據項目需要設定bundles,可用如下程序生成后拷貝到config.ini文件中。
    ConfigIniCreator.java

    /*******************************************************************************
    * Copyright (c) 2002-2006 Innoopract Informationssysteme GmbH.
    * All rights reserved. This program and the accompanying materials
    * are made available under the terms of the Eclipse Public License v1.0
    * which accompanies this distribution, and is available at
    * http://www.eclipse.org/legal/epl-v10.html
    *
    * Contributors:
    * Innoopract Informationssysteme GmbH - initial API and implementation
    ******************************************************************************/

    package org.eclipse.rap.tools;

    import java.io.File;


    /**
    * <p>This tool creates the content of a simple config.ini file.
    * Run this after the ANT build scripts (webappBuilder.xml and the
    * pde.exportFeatures) have finished. After that replace the content
    * of the config.ini file in the build.</p>
    *
    * <p>Note: this is not meant to be a high end deployment tool or the only
    * possibility of how the content of your config.ini should look like if you
    * are creating a RAP WAR. This should simplify the task to get
    * a minimalistic runtime configuration that works...</p>
    */
    public class ConfigIniCreator {

    public static void main( final String[] arx ) {
    ////////////////////////////////////////////////////////////////////////////
    // replace this with the absolute path to the plugin directory of
    // the deployment build for example
    // File file = new File( "C:\\projects\\org.eclipse.rap\\org.eclipse.rap.demo.feature\\build\\rapdemo\\WEB-INF\\eclipse\\plugins" );
    File file = new File( "D:\\RAP\\eclipse\\workspace\\rcp.feature\\build\\xwiki\\WEB-INF\\eclipse\\plugins" );
    ////////////////////////////////////////////////////////////////////////////

    String[] list = file.list();
    StringBuffer buffer = new StringBuffer();
    buffer.append( "#Eclipse Runtime Configuration File\n" );

    buffer.append( "osgi.bundles=" );
    for( int i = 0; i < list.length; i++ ) {
    if( list[ i ].endsWith( ".jar" )
    && !list[ i ].startsWith( "org.eclipse.osgi_" ) )
    {
    buffer.append( list[ i ] );
    if( list[ i ].startsWith( "org.eclipse.equinox.common_" ) ) {
    buffer.append( "@2:start" );
    } else {
    buffer.append( "@start" );
    }
    if( i + 1 < list.length ) {
    buffer.append( "," );
    }
    }
    }
    buffer.append( "\n" );
    buffer.append( "osgi.bundles.defaultStartLevel=4\n" );

    // write the content to the console
    System.out.print( buffer );
    }
    }

    在控制臺上可看到類似信息:
    config.ini

    #Eclipse Runtime Configuration File
    osgi.bundles=org.eclipse.core.commands_3.3.0.I20070605-0010.jar@start,
    org.eclipse.core.contenttype_3.2.100.v20070319.jar@start,
    org.eclipse.core.expressions_3.3.0.v20070606-0010.jar@start,
    org.eclipse.core.jobs_3.3.0.v20070423.jar@start,
    org.eclipse.core.runtime_3.3.100.v20070530.jar@start,
    org.eclipse.equinox.app_1.0.0.v20070606.jar@start,
    org.eclipse.equinox.common_3.3.0.v20070426.jar@2:start,
    org.eclipse.equinox.http.registry_1.0.0.jar@start,
    org.eclipse.equinox.http.servletbridge_1.0.0.jar@start,
    org.eclipse.equinox.http.servlet_1.0.0.jar@start,
    org.eclipse.equinox.preferences_3.2.100.v20070522.jar@start,
    org.eclipse.equinox.registry_3.3.0.v20070522.jar@start,
    org.eclipse.osgi.services_3.1.200.v20070605.jar@start,
    org.eclipse.rap.jface_1.0.0.jar@start,
    org.eclipse.rap.rwt_1.0.0.jar@start,
    org.eclipse.rap.ui.workbench_1.0.0.jar@start,
    org.eclipse.rap.ui_1.0.0.jar@start,
    org.eclipse.update.configurator_1.0.0.jar@start,
    rcp_1.0.0.jar@start
    osgi.bundles.defaultStartLevel=4

    9. 構建完成,打包應用(用jar命令歸檔為一個war文件);
    10. 拷貝到Web容器相應的Web應用目錄下,或采用Web服務器的部署工具部署。
      回復  更多評論   

    # re: Eclipse Rich Ajax Platform (RAP)開發環境的配置 [未登錄] 2008-05-14 23:32 knight

    還真×××復雜!  回復  更多評論   

    # re: Eclipse Rich Ajax Platform (RAP)開發環境的配置 2008-05-28 14:56 盼回復

    @gembin

    如何把RAP 變成 WAR。

    多謝!

    zhugexiao@yfgm.com.cn

      回復  更多評論   

    # re: Eclipse Rich Ajax Platform (RAP)開發環境的配置 2008-05-28 15:26 盼回復

    @gembin

    我參照help,能夠生成war并部署到Tomcat容器里,但不知怎么在瀏覽器里運行。

    多謝!

    zhugexiao@yfgm.com.cn

      回復  更多評論   

    # re: Eclipse Rich Ajax Platform (RAP)開發環境的配置 2008-05-28 16:50 gembin

    @盼回復
    http://127.0.0.1:4469/rap?startup=XXXX

    Plugin.xml

    <extension
    point="org.eclipse.rap.ui.entrypoint">
    <entrypoint
    class="rap.Application"
    parameter="XXXX"
    id="rap.Application">
    </entrypoint>
    </extension>
      回復  更多評論   

    導航

    統計

    常用鏈接

    留言簿(6)

    隨筆分類(440)

    隨筆檔案(378)

    文章檔案(6)

    新聞檔案(1)

    相冊

    收藏夾(9)

    Adobe

    Android

    AS3

    Blog-Links

    Build

    Design Pattern

    Eclipse

    Favorite Links

    Flickr

    Game Dev

    HBase

    Identity Management

    IT resources

    JEE

    Language

    OpenID

    OSGi

    SOA

    Version Control

    最新隨筆

    搜索

    積分與排名

    最新評論

    閱讀排行榜

    評論排行榜

    free counters
    主站蜘蛛池模板: 国产在线精品一区免费香蕉| 国产成人高清精品免费鸭子| 午夜一级免费视频| 亚洲国产成人精品无码久久久久久综合| 亚洲伊人成无码综合网| 91久久亚洲国产成人精品性色| 最近免费视频中文字幕大全| 午夜一级免费视频| 老色鬼久久亚洲AV综合| 国产成人不卡亚洲精品91| 8x成人永久免费视频| 亚洲国产成人久久精品99| 亚洲一级片在线观看| 99精品视频在线观看免费| 久久99免费视频| 国产免费人成在线视频| 亚洲精品视频观看| a毛片成人免费全部播放| 好爽又高潮了毛片免费下载| 亚洲av日韩av激情亚洲| 又粗又长又爽又长黄免费视频 | 亚洲高清在线视频| 国产亚洲漂亮白嫩美女在线| 最近2019免费中文字幕6| 伊人久久亚洲综合| 自拍偷自拍亚洲精品播放| 无码区日韩特区永久免费系列| 亚洲熟妇丰满多毛XXXX| 羞羞视频在线免费观看| 99久久免费精品国产72精品九九 | 亚洲国产午夜福利在线播放| 亚洲无吗在线视频| 亚洲成年人免费网站| 亚洲精品自产拍在线观看| 阿v免费在线观看| 午夜时刻免费入口| 亚洲无吗在线视频| 99在线精品免费视频九九视| 亚洲精品无码不卡| 久久免费福利视频| 午夜亚洲国产理论秋霞|