發(fā)現(xiàn)BlogJava沒以前人氣旺了...首頁都沒啥人更新了..那我在寫一個吧.
一個小程序 ..支持鼠標(biāo)左鍵點擊
右鍵按下可旋轉(zhuǎn) 縮略圖可以展示被點擊的物體.
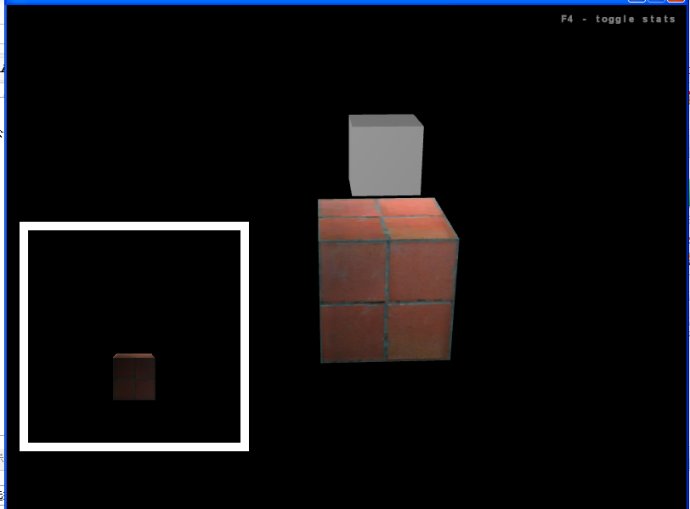
功能:左邊是個縮略圖.白框外面是場景...要求點擊場景中的任何一個物體并且將物體顯示在縮略圖中..并且鼠標(biāo)要求左鍵無法移動視角只可點擊..右鍵只有在按下時 才可旋轉(zhuǎn)視角.
要實現(xiàn)這個效果..我們一步一步來..
首先是初始化 我們先將 攝象機 燈光 模型 等等都將在這里一次生成.

 protected void simpleInitGame()
  {
{
 display.setTitle("PickBox Demo");
// 安裝攝象機
cam.setFrustumPerspective(45.0f, (float) display.getWidth()
/ (float) display.getHeight(), 1, 5000);
cam.setLocation(new Vector3f(200, 150, 200));
cam.lookAt(new Vector3f(0, 0, 0), Vector3f.UNIT_Y);
cam.update();
pr = new BoundingPickResults();
am = new AbsoluteMouse("The Mouse", display.getWidth(), display
.getHeight());
am.registerWithInputHandler(input);
// 安裝燈光系統(tǒng)
PointLight light = new PointLight();
light.setDiffuse(new ColorRGBA(1.0f, 1.0f, 1.0f, 1.0f));
light.setAmbient(new ColorRGBA(0.5f, 0.5f, 0.5f, 1.0f));
light.setLocation(new Vector3f(0, 30, 0));
light.setEnabled(true);
lightState.attach(light);
// Objects 所有可選的物體都將加到這個Node里 rootNode.attachChild(createObjects());
// Setup renderpasses
RenderPass rootPass = new RenderPass();
rootPass.add(rootNode);
pManager.add(rootPass);
createDebugQuads();
statNode.attachChild(debugQuadsNode);
//為了讓鼠標(biāo)左鍵不隨鼠標(biāo)自動旋轉(zhuǎn)視角 我們首先要將鼠標(biāo)釋放出來
MouseInput.get().setCursorVisible(true);
 }
}
 //objects 所有可以讓鼠標(biāo)選擇的物體都應(yīng)該加載到這個Node上面
//因為我們會在Update方法中 使用BoundingPickResults 來尋找這個Node
private Node createObjects() {
objects = new Node("objects");
ts = display.getRenderer().createTextureState();
Texture t0 = TextureManager.loadTexture(PickBoxDemo.class.getClassLoader()
.getResource("jmetest/data/texture/wall.jpg"),
Texture.MinificationFilter.Trilinear,
Texture.MagnificationFilter.Bilinear);
t0.setWrap(Texture.WrapMode.Repeat);
ts.setTexture(t0);
textureBox = new Box("box1", new Vector3f(-10, -10, -10), new Vector3f(10,
10, 10));
textureBox.setLocalTranslation(new Vector3f(0, 10, 0));
textureBox.setRenderState(ts);
textureBox.setModelBound(new BoundingBox());
textureBox.updateModelBound();
objects.attachChild(textureBox);
whiteBox = new Box("box2", new Vector3f(-5, -5, -5), new Vector3f(5, 5, 5));
whiteBox.setLocalTranslation(new Vector3f(0, 30, 0));
whiteBox.setModelBound(new BoundingBox());
whiteBox.updateModelBound();
objects.attachChild(whiteBox);
shadowBox = new Box("sn", new Vector3f(-5, -5, -5), 5, 5, 5);
shadowBox.setLocalTranslation(new Vector3f(0, 10, 10));
shadowBox.setModelBound(new BoundingBox());
shadowBox.updateModelBound();
return objects;
}
下面將創(chuàng)建縮略圖周圍的白色框框
private void createDebugQuads() {
tRenderer = display.createTextureRenderer(256, 256,
TextureRenderer.Target.Texture2D);
tRenderer.getCamera().setAxes(new Vector3f(-1, 0, 0),
new Vector3f(0, 0, 1), new Vector3f(0, 1, 0));
tRenderer.getCamera().setLocation(new Vector3f(0, -100, 20));
monitorNode = new Node("Monitor Node");
monitorNode.setRenderQueueMode(Renderer.QUEUE_ORTHO);
Quad quad = new Quad("Monitor");
quad.updateGeometry(250, 250);
quad.setLocalTranslation(new Vector3f(150, 210, 0));
quad.setZOrder(1);
monitorNode.attachChild(quad);
Quad quad2 = new Quad("Monitor Back");
quad2.updateGeometry(270, 270);
quad2.setLocalTranslation(new Vector3f(150, 210, 0));
quad2.setZOrder(2);
monitorNode.attachChild(quad2);
ZBufferState buf = display.getRenderer().createZBufferState();
buf.setEnabled(false);
monitorNode.setRenderState(buf);
tRenderer.setBackgroundColor(new ColorRGBA(0f, 0f, 0f, 1f));
fakeTex = new Texture2D();
fakeTex.setRenderToTextureType(Texture.RenderToTextureType.RGBA);
tRenderer.setupTexture(fakeTex);
TextureState screen = display.getRenderer().createTextureState();
screen.setTexture(fakeTex);
screen.setEnabled(true);
quad.setRenderState(screen);
monitorNode.setLightCombineMode(Spatial.LightCombineMode.Off);
rootNode.attachChild(monitorNode);
}
//我們將用Texture2D的方式將框框放到界面里 那將是一個Quad 四邊形 .
//接下來是我們最核心的方法
protected void simpleUpdate(){ //我們首先來判斷 是否是左鍵點擊 這里的isButtonDown(0) 中的 0 代表的就是左鍵 if

 (MouseInput.get().isButtonDown(0)) { Vector2f screenPos = new
Vector2f(); screenPos.set(am.getHotSpotPosition().x,
am.getHotSpotPosition().y); Vector3f worldCoords =
display.getWorldCoordinates(screenPos, 0); Vector3f worldCoords2 =
display.getWorldCoordinates(screenPos, 1); Ray mouseRay = new
Ray(worldCoords, worldCoords2.subtractLocal(
worldCoords).normalizeLocal()); pr.clear();
//為了讓 BoundingPickResults 可以點擊 objects內(nèi)的所有模型
objects.findPick(mouseRay, pr);
try {
//我們會通過pickResults拿到我們點擊當(dāng)前的第1個Node.并且拿到Node的Nmae.接著我們判斷并且將點擊的Box 復(fù)制給縮略圖里的Box..這樣。他就進去了 String name =
pr.getPickData(0).getTargetMesh().getName(); if
(name.equalsIgnoreCase("box1")) { shadowBox = textureBox; } else if
(name.equalsIgnoreCase("box2")) { shadowBox = whiteBox; } } catch
(IndexOutOfBoundsException ex) { ex.printStackTrace(); } }
}
接下來我們是鼠標(biāo)的處理...由于要求是鼠標(biāo)右鍵按下時并且拖動鼠標(biāo) 才可以旋轉(zhuǎn)視角 OK
那么我們可以在MouseLook的performAction里 增加一些條件 來實現(xiàn)這個效果
public void performAction(InputActionEvent evt) {
float time = 0.01f * speed;
//首先看鼠標(biāo)是否右鍵按下 如果按下 .setCursorVisible(false); 讓光標(biāo)隱藏掉并且移動視角
if(MouseInput.get().isButtonDown(1)){
MouseInput.get().setCursorVisible(false);
if(!buttonPressRequired || MouseInput.get().isButtonDown(mouseButtonForRequired)) {
if (mouse.getLocalTranslation().x > 0) {
event.setTime(time * mouse.getLocalTranslation().x);
rotateRight.performAction(event);
} else if (mouse.getLocalTranslation().x < 0) {
event.setTime(time * mouse.getLocalTranslation().x * -1);
rotateLeft.performAction(event);
 }
}
if (mouse.getLocalTranslation().y > 0) {
event.setTime(time * mouse.getLocalTranslation().y);
lookUp.performAction(event);
} else if (mouse.getLocalTranslation().y < 0) {
event.setTime(time * mouse.getLocalTranslation().y * -1);
lookDown.performAction(event);
}
}
}
//當(dāng)鼠標(biāo)右鍵抬起后 我們將在光標(biāo)顯示出來.
if(!MouseInput.get().isButtonDown(1)){
MouseInput.get().setCursorVisible(true);
}
}
源代碼下載:點擊下載