<rt id="bn8ez"></rt>
<label id="bn8ez"></label>

  • <span id="bn8ez"></span>

    <label id="bn8ez"><meter id="bn8ez"></meter></label>

    貝貝爸爸的程序人生

    關注Seam、BPM
    posts - 23, comments - 10, trackbacks - 0, articles - 32
      BlogJava :: 首頁 :: 新隨筆 :: 聯系 :: 聚合  :: 管理

    2011年5月11日

    今天興致來了,說要在家搞搞平臺的東西,nnd,竟然遇到了莫名其妙的mysql亂碼問題,其實不是mysql的問題,是jdbc數據源的鏈接沒有指明字符集的問題,記下來備用:<datasource jta="false" jndi-name="java:jboss/datasources/MySqlDS" pool-name="bdp" enabled="true" use-java-context="true" use-ccm="true">
                        <connection-url>jdbc:mysql://localhost:3306/bdp-dev?useUnicode=true&amp;characterEncoding=utf8</connection-url>
                        <driver>com.mysql</driver>
                        <pool>
                            <min-pool-size>10</min-pool-size>
                            <max-pool-size>100</max-pool-size>
                            <prefill>true</prefill>
                            <use-strict-min>false</use-strict-min>
                            <flush-strategy>FailingConnectionOnly</flush-strategy>
                        </pool>
                        <security>
                            <user-name>root</user-name>
                        </security>
                        <statement>
                            <prepared-statement-cache-size>32</prepared-statement-cache-size>
                            <share-prepared-statements>true</share-prepared-statements>
                        </statement>
                    </datasource>

    posted @ 2012-05-19 01:40 貝貝爸爸 閱讀(769) | 評論 (0)編輯 收藏

    今天在處理zTree的時候,無意間遇到一個很好的插件,可以將array對象轉換為json對象,真的很好用哦,呵呵。
    var thing = {plugin: 'jquery-json', version: 2.3};

    var encoded = $.toJSON( thing );
    // '{"plugin":"jquery-json","version":2.3}'
    var name = $.evalJSON( encoded ).plugin;
    // "jquery-json"
    var version = $.evalJSON(encoded).version;
    // 2.3
    像上面那樣用就行了,很容易進行請求間的參數傳遞。
    項目地址為:http://code.google.com/p/jquery-json/

    posted @ 2012-05-10 13:45 貝貝爸爸 閱讀(1076) | 評論 (1)編輯 收藏

     cat /tmp/id_rsa.john.pub >> ~/.ssh/authorized_keys

    posted @ 2012-04-26 14:45 貝貝爸爸 閱讀(390) | 評論 (0)編輯 收藏

    nnd,今天搞了快2個小時,總是無法解決ldap支持的其他屬性返回問題,因為之前配置的是3.3.5版本,現在最新的版本是3.4.11,原來的配置竟然無法使用了,原來是因為增加服務:
    <bean id="serviceRegistryDao" class="org.jasig.cas.services.InMemoryServiceRegistryDaoImpl">
    導致無法返回principal的其他屬性到客戶端,其實象這樣配置即可:<bean id="attributeRepository"
      class="org.jasig.services.persondir.support.ldap.LdapPersonAttributeDao">
      <property name="contextSource" ref="contextSource" />
      <property name="baseDN" value="ou=users,${ldap.basePath}" />
      <property name="requireAllQueryAttributes" value="true" />
      <!--
      Attribute mapping beetween principal (key) and LDAP (value) names
      used to perform the LDAP search.  By default, multiple search criteria
      are ANDed together.  Set the queryType property to change to OR.
      
    -->
      <property name="queryAttributeMapping">
        <map>
          <entry key="username" value="uid" />
        </map>
      </property>
     
      <property name="resultAttributeMapping">
        <map>
        <!-- Mapping beetween LDAP entry attributes (key) and Principal's (value) -->
        <entry key="name" value="userName"/>
        <entry key="uid" value="userId"/>
        </map>
      </property>
    </bean>

        <bean id="serviceRegistryDao" class="org.jasig.cas.services.InMemoryServiceRegistryDaoImpl">
            <property name="registeredServices">
                <list>
                    <bean class="org.jasig.cas.services.RegisteredServiceImpl">
                        <property name="id" value="0" />
                        <property name="name" value="HTTP" />
                        <property name="description" value="Only Allows HTTP Urls" />
                        <property name="serviceId" value="http://**" />
                        <property name="evaluationOrder" value="10000001" />
                        <property name="ignoreAttributes" value="true" />
                    </bean>
                                    ………………
                            </list>
                    </property>
            </bean>
    如上所示,其中注冊的服務registeredServices
    默認是不允許返回其他屬性到客戶端的!!!!!,真的是很坑爹啊,不過,配置一下ignoreAttributes即可,也可以指定allowedAttributes
    如下:
    <property name="allowedAttributes">
        <list>
                <value><!-- your attribute key --></value>
        </list>
    </property>

    posted @ 2012-04-25 23:12 貝貝爸爸 閱讀(1329) | 評論 (0)編輯 收藏


    cat /boot/grub2/grub.cfg |grep Fedora
    grub2-set-default "Fedora Linux, with Linux 3.1.0-5.fc16.i686"
    grub2-editenv list
    grub2-mkconfig -o /boot/grub2/grub.cfg

    posted @ 2012-04-20 08:50 貝貝爸爸 閱讀(372) | 評論 (0)編輯 收藏

    #
    contrib / completion / git-completion.bash

    #
     Source the git bash completion file
    if [ -f ~/.git-completion.bash ]; then
        source ~/.git-completion.bash
        GIT_PS1_SHOWDIRTYSTATE=true
        PS1='[\u@\h:\W $(__git_ps1 "(%s)")]$ '
    fi

    posted @ 2012-04-04 09:26 貝貝爸爸 閱讀(847) | 評論 (0)編輯 收藏

    http://www.secondpersonplural.ca/jqgriddocs/index.htm

    posted @ 2012-03-29 05:05 貝貝爸爸 閱讀(195) | 評論 (0)編輯 收藏

    http://junv.sinaapp.com/1955.html

    posted @ 2012-03-21 17:22 貝貝爸爸 閱讀(280) | 評論 (0)編輯 收藏

    http://www.navicat.com/en/download/download.html
    NAVJ-W56S-3YUU-MVHV


    posted @ 2012-03-19 17:25 貝貝爸爸 閱讀(322) | 評論 (0)編輯 收藏

    今天調試了一天,所有的步驟都正確,可最后到了web下載,卻總是404錯誤,好心zzq網友幫著一起定位和解決問題,可依然沒有找到原因,偶爾的一個google搜索,發現是因為沒有sudo啟動nginx。。。。
    真tmd扯淡了。

    posted @ 2012-03-18 20:13 貝貝爸爸 閱讀(361) | 評論 (0)編輯 收藏

    https://gist.github.com/2066974

    posted @ 2012-03-18 08:26 貝貝爸爸 閱讀(258) | 評論 (0)編輯 收藏

    系統環境
    CentOS6.2
    #step 1. download libevent https://github.com/downloads/libevent/libevent/libevent-2.0.17-stable.tar.gz
    $ ./configure
    $ make
    $ make verify   # (optional)
    $ sudo make install
    $ln -s /usr/local/lib/libevent-2.0.so.5 /usr/lib64/libevent-2.0.so.5
    #step 2. download FastDFS source package and unpack it,
    $ ./make.sh
    $ ./make.sh install
    #step 3. edit/modify the config file of tracker and storage
    #step 3.1.
    $ vim /etc/fdfs/tracker.conf
    ## base_path=??
    ## reserved_storage_space = 1GB
    #step 3.2
    $ vim /etc/fdfs/storage.conf
    ## base_path=/home/yuan/fastdfs/storage
    ## path(disk or mount point) count, default value is 1
    ## store_path_count=1
    ## store_path#, based 0, if store_path0 not exists, it's value is base_path
    ## the paths must be exist
    ## store_path0=/home/yuan/fastdfs0
    ## tracker_server=host:port
    #step 4 cp the start shell into /etc/init.d
    $ cd FastDFS
    $ cp init.d/fdfs_trackerd /etc/init.d
    $ cp init.d/fdfs_storaged /etc/init.d
    #step 5 mkdir the trackerd base path and storaged base path
    $ mkdir /home/yuan/fastdfs
    $ mkdir /home/yuan/fastdfs0
    #step 6 start trackerd service
    $/sbin/service fdfs_trackerd start
    ###$/sbin/service fdfs_trackerd status
    ###$fdfs_trackerd (pid 11441) is running...
    #step 7 start storaged service
    $/sbin/service fdfs_storaged start
    ###$/sbin/service fdfs_storaged status
    ###$fdfs_storaged (pid 11553) is running...
    #step 8. run test program
    #step 8.1. vim /etc/fdfs/client.conf
    ###base_path=/home/yuan/fastdfs
    ###tracker_server=192.168.0.197:22122
    #step 8.2 run test program
    $/usr/local/bin/fdfs_test /etc/fdfs/client.conf upload /usr/include/stdlib.h
    #step 9 monitor fdfs
    $/usr/local/bin/fdfs_monitor /etc/fdfs/client.conf

    posted @ 2012-03-17 16:38 貝貝爸爸 閱讀(764) | 評論 (0)編輯 收藏

    可能后面會遇到同一臺服務器,安裝多個jboss實例的問題,那顯然的問題可能就是端口沖突問題,怎么辦?
    1、修改各個配置文件的端口配置
    2、最簡單的方法是,啟動是指明端口綁定步長,例如:-Djboss.socket.binding.port-offset=100

    posted @ 2012-03-04 20:40 貝貝爸爸 閱讀(463) | 評論 (0)編輯 收藏

    mvn deploy:deploy-file -Dfile=target/web-3.1.0-SNAPSHOT-api.jar -Durl=http://repo.yongtai.com.cn/nexus/content/repositories/snapshots/ -DrepositoryId=nexus-snapshots -DpomFile=pom.xml -Dpackaging=jar -Dclassifier=api

    posted @ 2012-02-22 12:02 貝貝爸爸 閱讀(224) | 評論 (0)編輯 收藏

    今天又在centos下折騰呢,呵呵,不過這次的環境是mac下安裝centos的虛擬機,mac環境和linux環境還是很大區別,至少無法安裝我想要的FastDFS環境,著實有點無法接受,所以只能安裝虛擬機了。
    ssh centos后,主要安裝遇到了如下問題:
    1、gcc-c++沒有安裝,會導致安裝pcre的時候,報c++編譯器沒找到,直接安裝:yum install gcc-c++即可
    2、zlib包無法找到,安裝:yum install zlib-devel即可
    3、error while loading shared libraries: libpcre.so.1:[root@bogon nginx-1.0.12]# ldd $(which /usr/local/nginx/sbin/nginx)
        linux-vdso.so.1 =>  (0x00007fff7e9db000)
        libpthread.so.0 => /lib64/libpthread.so.0 (0x00007fe4629d0000)
        libcrypt.so.1 => /lib64/libcrypt.so.1 (0x00007fe462799000)
        libpcre.so.1 => not found//確實沒找到
        libz.so.1 => /lib64/libz.so.1 (0x00007fe462582000)
        libc.so.6 => /lib64/libc.so.6 (0x00007fe4621e1000)
        /lib64/ld-linux-x86-64.so.2 (0x00007fe462bfa000)
        libfreebl3.so => /lib64/libfreebl3.so (0x00007fe461f7e000)
        libdl.so.2 => /lib64/libdl.so.2 (0x00007fe461d7a000)
    [root@bogon nginx-1.0.12]# cd /lib64/

    [root@bogon lib64]# ln -s libpcre.so.0.0.1 libpcre.so.1
    [root@bogon lib64]# ldd $(which /usr/local/nginx/sbin/nginx)
        linux-vdso.so.1 =>  (0x00007fff4d7ff000)
        libpthread.so.0 => /lib64/libpthread.so.0 (0x00007fb06f13e000)
        libcrypt.so.1 => /lib64/libcrypt.so.1 (0x00007fb06ef07000)
        libpcre.so.1 => /lib64/libpcre.so.1 (0x00007fb06ecda000)
        libz.so.1 => /lib64/libz.so.1 (0x00007fb06eac4000)
        libc.so.6 => /lib64/libc.so.6 (0x00007fb06e723000)
        /lib64/ld-linux-x86-64.so.2 (0x00007fb06f368000)
        libfreebl3.so => /lib64/libfreebl3.so (0x00007fb06e4c0000)
        libdl.so.2 => /lib64/libdl.so.2 (0x00007fb06e2bc000)

    posted @ 2012-02-19 07:49 貝貝爸爸 閱讀(2103) | 評論 (0)編輯 收藏

    這篇文章獻給天下兒童的父母。
         老農民的智慧和知識分子的尷尬:
        很多沒有上過學的老農民培養出了優秀的孩子,不少有知識、高學歷的城里人卻把孩子管出諸多毛病,甚至培養出問題孩子,為什么?老農民沒知識但有智慧,城里人有知識但沒智慧。(知識不等于智慧。)
        智慧的老農民三句話就培養出了好孩子:
        第一句話:“孩子,爸媽沒本事,你要靠自己了。”不包辦,把責任還給孩子,讓孩子擁有了責任心。
        第二句話:“孩子,做事先做人,一定不能做傷害別人的事情。”講德行,告訴孩子做人的標準。
        第三句話:“孩子,撒開手闖吧,實在不行,回家來還有口飯吃。”無私的愛,無盡的愛!
        看看一些城里人怎么把孩子教育出問題的:
        第一句話:“寶貝,你 好好學習就行了,其他的事情爸爸媽媽來辦!”剝奪了孩子負責任的權利,培養出了沒有責任心的孩子。
        第二句話:“寶貝,出去不能吃虧,別人打你一定要還手!”基本的做人準則都沒有教對,可能培養出“缺德”的孩子。
        第三句話:“我告訴你,你要是再不好好學習,長大沒飯吃別來找我!”有條件的愛,根本不是真愛。
        只要擁有智慧,每一位家長都能把孩子培養成才,而智慧與知識和學歷并不相關!

    posted @ 2011-08-06 22:47 貝貝爸爸 閱讀(271) | 評論 (0)編輯 收藏

    原文A successful Git branching model
    In this post I present the development model that I’ve introduced for all of my projects (both at work and private) about a year ago, and which has turned out to be very successful. I’ve been meaning to write about it for a while now, but I’ve never really found the time to do so thoroughly, until now. I won’t talk about any of the projects’ details, merely about the branching strategy and release management.
    這篇文章,將介紹所有一年前我工作中或者個人項目的開發模型,這個模型已經被證明是十分有用的(successfull)。我老早就想寫一些關于這個模型的文章,但是總是抽不出時間。在這篇文章中,我將不會介紹項目的詳細情況,僅僅對分支的策略和發布管理作一個介紹。

    It focuses around Git as the tool for the versioning of all of our source code.
    我們將圍繞這使用Git作為所有項目源碼的版本控制工具。
    • 為何選擇GIT?
    For a thorough discussion on the pros and cons of Git compared to centralized source code control systems, see the web. There are plenty of flame wars going on there. As a developer, I prefer Git above all other tools around today. Git really changed the way developers think of merging and branching. From the classic CVS/Subversion world I came from, merging/branching has always been considered a bit scary (“beware of merge conflicts, they bite you!”) and something you only do every once in a while.
    關于Git作為集中的源碼控制系統的優缺點,可以查看一下鏈接,關于這個話題,有激烈的爭論。作為一個開發者,與其他版本控制工具相比,我更喜歡Git,Git真正的改變了開發者關于合并和分支的思考(think)。我曾經也用過CVS、svn,分支和合并,真的很讓人頭疼(合并時產生的沖突),因此,有時你每次只能做一會工作(個人理解:因為svn這種版本控制庫只有一個服務倉庫,涉及公共資源,只能鎖定編輯)

    But with Git, these actions are extremely cheap and simple, and they are considered one of the core parts of your daily workflow, really. For example, in CVS/Subversion books, branching and merging is first discussed in the later chapters (for advanced users), while in every Git book, it’s already covered in chapter 3 (basics).
    但是對于Git來說,做這樣的工作(分支、合并),太簡單!它真的可以作為你日常工作流程中最核心的部分。例如,在有關CVS/svn的書籍中,分支和合并要放到最后一章才會闡述(針對高級用戶),然后在Git相關的書籍中,首先就先跟你闡述分支和合并(第3章)。

    Enough about the tools, let’s head onto the development model. The model that I’m going to present here is essentially no more than a set of procedures that every team member has to follow in order to come to a managed software development process.
    關于這個工具的介紹,我們不再贅述,現在我們回到開發模式的話題上來。這個模型,基本上和每個開發團隊管理軟件開發流程是類似的。
    • 分布而集中
    The repository setup that we use and that works well with this branching model, is that with a central “truth” repo. Note that this repo is only considered to be the central one (since Git is a DVCS, there is no such thing as a central repo at a technical level). We will refer to this repo as origin, since this name is familiar to all Git users.
    我們使用這個分支模型很好工作的倉庫,是真正意義上的中央倉庫。這個倉庫是唯一的中央倉庫(因為Git本身就是分布式版本控制系統DVCS,所以這沒有技術問題)。我們稱這樣一個中央倉庫為origin,所有Git用戶都知道origin這個名稱。
    Each developer pulls and pushes to origin. But besides the centralized push-pull relationships, each developer may also pull changes from other peers to form sub teams. For example, this might be useful to work together with two or more developers on a big new feature, before pushing the work in progress to origin prematurely. In the figure above, there are subteams of Alice and Bob, Alice and David, and Clair and David.
    每個開發者,都可以從origin獲得(pull)資源,同時也能推送(push)到origin。除此之外,每個開發者可以從其他開發者那里獲得資源,以此組建自己的一個小組。例如,當我們要開發一個大的新功能時,我們將和其他人一起協作,在提交到中央倉庫origin之前,我們需要小組內部能夠互相協作,這將是十分有用的。上圖中,Alice和Bob是一個小組,同時Alice和David是一個小組,Clair和David又是一個小組。
    Technically, this means nothing more than that Alice has defined a Git remote, named bob, pointing to Bob’s repository, and vice versa.
    從技術實現上講,這無非是在Alice的項目里,定義了一個指向Bot的遠程鏈接而已(git remote add bob git@bobserver bob.git),反之也是一樣,如此簡單!!
    • 主要的分支
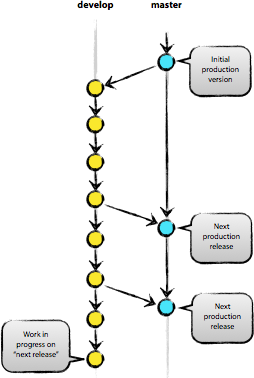
    At the core, the development model is greatly inspired by existing models out there. The central repo holds two main branches with an infinite lifetime:
    中央倉庫有2個主要的分支,這些分支將一直存在:
      • master
      • develop
    The master branch at origin should be familiar to every Git user. Parallel to the master branch, another branch exists called develop.
    中央倉庫的master分支已經為所有Git用戶熟知,與master分支并行的另外一個分支,我們稱之為develop。
    We consider origin/master to be the main branch where the source code of HEAD always reflects a production-ready state.
    我們稱origin/master為主要分支,因為分支的HEAD指向的源碼總是反映了一個可以發布的產品狀態(production-ready)。

    We consider origin/develop to be the main branch where the source code of HEAD always reflects a state with the latest delivered development changes for the next release. Some would call this the “integration branch”. This is where any automatic nightly builds are built from.
    我們稱origin/develop為主要分支,因為分支的HEAD指向的源碼,總是反映了下次發布前最新提交的開發代碼。有些人稱之為“集成分支”(integration barnch),因為我們的每晚自動構建都是基于此分支進行的。(例如hudson,可以做自動構建工作)。
    When the source code in the develop branch reaches a stable point and is ready to be released, all of the changes should be merged back into master somehow and then tagged with a release number. How this is done in detail will be discussed further on.
    當develop分支的源碼穩定并且準備發布,所有的改變應該合并(merge)到master分支,同時做一個發布版本的標簽(tag),我們將在后面討論這個細節。
    Therefore, each time when changes are merged back into master, this is a new production release by definition. We tend to be very strict at this, so that theoretically, we could use a Git hook script to automatically build and roll-out our software to our production servers everytime there was a commit on master.
    因此,當每一次將所有更改合并回master時,將會產生一個新的可以發布的產品狀態。我們往往對于這個操作的控制是比較嚴格的,每當往master分支提交時,我們可以使用Git的hook來自動構建和轉出到產品服務器上。
    • 輔助分支

    posted @ 2011-07-06 12:34 貝貝爸爸 閱讀(535) | 評論 (0)編輯 收藏

    首先,需要配置mail-service.xml
    <?xml version="1.0" encoding="UTF-8"?>
    <!-- $Id: mail-service.xml 62350 2007-04-15 16:50:12Z dimitris@jboss.org $ -->
    <server>

      
    <!-- ==================================================================== -->
      
    <!-- Mail Connection Factory                                              -->
      
    <!-- ==================================================================== -->

      
    <mbean code="org.jboss.mail.MailService"
             name
    ="jboss:service=Mail">
        
    <attribute name="JNDIName">java:/Mail</attribute>
        
    <attribute name="User">bpm</attribute>
        
    <attribute name="Password">*****</attribute>
        
    <attribute name="Configuration">
          
    <!-- A test configuration -->
          
    <configuration>
            
    <!-- Change to your mail server prototocol -->
            
    <property name="mail.store.protocol" value="pop3"/>
            
    <property name="mail.transport.protocol" value="smtp"/>

            
    <!-- Change to the user who will receive mail  -->
            
    <property name="mail.user" value="bpm"/>
            
    <property name="mail.smtp.auth" value="true"/>

            
    <!-- Change to the mail server  -->
            
    <property name="mail.pop3.host" value="**pop3服務器地址**"/>

            
    <!-- Change to the SMTP gateway server -->
            
    <property name="mail.smtp.host" value="***smtp服務器地址***"/>
            
            
    <!-- The mail server port -->
            
    <property name="mail.smtp.port" value="25"/>
            
            
    <!-- Change to the address mail will be from  -->
            
    <property name="mail.from" value="bpm@eontime.com.cn"/>

            
    <!-- Enable debugging output from the javamail classes -->
            
    <property name="mail.debug" value="false"/>
          
    </configuration>
        
    </attribute>
        
    <depends>jboss:service=Naming</depends>
      
    </mbean>

    </server>

    其次新建一個jsp頁面mail2.jsp,作為測試
    <%@page contentType="text/html"%>
    <%@ page import="javax.mail.*,javax.mail.internet.*, javax.activation.*, javax.naming.InitialContext" %> 
    <h3>Test JbsssMail DB</h3> 
    <%
    String toAddress
    =request.getParameter("MailTo");
    String fromAddress
    =request.getParameter("MailFrom");
    String subject
    =request.getParameter("MailSubject");
    String content
    =request.getParameter("MailContent");
    InitialContext ctx 
    = new InitialContext(); 
    Session sessions 
    = (Session) ctx.lookup("java:/Mail");
    if(toAddress!=null &&!toAddress.equals("")){ 
    try{
     MimeMessage msg 
    = new MimeMessage(sessions);
     msg.setFrom(
    new InternetAddress(fromAddress));
     msg.setRecipients(javax.mail.Message.RecipientType.TO,toAddress);
     msg.setSubject(subject);
     msg.setSentDate(
    new java.util.Date());
     Multipart multipt 
    = new MimeMultipart();
     MimeBodyPart msgbody 
    = new MimeBodyPart();
     msgbody.setContent(content,
    "text/plain");
     multipt.addBodyPart(msgbody);
     msg.setContent(multipt);
     Transport.send(msg);
     System.out.println(
    "SendMail OK!");
    }
    catch(MessagingException e)
    {
     e.printStackTrace();
    }
    }
    %> 
    <HTML>
    <BODY BGCOLOR="white">
    <form METHOD="POST" ACTION="mail2.jsp">
     
    <table CELLSPACING="0" CELLPADDING="3" BORDER="1" WIDTH="474">
        
    <tr>
          
    <td width="150"><div align="left">From :</small></td>
          
    <td width="324"><input TYPE="TEXT" name="MailFrom" value=""></td>
        
    </tr>
        
    <tr>
          
    <td width="150"><div align="left">To :</small></td>
          
    <td width="324"><input TYPE="TEXT" name="MailTo" value=""></td>
        
    </tr>
        
    <tr>
          
    <td width="150"><div align="left">Subject :</small></td>
          
    <td width="324"><input TYPE="TEXT" name="MailSubject" value=""></td>
        
    </tr>
        
    <tr>
          
    <td width="150"><div align="left">Content :</small></td>
          
    <td width="324"><TEXTAREA cols=50 name="MailContent" rows=8></TEXTAREA></td>
        
    </tr>
        
    <tr>
          
    <td></td>
          
    <td colspan="2" width="474"><input TYPE="Submit"></td>
        
    </tr>
     
    </table>
    </form>
    </BODY>
    </HTML>

    posted @ 2011-06-25 22:44 貝貝爸爸 閱讀(469) | 評論 (0)編輯 收藏

    git的分支處理模型,真的很爽,但關于如何對git的分支進行管理?最近有網友給我提到了git flow,呵呵,按照我的理解,應該是git的一個最佳實踐吧,原文A successful Git branching model對git的分支模型作了闡述,以下我對該文章進行自己的翻譯和理解,聊以日后學習,首先先看一下下面這個圖:
    git flow將git的分支主要分為2類:主要分支和支持分支
    • 主要分支
      • master:永遠處在產品可以發布(production ready)狀態
      • develop: 當前最新的開發狀態
    • 支持分支
      • Feature branches: 開發新的功能,從develop分支出來,完成開發、測試后,merge回develop。
      • Release branches: 準備發布版本的分支,該分支只修復bug,完成后,merge回develop和master。
      • Hotfix branches: 來不及等待下個版本的發布,但又要馬上修復bug的情況,從master分支出來,完成開發、測試后,merge回master和develop。

    posted @ 2011-05-31 09:44 貝貝爸爸 閱讀(678) | 評論 (1)編輯 收藏

    由于最近在做的oryx-editor使用的是posgresql8.3.15,不能自動的使用yum install安裝了,因為現在源里面的版本是8.1,無法滿足項目要求,特安裝了postgresql8.3.15,只能源碼編譯安裝了。
    ----------------------------

    1、下載postgresql最新版:http://www.postgresql.org/ftp/source/

    wget http://wwwmaster.postgresql.org/redir/391/f/source/v8.3.15/postgresql-8.3.15.tar.gz

    2、解壓文件:
    tar zxvf postgresql-8.3.7.tar.gz
    cd postgresql-8.3.7

    3、配置:
    ./configure --prefix=/usr/local/pgsql

    4、編譯:
    make

    5、安裝:
    make install

    6、創建用戶組和用戶:
    groupadd postgres
    useradd -g postgres postgres

    7、創建數據庫庫文件存儲目錄、給postgres賦予權限:
    mkdir /usr/local/pgsql/data
    cd /usr/local/pgsql
    chown postgres.postgres data

    8、初始化數據庫目錄:
    切換用戶
       su - postgresql

    初始化數據
       /usr/local/pgsql/bin/initdb -D /usr/local/pgsql/data

    啟動數據庫
       /usr/local/pgsql/bin/postmaster -D /usr/local/pgsql/data

    9、配置監聽地址和端口:
    vi /usr/local/pgsql/data/postgresql.conf
    取消以下兩行的注釋
       listen_addresses = '*'

       port = 5432

    10、允許遠程連接:
    vi /usr/local/pgsql/data/pg_hba.conf
    添加
       host all all 192.168.1.0/24 trust 

       每項的具體意思在配置文件中有詳細說明
    配置iptables讓遠程主機能訪問:
       vi /etc/sysconfig
       添加
          -A RH-Firewall-1-INPUT -m state --state NEW -m tcp -p tcp --dport 5432 -j ACCEPT
       service iptables restart

    11、讓postgresql數據庫隨系統啟動而啟動:
    將啟動腳本拷貝到/etc/init.d/目錄下,具體執行如下命令:
    cd /etc/rc.d/init.d
    cp (第一步解壓的安裝文件目錄)/postgresql-8.3.7/contrib/start-scripts/linux postgresql
    chmod +x postgresql
    vi postgresql
       prefix=/usr/local/pgsql
       PGDATA="/usr/local/pgsql/data"
       PGUSER=postgres
       PGLOG="/var/log/pgsql.log"

       chkconfig --add postgresql
    啟動數據庫:
       service postgresql start

    配置完畢 。

    posted @ 2011-05-27 23:00 貝貝爸爸 閱讀(660) | 評論 (0)編輯 收藏

    1、顯示數據庫列表。
    show databases;
    2、顯示庫中的數據表:
    use mysql;
    show tables;
    3、顯示數據表的結構:
    describe 表名;
    4、建庫:
    create database 庫名;
    5、建表:
    use 庫名;
    create table 表名 (字段設定列表);
    6、刪庫和刪表:
    drop database 庫名;
    drop table 表名;
    7、將表中記錄清空:
    delete from 表名;
    8、顯示表中的記錄:
    select * from 表名

    • 外網無法訪問的問題
      #登錄myql
      #
      mysql -u root mysql -p

      #mysql>update user set password=password('123456') where user='root';

      #mysql>fulsh privileges;
      #
      mysql>\q

    posted @ 2011-05-26 21:36 貝貝爸爸 閱讀(228) | 評論 (0)編輯 收藏

    • 安裝python環境
    #yum install python python-setuptools
     1 ##下載gitosis倉庫到本地
     2 # git clone git://eagain.net/gitosis.git gitosis
     3 
     4 #安裝 yum install python-setuptools
     
    5 # python setup.py install --record uninstall.txt #記錄需要卸載的東西
     6 
     7 #導入初始化公鑰
     8 # su git
     9 [git@dev01 gitosis]$ gitosis-init < /tmp/id_rsa_yuan.pub 
    10 Initialized empty Git repository in /home/git/repositories/gitosis-admin.git/
    11 Reinitialized existing Git repository in /home/git/repositories/gitosis-admin.git/
    12 
    13 #進入自己設置的git倉庫路徑
    14 # cd /var/git/
    15 [root@dev01 git]# ln -s /home/git/repositories/ repo
    16 #改變文件權限
    17 [root@dev01 git]# chmod 755 /var/git/repo/gitosis-admin.git/hooks/post-update
    18 
    19 -----------------------
    20 回到本機測試一下ssh連接
    21 $ ssh git@192.168.250.231
    22 ERROR:gitosis.serve.main:Need SSH_ORIGINAL_COMMAND in environment.
    23 Connection to 192.168.250.231 closed.
    24 
    25 ##大功告成,說明gitosis生效
    • 提交本地工程到服務器
    #首先clonegitosis-admin項目到本地
    $ git clone git@192.168.250.231:gitosis-admin.git
    Cloning into gitosis
    -admin
    remote: Counting objects: 
    5, done.
    remote: Compressing objects: 
    100% (5/5), done.
    remote: Total 
    5 (delta 0), reused 5 (delta 0)
    Receiving objects: 
    100% (5/5), done.
    啊啊
    #修改查看到gitosis.conf
    [gitosis]

    [group gitosis
    -admin]
    writable 
    = gitosis-admin
    members 
    = yuan
    [group eontime]
    writable 
    = costdb \
               oryx
    -editor \
               demo
    /test
    members 
    = yuan
    #如上所示,分有2個組類型admin和我們自定義的,你可以隨便定義一個組,其實就是個權限集合
    #
    writable意思是,這個權限組有哪幾個項目的寫權限?這里是空格分開,如果太長就換行,例如demo/test的話,就是:
    git remote add origin git@gitserver:demo/test.git

    members就是有這個權限的組成員了,通過把有權限的開發者的公鑰上傳至keydir

    最后將gitosis
    -admin提交至遠程
    #git push remote origin master

    ok,一切完成,服務端將同步有一個倉庫了。

    posted @ 2011-05-26 15:46 貝貝爸爸 閱讀(3305) | 評論 (0)編輯 收藏

    呵呵,不知道為何新建項目之后,這個東西就不見了,我覺得還是很有用的:
    Global setup:

     Download and install Git
      git config 
    --global user.name "yuanqixun"
      git config 
    --global user.email yuanqixun@gmail.com
            

    Next steps:

      mkdir activiti
    -modeler
      cd activiti
    -modeler
      git init
      touch README
      git add README
      git commit 
    -'first commit'
      git remote add origin git@github.com:yuanqixun
    /activiti-modeler.git
      git push 
    -u origin master
          

    Existing Git Repo
    ?

      cd existing_git_repo
      git remote add origin git@github.com:yuanqixun
    /activiti-modeler.git
      git push 
    -u origin master
          

    Importing a Subversion Repo
    ?

      Click here
          

    When you
    're done:

      Continue


    • 安裝eclipse的egit插件地址
    https://repository.sonatype.org/content/repositories/forge-sites/m2eclipse-egit/0.13.0/N/0.13.0.201103031543/

    https://repository.sonatype.org/content/sites/forge-sites/m2eclipse-subversive/0.13.0/N/0.13.0.201103011512/

    posted @ 2011-05-20 17:42 貝貝爸爸 閱讀(765) | 評論 (0)編輯 收藏

    • 安裝
    # yum install postgresql postgresql-libs postgresql-server
    [root@dev ~]# service postgresql status
    postmaster is stopped
    [root@dev 
    ~]# service postgresql start
    Initializing database:                                     [  OK  ]
    Starting postgresql service:                               [  OK  ]


    • 設為開機啟動

    [root@dev ~]# chkconfig postgresql on
    [root@dev ~]# chkconfig --list postgresql
    postgresql      0:off   1:off   2:on    3:on    4:on    5:on    6:off
    • 配置參數

    [root@dev ~]# vim /var/lib/pgsql/data/pg_hba.conf
    #
     "local" is for Unix domain socket connections only
    #
    local   all         all                               ident sameuser
    local   all         all         trust
    # IPv4 local connections:
    #
    host    all         all         127.0.0.1/32          ident sameuser
    host    all         all         127.0.0.1/32          md5
    host
        all         all         192.168.28.3/32       md5 #必須有后面那個,那個是掩碼,否則總報pg_hba.conf語法錯
    [root@dev ~]# su - postgres
    -bash-3.2$ pg_ctl reload
    postmaster signaled
    [root@dev 
    ~]# vim /var/lib/pgsql/data/postgresql.conf 
    listen_addresses = '*'
    [root@dev 
    ~]# su - postgres
    -bash-3.2$ pg_ctl reload
    postmaster signaled
    • 常用命令

    # psql -l            列出所有數據庫   # psql
    => \l                列出所有數據庫
    => \c cake            連接到cake數據庫
    => \dt                列出所有tables
    => \d shift            查看shift表結構
    => \di                列出所有indexes
    => \d shift_pkey    列出所有index: shift_pkey
    • 測試java代碼

     1 import java.sql.Connection;
     2 import java.sql.DriverManager;
     3 import java.sql.ResultSet;
     4 import java.sql.Statement;
     5 
     6 public class PostgresqlTest {
     7 
     8     /**
     9      * @param args
    10      */
    11     public static void main(String[] args) {
    12         try {
    13             Class.forName("org.postgresql.Driver").newInstance();
    14             String connectUrl = "jdbc:postgresql://192.168.250.231:5432/poem";
    15             Connection conn = DriverManager.getConnection(connectUrl,
    16                     "poem""poem");
    17             Statement st = conn.createStatement();
    18             String sql = "select 1;";
    19             ResultSet rs = st.executeQuery(sql);
    20             while (rs.next()) {
    21                 System.out.println(rs.getInt(1));
    22             }
    23             rs.close();
    24             st.close();
    25             conn.close();
    26         } catch (Exception e) {
    27             e.printStackTrace();
    28         }
    29     }
    30 
    31 }
    32 

    posted @ 2011-05-18 21:58 貝貝爸爸 閱讀(3197) | 評論 (0)編輯 收藏

    今天研究了git一天,發現git真的很好哦,總結為3點:
    1、本地快照方式,會讓提交工作很快
    2、獨特的快速分支處理方式,對后期的bug補丁的修改、發行將很有好處;
    3、合并--git的合并發生在客戶端而非svn、cvs的服務端(個人覺得這個是極大的好處,協作的svn就是在服務端,造成了每次提交有的成功了,有的不成功)

    后面我會慢慢的總結進來的。

    posted @ 2011-05-12 21:16 貝貝爸爸 閱讀(226) | 評論 (0)編輯 收藏

    卸載mysql

    rpm -qa|grep -i mysql

    rpm -ev MySQL-server-4.0.14-0 MySQL-client-4.0.14-0

    卸載后/var/lib/mysql中的數據及/etc/my.cnf不會刪除,如果確定沒用后就手工刪除

    rm -f /etc/my.cnf

    rm -rf /var/lib/mysql
    #yum -y remove php
    #yum -y remove mysql
    #yum -y remove httpd

    centos卸載系統與環境部署
    centos卸載系統已被廣泛應用但是也在不斷的更新,這里介紹centos卸載系統設置使用,幫助大家安裝更新centos卸載系統。centos安裝好之后centos卸載系統自帶的 php,mysql,apache

    centos卸載系統可以使用rpm命令檢查一下
    #rpm -qa|grep -i php
    #rpm -qa|grep -i mysql
    #rpm -qa|grep -i httpd

    centos卸載系統很多依賴。最簡單的方法是使用yum卸載。由于是新安裝的系統,所以問題應該不大。
    #yum -y remove php
    #yum -y remove mysql
    #yum -y remove httpd

    centos卸載系統再用rpm -qa看一下,全部卸掉了轉一個系統目錄約定,軟件源代碼包存放位置/usr/local/src源碼包編譯安裝位置(prefix)/usr /local/software_name腳本以及維護程序存放位置/usr/local/sbinMySQL 數據庫位置/var/lib/mysqlApache 網站根目錄/data/wwwrootApache 虛擬主機日志根目錄/data/logs/wwwApache 運行賬戶www:wwwyum RPM包信息文件/etc/yum.list 下面的LAMP環境部署 基本也是參考上面的文章。

    系統環境部署及調整

    1. 檢查系統是否正常# more /var/log/messages(檢查有無系統內核級錯誤信息)# dmesg (檢查硬件設備是否有錯誤信息)# ifconfig(檢查網卡設置是否正確)# ping www.163.com  (檢查網絡是否正常)

    2. 關閉不需要的服務# ntsysv以下僅列出需要啟動的服務,未列出的服務一律關閉:crondirqbalance (僅當服務器CPU為S.M.P架構或支持雙核心、HT技術時,才需開啟,否則關 閉。)microcode_ctlnetworkrandomsendmailsshdsyslog

    3. 對TCP/IP網絡參數進行調整,加強抗SYN Flood能力# echo ‘net.ipv4.tcp_syncookies = 1′ >> /etc/sysctl.conf# sysctl -p

    4. 配置yum# rpm –import /usr/share/doc/centos-release-3/RPM-GPG-KEY-CentOS-3# yum list | tee /etc/yum.list

    5. 修改命令history記錄# vi /etc/profile找到 HISTSIZE=1000 改為 HISTSIZE=50

    6. 定時校正服務器時間# yum install ntp# crontab -e加入一行:*/15 * * * * ntpdate 210.72.145.44## 210.72.145.44 為中國國家授時中心服務器地址。

    7. 重新啟動系統# init 6

    8. 使用 yum 程序安裝所需開發包(以下為標準的 RPM 包名稱)gcc gcc-c++ gcc-g77 flex bison autoconf automake bzip2-devel zlib-devel ncurses-devel libjpeg-devel libpng-devel libtiff-devel freetype-devel pam-devel按上面步驟操作,基本沒有問題,很順利。以上介紹centos卸載系統。

    posted @ 2011-05-11 09:03 貝貝爸爸 閱讀(987) | 評論 (0)編輯 收藏

    主站蜘蛛池模板: 亚洲精品高清久久| 久久精品电影免费动漫| 亚洲精品mv在线观看| 自拍偷自拍亚洲精品第1页| 在线免费观看一级毛片| 免费国产污网站在线观看15 | 91精品免费观看| caoporn国产精品免费| 亚洲精品国产suv一区88| 亚洲欧洲日产国码www| 亚洲国产成人片在线观看无码 | 亚洲av色香蕉一区二区三区蜜桃| 亚洲黄色在线视频| 亚洲av永久无码精品表情包| 亚洲一级特黄大片在线观看| 四虎永久免费网站免费观看| 好吊妞788免费视频播放| 免费观看激色视频网站bd| 国产免费拔擦拔擦8X高清在线人| ssswww日本免费网站片| 野花视频在线官网免费1| 亚洲heyzo专区无码综合| 中文字幕 亚洲 有码 在线| 亚洲福利电影在线观看| 亚洲国产精品自在线一区二区| 亚洲精品自在在线观看| 综合亚洲伊人午夜网| 亚洲中文字幕成人在线| 亚洲片一区二区三区| 亚洲色偷偷综合亚洲AV伊人| 亚洲国产综合精品一区在线播放| 又爽又高潮的BB视频免费看 | 亚洲欧美日韩中文字幕一区二区三区 | 久久精品国产精品亚洲下载| 免费一级毛片一级毛片aa| 国产美女无遮挡免费视频网站| 日韩在线免费看网站| 国产精品酒店视频免费看| 免费99热在线观看| 日韩亚洲国产二区| 久久久亚洲精品蜜桃臀|