4 整合第三方組件
在《Google Guice 入門教程06 – Web 和Servlet》 中我們看到了Guice 整合Struts
2的應用。本章節繼續討論Guice整合其它第三方組件的應用。
本章節重點談Guice與DWR和Spring的整合。
4.1 整合DWR
DWR作為Ajax遠程調用的服務端得到了很多程序員的追捧,在DWR的2.x版本中已經集成了Guice的插件。
老套了,我們還是定義一個HelloWorld的服務吧,哎,就喜歡HelloWorld,不怕被別人罵!
1 public interface HelloWorld {
2
3 String sayHello();
4
5 Date getSystemDate();
6 }
7
然后寫一個簡單的實現吧。
1 public class HelloWorldImpl implements HelloWorld {
2
3 @Override
4 public Date getSystemDate() {
5 return new Date();
6 }
7
8 @Override
9 public String sayHello() {
10 return "Hello, guice";
11 }
12 }
13
然后是與dwr有關的東西了,我們寫一個dwr的listener來注入我們的模塊。
1 package cn.imxylz.study.guice.web.dwr;
2
3 import org.directwebremoting.guice.DwrGuiceServletContextListener;
4
5 /**
6 * @author xylz (www.imxylz.cn)
7 * @version $Rev: 105 $
8 */
9 public class MyDwrGuiceServletContextListener extends DwrGuiceServletContextListener{
10
11 @Override
12 protected void configure() {
13 bindRemotedAs("helloworld", HelloWorld.class).to(HelloWorldImpl.class).asEagerSingleton();
14 }
15 }
16
這里使用bindRemotedAs來將我們的服務開放出來供dwr遠程調用。
剩下的就是修改web.xml,需要配置一個dwr的Servlet并且將我們的listener加入其中。看看全部的內容。
1 <?xml version="1.0" encoding="UTF-8"?>
2 <web-app xmlns="http://java.sun.com/xml/ns/javaee" xmlns:xsi="http://www.w3.org/2001/XMLSchema-instance"
3 xsi:schemaLocation="http://java.sun.com/xml/ns/javaee http://java.sun.com/xml/ns/javaee/web-app_2_5.xsd"
4 version="2.5">
5
6 <display-name>guice-dwr</display-name>
7 <description>xylz study project - guice</description>
8
9 <listener>
10 <listener-class>cn.imxylz.study.guice.web.dwr.MyDwrGuiceServletContextListener
11 </listener-class>
12 </listener>
13 <servlet>
14 <servlet-name>dwr-invoker</servlet-name>
15 <servlet-class>org.directwebremoting.guice.DwrGuiceServlet</servlet-class>
16 <init-param>
17 <param-name>debug</param-name>
18 <param-value>true</param-value>
19 </init-param>
20 </servlet>
21 <servlet-mapping>
22 <servlet-name>dwr-invoker</servlet-name>
23 <url-pattern>/dwr/*</url-pattern>
24 </servlet-mapping>
25
26 </web-app>
27
非常簡單,也非常簡潔,其中DwrGuiceServlet的debug參數只是為了調試方便才開放的,實際中就不用寫了。
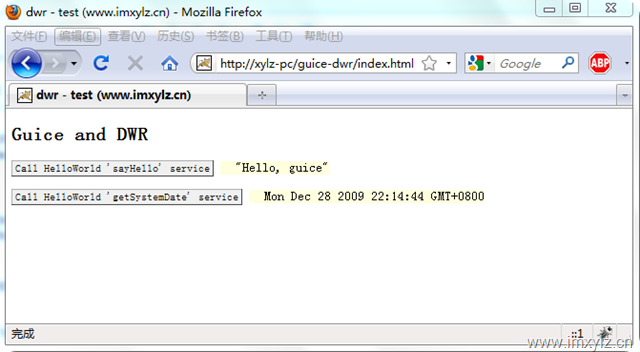
好了,看看我們的效果。
1 <html>
2 <head><title>dwr - test (www.imxylz.cn) </title>
3 <script type='text/javascript' src='/guice-dwr/dwr/interface/helloworld.js'></script>
4 <script type='text/javascript' src='/guice-dwr/dwr/engine.js'></script>
5 <script type='text/javascript' src='/guice-dwr/dwr/util.js'></script>
6 <script type='text/javascript'>
7 var showHello = function(data){
8 dwr.util.setValue('result',dwr.util.toDescriptiveString(data,1));
9 }
10 var getSystemDate = function(data){
11 dwr.util.setValue('systime',dwr.util.toDescriptiveString(data,2));
12 }
13 </script>
14 <style type='text/css'>
15 input.button { border: 1px outset; margin: 0px; padding: 0px; }
16 span { background: #ffffdd; white-space: pre; padding-left:20px;}
17 </style>
18 </head>
19 <body onload='dwr.util.useLoadingMessage()'>
20 <p>
21 <h2>Guice and DWR</h2>
22 <input class='button' type='button' value="Call HelloWorld 'sayHello' service" onclick="helloworld.sayHello(showHello)" />
23 <span id='result' ></span>
24 </p>
25 <p>
26 <input class='button' type='button' value="Call HelloWorld 'getSystemDate' service" onclick="helloworld.getSystemDate(getSystemDate)" />
27 <span id='systime' ></span>
28 </P>
29 </body>
30 </html>
我們通過兩個按鈕來獲取我們的遠程調用的結果。
 我對DWR的認識也僅限于此就不獻丑了。有興趣的可以研究http://directwebremoting.org/dwr/。
4.2 整合Spring
仍然使用我們的HelloWorld服務。
1 public interface HelloWorld {
2
3 String sayHello(String user);
4 }
5
1 public class HelloWorldImpl implements HelloWorld {
2
3 @Override
4 public String sayHello(String user) {
5 return String.format("Welcome to Guice with spring, %1$s. Now is %2$tF %2$tH:%2$tM:%2$tS.", user,new Date());
6 }
7 }
8
當然了,我們定義一個簡單的spring配置文件,只有一個bean。
1 <?xml version="1.0" encoding="UTF-8"?>
2 <beans xmlns="http://www.springframework.org/schema/beans"
3 xmlns:xsi="http://www.w3.org/2001/XMLSchema-instance"
4 xsi:schemaLocation="http://www.springframework.org/schema/beans
5 http://www.springframework.org/schema/beans/spring-beans-2.0.xsd">
6 <bean id="helloworld" class="cn.imxylz.study.guice.spring.HelloWorldImpl"
7 scope="singleton" />
8 </beans>
然后看我們的Demo程序。
1 public static void main(String[] args) {
2
3 final ApplicationContext context = new ClassPathXmlApplicationContext("/applicationContext.xml", GuiceSpringDemo.class);
4 Injector injector = Guice.createInjector(new AbstractModule() {
5 protected void configure() {
6 bind(BeanFactory.class).toInstance(context);
7 bind(HelloWorld.class).toProvider(SpringIntegration.fromSpring(HelloWorld.class, "helloworld"));
8 }
9 });
10 HelloWorld hw1 =injector.getInstance(HelloWorld.class);
11 String msg=hw1.sayHello("xylz");
12 System.out.println(msg);
13 HelloWorld hw2 =(HelloWorld)context.getBean("helloworld");
14 String msg2=hw2.sayHello("xylz");
15 System.out.println(msg2);
16 System.out.println(hw1==hw2);
17 }
18
最后我們通過Injector和ApplicationContext都能夠得到我們的服務,并且我們的服務hw1==hw2。
如果閑一個個服務的注入麻煩,這里還有一個簡便的方法,一次將spring中的所有服務都注入。
final ApplicationContext context = new ClassPathXmlApplicationContext("/applicationContext.xml", GuiceSpringDemo.class);
Injector injector = Guice.createInjector(new Module() {
@Override
public void configure(Binder binder) {
SpringIntegration.bindAll(binder, context);
}
});
但是Guice獲取服務的方式就不一樣了。
String msg=injector.getInstance(Key.get(HelloWorldImpl.class,
Names.named("helloworld"))).sayHello("xylz");
System.out.println(msg);
這里我們不能getInstance(HelloWorld.class)來獲取一個服務了,為什么呢?因為注入所有服務的時候,Guice并不能知道我們的服務是什么類型,于是將當作實際的類型注入了,另外由于spring允許一種類型的多個服務(bean)存在,所以自動注入的時候為了區分就需要帶一個命名的注解,比如我們的helloworld,這個名稱就是spring中的id。在Injector中為了獲取一個帶注解的類型服務,我們需要com.google.inject.Key<T>對象,此對象可以講類型和注解關聯起來,這樣我們就能從Guice容器中獲取一個服務了。
那如果我們想屏蔽真實的服務代碼,也就是我們只是想客戶端拿到HelloWorld服務而不是HelloWorldImpl實現怎么做?
目前只能在spring中使用代理服務。
1 <?xml version="1.0" encoding="UTF-8"?>
2 <beans xmlns="http://www.springframework.org/schema/beans"
3 xmlns:xsi="http://www.w3.org/2001/XMLSchema-instance"
4 xsi:schemaLocation="http://www.springframework.org/schema/beans
5 http://www.springframework.org/schema/beans/spring-beans-2.0.xsd">
6 <bean id="helloworldTarget" class="cn.imxylz.study.guice.spring.HelloWorldImpl"
7 scope="singleton" />
8 <bean id="helloworld" class="org.springframework.aop.framework.ProxyFactoryBean">
9 <property name="proxyInterfaces" value="cn.imxylz.study.guice.spring.HelloWorld" />
10 <property name="target" ref="helloworldTarget" />
11 </bean>
12 </beans>
然后我們在Guice中這樣獲取服務:
String msg=injector.getInstance(Key.get(HelloWorld.class, Names.named("helloworld"))).sayHello("xylz");
System.out.println(msg);
顯然,如果客戶端知道服務的實際類型并且知道spring中的id,那么仍然可以調用我們的服務,比如下面的例子:
String msg3=injector.getInstance(Key.get(HelloWorldImpl.class, Names.named("helloworldTarget"))).sayHello("xylz");
System.out.println(msg3);
上一篇:Google Guice 入門教程06 – Web 和 Servlet
下一篇:Google Guice 入門教程08 - 整合第三方組件(2)
©2009-2014 IMXYLZ
|求賢若渴