2010年9月15日
#
Throwable occurred: org.springframework.transaction.CannotCreateTransactionException: Could not open JDBC Connection for transaction; nested exception is com.mysql.jdbc.exceptions.jdbc4.CommunicationsException: The last packet successfully received from the server was 50,123,505 milliseconds ago. The last packet sent successfully to the server was 50,123,505 milliseconds ago. is longer than the server configured value of 'wait_timeout'. You should consider either expiring and/or testing connection validity before use in your application, increasing the server configured values for client timeouts, or using the Connector/J connection property 'autoReconnect=true' to avoid this problem.
這主要是由兩個原因引起來的:
1.mysql 會自動關(guān)閉長時間不用的connection,一個連接如果處于sleep狀態(tài)達(dá)到mysql的參數(shù)wait_timeout指定的時間(默認(rèn)為8小時),就是自動關(guān)閉這個連接
2.common pool中沒有指定相應(yīng)的連接檢查參數(shù)
解決辦法:從common pool的配置參數(shù)來解決:
<bean id="dataSource" class="org.apache.commons.dbcp.BasicDataSource" destroy-method="close">
<property name="driverClassName">
<value>${db.driver}</value>
</property>
<property name="url">
<value>${db.url}</value>
</property>
<property name="username">
<value>${db.user}</value>
</property>
<property name="password">
<value>${db.password}</value>
</property>
<property name="maxActive">
<value>100</value>
</property>
<property name="maxIdle">
<value>50</value>
</property>
<property name="maxWait">
<value>10000</value>
</property>
<property name="timeBetweenEvictionRunsMillis">
<value>3600000</value><!--1 hours-->
</property>
<!--
<property name="minEvictableIdleTimeMillis">
<value>20000</value>
</property>
-->
<property name="testWhileIdle">
<value>true</value>
</property>
<property name="validationQuery">
<value>select 1 from dual</value>
</property>
</bean>
使用上述的三個紅色的參數(shù),就可以避免這個問題.這三個參數(shù)的意義:
timeBetweenEvictionRunsMillis:啟動connection校驗(yàn)定時器,定時器運(yùn)行時間間隔就是timeBetweenEvictionRunsMillis的值.默認(rèn)為-1,表示不啟動定時器,這里設(shè)定為1小時,只要小于mysql的wait_timeout就可以了
testWhileIdle: true,表示檢查idle的connection,false為不檢查
validationQuery:用于檢查connection的sql語句.
這只是一種方法,另外的幾種方法:
timeBetweenEvictionRunsMillis+minEvictableIdleTimeMillis:這種方式不檢查Connection的有效性,而是檢查連接的空閑時間,大于minEvictableIdleTimeMillis就清除.
<property name="timeBetweenEvictionRunsMillis">
<value>3600000</value><!--1 hours-->
</property>
<property name="minEvictableIdleTimeMillis">
<value>120000</value><!--connection的空閑時間大于這個值,就直接被關(guān)閉,并從連接池中刪除-->
</property>
如果不喜歡用定時器,也可以配置testOnBorrow+validationQuery參數(shù):每次從連接池取參數(shù)都會校驗(yàn)連接的有效性.實(shí)際上這種方式性能會比定時器差些.
<property name="testOnBorrow">
<value>true</value>
</property>
<property name="validationQuery">
<value>select 1 from dual</value>
</property>
另外,也可以用testOnReturn+validationQuery,不過未必會解決問題:這表示每次使用完連接,歸還連接池的時候檢查連接的有效性,這有可能導(dǎo)致使用一次無效的連接,最好不要用.
上面的幾種方法可以合并使用,只是檢查的點(diǎn)多了,未必是好事
另外,也可以使用Abandoned的那幾個參數(shù),來刪除連接池中的連接.也能達(dá)到效果.我沒測試.
2010年8月12日
#
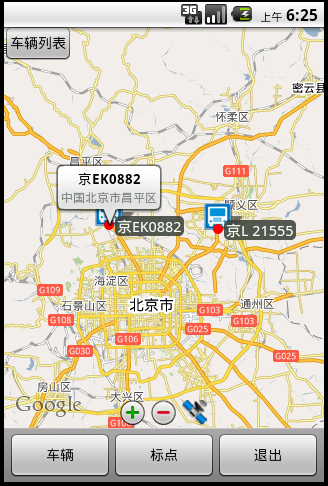
就是上面的樣子
做這個過程中我碰到兩個問題:
1:如何做帶尾巴的氣泡View
2:如何把這個View添加到MapView中.
1:如何做帶尾巴的氣泡View
我是采用背景圖的方式來實(shí)現(xiàn)的.當(dāng)然,普通的PNG在View 縮放的時候會失真,尤其是那個尖尖的尾巴.
后來采用9.png的格式,才完成了不變形的效果.9.png格式的Png可以用SDK\Tools\draw9patch.bat來處理,只要把普通的png的邊上標(biāo)志一下就可以了,具體draw9patch.bat如何使用這里就不說了,網(wǎng)上有很多文檔,自己查查就知道了.
我生成的9.png就是下面這個樣子,注意四周的黑線.就是9png拉伸時的標(biāo)識

有了這個png,直接放到你的工程下的res/drawable目錄就可以了,
然后在res/layout目錄下建立你的view的xml文件,比如叫overlay_pop.xml,我的是這樣的:
<?xml version="1.0" encoding="UTF-8"?>
<LinearLayout xmlns:android="http://schemas.android.com/apk/res/android"
android:orientation="vertical"
android:background="@drawable/bubble_background"
<!--這就是那個9.png-->
android:layout_width="wrap_content"
android:layout_height="wrap_content"
android:paddingLeft="5px"
android:paddingTop="5px"
android:paddingRight="5px"
android:paddingBottom="20px"
<!--注意加上padding,否則view里面的東西就畫到邊框上了-->
>
<TextView android:id="@+id/map_bubbleTitle"
android:ellipsize="marquee"
android:layout_width="match_parent"
android:layout_height="wrap_content"
android:gravity="center_horizontal"
android:singleLine="true"
style="@style/map_BubblePrimary" />
<!--style可以沒有,我這里第一個TextView表示標(biāo)題,用的是大字體-->
<TextView android:id="@+id/map_bubbleText"
android:layout_width="match_parent"
android:layout_height="wrap_content"
android:singleLine="false"
style="@style/map_BubbleSecondary" />
<!--style可以沒有,我這里第二個TextView表示描述信息,用的是大字體-->
</LinearLayout>
這樣popView就建立好了
2:如何把這個View添加到MapView中.
通常是在mapView中點(diǎn)擊某個位置,彈出popView
或者點(diǎn)擊某個Overlay彈出popView,這里用點(diǎn)擊Overlay來說明,
overlay有onTap()方法,你可以實(shí)現(xiàn)自己的overlay,overideonTap()方法,彈出popView,
也可以使用setOnFocusChangeListener(),在listener中實(shí)現(xiàn)彈出popView,.
我是用的listener,因?yàn)閟etOnFocusChangeListener在失去焦點(diǎn)也會觸發(fā),我可以再失去焦點(diǎn)的時候隱藏popView.
MapView是
繼承自ViewGroup的,因此,MapView有addView()方法,同時還有
MapView.LayoutParams
MapView.LayoutParams 可以根據(jù)GeoPoint來定位,我就是利用這個特性來定位彈出的popView的.
PointItemizedOverlay overlay = new PointItemizedOverlay(drawable); <!--這是我繼承自ItemizedOverlay的overlay,主要就是畫一個圖片,寫一個名稱,很簡單,這里不貼具體代碼了-->
public class BaseMapActivity extends MapActivity {
/**
* 地圖View
*/
protected MapView mapView;
/**
* 彈出的氣泡View
*/
private View popView;
/**
監(jiān)聽器
*/
private final ItemizedOverlay.OnFocusChangeListener onFocusChangeListener = new ItemizedOverlay.OnFocusChangeListener() {
@Override
public void onFocusChanged(ItemizedOverlay overlay, OverlayItem newFocus) {
//創(chuàng)建氣泡窗口
if (popView != null) {
popView.setVisibility(View.GONE);
}
if (newFocus != null) {
MapView.LayoutParams geoLP = (MapView.LayoutParams) popView.getLayoutParams();
geoLP.point = newFocus.getPoint();//這行用于popView的定位
TextView title = (TextView) popView.findViewById(R.id.map_bubbleTitle);
title.setText(newFocus.getTitle());
TextView desc = (TextView) popView.findViewById(R.id.map_bubbleText);
if (newFocus.getSnippet() == null || newFocus.getSnippet().length() == 0) {
desc.setVisibility(View.GONE);
} else {
desc.setVisibility(View.VISIBLE);
desc.setText(newFocus.getSnippet());
}
mapView.updateViewLayout(popView, geoLP);
popView.setVisibility(View.VISIBLE);
}
}
};
public void onCreate(Bundle savedInstanceState) {
super.onCreate(savedInstanceState);
/**
省略其他代碼
**/
//初始化氣泡,并設(shè)置為不可見
popView = inflater.inflate(R.layout.overlay_popup, null);
mapView.addView( popView,
new MapView.LayoutParams(MapView.LayoutParams.WRAP_CONTENT, MapView.LayoutParams.WRAP_CONTENT,
null, MapView.LayoutParams.BOTTOM_CENTER));
//由于我的氣泡的尾巴是在下邊居中的,因此要設(shè)置成MapView.LayoutParams.BOTTOM_CENTER.
//這里沒有給GeoPoint,在onFocusChangeListener中設(shè)置
views.add(popView);
popView.setVisibility(View.GONE);
添加overlay
PointItemizedOverlay overlay = new PointItemizedOverlay(drawable);
//設(shè)置顯示/隱藏泡泡的監(jiān)聽器
overlay.setOnFocusChangeListener(onFocusChangeListener);
overlay.addOverlay(/*你自己的overlayItem*/);
overlay.addOverlay(/*你自己的overlayItem*/);
overlay.addOverlay(/*你自己的overlayItem*/);
}
}
這樣就基本完工了.
使用方法:
LineItemizedOverlay overlay = new LineItemizedOverlay();
overlay.addOverlay(/*起點(diǎn)的OverlayItem*/);
overlay.addOverlay(/*終點(diǎn)的OverlayItem*/);
overlay.addLinePoint(/*要畫的軌跡的GeoPoint的List*/);
mapView.getOverlays().add(overlay);
/**
*
*/
package com.xtyon.tuola.truck.map;
import java.util.ArrayList;
import android.graphics.Canvas;
import android.graphics.Color;
import android.graphics.Paint;
import android.graphics.Point;
import android.graphics.drawable.Drawable;
import com.google.android.maps.GeoPoint;
import com.google.android.maps.ItemizedOverlay;
import com.google.android.maps.MapView;
import com.google.android.maps.OverlayItem;
import com.google.android.maps.Projection;
/**
* 地圖上的線型圖層:包括一個起點(diǎn),一個終點(diǎn),以及之間的曲線
* @author superwang
*/
public class LineItemizedOverlay extends ItemizedOverlay<OverlayItem> {
private static final int LAYER_FLAGS = Canvas.MATRIX_SAVE_FLAG | Canvas.CLIP_SAVE_FLAG
| Canvas.HAS_ALPHA_LAYER_SAVE_FLAG | Canvas.FULL_COLOR_LAYER_SAVE_FLAG | Canvas.CLIP_TO_LAYER_SAVE_FLAG;
/**
* 用于保存起點(diǎn)/終點(diǎn)數(shù)據(jù)
*/
private final ArrayList<OverlayItem> mOverlays = new ArrayList<OverlayItem>();
/**
* 用于保存構(gòu)成曲線的點(diǎn)的數(shù)據(jù)
*/
private final ArrayList<GeoPoint> linePoints = new ArrayList<GeoPoint>();
/**
* @param defaultMarker
*/
public LineItemizedOverlay() {
super(null);
// TODO Auto-generated constructor stub
}
/* (non-Javadoc)
* @see com.google.android.maps.ItemizedOverlay#createItem(int)
*/
@Override
protected OverlayItem createItem(int i) {
return mOverlays.get(i);
}
/* (non-Javadoc)
* @see com.google.android.maps.ItemizedOverlay#size()
*/
@Override
public int size() {
// TODO Auto-generated method stub
return mOverlays.size();
}
/**
* 調(diào)價起點(diǎn)/終點(diǎn)
* description:
* @param overlay
*/
public void addOverlay(OverlayItem overlay) {
mOverlays.add(overlay);
populate();
}
/**
* 添加曲線中的點(diǎn)
* description:
* @param point
*/
public void addLinePoint(GeoPoint point) {
linePoints.add(point);
}
public ArrayList<GeoPoint> getLinePoints() {
return linePoints;
}
/**
* 畫起點(diǎn)/終點(diǎn)/軌跡
*/
@Override
public void draw(Canvas canvas, MapView mapView, boolean shadow) {
if (!shadow) {
//System.out.println("!!!!!!!!!!!!!!");
canvas.save(LAYER_FLAGS);
//canvas.save();
Projection projection = mapView.getProjection();
int size = mOverlays.size();
Point point = new Point();
Paint paint = new Paint();
paint.setAntiAlias(true);
OverlayItem overLayItem;
//畫起點(diǎn)/終點(diǎn)
for (int i = 0; i < size; i++) {
overLayItem = mOverlays.get(i);
Drawable marker = overLayItem.getMarker(0);
//marker.getBounds()
/* 象素點(diǎn)取得轉(zhuǎn)換 */
projection.toPixels(overLayItem.getPoint(), point);
if (marker != null) {
boundCenterBottom(marker);
}
/* 圓圈 */
//Paint paintCircle = new Paint();
//paintCircle.setColor(Color.RED);
paint.setColor(Color.RED);
canvas.drawCircle(point.x, point.y, 5, paint);
/* 文字設(shè)置 */
/* 標(biāo)題 */
String title = overLayItem.getTitle();
/* 簡介 */
// String snippet = overLayItem.getSnippet();
//
// StringBuffer txt = new StringBuffer();
// if (title != null && !"".equals(title))
// txt.append(title);
//
// if (snippet != null && !"".equals(snippet)) {
// if (txt.length() > 0) {
// txt.append(":");
// }
// txt.append(snippet);
// }
//Paint paintText = new Paint();
if (title != null && title.length() > 0) {
paint.setColor(Color.BLACK);
paint.setTextSize(15);
canvas.drawText(title, point.x, point.y, paint);
}
}
//畫線
boolean prevInBound = false;//前一個點(diǎn)是否在可視區(qū)域
Point prev = null;
int mapWidth = mapView.getWidth();
int mapHeight = mapView.getHeight();
//Paint paintLine = new Paint();
paint.setColor(Color.RED);
//paint.setPathEffect(new CornerPathEffect(10));
paint.setStrokeWidth(2);
int count = linePoints.size();
//Path path = new Path();
//path.setFillType(Path.FillType.INVERSE_WINDING);
for (int i = 0; i < count; i++) {
GeoPoint geoPoint = linePoints.get(i);
//projection.toPixels(geoPoint, point); //這一行似乎有問題
point = projection.toPixels(geoPoint, null);
if (prev != null) {
if (point.x >= 0 && point.x <= mapWidth && point.y >= 0 && point.y <= mapHeight) {
if ((Math.abs(prev.x - point.x) > 2 || Math.abs(prev.y - point.y) > 2)) {
//這里判斷點(diǎn)是否重合,重合的不畫線,可能會導(dǎo)致畫線不在路上
canvas.drawLine(prev.x, prev.y, point.x, point.y, paint);
//path.lineTo(point.x, point.y);
prev = point;
prevInBound = true;
}
} else {
//在可視區(qū)與之外
if (prevInBound) {//前一個點(diǎn)在可視區(qū)域內(nèi),也需要劃線
//path.lineTo(point.x, point.y);
canvas.drawLine(prev.x, prev.y, point.x, point.y, paint);
}
prev = point;
prevInBound = false;
}
} else {
//path.moveTo(point.x, point.y);
prev = point;
}
}
//canvas.drawPath(path, paint);
canvas.restore();
//DebugUtils.showMemory();
}
super.draw(canvas, mapView, shadow);
}
}
2010年6月30日
#
我做的應(yīng)用是以Spring為系統(tǒng)的基礎(chǔ)框架,mysql為后臺數(shù)據(jù)庫.在tomcat上發(fā)布后,總是不能進(jìn)行熱部署(reload),多次reload后,就會出OutOfMemory PermGen,
為此煩惱了很久,總于下定決心找找根源.
經(jīng)過3天的不懈努力,小有成果,記錄下來
實(shí)際上下面的分析都已經(jīng)沒什么用了,如果你使用tomcat6.0.26及以后的版本,我所說的這些情況都已經(jīng)被處理了,并且比我處理的還要多很多.可以下載tomcat6.0.26的源代碼
看看WebappClassLoader類的處理就成了.
通過分析工具的分析(用了YourKit,以及JDK1.6/bin下的jps/jmap/jhat),發(fā)現(xiàn)有下面幾個方面會造成memory leak.
1.SystemClassLoader與WebappClassLoader加載的類相互引用,tomcat reload只是卸載WebappClassloader中的class,SystemClassLoader是不會卸載的(否則其他應(yīng)用也停止了).但是WebappClassloader加載的類被SystemClassLoader引用的化,WebappClassloader中的相關(guān)類就不會被JVM進(jìn)行垃圾收集
目前發(fā)現(xiàn)2種容易產(chǎn)生這種leak的現(xiàn)象.
a.在使用java.lang.ThreadLocal的時候很容易產(chǎn)生這種情況
b.使用jdbc驅(qū)動,而且不是在tomcat中配置的公共連接池.則java.sql.DriverManager一定會產(chǎn)生這種現(xiàn)象
ThreadLocal.set(Object),如果這個Object是WebappsClassLoader加載的,使用之后沒有做ThreadLocal.set(null)或者ThreadLocal.remove(),就會產(chǎn)生memory leak.
由于ThreadLocal實(shí)際上操作的是java.lang.Thread類中的ThreadLocalMap,Thread類是由SystemClassLoder加載的.而這個線程實(shí)例(main thread)在tomcat reload的時候不會銷毀重建,必然就產(chǎn)生了SystemClassLoder中的類引用WebappsClassLoader的類.
DriverManager也是由SystemClassLoder載入的,當(dāng)初始化某個JDBC驅(qū)動的時候,會向DriverManager中注冊該驅(qū)動,通常是***.driver,例如com.mysql.jdbc.Driver
這個Driver是通過class.forName()加載的,通常也是加載到WebappClassLoader.這就出現(xiàn)了兩個classLoader中的類的交叉引用.導(dǎo)致memory leak.
解決辦法:
寫一個ServletContextListener,在contextDestroyed方法中統(tǒng)一刪除當(dāng)前Thread的ThreadLocalMap中的內(nèi)容.
public class ApplicationCleanListener implements ServletContextListener {
public void contextInitialized(ServletContextEvent event) {
}
public void contextDestroyed(ServletContextEvent event) {
//處理ThreadLocal
ThreadLocalCleanUtil.clearThreadLocals();
/*
* 如果數(shù)據(jù)故驅(qū)動是通過應(yīng)用服務(wù)器(tomcat etc...)中配置的<公用>連接池,這里不需要 否則必須卸載Driver
*
* 原因: DriverManager是System classloader加載的, Driver是webappclassloader加載的,
* driver保存在DriverManager中,在reload過程中,由于system
* classloader不會銷毀,driverManager就一直保持著對driver的引用,
* driver無法卸載,與driver關(guān)聯(lián)的其他類
* ,例如DataSource,jdbcTemplate,dao,service....都無法卸載
*/
try {
System.out.println("clean jdbc Driver......");
for (Enumeration e = DriverManager.getDrivers(); e
.hasMoreElements();) {
Driver driver = (Driver) e.nextElement();
if (driver.getClass().getClassLoader() == getClass()
.getClassLoader()) {
DriverManager.deregisterDriver(driver);
}
}
} catch (Exception e) {
System.out
.println("Exception cleaning up java.sql.DriverManager's driver: "
+ e.getMessage());
}
}
}
/**
* 這個類根據(jù)
*/
public class ThreadLocalCleanUtil {
/**
* 得到當(dāng)前線程組中的所有線程 description:
*
* @return
*/
private static Thread[] getThreads() {
ThreadGroup tg = Thread.currentThread().getThreadGroup();
while (tg.getParent() != null) {
tg = tg.getParent();
}
int threadCountGuess = tg.activeCount() + 50;
Thread[] threads = new Thread[threadCountGuess];
int threadCountActual = tg.enumerate(threads);
while (threadCountActual == threadCountGuess) {
threadCountGuess *= 2;
threads = new Thread[threadCountGuess];
threadCountActual = tg.enumerate(threads);
}
return threads;
}
public static void clearThreadLocals() {
ClassLoader classloader = Thread
.currentThread()
.getContextClassLoader();
Thread[] threads = getThreads();
try {
Field threadLocalsField = Thread.class
.getDeclaredField("threadLocals");
threadLocalsField.setAccessible(true);
Field inheritableThreadLocalsField = Thread.class
.getDeclaredField("inheritableThreadLocals");
inheritableThreadLocalsField.setAccessible(true);
Class tlmClass = Class
.forName("java.lang.ThreadLocal$ThreadLocalMap");
Field tableField = tlmClass.getDeclaredField("table");
tableField.setAccessible(true);
for (int i = 0; i < threads.length; ++i) {
if (threads[i] == null)
continue;
Object threadLocalMap = threadLocalsField.get(threads[i]);
clearThreadLocalMap(threadLocalMap, tableField, classloader);
threadLocalMap = inheritableThreadLocalsField.get(threads[i]);
clearThreadLocalMap(threadLocalMap, tableField, classloader);
}
} catch (Exception e) {
e.printStackTrace();
}
}
private static void clearThreadLocalMap(Object map,
Field internalTableField, ClassLoader classloader)
throws NoSuchMethodException, IllegalAccessException,
NoSuchFieldException, InvocationTargetException {
if (map != null) {
Method mapRemove = map.getClass().getDeclaredMethod("remove",
new Class[] { ThreadLocal.class });
mapRemove.setAccessible(true);
Object[] table = (Object[]) internalTableField.get(map);
int staleEntriesCount = 0;
if (table != null) {
for (int j = 0; j < table.length; ++j) {
if (table[j] != null) {
boolean remove = false;
Object key = ((Reference) table[j]).get();
if ((key != null)
&& (key.getClass().getClassLoader() == classloader)) {
remove = true;
System.out.println("clean threadLocal key,class="
+ key.getClass().getCanonicalName()
+ ",value=" + key.toString());
}
Field valueField = table[j]
.getClass()
.getDeclaredField("value");
valueField.setAccessible(true);
Object value = valueField.get(table[j]);
if ((value != null)
&& (value.getClass().getClassLoader() == classloader)) {
remove = true;
System.out.println("clean threadLocal value,class="
+ value.getClass().getCanonicalName()
+ ",value=" + value.toString());
}
if (remove) {
if (key == null)
++staleEntriesCount;
else {
mapRemove.invoke(map, new Object[] { key });
}
}
}
}
}
if (staleEntriesCount > 0) {
Method mapRemoveStale = map
.getClass()
.getDeclaredMethod("expungeStaleEntries", new Class[0]);
mapRemoveStale.setAccessible(true);
mapRemoveStale.invoke(map, new Object[0]);
}
}
}
}
2.對于使用mysql JDBC驅(qū)動的:mysql JDBC驅(qū)動會啟動一個Timer Thread,這個線程在reload的時候也是無法自動銷毀.
因此,需要強(qiáng)制結(jié)束這個timer
可以在 上面的ApplicationCleanListener中加入如下代碼:
try {
Class ConnectionImplClass = Thread
.currentThread()
.getContextClassLoader()
.loadClass("com.mysql.jdbc.ConnectionImpl");
if (ConnectionImplClass != null
&& ConnectionImplClass.getClassLoader() == getClass()
.getClassLoader()) {
System.out.println("clean mysql timer......");
Field f = ConnectionImplClass.getDeclaredField("cancelTimer");
f.setAccessible(true);
Timer timer = (Timer) f.get(null);
timer.cancel();
}
} catch (java.lang.ClassNotFoundException e1) {
// do nothing
} catch (Exception e) {
System.out
.println("Exception cleaning up MySQL cancellation timer: "
+ e.getMessage());
}
3.common-logging+log4j似乎也會導(dǎo)致leak,看網(wǎng)上有人說在ApplicationCleanListene6中加入這行代碼就可以:
LogFactory.release(Thread.currentThread().getContextClassLoader());
我沒試成功,懶得再找原因,直接換成了slf4j+logback,沒有問題.據(jù)說slf4j+logback的性能還要更好.
后記:
tomcat-6.0.26之前的版本(我用的是tomcat-6.0.18),加入上述ApplicationCleanListener后,多次reload,不會出現(xiàn)outOfMemory.
但要注意,第一次啟動后,reload一次,內(nèi)存會增加,也就是看著還是由memory Leak,但是重復(fù)reload,內(nèi)存始終保持在第一次reload的大小.似乎tomcat始終保留了雙WebappClassLoader.因此,配置內(nèi)存要小心些,至少要保證能夠load兩倍的你的所有jar包的大小(當(dāng)然,是指Perm的內(nèi)存大小).
測試過程中最好加上 JVM參數(shù) -verbosegc,這樣,在做GC的時候可以直觀的看到class被卸載.
2009年4月2日
#
keytool -genkey -alias tomcat -keyalg RSA -keysize 1024 -keypass changeit -storepass changeit -keystore tomcat.keystore -validity 3600
--這兩步可以不用
keytool -export -trustcacerts -alias tomcat -file tomcat.cer -keystore tomcat.keystore -storepass changeit
keytool -import -trustcacerts -alias tomcat -file tomcat.cer -keystore %JAVA_HOME%/jre/lib/security/cacerts -storepass changeit
Tomcat4.1.34配置:
<Connector className="org.apache.coyote.tomcat4.CoyoteConnector" port="8443" enableLookups="true" scheme="https" secure="true" acceptCount="100" useURIValidationHack="false" disableUploadTimeout="true" clientAuth="false" sslProtocol="TLS" keystoreFile="tomcat.keystore" keystorePass="changeit"/>
Tomcat5.5.9配置:
<Connector port="8443" maxHttpHeaderSize="8192"
maxThreads="150" minSpareThreads="25" maxSpareThreads="75"
enableLookups="false" disableUploadTimeout="true"
acceptCount="100" scheme="https" secure="true"
clientAuth="false" sslProtocol="TLS"
keystoreFile="tomcat.keystore"
keystorePass="changeit"/>
Tomcat5.5.20配置(此配置同樣可用于Tomcat6.0):
<Connector protocol="org.apache.coyote.http11.Http11Protocol"
port="8443" maxHttpHeaderSize="8192"
maxThreads="150" minSpareThreads="25" maxSpareThreads="75"
enableLookups="false" disableUploadTimeout="true"
acceptCount="100" scheme="https" secure="true"
clientAuth="false" sslProtocol="TLS"
keystoreFile="tomcat.keystore"
keystorePass="changeit"/>
Tomcat6.0.10配置:
<Connector protocol="org.apache.coyote.http11.Http11NioProtocol"
port="8443" minSpareThreads="5" maxSpareThreads="75"
enableLookups="true" disableUploadTimeout="true"
acceptCount="100" maxThreads="200"
scheme="https" secure="true" SSLEnabled="true"
clientAuth="false" sslProtocol="TLS"
keystoreFile="D:/tools/apache-tomcat-6.0.10/tomcat.keystore"
keystorePass="changeit"/>
其他有用keytool命令(列出信任證書庫中所有已有證書,刪除庫中某個證書):
keytool -list -v -keystore D:/sdks/jdk1.5.0_11/jre/lib/security/cacerts
keytool -delete -trustcacerts -alias tomcat -keystore D:/sdks/jdk1.5.0_11/jre/lib/security/cacerts -storepass changeit
2009年1月6日
#
1.在系統(tǒng)環(huán)境變量中(System.getProperties())中查找key=javax.xml.parsers.DocumentBuilderFactory
2.如果1沒有找到,則找java.home\lib\jaxp.properties 文件,如果文件存在,在文件中查找key=javax.xml.parsers.DocumentBuilderFactory
3.如果2沒有找到,則在classpath中的所有的jar包中查找META-INF/services/javax.xml.parsers.DocumentBuilderFactory 文件
全都沒找到,則返回null
2007年3月14日
#
2006年12月12日
#
對DOJO基本上算是文盲,只是項(xiàng)目中需要一些特效頁面,在網(wǎng)上找了找,感覺DOJO做的不錯,就拿過來用了,不過感覺性能很不好,頁面刷新明顯遲鈍
???我的頁面上大概有10幾個DOJO,刷一次頁面僅僅因?yàn)镈OJO的widget的初始化的問題就要5-6秒鐘,讀了一下DOJO的代碼,只要的時間都花費(fèi)在dojo.hostenv.makeWidgets這個方法中,本人的js水平比較低,基本上改不了DOJO的代碼,不過在這個方法中卻找到了一個稍微提高些性能的辦法,這就是 djConfig.searchIds的使用。
dojo.hostenv.makeWidgets = function(){
?// you can put searchIds in djConfig and dojo.hostenv at the moment
?// we should probably eventually move to one or the other
?var sids = [];
?if(djConfig.searchIds && djConfig.searchIds.length > 0) {
??sids = sids.concat(djConfig.searchIds);
?}
?if(dojo.hostenv.searchIds && dojo.hostenv.searchIds.length > 0) {
??sids = sids.concat(dojo.hostenv.searchIds);
?}
?if((djConfig.parseWidgets)||(sids.length > 0)){
??if(dojo.evalObjPath("dojo.widget.Parse")){
???// we must do this on a delay to avoid:
???//?http://www.shaftek.org/blog/archives/000212.html
???// IE is such a tremendous peice of shit.
????var parser = new dojo.xml.Parse();
????if(sids.length > 0){
?????for(var x=0; x<sids.length; x++){
??????var tmpNode = document.getElementById(sids[x]);
??????if(!tmpNode){ continue; }
??????var frag = parser.parseElement(tmpNode, null, true);
??????dojo.widget.getParser().createComponents(frag);
?????}
????}else if(djConfig.parseWidgets){
?????var frag? = parser.parseElement(document.getElementsByTagName("body")[0] || document.body, null, true);
?????dojo.widget.getParser().createComponents(frag);
????}
??}
?}
}
具體使用方法就是在自己的頁面上把所有的dojo的widget都要定義ID,類似這樣
<input id="queryStr_0" name="queryStr_0" dojoType="ComboBox" style="width:280px;" autocomplete="false" >
然后加上這樣一段js
<script language=javascript>
?djConfig.searchIds=['queryStr_0','queryStr_1','queryStr_2'];
</script>
這里的'queryStr_0'之類的就是你的widget的ID,這樣對于我的10幾個widget的頁面,速度基本上會快上1-2倍。
2006年11月27日
#
JSON-RPC 大家都知道了,我比較反感JSON-RPC的客戶端/服務(wù)器端的交互方式,個人認(rèn)為還是DWR的框架似乎好一些,不過單純比較后臺代碼的風(fēng)格,似乎JSON-RPC的代碼更好些---純粹個人喜好。
???雖然不喜歡JSON-RPC的框架,不過對于JSON的javaObject--javascriptObject的轉(zhuǎn)換代碼倒是很欣賞,因此直接把JSON-RPC的這部分代碼直接拿過來用,感覺也不錯。當(dāng)然,這已經(jīng)跟AJAX關(guān)系不大了。
???1.將jsonrpc-1.0.jar包含在你的project的classpath中,
???2.寫個簡單的Util類,將你的java Object 序列化成javascript的字符串。
public class JSONUtil {
?public static final JSONSerializer se = new JSONSerializer();
?private static Logger log = Logger.getLogger(JSONUtil.class);?
?static
?{
??try
??{
???se.registerDefaultSerializers();
??}
??catch (Exception e)
??{
???log.error(e);
??}
?}
?
?public static String toJSON(Object obj)
?{
??try
??{
???SerializerState state = new SerializerState();
???Object retuObj = se.marshall(state, obj);
???String retuStr = retuObj.toString();
???//retuStr.replaceAll("
\\\"", "
\\'");
???//log.debug("JSONStr:"+retuStr);
???return retuStr;
??}
??catch (Exception e){
???log.error(e);
???return obj.toString();
??}
?}
3.???客戶端的jsp中只要簡單的加上這段js
<script language=javascript>
?eval('jsObject = <%=JSONUtil.toJSON(javaObject)%>'+';');
</script>
javaObject是你自己的java類的實(shí)例,這樣你就可以在js中直接操作jsObject 這個js對象了。
對于一個AJAX請求
如果返回的是標(biāo)準(zhǔn)的XML(有<?xml version="1.0" encoding="UTF-8"?>,并且ContentType = "text/xml"),則直接操作xmlhttp.responseXML應(yīng)該是可以的,比如:
var requestMsg=xmlhttp.responseXML;
alert(requestMsg.getElementsByTagName("book").length);
如果不是標(biāo)準(zhǔn)的XML.則返回的信息實(shí)際上是以文本的方式表示的,必須從xmlhttp.responseText中取得數(shù)據(jù),方式如下:
var requestMsg=getXMLDoc(originalRequest.responsetext);
alert(requestMsg.getElementsByTagName("book").length);
getXMLDoc方法如下:
?function getXMLDoc(xmlText){
??if(window.ActiveXObject){
???xmlDoc=new ActiveXObject("Microsoft.XMLDOM");
???xmlDoc.async=false;
???xmlDoc.onreadystatechange = function()
???{
????//if(xmlDoc.readyState == 4) doAction();
???}
???xmlDoc.loadXML(xmlText);
??}else if(document.implementation&&document.implementation.createDocument){
???xmlDoc=document.implementation.createDocument('','',null);
???//xmlDoc.onload=doAction();
???xmlDoc.loadXML(xmlText);
??}else return null;
??return xmlDoc;
?}