在前面一篇文章中,我們分析了Android系統在啟動時安裝應用程序的過程,這些應用程序安裝好之后,還需要有一個Home應用程序來負責把它們在桌面上展示出來,在Android系統中,這個默認的Home應用程序就是Launcher了,本文將詳細分析Launcher應用程序的啟動過程。
Android系統的Home應用程序Launcher是由ActivityManagerService啟動的,而ActivityManagerService和PackageManagerService一樣,都是在開機時由SystemServer組件啟動的,SystemServer組件首先是啟動ePackageManagerServic,由它來負責安裝系統的應用程序,具體可以參考前面一篇文章Android應用程序安裝過程源代碼分析,系統中的應用程序安裝好了以后,SystemServer組件接下來就要通過ActivityManagerService來啟動Home應用程序Launcher了,Launcher在啟動的時候便會通過PackageManagerServic把系統中已經安裝好的應用程序以快捷圖標的形式展示在桌面上,這樣用戶就可以使用這些應用程序了,整個過程如下圖所示:
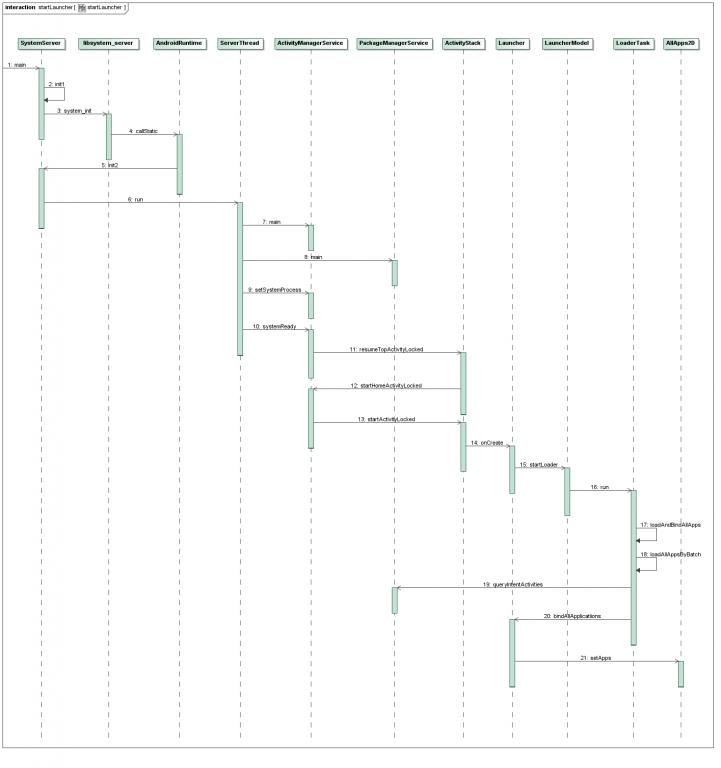
點擊查看大圖
下面詳細分析每一個步驟。
Step 1. SystemServer.main
這個函數定義在frameworks/base/services/java/com/android/server/SystemServer.java文件中,具體可以參考前面一篇文章Android應用程序安裝過程源代碼分析的Step 1。
Step 2. SystemServer.init1
這個函數是一個JNI方法,實現在 frameworks/base/services/jni/com_android_server_SystemServer.cpp文件中,具體可以參考前面一篇文章Android應用程序安裝過程源代碼分析的Step 2。
Step 3. libsystem_server.system_init
函數system_init實現在libsystem_server庫中,源代碼位于frameworks/base/cmds/system_server/library/system_init.cpp文件中,具體可以參考前面一篇文章Android應用程序安裝過程源代碼分析的Step 3。
Step 4. AndroidRuntime.callStatic
這個函數定義在frameworks/base/core/jni/AndroidRuntime.cpp文件中,具體可以參考前面一篇文章Android應用程序安裝過程源代碼分析的Step 4。
Step 5. SystemServer.init2
這個函數定義在frameworks/base/services/java/com/android/server/SystemServer.java文件中,具體可以參考前面一篇文章Android應用程序安裝過程源代碼分析的Step 5。
Step 6. ServerThread.run
這個函數定義在frameworks/base/services/java/com/android/server/SystemServer.java文件中,具體可以參考前面一篇文章Android應用程序安裝過程源代碼分析的Step 6。
Step 7. ActivityManagerService.main
這個函數定義在frameworks/base/services/java/com/android/server/am/ActivityManagerServcie.java文件中:
public final class ActivityManagerService extends ActivityManagerNative
		implements Watchdog.Monitor, BatteryStatsImpl.BatteryCallback {
	......

	public static final Context main(int factoryTest) {
		AThread thr = new AThread();
		thr.start();

		synchronized (thr) {
			while (thr.mService == null) {
				try {
					thr.wait();
				} catch (InterruptedException e) {
				}
			}
		}

		ActivityManagerService m = thr.mService;
		mSelf = m;
		ActivityThread at = ActivityThread.systemMain();
		mSystemThread = at;
		Context context = at.getSystemContext();
		m.mContext = context;
		m.mFactoryTest = factoryTest;
		m.mMainStack = new ActivityStack(m, context, true);

		m.mBatteryStatsService.publish(context);
		m.mUsageStatsService.publish(context);

		synchronized (thr) {
			thr.mReady = true;
			thr.notifyAll();
		}

		m.startRunning(null, null, null, null);

		return context;
	}

	......
}
這個函數首先通過AThread線程對象來內部創建了一個ActivityManagerService實例,然后將這個實例保存其成員變量mService中,接著又把這個ActivityManagerService實例保存在ActivityManagerService類的靜態成員變量mSelf中,最后初始化其它成員變量,就結束了。
Step 8. PackageManagerService.main
這個函數定義在frameworks/base/services/java/com/android/server/PackageManagerService.java文件中,具體可以參考前面一篇文章Android應用程序安裝過程源代碼分析的Step 7。執行完這一步之后,系統中的應用程序的所有信息都保存在PackageManagerService中了,后面Home應用程序Launcher啟動起來后,就會把PackageManagerService中的應用程序信息取出來,然后以快捷圖標的形式展示在桌面上,后面我們將會看到這個過程。
Step 9. ActivityManagerService.setSystemProcess
這個函數定義在frameworks/base/services/java/com/android/server/am/ActivityManagerServcie.java文件中:
public final class ActivityManagerService extends ActivityManagerNative
		implements Watchdog.Monitor, BatteryStatsImpl.BatteryCallback {
	......

	public static void setSystemProcess() {
		try {
			ActivityManagerService m = mSelf;

			ServiceManager.addService("activity", m);
			ServiceManager.addService("meminfo", new MemBinder(m));
			if (MONITOR_CPU_USAGE) {
				ServiceManager.addService("cpuinfo", new CpuBinder(m));
			}
			ServiceManager.addService("permission", new PermissionController(m));

			ApplicationInfo info =
				mSelf.mContext.getPackageManager().getApplicationInfo(
				"android", STOCK_PM_FLAGS);
			mSystemThread.installSystemApplicationInfo(info);

			synchronized (mSelf) {
				ProcessRecord app = mSelf.newProcessRecordLocked(
					mSystemThread.getApplicationThread(), info,
					info.processName);
				app.persistent = true;
				app.pid = MY_PID;
				app.maxAdj = SYSTEM_ADJ;
				mSelf.mProcessNames.put(app.processName, app.info.uid, app);
				synchronized (mSelf.mPidsSelfLocked) {
					mSelf.mPidsSelfLocked.put(app.pid, app);
				}
				mSelf.updateLruProcessLocked(app, true, true);
			}
		} catch (PackageManager.NameNotFoundException e) {
			throw new RuntimeException(
				"Unable to find android system package", e);
		}
	}
	......
}
這個函數首先是將這個ActivityManagerService實例添加到ServiceManager中去托管,這樣其它地方就可以通過ServiceManager.getService接口來訪問這個全局唯一的ActivityManagerService實例了,接著又通過調用mSystemThread.installSystemApplicationInfo函數來把應用程序框架層下面的android包加載進來 ,這里的mSystemThread是一個ActivityThread類型的實例變量,它是在上面的Step 7中創建的,后面就是一些其它的初始化工作了。
Step 10. ActivityManagerService.systemReady
這個函數是在上面的Step 6中的ServerThread.run函數在將系統中的一系列服務都初始化完畢之后才調用的,它定義在frameworks/base/services/java/com/android/server/am/ActivityManagerServcie.java文件中:
public final class ActivityManagerService extends ActivityManagerNative
		implements Watchdog.Monitor, BatteryStatsImpl.BatteryCallback {
	......

	public void systemReady(final Runnable goingCallback) {
		......

		synchronized (this) {
			......

			mMainStack.resumeTopActivityLocked(null);
		}
	}

	......
}
這個函數的內容比較多,這里省去無關的部分,主要關心啟動Home應用程序的邏輯,這里就是通過mMainStack.resumeTopActivityLocked函數來啟動Home應用程序的了,這里的mMainStack是一個ActivityStack類型的實例變量。
Step 11. ActivityStack.resumeTopActivityLocked
這個函數定義在frameworks/base/services/java/com/android/server/am/ActivityStack.java文件中:
public class ActivityStack {
	......

	final boolean resumeTopActivityLocked(ActivityRecord prev) {
		// Find the first activity that is not finishing.
		ActivityRecord next = topRunningActivityLocked(null);

		......

		if (next == null) {
			// There are no more activities!  Let's just start up the
			// Launcher...
			if (mMainStack) {
				return mService.startHomeActivityLocked();
			}
		}

		......
	}

	......
}
這里調用函數topRunningActivityLocked返回的是當前系統Activity堆棧最頂端的Activity,由于此時還沒有Activity被啟動過,因此,返回值為null,即next變量的值為null,于是就調用mService.startHomeActivityLocked語句,這里的mService就是前面在Step 7中創建的ActivityManagerService實例了。
Step 12. ActivityManagerService.startHomeActivityLocked
這個函數定義在frameworks/base/services/java/com/android/server/am/ActivityManagerServcie.java文件中:
public final class ActivityManagerService extends ActivityManagerNative
		implements Watchdog.Monitor, BatteryStatsImpl.BatteryCallback {
	......

	boolean startHomeActivityLocked() {
		......

		Intent intent = new Intent(
			mTopAction,
			mTopData != null ? Uri.parse(mTopData) : null);
		intent.setComponent(mTopComponent);
		if (mFactoryTest != SystemServer.FACTORY_TEST_LOW_LEVEL) {
			intent.addCategory(Intent.CATEGORY_HOME);
		}
		ActivityInfo aInfo =
			intent.resolveActivityInfo(mContext.getPackageManager(),
			STOCK_PM_FLAGS);
		if (aInfo != null) {
			intent.setComponent(new ComponentName(
				aInfo.applicationInfo.packageName, aInfo.name));
			// Don't do this if the home app is currently being
			// instrumented.
			ProcessRecord app = getProcessRecordLocked(aInfo.processName,
				aInfo.applicationInfo.uid);
			if (app == null || app.instrumentationClass == null) {
				intent.setFlags(intent.getFlags() | Intent.FLAG_ACTIVITY_NEW_TASK);
				mMainStack.startActivityLocked(null, intent, null, null, 0, aInfo,
					null, null, 0, 0, 0, false, false);
			}
		}

		return true;
	}

	......
}
函數首先創建一個CATEGORY_HOME類型的Intent,然后通過Intent.resolveActivityInfo函數向PackageManagerService查詢Category類型為HOME的Activity,這里我們假設只有系統自帶的Launcher應用程序注冊了HOME類型的Activity(見packages/apps/Launcher2/AndroidManifest.xml文件):
<manifest
    xmlns:android="http://schemas.android.com/apk/res/android"
    package="com.android.launcher"
    android:sharedUserId="@string/sharedUserId"
	>

    ......

	<application
	    android:name="com.android.launcher2.LauncherApplication"
	    android:process="@string/process"
	    android:label="@string/application_name"
	    android:icon="@drawable/ic_launcher_home">

		<activity
			android:name="com.android.launcher2.Launcher"
			android:launchMode="singleTask"
			android:clearTaskOnLaunch="true"
			android:stateNotNeeded="true"
			android:theme="@style/Theme"
			android:screenOrientation="nosensor"
			android:windowSoftInputMode="stateUnspecified|adjustPan">
			<intent-filter>
				<action android:name="android.intent.action.MAIN" />
				<category android:name="android.intent.category.HOME" />
				<category android:name="android.intent.category.DEFAULT" />
				<category android:name="android.intent.category.MONKEY"/>
				</intent-filter>
		</activity>

		......
	</application>
</manifest>
因此,這里就返回com.android.launcher2.Launcher這個Activity了。由于是第一次啟動這個Activity,接下來調用函數getProcessRecordLocked返回來的ProcessRecord值為null,于是,就調用mMainStack.startActivityLocked函數啟動com.android.launcher2.Launcher這個Activity了,這里的mMainStack是一個ActivityStack類型的成員變量。
Step 13. ActivityStack.startActivityLocked
這個函數定義在frameworks/base/services/java/com/android/server/am/ActivityStack.java文件中,具體可以參考Android應用程序啟動過程源代碼分析一文,這里就不詳述了,在我們這個場景中,調用這個函數的最后結果就是把com.android.launcher2.Launcher啟動起來,接著調用它的onCreate函數。
Step 14. Launcher.onCreate
這個函數定義在packages/apps/Launcher2/src/com/android/launcher2/Launcher.java文件中:
public final class Launcher extends Activity
		implements View.OnClickListener, OnLongClickListener, LauncherModel.Callbacks, AllAppsView.Watcher {
	......

	@Override
	protected void onCreate(Bundle savedInstanceState) {
		......

		if (!mRestoring) {
			mModel.startLoader(this, true);
		}

		......
	}

	......
}
這里的mModel是一個LauncherModel類型的成員變量,這里通過調用它的startLoader成員函數來執行加應用程序的操作。
Step 15. LauncherModel.startLoader
這個函數定義在packages/apps/Launcher2/src/com/android/launcher2/LauncherModel.java文件中:
public class LauncherModel extends BroadcastReceiver {
	......

	public void startLoader(Context context, boolean isLaunching) {
		......

                synchronized (mLock) {
                     ......

                     // Don't bother to start the thread if we know it's not going to do anything
                     if (mCallbacks != null && mCallbacks.get() != null) {
                         // If there is already one running, tell it to stop.
                         LoaderTask oldTask = mLoaderTask;
                         if (oldTask != null) {
                             if (oldTask.isLaunching()) {
                                 // don't downgrade isLaunching if we're already running
                                 isLaunching = true;
                             }
                             oldTask.stopLocked();
		         }
		         mLoaderTask = new LoaderTask(context, isLaunching);
		         sWorker.post(mLoaderTask);
	            }
	       }
	}

	......
}
這里不是直接加載應用程序,而是把加載應用程序的操作作為一個消息來處理。這里的sWorker是一個Handler,通過它的post方式把一個消息放在消息隊列中去,然后系統就會調用傳進去的參數mLoaderTask的run函數來處理這個消息,這個mLoaderTask是LoaderTask類型的實例,于是,下面就會執行LoaderTask類的run函數了。
Step 16. LoaderTask.run
這個函數定義在packages/apps/Launcher2/src/com/android/launcher2/LauncherModel.java文件中:
public class LauncherModel extends BroadcastReceiver {
	......

	private class LoaderTask implements Runnable {
		......

		public void run() {
			......

			keep_running: {
				......

				// second step
				if (loadWorkspaceFirst) {
					......
					loadAndBindAllApps();
				} else {
					......
				}

				......
			}

			......
		}

		......
	}

	......
}
這里調用loadAndBindAllApps成員函數來進一步操作。
Step 17. LoaderTask.loadAndBindAllApps
這個函數定義在packages/apps/Launcher2/src/com/android/launcher2/LauncherModel.java文件中:
public class LauncherModel extends BroadcastReceiver {
	......

	private class LoaderTask implements Runnable {
		......

		private void loadAndBindAllApps() {
			......

			if (!mAllAppsLoaded) {
				loadAllAppsByBatch();
				if (mStopped) {
					return;
				}
				mAllAppsLoaded = true;
			} else {
				onlyBindAllApps();
			}
		}


		......
	}

	......
}
由于還沒有加載過應用程序,這里的mAllAppsLoaded為false,于是就繼續調用loadAllAppsByBatch函數來進一步操作了。
Step 18. LoaderTask.loadAllAppsByBatch
這個函數定義在packages/apps/Launcher2/src/com/android/launcher2/LauncherModel.java文件中:
public class LauncherModel extends BroadcastReceiver {
	......

	private class LoaderTask implements Runnable {
		......

		private void loadAllAppsByBatch() {
			......

			final Intent mainIntent = new Intent(Intent.ACTION_MAIN, null);
			mainIntent.addCategory(Intent.CATEGORY_LAUNCHER);

			final PackageManager packageManager = mContext.getPackageManager();
			List<ResolveInfo> apps = null;

			int N = Integer.MAX_VALUE;

			int startIndex;
			int i=0;
			int batchSize = -1;
			while (i < N && !mStopped) {
				if (i == 0) {
					mAllAppsList.clear();
					......
					apps = packageManager.queryIntentActivities(mainIntent, 0);

					......

					N = apps.size();

					......

					if (mBatchSize == 0) {
						batchSize = N;
					} else {
						batchSize = mBatchSize;
					}

					......

					Collections.sort(apps,
						new ResolveInfo.DisplayNameComparator(packageManager));
				}

				startIndex = i;
				for (int j=0; i<N && j<batchSize; j++) {
					// This builds the icon bitmaps.
					mAllAppsList.add(new ApplicationInfo(apps.get(i), mIconCache));
					i++;
				}

				final boolean first = i <= batchSize;
				final Callbacks callbacks = tryGetCallbacks(oldCallbacks);
				final ArrayList<ApplicationInfo> added = mAllAppsList.added;
				mAllAppsList.added = new ArrayList<ApplicationInfo>();

				mHandler.post(new Runnable() {
					public void run() {
						final long t = SystemClock.uptimeMillis();
						if (callbacks != null) {
							if (first) {
								callbacks.bindAllApplications(added);
							} else {
								callbacks.bindAppsAdded(added);
							}
							......
						} else {
							......
						}
					}
				});

				......
			}

			......
		}

		......
	}

	......
}
函數首先構造一個CATEGORY_LAUNCHER類型的Intent:
    final Intent mainIntent = new Intent(Intent.ACTION_MAIN, null);
    mainIntent.addCategory(Intent.CATEGORY_LAUNCHER);
接著從mContext變量中獲得PackageManagerService的接口:
final PackageManager packageManager = mContext.getPackageManager();
下一步就是通過這個PackageManagerService.queryIntentActivities接口來取回所有Action類型為Intent.ACTION_MAIN,并且Category類型為Intent.CATEGORY_LAUNCHER的Activity了。
我們先進入到PackageManagerService.queryIntentActivities函數中看看是如何獲得這些Activity的,然后再回到這個函數中來看其余操作。
Step 19. PackageManagerService.queryIntentActivities
這個函數定義在frameworks/base/services/java/com/android/server/PackageManagerService.java文件中:
class PackageManagerService extends IPackageManager.Stub {
	......

	public List<ResolveInfo> queryIntentActivities(Intent intent,
			String resolvedType, int flags) {
		......

		synchronized (mPackages) {
			String pkgName = intent.getPackage();
			if (pkgName == null) {
				return (List<ResolveInfo>)mActivities.queryIntent(intent,
						resolvedType, flags);
			}

			......
		}

		......
	}

	......
}
回憶前面一篇文章Android應用程序安裝過程源代碼分析,系統在前面的Step 8中啟動PackageManagerService時,會把系統中的應用程序都解析一遍,然后把解析得到的Activity都保存在mActivities變量中,這里通過這個mActivities變量的queryIntent函數返回符合條件intent的Activity,這里要返回的便是Action類型為Intent.ACTION_MAIN,并且Category類型為Intent.CATEGORY_LAUNCHER的Activity了。
回到Step 18中的 LoaderTask.loadAllAppsByBatch函數中,從queryIntentActivities函數調用處返回所要求的Activity后,便調用函數tryGetCallbacks(oldCallbacks)得到一個返CallBack接口,這個接口是由Launcher類實現的,接著調用這個接口的.bindAllApplications函數來進一步操作。注意,這里又是通過消息來處理加載應用程序的操作的。
Step 20. Launcher.bindAllApplications
這個函數定義在packages/apps/Launcher2/src/com/android/launcher2/Launcher.java文件中:
public final class Launcher extends Activity
		implements View.OnClickListener, OnLongClickListener, LauncherModel.Callbacks, AllAppsView.Watcher {
	......

	private AllAppsView mAllAppsGrid;

	......

	public void bindAllApplications(ArrayList<ApplicationInfo> apps) {
		mAllAppsGrid.setApps(apps);
	}

	......
}
這里的mAllAppsGrid是一個AllAppsView類型的變量,它的實際類型一般就是AllApps2D了。
Step 21. AllApps2D.setApps
這個函數定義在packages/apps/Launcher2/src/com/android/launcher2/AllApps2D.java文件中:
public class AllApps2D
	extends RelativeLayout
	implements AllAppsView,
		AdapterView.OnItemClickListener,
		AdapterView.OnItemLongClickListener,
		View.OnKeyListener,
		DragSource {

	......

	public void setApps(ArrayList<ApplicationInfo> list) {
		mAllAppsList.clear();
		addApps(list);
	}

	public void addApps(ArrayList<ApplicationInfo> list) {
		final int N = list.size();

		for (int i=0; i<N; i++) {
			final ApplicationInfo item = list.get(i);
			int index = Collections.binarySearch(mAllAppsList, item,
				LauncherModel.APP_NAME_COMPARATOR);
			if (index < 0) {
				index = -(index+1);
			}
			mAllAppsList.add(index, item);
		}
		mAppsAdapter.notifyDataSetChanged();
	}

	......
}
函數setApps首先清空mAllAppsList列表,然后調用addApps函數來為上一步得到的每一個應用程序創建一個ApplicationInfo實例了,有了這些ApplicationInfo實例之后,就可以在桌面上展示系統中所有的應用程序了。
到了這里,系統默認的Home應用程序Launcher就把PackageManagerService中的應用程序加載進來了,當我們在屏幕上點擊下面這個圖標時,就會把剛才加載好的應用程序以圖標的形式展示出來了:
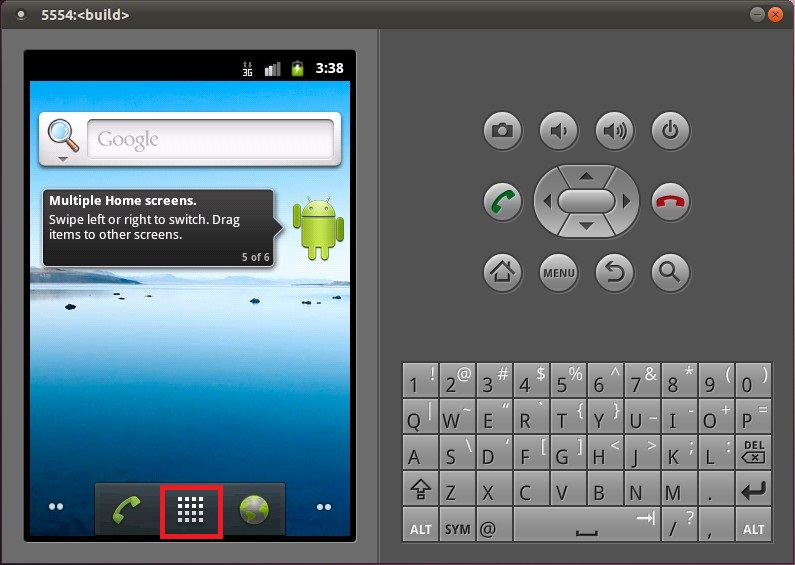
點擊這個按鈕時,便會響應Launcher.onClick函數:
public final class Launcher extends Activity
		implements View.OnClickListener, OnLongClickListener, LauncherModel.Callbacks, AllAppsView.Watcher {
	......

	public void onClick(View v) {
		Object tag = v.getTag();
		if (tag instanceof ShortcutInfo) {
			......
		} else if (tag instanceof FolderInfo) {
			......
		} else if (v == mHandleView) {
			if (isAllAppsVisible()) {
				......
			} else {
				showAllApps(true);
			}
		}
	}

	......
}
接著就會調用showAllApps函數顯示應用程序圖標:
public final class Launcher extends Activity
		implements View.OnClickListener, OnLongClickListener, LauncherModel.Callbacks, AllAppsView.Watcher {
	......

	void showAllApps(boolean animated) {
		mAllAppsGrid.zoom(1.0f, animated);

		((View) mAllAppsGrid).setFocusable(true);
		((View) mAllAppsGrid).requestFocus();

		// TODO: fade these two too
		mDeleteZone.setVisibility(View.GONE);
	}

	......
}
這樣我們就可以看到系統中的應用程序了:
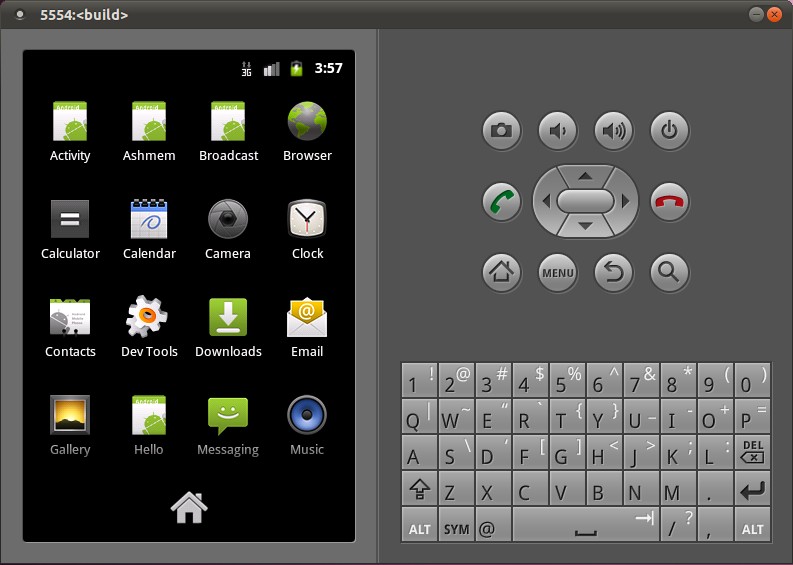
當點擊上面的這些應用程序圖標時,便會響應AllApps2D.onItemClick函數:
public class AllApps2D
	extends RelativeLayout
	implements AllAppsView,
		AdapterView.OnItemClickListener,
		AdapterView.OnItemLongClickListener,
		View.OnKeyListener,
		DragSource {

	......

	public void onItemClick(AdapterView parent, View v, int position, long id) {
		ApplicationInfo app = (ApplicationInfo) parent.getItemAtPosition(position);
		mLauncher.startActivitySafely(app.intent, app);
	}


	......
}
這里的成員變量mLauncher的類型為Launcher,于是就調用Launcher.startActivitySafely函數來啟動應用程序了,這個過程具體可以參考Android應用程序啟動過程源代碼分析一文。
作者:Luoshengyang 發表于2011-9-16 0:58:48
原文鏈接
posted on 2012-04-17 21:32
mixer-a 閱讀(2074)
評論(0) 編輯 收藏