前面我們分析了Android應用程序注冊廣播接收器的過程,這個過程只完成了萬里長征的第一步,接下來它還要等待ActivityManagerService將廣播分發(fā)過來。ActivityManagerService是如何得到廣播并把它分發(fā)出去的呢?這就是本文要介紹的廣播發(fā)送過程了。
廣播的發(fā)送過程比廣播接收器的注冊過程要復雜得多了,不過這個過程仍然是以ActivityManagerService為中心。廣播的發(fā)送者將廣播發(fā)送到ActivityManagerService,ActivityManagerService接收到這個廣播以后,就會在自己的注冊中心查看有哪些廣播接收器訂閱了該廣播,然后把這個廣播逐一發(fā)送到這些廣播接收器中,但是ActivityManagerService并不等待廣播接收器處理這些廣播就返回了,因此,廣播的發(fā)送和處理是異步的。概括來說,廣播的發(fā)送路徑就是從發(fā)送者到ActivityManagerService,再從ActivityManagerService到接收者,這中間的兩個過程都是通過Binder進程間通信機制來完成的,因此,希望讀者在繼續(xù)閱讀本文之前,對Android系統(tǒng)的Binder進程間通信機制有所了解,具體可以參考Android進程間通信(IPC)機制Binder簡要介紹和學習計劃一文。
本文繼續(xù)以Android系統(tǒng)中的廣播(Broadcast)機制簡要介紹和學習計劃一文中所開發(fā)的應用程序為例子,并且結合上文Android應用程序注冊廣播接收器(registerReceiver)的過程分析的內容,一起來分析Android應用程序發(fā)送廣播的過程。
回顧一下Android系統(tǒng)中的廣播(Broadcast)機制簡要介紹和學習計劃一文中所開發(fā)的應用程序的組織架構,MainActivity向ActivityManagerService注冊了一個CounterService.BROADCAST_COUNTER_ACTION類型的計數(shù)器服務廣播接收器,計數(shù)器服務CounterService在后臺線程中啟動了一個異步任務(AsyncTask),這個異步任務負責不斷地增加計數(shù),并且不斷地將當前計數(shù)值通過廣播的形式發(fā)送出去,以便MainActivity可以將當前計數(shù)值在應用程序的界面線程中顯示出來。
計數(shù)器服務CounterService發(fā)送廣播的代碼如下所示:
public class CounterService extends Service implements ICounterService {
	......

	public void startCounter(int initVal) {
		AsyncTask<Integer, Integer, Integer> task = new AsyncTask<Integer, Integer, Integer>() {
			@Override
			protected Integer doInBackground(Integer... vals) {
				......
			}

			@Override
			protected void onProgressUpdate(Integer... values) {
				super.onProgressUpdate(values);

				int counter = values[0];

				Intent intent = new Intent(BROADCAST_COUNTER_ACTION);
				intent.putExtra(COUNTER_VALUE, counter);

				sendBroadcast(intent);
			}

			@Override
			protected void onPostExecute(Integer val) {
				......
			}

		};

		task.execute(0);
	}

	......
}
在onProgressUpdate函數(shù)中,創(chuàng)建了一個BROADCAST_COUNTER_ACTION類型的Intent,并且在這里個Intent中附加上當前的計數(shù)器值,然后通過CounterService類的成員函數(shù)sendBroadcast將這個Intent發(fā)送出去。CounterService類繼承了Service類,Service類又繼承了ContextWrapper類,成員函數(shù)sendBroadcast就是從ContextWrapper類繼承下來的,因此,我們就從ContextWrapper類的sendBroadcast函數(shù)開始,分析廣播發(fā)送的過程。
在繼承分析廣播的發(fā)送過程前,我們先來看一下廣播發(fā)送過程的序列圖,然后按照這個序圖中的步驟來一步一步分析整個過程。
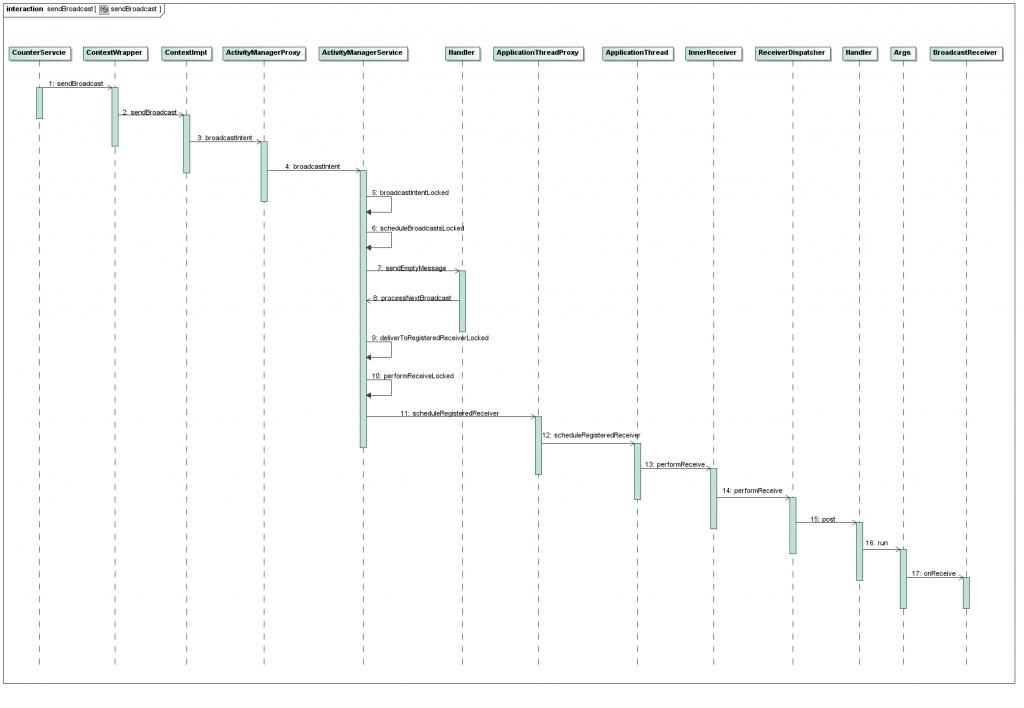
點擊查看大圖
Step 1. ContextWrapper.sendBroadcast
這個函數(shù)定義在frameworks/base/core/java/android/content/ContextWrapper.java文件中:
public class ContextWrapper extends Context {
	Context mBase;

	......

	@Override
	public void sendBroadcast(Intent intent) {
		mBase.sendBroadcast(intent);
	}

	......

}
這里的成員變量mBase是一個ContextImpl實例,這里只簡單地調用ContextImpl.sendBroadcast進一行操作。
Step 2. ContextImpl.sendBroadcast
這個函數(shù)定義在frameworks/base/core/java/android/app/ContextImpl.java文件中:
class ContextImpl extends Context {
	......

	@Override
	public void sendBroadcast(Intent intent) {
		String resolvedType = intent.resolveTypeIfNeeded(getContentResolver());
		try {
			ActivityManagerNative.getDefault().broadcastIntent(
				mMainThread.getApplicationThread(), intent, resolvedType, null,
				Activity.RESULT_OK, null, null, null, false, false);
		} catch (RemoteException e) {
		}
	}

	......

}
這里的resolvedType表示這個Intent的MIME類型,我們沒有設置這個Intent的MIME類型,因此,這里的resolvedType為null。接下來就調用ActivityManagerService的遠程接口ActivityManagerProxy把這個廣播發(fā)送給ActivityManagerService了。
Step 3. ActivityManagerProxy.broadcastIntent
這個函數(shù)定義在frameworks/base/core/java/android/app/ActivityManagerNative.java文件中:
class ActivityManagerProxy implements IActivityManager
{
	......

	public int broadcastIntent(IApplicationThread caller,
		Intent intent, String resolvedType,  IIntentReceiver resultTo,
		int resultCode, String resultData, Bundle map,
		String requiredPermission, boolean serialized,
		boolean sticky) throws RemoteException
	{
		Parcel data = Parcel.obtain();
		Parcel reply = Parcel.obtain();
		data.writeInterfaceToken(IActivityManager.descriptor);
		data.writeStrongBinder(caller != null ? caller.asBinder() : null);
		intent.writeToParcel(data, 0);
		data.writeString(resolvedType);
		data.writeStrongBinder(resultTo != null ? resultTo.asBinder() : null);
		data.writeInt(resultCode);
		data.writeString(resultData);
		data.writeBundle(map);
		data.writeString(requiredPermission);
		data.writeInt(serialized ? 1 : 0);
		data.writeInt(sticky ? 1 : 0);
		mRemote.transact(BROADCAST_INTENT_TRANSACTION, data, reply, 0);
		reply.readException();
		int res = reply.readInt();
		reply.recycle();
		data.recycle();
		return res;
	}

	......

}
這里的實現(xiàn)比較簡單,把要傳遞的參數(shù)封裝好,然后通過Binder驅動程序進入到ActivityManagerService的broadcastIntent函數(shù)中。
Step 4. ctivityManagerService.broadcastIntent
這個函數(shù)定義在frameworks/base/services/java/com/android/server/am/ActivityManagerService.java文件中:
public final class ActivityManagerService extends ActivityManagerNative
		implements Watchdog.Monitor, BatteryStatsImpl.BatteryCallback {
	......

	public final int broadcastIntent(IApplicationThread caller,
			Intent intent, String resolvedType, IIntentReceiver resultTo,
			int resultCode, String resultData, Bundle map,
			String requiredPermission, boolean serialized, boolean sticky) {
		synchronized(this) {
			intent = verifyBroadcastLocked(intent);

			final ProcessRecord callerApp = getRecordForAppLocked(caller);
			final int callingPid = Binder.getCallingPid();
			final int callingUid = Binder.getCallingUid();
			final long origId = Binder.clearCallingIdentity();
			int res = broadcastIntentLocked(callerApp,
				callerApp != null ? callerApp.info.packageName : null,
				intent, resolvedType, resultTo,
				resultCode, resultData, map, requiredPermission, serialized,
				sticky, callingPid, callingUid);
			Binder.restoreCallingIdentity(origId);
			return res;
		}
	}

	......
}
這里調用broadcastIntentLocked函數(shù)來進一步處理。
Step 5. ActivityManagerService.broadcastIntentLocked
這個函數(shù)定義在frameworks/base/services/java/com/android/server/am/ActivityManagerService.java文件中:
public final class ActivityManagerService extends ActivityManagerNative
		implements Watchdog.Monitor, BatteryStatsImpl.BatteryCallback {
	......

	private final int broadcastIntentLocked(ProcessRecord callerApp,
			String callerPackage, Intent intent, String resolvedType,
			IIntentReceiver resultTo, int resultCode, String resultData,
			Bundle map, String requiredPermission,
			boolean ordered, boolean sticky, int callingPid, int callingUid) {
		intent = new Intent(intent);

		......

		// Figure out who all will receive this broadcast.
		List receivers = null;
		List<BroadcastFilter> registeredReceivers = null;
		try {
			if (intent.getComponent() != null) {
				......
			} else {
				......
				registeredReceivers = mReceiverResolver.queryIntent(intent, resolvedType, false);
			}
		} catch (RemoteException ex) {
			......
		}

		final boolean replacePending =
			(intent.getFlags()&Intent.FLAG_RECEIVER_REPLACE_PENDING) != 0;

		int NR = registeredReceivers != null ? registeredReceivers.size() : 0;
		if (!ordered && NR > 0) {
			// If we are not serializing this broadcast, then send the
			// registered receivers separately so they don't wait for the
			// components to be launched.
			BroadcastRecord r = new BroadcastRecord(intent, callerApp,
				callerPackage, callingPid, callingUid, requiredPermission,
				registeredReceivers, resultTo, resultCode, resultData, map,
				ordered, sticky, false);
			......
			boolean replaced = false;
			if (replacePending) {
				for (int i=mParallelBroadcasts.size()-1; i>=0; i--) {
					if (intent.filterEquals(mParallelBroadcasts.get(i).intent)) {
						......
						mParallelBroadcasts.set(i, r);
						replaced = true;
						break;
					}
				}
			}

			if (!replaced) {
				mParallelBroadcasts.add(r);

				scheduleBroadcastsLocked();
			}

			registeredReceivers = null;
			NR = 0;
		}

		......

	}

	......
}
這個函數(shù)首先是根據(jù)intent找出相應的廣播接收器:
    // Figure out who all will receive this broadcast.
    List receivers = null;
    List<BroadcastFilter> registeredReceivers = null;
    try {
	if (intent.getComponent() != null) {
	        ......
	} else {
		......
		registeredReceivers = mReceiverResolver.queryIntent(intent, resolvedType, false);
	}
    } catch (RemoteException ex) {
	......
    }
回憶一下前面一篇文章
Android應用程序注冊廣播接收器(registerReceiver)的過程分析中的Step 6(ActivityManagerService.registerReceiver)中,我們將一個filter類型為BROADCAST_COUNTER_ACTION類型的BroadcastFilter實例保存在了ActivityManagerService的成員變量mReceiverResolver中,這個BroadcastFilter實例包含了我們所注冊的廣播接收器,這里就通過mReceiverResolver.queryIntent函數(shù)將這個BroadcastFilter實例取回來。由于注冊一個廣播類型的接收器可能有多個,所以這里把所有符合條件的的BroadcastFilter實例放在一個List中,然后返回來。在我們這個場景中,這個List就只有一個BroadcastFilter實例了,就是MainActivity注冊的那個廣播接收器。
繼續(xù)往下看:
   final boolean replacePending =
	    (intent.getFlags()&Intent.FLAG_RECEIVER_REPLACE_PENDING) != 0;
這里是查看一下這個intent的Intent.FLAG_RECEIVER_REPLACE_PENDING位有沒有設置,如果設置了的話,ActivityManagerService就會在當前的系統(tǒng)中查看有沒有相同的intent還未被處理,如果有的話,就有當前這個新的intent來替換舊的intent。這里,我們沒有設置intent的Intent.FLAG_RECEIVER_REPLACE_PENDING位,因此,這里的replacePending變量為false。
再接著往下看:
   int NR = registeredReceivers != null ? registeredReceivers.size() : 0;
   if (!ordered && NR > 0) {
	// If we are not serializing this broadcast, then send the
	// registered receivers separately so they don't wait for the
	// components to be launched.
	BroadcastRecord r = new BroadcastRecord(intent, callerApp,
		callerPackage, callingPid, callingUid, requiredPermission,
		registeredReceivers, resultTo, resultCode, resultData, map,
		ordered, sticky, false);
	......
	boolean replaced = false;
	if (replacePending) {
		for (int i=mParallelBroadcasts.size()-1; i>=0; i--) {
			if (intent.filterEquals(mParallelBroadcasts.get(i).intent)) {
				......
				mParallelBroadcasts.set(i, r);
				replaced = true;
				break;
			}
		}
	}

	if (!replaced) {
		mParallelBroadcasts.add(r);

		scheduleBroadcastsLocked();
	}

	registeredReceivers = null;
	NR = 0;
    }
前面我們說到,這里得到的列表registeredReceivers的大小為1,且傳進來的參數(shù)ordered為false,表示要將這個廣播發(fā)送給所有注冊了BROADCAST_COUNTER_ACTION類型廣播的接收器,因此,會執(zhí)行下面的if語句。這個if語句首先創(chuàng)建一個廣播記錄塊BroadcastRecord,里面記錄了這個廣播是由誰發(fā)出的以及要發(fā)給誰等相關信息。由于前面得到的replacePending變量為false,因此,不會執(zhí)行接下來的if語句,即不會檢查系統(tǒng)中是否有相同類型的未處理的廣播。
這樣,這里得到的replaced變量的值也為false,于是,就會把這個廣播記錄塊r放在ActivityManagerService的成員變量mParcelBroadcasts中,等待進一步處理;進一步處理的操作由函數(shù)scheduleBroadcastsLocked進行。
Step 6. ActivityManagerService.scheduleBroadcastsLocked
這個函數(shù)定義在frameworks/base/services/java/com/android/server/am/ActivityManagerService.java文件中:
public final class ActivityManagerService extends ActivityManagerNative
		implements Watchdog.Monitor, BatteryStatsImpl.BatteryCallback {
	......

	private final void scheduleBroadcastsLocked() {
		......

		if (mBroadcastsScheduled) {
			return;
		}

		mHandler.sendEmptyMessage(BROADCAST_INTENT_MSG);
		mBroadcastsScheduled = true;
	}

	......
}
這里的mBroadcastsScheduled表示ActivityManagerService當前是不是正在處理其它廣播,如果是的話,這里就先不處理直接返回了,保證所有廣播串行處理。
注意這里處理廣播的方式,它是通過消息循環(huán)來處理,每當ActivityManagerService接收到一個廣播時,它就把這個廣播放進自己的消息隊列去就完事了,根本不管這個廣播后續(xù)是處理的,因此,這里我們可以看出廣播的發(fā)送和處理是異步的。
這里的成員變量mHandler是一個在ActivityManagerService內部定義的Handler類變量,通過它的sendEmptyMessage函數(shù)把一個類型為BROADCAST_INTENT_MSG的空消息放進ActivityManagerService的消息隊列中去。這里的空消息是指這個消息除了有類型信息之外,沒有任何其它額外的信息,因為前面已經(jīng)把要處理的廣播信息都保存在mParcelBroadcasts中了,等處理這個消息時,從mParcelBroadcasts就可以讀回相關的廣播信息了,因此,這里不需要把廣播信息再放在消息內容中。
Step 7. Handler.sendEmptyMessage
這個自定義的Handler類實現(xiàn)在frameworks/base/services/java/com/android/server/am/ActivityManagerService.java文件中,它是ActivityManagerService的內部類,調用了它的sendEmptyMessage函數(shù)來把一個消息放到消息隊列后,一會就會調用它的handleMessage函數(shù)來真正處理這個消息:
public final class ActivityManagerService extends ActivityManagerNative
		implements Watchdog.Monitor, BatteryStatsImpl.BatteryCallback {
	......

	final Handler mHandler = new Handler() {
		public void handleMessage(Message msg) {
			switch (msg.what) {
			......
			case BROADCAST_INTENT_MSG: {
				......
				processNextBroadcast(true);
			} break;
			......
			}
		}
	}

	......
}
這里又調用了ActivityManagerService的processNextBroadcast函數(shù)來處理下一個未處理的廣播。
Step 8. ActivityManagerService.processNextBroadcast
這個函數(shù)定義在frameworks/base/services/java/com/android/server/am/ActivityManagerService.java文件中:
public final class ActivityManagerService extends ActivityManagerNative
		implements Watchdog.Monitor, BatteryStatsImpl.BatteryCallback {
	......

	private final void processNextBroadcast(boolean fromMsg) {
		synchronized(this) {
			BroadcastRecord r;

			......

			if (fromMsg) {
				mBroadcastsScheduled = false;
			}

			// First, deliver any non-serialized broadcasts right away.
			while (mParallelBroadcasts.size() > 0) {
				r = mParallelBroadcasts.remove(0);
				......
				final int N = r.receivers.size();
				......
				for (int i=0; i<N; i++) {
					Object target = r.receivers.get(i);
					......

					deliverToRegisteredReceiverLocked(r, (BroadcastFilter)target, false);
				}
				addBroadcastToHistoryLocked(r);
				......
			}

			......

		}
	}

	......
}
這里傳進來的參數(shù)fromMsg為true,于是把mBroadcastScheduled重新設為false,這樣,下一個廣播就能進入到消息隊列中進行處理了。前面我們在Step 5中,把一個廣播記錄塊BroadcastRecord放在了mParallelBroadcasts中,因此,這里就把它取出來進行處理了。廣播記錄塊BroadcastRecord的receivers列表中包含了要接收這個廣播的目標列表,即前面我們注冊的廣播接收器,用BroadcastFilter來表示,這里while循環(huán)中的for循環(huán)就是把這個廣播發(fā)送給每一個訂閱了該廣播的接收器了,通過deliverToRegisteredReceiverLocked函數(shù)執(zhí)行。
Step 9. ActivityManagerService.deliverToRegisteredReceiverLocked
這個函數(shù)定義在frameworks/base/services/java/com/android/server/am/ActivityManagerService.java文件中:
public final class ActivityManagerService extends ActivityManagerNative
		implements Watchdog.Monitor, BatteryStatsImpl.BatteryCallback {
	......

	private final void deliverToRegisteredReceiverLocked(BroadcastRecord r,
			BroadcastFilter filter, boolean ordered) {
		boolean skip = false;
		if (filter.requiredPermission != null) {
			......
		}
		if (r.requiredPermission != null) {
			......
		}

		if (!skip) {
			// If this is not being sent as an ordered broadcast, then we
			// don't want to touch the fields that keep track of the current
			// state of ordered broadcasts.
			if (ordered) {
				......
			}

			try {
				......
				performReceiveLocked(filter.receiverList.app, filter.receiverList.receiver,
					new Intent(r.intent), r.resultCode,
					r.resultData, r.resultExtras, r.ordered, r.initialSticky);
				......
			} catch (RemoteException e) {
				......
			}
		}

	}

	......
}
函數(shù)首先是檢查一下廣播發(fā)送和接收的權限,在我們分析的這個場景中,沒有設置權限,因此,這個權限檢查就跳過了,這里得到的skip為false,于是進入下面的if語句中。由于上面?zhèn)鲿r來的ordered參數(shù)為false,因此,直接就調用performReceiveLocked函數(shù)來進一步執(zhí)行廣播發(fā)送的操作了。
Step 10. ActivityManagerService.performReceiveLocked
這個函數(shù)定義在frameworks/base/services/java/com/android/server/am/ActivityManagerService.java文件中:
public final class ActivityManagerService extends ActivityManagerNative
		implements Watchdog.Monitor, BatteryStatsImpl.BatteryCallback {
	......

	static void performReceiveLocked(ProcessRecord app, IIntentReceiver receiver,
			Intent intent, int resultCode, String data, Bundle extras,
			boolean ordered, boolean sticky) throws RemoteException {
		// Send the intent to the receiver asynchronously using one-way binder calls.
		if (app != null && app.thread != null) {
			// If we have an app thread, do the call through that so it is
			// correctly ordered with other one-way calls.
			app.thread.scheduleRegisteredReceiver(receiver, intent, resultCode,
					data, extras, ordered, sticky);
		} else {
			......
		}
	}

	......
}
注意,這里傳進來的參數(shù)app是注冊廣播接收器的Activity所在的進程記錄塊,在我們分析的這個場景中,由于是MainActivity調用registerReceiver函數(shù)來注冊這個廣播接收器的,因此,參數(shù)app所代表的ProcessRecord就是MainActivity所在的進程記錄塊了;而參數(shù)receiver也是注冊廣播接收器時傳給ActivityManagerService的一個Binder對象,它的類型是IIntentReceiver,具體可以參考上一篇文章
Android應用程序注冊廣播接收器(registerReceiver)的過程分析中的Step 2。
MainActivity在注冊廣播接收器時,已經(jīng)把自己的ProcessRecord記錄下來了,所以這里的參數(shù)app和app.thread均不為null,于是,ActivityManagerService就調用app.thread.scheduleRegisteredReceiver函數(shù)來把這個廣播分發(fā)給MainActivity了。這里的app.thread是一個Binder遠程對象,它的類型是ApplicationThreadProxy,我們在前面介紹應用程序的Activity啟動過程時,已經(jīng)多次看到了,具體可以參考主題Android應用程序的Activity啟動過程簡要介紹和學習計劃。
Step 11. ApplicationThreadProxy.scheduleRegisteredReceiver
這個函數(shù)定義在frameworks/base/core/java/android/app/ApplicationThreadNative.java文件中:
class ApplicationThreadProxy implements IApplicationThread {
	......

	public void scheduleRegisteredReceiver(IIntentReceiver receiver, Intent intent,
			int resultCode, String dataStr, Bundle extras, boolean ordered, boolean sticky)
			throws RemoteException {
		Parcel data = Parcel.obtain();
		data.writeInterfaceToken(IApplicationThread.descriptor);
		data.writeStrongBinder(receiver.asBinder());
		intent.writeToParcel(data, 0);
		data.writeInt(resultCode);
		data.writeString(dataStr);
		data.writeBundle(extras);
		data.writeInt(ordered ? 1 : 0);
		data.writeInt(sticky ? 1 : 0);
		mRemote.transact(SCHEDULE_REGISTERED_RECEIVER_TRANSACTION, data, null,
			IBinder.FLAG_ONEWAY);
		data.recycle();
	}

	......
}
這里通過Binder驅動程序就進入到ApplicationThread.scheduleRegisteredReceiver函數(shù)去了。ApplicationThread是ActivityThread的一個內部類,具體可以參考Activity啟動主題
Android應用程序的Activity啟動過程簡要介紹和學習計劃。
Step 12. ApplicaitonThread.scheduleRegisteredReceiver
這個函數(shù)定義在frameworks/base/core/java/android/app/ActivityThread.java文件中:
public final class ActivityThread {
	......

	private final class ApplicationThread extends ApplicationThreadNative {
		......

		// This function exists to make sure all receiver dispatching is
		// correctly ordered, since these are one-way calls and the binder driver
		// applies transaction ordering per object for such calls.
		public void scheduleRegisteredReceiver(IIntentReceiver receiver, Intent intent,
				int resultCode, String dataStr, Bundle extras, boolean ordered,
				boolean sticky) throws RemoteException {
			receiver.performReceive(intent, resultCode, dataStr, extras, ordered, sticky);
		}

		......
	}

	......

}
這里的receiver是在前面一篇文章
Android應用程序注冊廣播接收器(registerReceiver)的過程分析中的Step 4中創(chuàng)建的,它的具體類型是LoadedApk.ReceiverDispatcher.InnerReceiver,即定義在LoadedApk類的內部類ReceiverDispatcher里面的一個內部類InnerReceiver,這里調用它的performReceive函數(shù)。
Step 13. InnerReceiver.performReceive
這個函數(shù)定義在frameworks/base/core/java/android/app/LoadedApk.java文件中:
final class LoadedApk {
	......

	static final class ReceiverDispatcher {

		final static class InnerReceiver extends IIntentReceiver.Stub {
			......

			public void performReceive(Intent intent, int resultCode,
					String data, Bundle extras, boolean ordered, boolean sticky) {

				LoadedApk.ReceiverDispatcher rd = mDispatcher.get();
				......
				if (rd != null) {
					rd.performReceive(intent, resultCode, data, extras,
							ordered, sticky);
				} else {
					......
				}
			}
		}

		......
	}

	......
}
這里,它只是簡單地調用ReceiverDispatcher的performReceive函數(shù)來進一步處理,這里的ReceiverDispatcher類是LoadedApk類里面的一個內部類。
Step 14. ReceiverDispatcher.performReceive
這個函數(shù)定義在frameworks/base/core/java/android/app/LoadedApk.java文件中:
final class LoadedApk {
	......

	static final class ReceiverDispatcher {
		......

		public void performReceive(Intent intent, int resultCode,
				String data, Bundle extras, boolean ordered, boolean sticky) {
			......

			Args args = new Args();
			args.mCurIntent = intent;
			args.mCurCode = resultCode;
			args.mCurData = data;
			args.mCurMap = extras;
			args.mCurOrdered = ordered;
			args.mCurSticky = sticky;
			if (!mActivityThread.post(args)) {
				......
			}
		}

		......
	}

	......
}
這里mActivityThread成員變量的類型為Handler,它是前面MainActivity注冊廣播接收器時,從ActivityThread取得的,具體可以參考前面一篇文章
Android應用程序注冊廣播接收器(registerReceiver)的過程分析中的Step 3。這里ReceiverDispatcher借助這個Handler,把這個廣播以消息的形式放到MainActivity所在的這個ActivityThread的消息隊列中去,因此,ReceiverDispatcher不等這個廣播被MainActivity處理就返回了,這里也體現(xiàn)了廣播的發(fā)送和處理是異步進行的。
注意這里處理消息的方式是通過Handler.post函數(shù)進行的,post函數(shù)的參數(shù)是Runnable類型的,這個消息最終會調用這個這個參數(shù)的run成員函數(shù)來處理。這里的Args類是LoadedApk類的內部類ReceiverDispatcher的一個內部類,它繼承于Runnable類,因此,可以作為mActivityThread.post的參數(shù)傳進去,代表這個廣播的intent也保存在這個Args實例中。
Step 15. Hanlder.post
這個函數(shù)定義在frameworks/base/core/java/android/os/Handler.java文件中,這個函數(shù)我們就不看了,有興趣的讀者可以自己研究一下,它的作用就是把消息放在消息隊列中,然后就返回了,這個消息最終會在傳進來的Runnable類型的參數(shù)的run成員函數(shù)中進行處理。
Step 16. Args.run
這個函數(shù)定義在frameworks/base/core/java/android/app/LoadedApk.java文件中:
final class LoadedApk {
	......

	static final class ReceiverDispatcher {
		......

		final class Args implements Runnable {
			......

			public void run() {
				BroadcastReceiver receiver = mReceiver;

				......

				Intent intent = mCurIntent;

				......

				try {
					ClassLoader cl =  mReceiver.getClass().getClassLoader();
					intent.setExtrasClassLoader(cl);
					if (mCurMap != null) {
						mCurMap.setClassLoader(cl);
					}
					receiver.setOrderedHint(true);
					receiver.setResult(mCurCode, mCurData, mCurMap);
					receiver.clearAbortBroadcast();
					receiver.setOrderedHint(mCurOrdered);
					receiver.setInitialStickyHint(mCurSticky);
					receiver.onReceive(mContext, intent);
				} catch (Exception e) {
					......
				}

				......
			}

			......
		}

		......
	}

	......
}
這里的mReceiver是ReceiverDispatcher類的成員變量,它的類型是BroadcastReceiver,這里它就是MainActivity注冊廣播接收器時創(chuàng)建的BroadcastReceiver實例了,具體可以參考前面一篇文章
Android應用程序注冊廣播接收器(registerReceiver)的過程分析中的Step 2。
有了這個ReceiverDispatcher實例之后,就可以調用它的onReceive函數(shù)把這個廣播分發(fā)給它處理了。
Step 17. BroadcastReceiver.onReceive
這個函數(shù)定義Android系統(tǒng)中的廣播(Broadcast)機制簡要介紹和學習計劃一文中所介紹的Android應用程序Broadcast的工程目錄下的src/shy/luo/broadcast/MainActivity.java文件中:
public class MainActivity extends Activity implements OnClickListener {
	......

	private BroadcastReceiver counterActionReceiver = new BroadcastReceiver(){
		public void onReceive(Context context, Intent intent) {
			int counter = intent.getIntExtra(CounterService.COUNTER_VALUE, 0);
			String text = String.valueOf(counter);
			counterText.setText(text);

			Log.i(LOG_TAG, "Receive counter event");
		}
	}

	......

}
這樣,MainActivity里面的定義的BroadcastReceiver實例counterActionReceiver就收到這個廣播并進行處理了。
至此,Android應用程序發(fā)送廣播的過程就分析完成了,結合前面這篇分析廣播接收器注冊過程的文章
Android應用程序注冊廣播接收器(registerReceiver)的過程分析,就會對Android系統(tǒng)的廣播機制且個更深刻的認識和理解了。
最后,我們總結一下這個Android應用程序發(fā)送廣播的過程:
1. Step 1 - Step 7,計數(shù)器服務CounterService通過sendBroadcast把一個廣播通過Binder進程間通信機制發(fā)送給ActivityManagerService,ActivityManagerService根據(jù)這個廣播的Action類型找到相應的廣播接收器,然后把這個廣播放進自己的消息隊列中去,就完成第一階段對這個廣播的異步分發(fā)了;
2. Step 8 - Step 15,ActivityManagerService在消息循環(huán)中處理這個廣播,并通過Binder進程間通信機制把這個廣播分發(fā)給注冊的廣播接收分發(fā)器ReceiverDispatcher,ReceiverDispatcher把這個廣播放進MainActivity所在的線程的消息隊列中去,就完成第二階段對這個廣播的異步分發(fā)了;
3. Step 16 - Step 17, ReceiverDispatcher的內部類Args在MainActivity所在的線程消息循環(huán)中處理這個廣播,最終是將這個廣播分發(fā)給所注冊的BroadcastReceiver實例的onReceive函數(shù)進行處理。
這樣,Android系統(tǒng)廣播機制就學習完成了,希望對讀者有所幫助。重新學習Android系統(tǒng)的廣播機制,請回到Android系統(tǒng)中的廣播(Broadcast)機制簡要介紹和學習計劃一文中。
作者:Luoshengyang 發(fā)表于2011-9-5 1:01:18
原文鏈接
posted on 2012-04-17 21:32
mixer-a 閱讀(7301)
評論(0) 編輯 收藏