本文主要介紹如何快速利用 jsp+taglib+javaBean 構建動態數據庫查詢模板的全過程,已經如和使用,擴展該模板的方法.
在使用該框架之前,我們知道通常如果我們需要利用web查詢數據庫通常是用我們所說的
Model 1 ,和 Model 2 即MVC.而本文介紹的大致如下圖:

本模板所要實現的功能是: 通過非常簡單地繼承一個模板中的方法產生類,和添加一個含有Tag的簡單JSP來實現動態數據庫查詢. 廢話不說了, 現在開始.
1 配置 Tomcat5.0 (或以上版本,我使用了JSP2.0版本的一些功能) 連接池 ,
打開tomcat_hoem/conf/server.xml文件,找到</Host>,在它之前添加如下語句
<Context path="/WebModule1" docBase="WebModule1"
debug="5" reloadable="true" crossContext="true">
<Logger className="org.apache.catalina.logger.FileLogger"
prefix="localhost_DBTest_log." suffix=".txt"
timestamp="true"/>
<Resource name="jdbc/TestDB"
auth="Container"
type="javax.sql.DataSource"/>
<ResourceParams name="jdbc/TestDB">
<parameter>
<name>factory</name>
<value>org.apache.commons.dbcp.BasicDataSourceFactory</value>
</parameter>
<parameter>
<name>maxActive</name>
<value>100</value>
</parameter>
<parameter>
<name>maxIdle</name>
<value>30</value>
</parameter>
<parameter>
<name>maxWait</name>
<value>10000</value>
</parameter>
<parameter>
<name>username</name>
<value>root</value>
</parameter>
<parameter>
<name>password</name>
<value></value>
</parameter>
<parameter>
<name>driverClassName</name>
<value>org.gjt.mm.mysql.Driver</value>
</parameter>
<parameter>
<name>url</name>
<value>jdbc:mysql://localhost:3306/student?autoReconnect=true</value>
</parameter>
</ResourceParams>
</Context>
說明一下, WebModule1 表示你在tomcat_home/webapp 下所建立的文件夾名稱,由于我使用的是MySql數據庫,所以driverClassName當然是org.gjt.mm.mysql.Driver了, ( 不要告訴我你不知道要將mm.mysql-2.0.4-bin.jar放入Tomcat 5.0\common\lib下哦)至于url,我的是jdbc:mysql://localhost:3306/student?autoReconnect=true 其中,我所選的庫名稱是student.
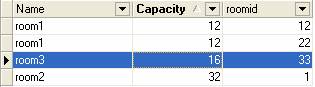
2 建立數據庫和表, 當然既然我們說的是模板,那么數據庫選擇,和測試表就由讀者任意了
我選的是student 庫下的room表作為測試的.內容如下
3 編寫標志處理器,并保存到你的Web-inf/
package mytag;
import java.io.*;
import java.util.*;
import javax.servlet.jsp.*;
import javax.servlet.jsp.tagext.*;
public class TableShow extends SimpleTagSupport {
private HashMap hp = null;
private String width = null;
public void setHp(HashMap hp) {
this.hp = hp;
}
public void setWidth(String wd) {
this.width = wd;
}
public void doTag() throws JspException, IOException {
JspWriter out = getJspContext().getOut();
String columu_name[] = (String[]) hp.get("column_name");
int sizeOfColumn = ((Integer) hp.get("sizeOfColumn")).intValue();
ArrayList data = (ArrayList) hp.get("data");
Iterator it = data.iterator();
if (width != null) {
out.println("<table width=\"" + width +
"\" border=\"1\" cellspacing=\"0\" align=\"center\">");
} else {
out.println(
"<table border=\"1\" cellspacing=\"0\" align=\"center\">");
}
out.println(" <tr bgcolor=\"#00FF99\"> ");
for (int i = 0; i < sizeOfColumn; i++) {
out.println("<td>");
out.println(columu_name[i]);
out.println(" </td>");
}
out.println(" </tr> ");
while (it.hasNext()) {
String[] value = (String[]) it.next();
out.println("<tr>");
for (int j = 0; j < sizeOfColumn; j++) {
out.println(" <td> ");
out.println(value[j]);
out.println(" </td> ");
}
}
out.println("</table>");
}
}
我想有必要先將大概思想說一下, 標志處理器首先通過傳遞來的屬性hp,類型為HashMap,(為什么要用HashMap,看不明白的先不管,我等會在說.)分析出要生成表格的大小,列數,名稱等等.然后在利用標簽的最大優勢,標志對運行環境的了解,容易復用,而且更容易使用. 它實現了javax.servlet.jsp.tagext. SimpleTagSupport (Jsp2.0中新添加的)接口,而JavaBean雖然也可以實現這個接口,但是只有在Web容器中這才有意義..
.4編寫標志庫描述項 ,保存為WebModule1\WEB-INF\tlds\ MyTag.tld
<?xml version="1.0" encoding="UTF-8"?>
<!-- Generated by Taglib Descriptor Wizard -->
<taglib version="2.0" xmlns="http://java.sun.com/xml/ns/j2ee" xmlns:xsi="http://www.w3.org/2001/XMLSchema-instance" xsi:schemaLocation="http://java.sun.com/xml/ns/j2ee http://java.sun.com/xml/ns/j2ee/web-jsptaglibrary_2_0.xsd">
<tlib-version>1.0</tlib-version>
<short-name>MyTag</short-name>
<tag>
<name>table</name>
<tag-class>mytag.TableShow</tag-class>
<body-content>empty</body-content>
<attribute>
<name>hp</name>
<required>true</required>
<rtexprvalue>true</rtexprvalue>
</attribute>
<attribute>
<name>width</name>
<required>false</required>
<rtexprvalue>true</rtexprvalue>
</attribute>
</tag>
</taglib>
這里我聲明了兩個屬性一個是hp,是必須要選擇的,另外一個是將要動態生成表格的寬度值
5編寫數據庫連接工廠類
package myFram.util;
import javax.sql.DataSource;
import javax.naming.*;
import java.sql.*;
public class SQLFactory {
private static DataSource ds=null;
private static Object Lock=new Object();
//生成DataSource**
public static DataSource gainDataSource(){
try{
if(ds==null){
synchronized(Lock){
if(ds==null){
Context ctx=new InitialContext();
ds=(DataSource)ctx.lookup("java:comp/env/jdbc/TestDB");
}
}
}
}
catch(NamingException e){e.printStackTrace();}
return ds;
}
//生成SQL連接**
public static synchronized Connection gainConnection(){
Connection con=null;
try{
if(ds==null){
gainDataSource();
}
con=ds.getConnection();
}
catch(SQLException e){e.printStackTrace();}
return con;
}
//釋放SQL連接**
public static void releaseConnection(ResultSet rs,PreparedStatement ps,Statement sql,Connection con){
try{
if(rs!=null)
rs.close();
}
catch(SQLException e){e.printStackTrace();}
try{
if(ps!=null)
ps.close();
}
catch(SQLException e){e.printStackTrace();}
try{
if(sql!=null)
sql.close();
}
catch(SQLException e){e.printStackTrace();}
try{
if(con!=null&&!con.isClosed())
con.close();
}
catch(SQLException e){e.printStackTrace();}
}
}
這里沒有什么好說明的,一看就知道了.
6 編寫方法生成類
package myFram.util;
import java.util.*;
import java.sql.*;
public class MethodGenerator {
private String[] columu_name = null;
private ArrayList data = null;
private HashMap hp = new HashMap();
private Connection con = null;
// private Statement sql = null;
private ResultSet rs = null;
private ResultSetMetaData rm = null;
private int columnCount;
public HashMap getStatementResult(String strsql) {
Statement sql = null;
try {
con = SQLFactory.gainConnection();
sql = con.createStatement(ResultSet.TYPE_SCROLL_INSENSITIVE,
ResultSet.CONCUR_READ_ONLY);
rs = sql.executeQuery(strsql);
rm = rs.getMetaData();
columnCount = rm.getColumnCount();
columu_name = new String[columnCount];
for (int i = 0; i < columnCount; i++) {
int j = i + 1;
columu_name[i] = rm.getColumnName(j);
}
data = new ArrayList();
while (rs.next()) {
String[] dataInRs = new String[columnCount];
for (int q = 0; q < columnCount; q++) {
int t = q + 1;
dataInRs[q] = rs.getString(t);
if (dataInRs[q] == null || dataInRs[q].equals("")) {
dataInRs[q] = " ";
}
}
data.add(dataInRs);
}
hp.put("sizeOfColumn", new Integer(columnCount));
hp.put("column_name", columu_name);
hp.put("data", data);
} catch (SQLException e) {
e.printStackTrace();
} finally {
SQLFactory.releaseConnection(rs, null, sql, con);
}
return hp;
}
public HashMap getPreparedStatement(String strsql, String[] parameters) {
PreparedStatement sql = null;
try {
con = SQLFactory.gainConnection();
sql = con.prepareStatement(strsql);
for (int i = 0; i < parameters.length; i++) {
int p = i + 1;
if (parameters[i] != null || parameters[i].equals("")) {
sql.setString(p, parameters[i]);
}
}
rs = sql.executeQuery();
rm = rs.getMetaData();
columnCount = rm.getColumnCount();
columu_name = new String[columnCount];
for (int i = 0; i < columnCount; i++) {
int j = i + 1;
columu_name[i] = rm.getColumnName(j);
}
data = new ArrayList();
while (rs.next()) {
String[] dataInRs = new String[columnCount];
for (int q = 0; q < columnCount; q++) {
int t = q + 1;
dataInRs[q] = rs.getString(t);
if (dataInRs[q] == null || dataInRs[q].equals("")) {
dataInRs[q] = " ";
}
}
data.add(dataInRs);
}
hp.put("sizeOfColumn", new Integer(columnCount));
hp.put("column_name", columu_name);
hp.put("data", data);
} catch (SQLException e) {
e.printStackTrace();
} finally {
SQLFactory.releaseConnection(rs, sql, null, con);
}
return hp;
}
}
這就是我們要繼承類了,有兩個方法分別是HashMap getStatementResult(String strsql),和public HashMap getPreparedStatement(String strsql, String[] parameters),可以看到都返回的是一個HashMap,思想是通過strsql,參數調用已經包裝好的方法,再分析查詢結果的屬性,包括String[] columu_name, int sizeOfColumn, ArrayList data這些都不需要讀者處理,與第一個函數不同的是HashMap getPreparedStatement(String strsql, String[] parameters),它處理了含有參數的查詢,這里要我們提供的 除了strsql之外的parameters值,要求按照順序以此寫入.這里思路很明確,之所以要大動干戈的將這么多參數放入HashMap中為的是我們以后動態表格生成時使用.
看到這里也許有人要說每次要生成的這么復雜的HashMap系統開銷一定不少,是的,任何事情都不是完美的. 但是當然閱讀完了此文后也許會感到卻是這樣做是無有所值的.
好了,到這里就介紹完了,讓我們一起看看是不是簡化了我們以前的方式.
1 繼承MethodGenerator類
package myFram;
import myFram.util.MethodGenerator;
import java.util.*;
public class UserQuery2 extends MethodGenerator {
HashMap hp = null;
public HashMap getStatementResult() {
String strsql = "select * from room";
hp = getStatementResult(strsql);
return hp;
}
// public HashMap getPreparedStatement(???,???)
public HashMap getPreparedStatement() {
String sql = "select * from room where Name=? and roomid=?";
String[] parameters = new String[2];
parameters[0] = "room1";
parameters[1] = "12";
hp = getPreparedStatement(sql, parameters);
return hp;
}
}
這里可以根據具體的需要和實際情況編寫.我這里針對的是剛才介紹的room表.第一個方法全表顯示,第二個帶有參數.至于參數的來源,即可以通過 jsp,也可以是提前寫好的
2 編寫JSP jsp4.jsp
<%@page contentType="text/html; charset=GB18030" import="java.util.*"%>
<%@taglib uri="/WEB-INF/tlds/MyTag.tld" prefix="mytag"%>
<html>
<head>
<jsp:useBean id="test" scope="page" class="myFram.UserQuery2"/>
<title>jsp4</title>
</head>
<body bgcolor="#ffffff">
<%HashMap hp = test.getPreparedStatement();%>
<mytag:table hp="<%=hp%>" width="500"/>
</body>
</html>
3 ok !! 試驗!
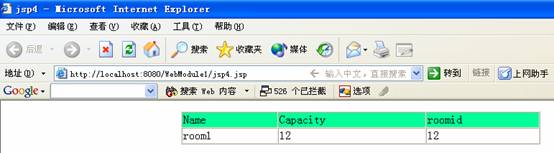
還可以稍微改動一下jsp4.jsp將<%HashMap hp = test.getPreparedStatement();%>
改為 <%HashMap hp = test.getStatementResult();%> 結果是

僅僅兩個簡單的步驟,省去了我們多少工作,大家一定有體會的吧~
這里控制器由于這個例子太簡單了,Servlet 并沒有用到,讀者可以根據自己的實際情況以及復雜程度自由選擇.
本人正在努力將分頁以標志的形式做到該模板中,屆時和大家分享.
由于本人水平有限,難免有出錯的地方,歡迎提出您的寶貴意見,和改進的方法.
QQ: 39315890
Mail:mill_lmq@tom.com
代碼下載:http://www.tkk7.com/Files/limq/code.rar