http://blog.csdn.net/maomaolingyu/archive/2009/09/13/4549123.aspx
開發(fā)環(huán)境
Sun Java 5+MyEclipse 5.0.0.
概述
本文介紹了使用MyEclipse Web Service來迅速開發(fā)和測(cè)試一個(gè)HelloWorld Web Service,其中包括:
1. 介紹了MyEclipse Web Services的基本概念
2. 創(chuàng)建一個(gè)MyEclipse Web Services工程
3. 創(chuàng)建一個(gè)簡(jiǎn)單的HelloWorld Web Service
4. 在Web容器中,如Tomcat 5中部署Web Service
5. 使用Web Services Explorer來測(cè)試部署的Web Services
XFire Java SOAP框架概述
MyEclipse Web Services是建立在XFire Java SOAP框架和工具基礎(chǔ)上的, XFire是一款開源的Java
SOAP框架。它擁有一個(gè)輕量級(jí)的信息處理模塊,通過STAX來與SOAP信息相結(jié)合。提供了一個(gè)工作在Web
Services下的簡(jiǎn)單API,支持POJO和schema開發(fā). XFire支持 Web Services standards,Spring
整合, 支持JBI , 支持 JAXB ,XMLBeans,Java 5 和JAX-WS.并支持HTTP, JMS, XMPP,
In-memory傳輸協(xié)議.
一. 創(chuàng)建Web Service工程
在MyEclipse 5.0中引入了一個(gè)新的工程類型即Web Service工程,該工程擴(kuò)展了MyEclipse Web
Project來支持額外的Web Service配置,開發(fā)和部署.本部分將使用Web Services Project
wizard來創(chuàng)建和配置一個(gè)新的Web Service Projects Web Service Wizard將完成下列的動(dòng)作:
創(chuàng)建MyEclipse J2EE Web Project
在工程中的web.xml文件中配置XFire Servlet
創(chuàng)建XFire services.xml配置文件
在工程中的構(gòu)建路徑中添加MyEclipse-XFire類庫
添加一個(gè)指定的MyEclipse web project
builder到.projects文件,以便部署services.xml文件到它合適的位置.如:
<webroot>/WEB-INF/classes/META-INF/xfire/
運(yùn)行Web Service Project Wizard
該向?qū)Оㄈ齻€(gè)頁面, Page-1搜集Web Project配置細(xì)節(jié), Page-2搜集XFire配置細(xì)節(jié), Page-3在新建的構(gòu)建路徑中配置XFire類庫
1. 執(zhí)行Web Services Project Wizard.
1). 選擇File>New>Other
2). 擴(kuò)展MyEclipse種類按照J(rèn)2EE工程的種類
3). 選擇Web Services Project然后點(diǎn)擊Next,如圖所示
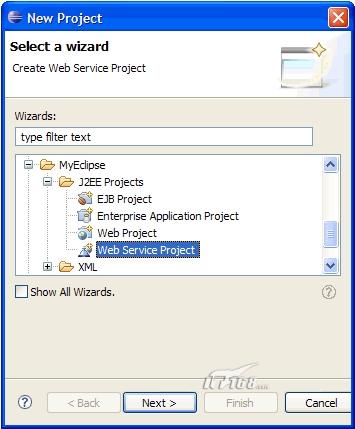
Figure-1: New Project Wizard Launcher
2. 添加Project Name,點(diǎn)擊Next
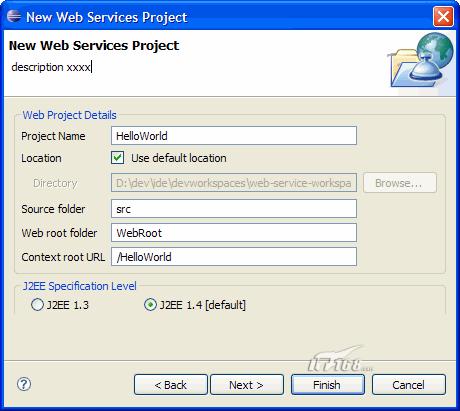
Figure-2: Page-2, Collecting web configuration details
3.在向?qū)У腜age-2中添加XFire servlet和service.xml文件的配置信息,按照默認(rèn)的值即可.

Figure-3: XFire servlet and services.xml configuration
【IT168技術(shù)文檔】
4.在向?qū)У腜age-3中選擇類庫添加到工程的構(gòu)建路徑中,其中XFire Core Library是需要的,如果要在工程中開發(fā)一個(gè)客戶端應(yīng)用, XFire HTTP Client Libraries也是需要的.
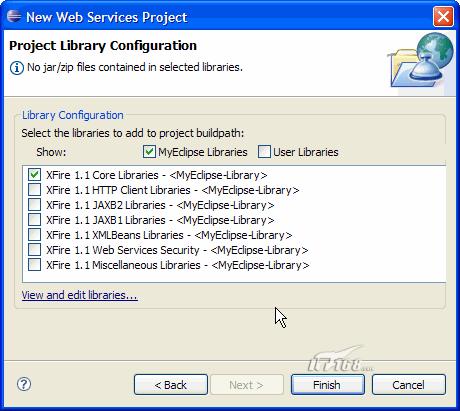
Figure-4: Selecting XFire libraries to add to new web service project buildpath
5選擇Finish完成Web Service工程的創(chuàng)建過程
Figure-5,顯示了新創(chuàng)建的HelloWorld Web Service工程的組織結(jié)構(gòu),Web Service 工程和一個(gè)標(biāo)準(zhǔn)的MyEclipse Web工程很相似. XFire Web Service配置元素如圖紅色區(qū)域顯示:
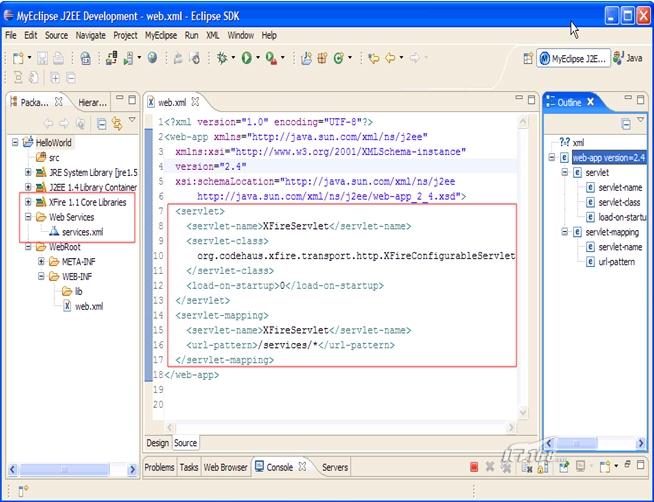
Figure-5: Web services artifacts of a new web service project
二. 創(chuàng)建Web Service-Code-first Strategy
在這部分將用MyEclipse Web Service Wizard并通過使用Code-first Strategy來創(chuàng)建一個(gè)HelloWorldService示例.
1. 執(zhí)行MyEclipse Web Service Wizard,有兩種方法來執(zhí)行MyEclipse Web Service Wizard
方法1.從MyEclipse perspective toolbar中來執(zhí)行向?qū)?nbsp;
在打開的Web Service Wizard上的workbench上來選擇新Web Service按鈕
方法2.從workbench menubar執(zhí)行向?qū)?nbsp;
1. 從workbench menubar選擇: File>New>Other>MyEclipse>Web Service
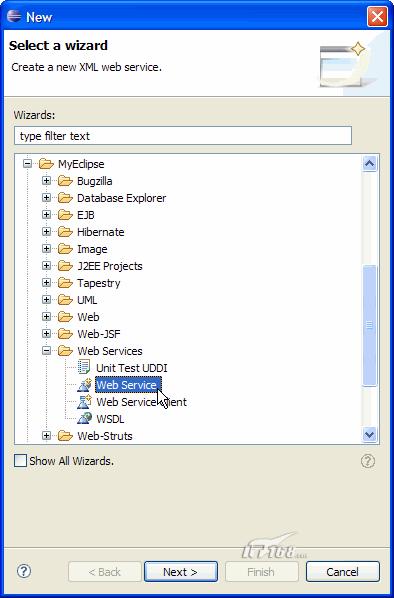
Figure-6: Launching Web Service Wizard
2. 在Page-1選擇HelloWorld 工程并選擇Create web service from Java bean
3. 選擇Next到Page-2

Figure-7: Page-1 of new web service wizard
【IT168技術(shù)文檔】
4. 填寫Web Service的名字HelloWorldService
5. 選擇Java Source folder或者選擇New按鈕來新建一個(gè)source folder
6. 填寫Java package或者通過選擇Browse按鈕來選擇一個(gè)已經(jīng)存在的package.也可以選擇New按鈕來新建一個(gè)Java package
注意:對(duì)Service接口和Service執(zhí)行的類的默認(rèn)值是基于所填入Web Service名字來產(chǎn)生的.
7. 選擇Next來初始化Web Service的創(chuàng)建過程
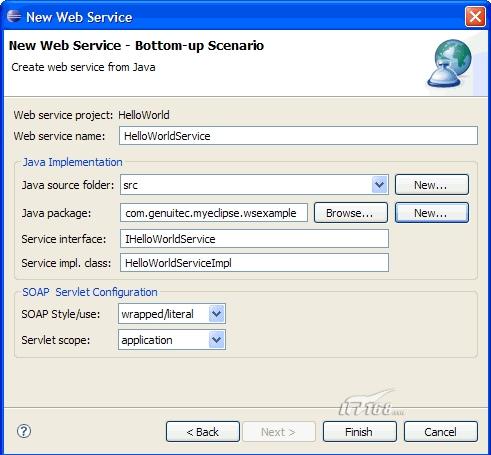
Figure-8: Page-2 of new web service wizard.
該向?qū)Мa(chǎn)生了IHelloWorldService Java接口和HelloWorldServiceImpl
Java類.并且在services.xml配置文件中創(chuàng)建了一個(gè)<service>實(shí)體(如圖所示),注意到example(String
message)方法在接口類中產(chǎn)生,當(dāng)Web Service部署后作為一個(gè)測(cè)試操作.
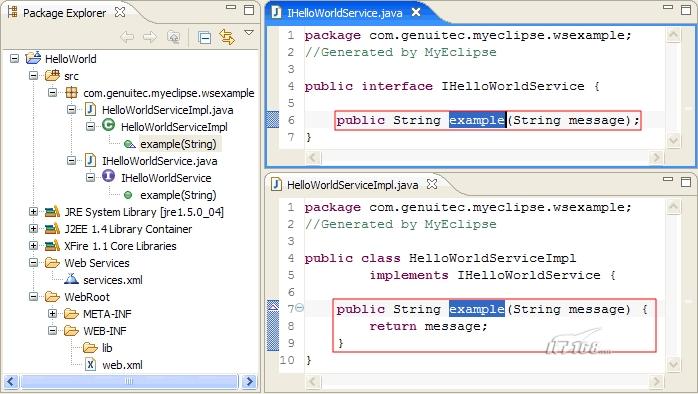
Figure-9: Newly created HelloWorld interface and implementation class
三. 部署Web Service Project
Web Service可以部署在任何MyEclipse支持的J2EE應(yīng)用服務(wù)器上,該部分將演示如何在Tomcat 5 Web容器上部署HelloWorld工程.
3.1部署HelloWorld Web Service Project
Figure-10顯示了如何部署HelloWorld應(yīng)用.
1. 從Server Manager中選擇Deployer按鈕(step-1)
2. 在Server Deployments對(duì)話框中選擇Add to create a new deployment (step-2)
3. 在New Deployment對(duì)話框中選擇HelloWorld工程并選擇Exploded Archive選項(xiàng)
4. 在New Deployment對(duì)話框選擇Finish來將HelloWorld在Tomcat 5默認(rèn)的位置中打包為WAR
5. 選擇OK完成部署
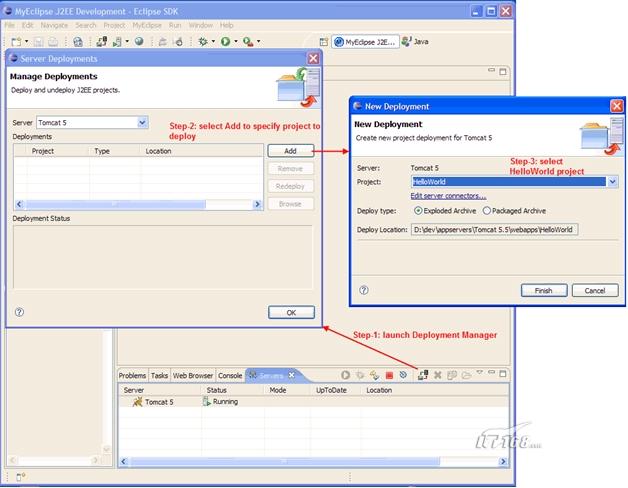
Figure-10: Three-step deployment process
新HelloWorld WAR部署將出現(xiàn)在Server Manager視圖中Tomcat 5節(jié)點(diǎn)下.
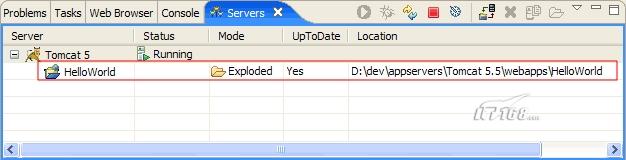
Figure-11: Servers Manager View depicting deployed HelloWorld web service project
【IT168技術(shù)文檔】
四. 啟動(dòng)Tomcat服務(wù)器
五. 使用Web Service Explorer測(cè)試Web Service
MyEclipse提供了一個(gè)Web Service Explorer來測(cè)試Web Service.
1. 在MyEclipse perspective中選擇toolbar button來執(zhí)行Web Service Explorer

Figure-15: Web Services Explorer launch button on workbench toolbar
2. 選擇WSDL模式(Figure-16)
3. 在活動(dòng)面板中鍵入HelloWorldService
WSDL文檔的URLhttp://localhost:8080/HelloWorld/services
/HelloWorldService?WSDL,Web Service
Explorer將下載自動(dòng)產(chǎn)生的WSDL文檔,該WSDL文檔由XFire framework,并產(chǎn)生一系列的操作能夠調(diào)用service.
4. 在活動(dòng)面板中選擇example操作并在in0域中鍵入HelloWorld
5. 選擇Go按鈕來調(diào)用在HelloWorldService上的example操作,,結(jié)果出現(xiàn)在Status面板上

Figure-16: Web Services Explorer testing HelloWorldService
六. 創(chuàng)建Java Test客戶端
XFire提供了一個(gè)動(dòng)態(tài)的代理框架,能夠讀取WSDL文檔和創(chuàng)建潛在的消息服務(wù)使Java類來執(zhí)行在Web Service的行為.該部分將為HelloWorld Web Service寫一個(gè)Java Web Service客戶端
6.1增加XFire類庫配置
為了使example client能夠在HelloWorld工程中運(yùn)行,需要增加XFire HTTP Client類庫到工程的構(gòu)建路徑中.
1. 在Package Explore視圖中右擊HelloWorld工程選擇Build Path>Add Library
2. 選擇MyEclipse Libraries
3. 選擇XFire HTTP Client Libraries
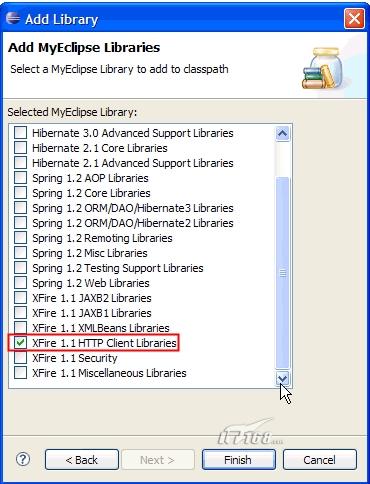
Figure-17: Choosing the XFire HTTP Client Libraries
4. 選擇Finish
6.2創(chuàng)建HelloWorldClient類
執(zhí)行Java類向?qū)韯?chuàng)建HelloWorldClient類
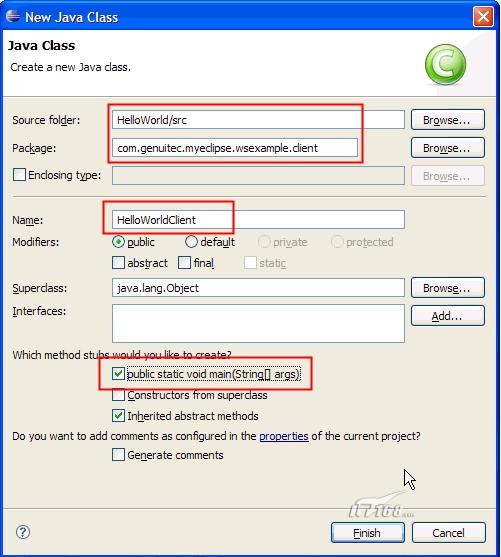
Figure-18: HelloWorldClient defined in New Java Class Wizard.
代碼如下:
 public static void main(String[] args) {
 Service srvcModel = new
ObjectServiceFactory().create(IHelloWorldService.class);
XFireProxyFactory factory =
new XFireProxyFactory(XFireFactory.newInstance().getXFire());
String helloWorldURL =
"http://localhost:8080/HelloWorld/services/HelloWorldService";
 try {
try {
IHelloWorldService srvc = (IHelloWorldService)factory.create(srvcModel, helloWorldURL);
String result = srvc.example("hello world");
System.out.print(result);
} catch (MalformedURLException e) {
e.printStackTrace();
 }
}
 }
}
該段代碼定義了創(chuàng)建一個(gè)XFire web service proxy的過程,該代理支持POJO IHelloWorldService接口
右鍵點(diǎn)擊Run As>Java Application或者Debug As>JavaApplication來運(yùn)行或調(diào)試該程序
posted on 2010-02-05 11:05
Ke 閱讀(307)
評(píng)論(0) 編輯 收藏