適合入門級看,但其中的錯誤解決適合大家參考。
在此使用MyEclipse6.0作為編程環(huán)境,真正領(lǐng)悟ssh后,就會知道MyEclipse添加spring與hibernate支持的用意只是讓MyEclipse自動添加spring與hibernate的包,還有產(chǎn)生一些配置文件代碼,在此為節(jié)省時間,使用MyEclipse來添加,但是其實(shí)自己添加也行。
要填的東西將會指出,其他都是默認(rèn)
前提:

 數(shù)據(jù)庫建庫
1/**//*
2 SQLyog Enterprise - MySQL GUI v6.06
3Host - 5.0.27-community-nt : Database - ssh
4*********************************************************************
5Server version : 5.0.27-community-nt
6 */
*/
7/**//*!40101 SET NAMES utf8 */;
8
9/**//*!40101 SET SQL_MODE=''*/;
10
11create database if not exists `ssh`;
12
13USE `ssh`;
14
15/**//*!40014 SET @OLD_FOREIGN_KEY_CHECKS=@@FOREIGN_KEY_CHECKS, FOREIGN_KEY_CHECKS=0 */;
16/**//*!40101 SET @OLD_SQL_MODE=@@SQL_MODE, SQL_MODE='NO_AUTO_VALUE_ON_ZERO' */;
17
18/**//*Table structure for table `user` */
19
20DROP TABLE IF EXISTS `user`;
21
22CREATE TABLE `user` (
23 `id` int(11) NOT NULL auto_increment,
24 `name` varchar(20) collate utf8_unicode_ci NOT NULL,
25 `password` varchar(20) collate utf8_unicode_ci NOT NULL,
26 `purview` varchar(20) collate utf8_unicode_ci NOT NULL,
27 PRIMARY KEY (`id`),
28 UNIQUE KEY `name` (`name`)
29) ENGINE=InnoDB DEFAULT CHARSET=utf8 COLLATE=utf8_unicode_ci;
30
31/**//*Data for the table `user` */
32
33insert into `user`(`id`,`name`,`password`,`purview`) values (1,'admin','admin','MANAGER');
34
35/**//*!40101 SET SQL_MODE=@OLD_SQL_MODE */;
36/**//*!40014 SET FOREIGN_KEY_CHECKS=@OLD_FOREIGN_KEY_CHECKS */;
37
使用上面SQL語句在MySQL中建立表格,最好使用SQL yog Enterprise工具
安裝MySQL與SQL yogEnterprise請自己掌握。
1.創(chuàng)建工程:
file-->web project(習(xí)慣使用,貌似dynamic web project也行)
project name:ssh
J2EE Specification Level選擇Java EE5.0(使用新一點(diǎn)的吧)
finish->
菜單Wiindows-->Open Perspective-->MyEclipse Java Enterprise 視圖
2.添加Spring支持:
工程名上右鍵-->MyEclipse-->Add Spring Capabilities
a).在框內(nèi)選上:
Spring2.0 AOP Libraries(對于面向切面有用,后面會用到配置面向切面的)
Spring2.0 Core Libraries(Spring核心庫)
Spring2.0 Persistence Core Libraries(持久層庫,要Spring與Hibernate集成,當(dāng)然就添加啦)
Spring2.0 J2EE Library
Spring2.0 Web Libraries
暫時就只添加這5個
Copy checked Library contents to project folder 選上,這樣就可以將庫添加到工程內(nèi),否則這個工程編譯的時候會引用本機(jī)的文件系統(tǒng)內(nèi)的庫,工程轉(zhuǎn)移到其它機(jī)器就需要重新將每個包改對路徑,當(dāng)然如果只需要本機(jī)開發(fā)的就不用copy啦。
next->
b).new applicationContext.xml 將路徑改為在WebRoot/WEB-INF下面,其實(shí)放在src下也行,但是工程編譯的時候?qū)rc下的東西編譯到WebRoot/WEB-INF下的classes目錄下,配置applicationContext路徑的時候就相應(yīng)修改就行。
finish->
3.建立數(shù)據(jù)庫連接
菜單Wiindows-->Open Perspective-->MyEclipse Database Explorer
DB Browser中右鍵-->new,新建一個數(shù)據(jù)庫連接,打開一個對話框
Driver template 選擇MySQL connector/J(可以不選,選著只是為了下面顯示出連接字符串的模板,讓不熟悉的人可以照這模式來填)
Driver name:任意,用于標(biāo)識這個連接,對我們工程沒有任何關(guān)系的。
Connection URL:jdbc:mysql://localhost:3306/ssh (意思是本地地址IP的數(shù)據(jù)庫ssh,如果是遠(yuǎn)程數(shù)據(jù)庫,請寫遠(yuǎn)程地址,當(dāng)然要確保遠(yuǎn)程地址是可達(dá)的,例如防火墻阻隔等)
User name:你的數(shù)據(jù)庫登錄名
password:登錄名密碼
Add Jars-->打開對話框?qū)ふ冶镜匚募到y(tǒng)的MySQL連接驅(qū)動包,(提供下載
/Files/jianyue/mysqlConnector.rar,解壓取里面那個jar)
save password 打上鉤,方便點(diǎn)
可以test 測試一下是否能夠連接
這步驟的實(shí)際意義是在MyEclipse IDE工具上建立一個數(shù)據(jù)庫連接,來管理,對于我們工程其實(shí)沒有一點(diǎn)影響的,只是這個連接,以后引用或者管理的時候就較方便。
finish-->
4.添加Hibernate支持
切換回原來的視圖,其實(shí)有多種切換視圖的方法,快捷鍵等,自己學(xué)吧。
a).工程名上右鍵-->MyEclipse-->add Hibernate Capabilities
同樣Copy checked Library Jars to project folder and add to build-path
next-->
b).選擇Spring configuration file
next->
c).因?yàn)樵瓉硪呀?jīng)有一個spring配置文件,所以就選擇Existing Spring configuration file
sessionFactory ID:sessionFactory(可以自定義名稱,使用慣例的吧,隨便啦)
next-->
d).DB Driver 選擇在MyEclipse DB Explorer中建立的數(shù)據(jù)庫連接名稱(這里就體現(xiàn)到同一個IDE工具的好處,方便地引用那個連接的配置)
Bean ID:dataSource(又是慣例的名稱)
next-->
取消掉create SessionFactory class
finish-->
5.添加Struts2.0支持
由于MyEclipse沒有集成Struts2.0的包,所以自己添加Struts的五個包
由于空間有限,可以上網(wǎng)搜索一個叫struts2-blank的工程包,war文件也可以,可以用rar打開,取其里面lib下的這五個包
struts暫且只添加這5個包,多包反而會導(dǎo)致沖突(后面有說),至于struts想集成meshsite等的話,就另外加包吧。
順便將原來的那個mysqlConnector的jar包也拿來吧,一起拖到WEB-INF/lib目錄下,可以直接拖到IDE工具上的工程瀏覽框(即Package視圖)的lib圖標(biāo)上,MyEclipse支持拖放功能。
還有commons-pool-1.4.jar和commons-dbcp-1.2.2.jar和struts2-spring-plugin-2.0.6.jar也是必須自己加進(jìn)lib中的
如果有包重復(fù)的話,覆蓋就行。
6.配置文件web.xml詳解
web.xml
1<?xml version="1.0" encoding="UTF-8"?>
2<web-app version="2.5" xmlns="http://java.sun.com/xml/ns/javaee"
3 xmlns:xsi="http://www.w3.org/2001/XMLSchema-instance"
4 xsi:schemaLocation="http://java.sun.com/xml/ns/javaee
5 http://java.sun.com/xml/ns/javaee/web-app_2_5.xsd">
6<!-- 網(wǎng)站默認(rèn)首頁 -->
7 <welcome-file-list>
8 <welcome-file>index.jsp</welcome-file>
9 </welcome-file-list>
10<!-- spring環(huán)境配置 -->
11 <context-param>
12 <param-name>contextConfigLocation</param-name>
13 <param-value>/WEB-INF/applicationContext*.xml</param-value>
14 </context-param>
15 <listener>
16 <listener-class>
17 org.springframework.web.context.ContextLoaderListener
18 </listener-class>
19 </listener>
20<!-- 這個過濾器負(fù)責(zé)管理hibernate的數(shù)據(jù)庫訪問session,session的關(guān)閉將在action完畢的時候關(guān)閉,這樣既不遲也不早
21這個過濾器必須配置在struts過濾器之前 -->
22 <filter>
23 <filter-name>lazyLoadingFilter</filter-name>
24 <filter-class>
25 org.springframework.orm.hibernate3.support.OpenSessionInViewFilter
26 </filter-class>
27 </filter>
28 <filter-mapping>
29 <filter-name>lazyLoadingFilter</filter-name>
30 <url-pattern>*.action</url-pattern>
31 </filter-mapping>
32<!-- struts2過濾器,對任何請求都添加這個過濾器 -->
33 <filter>
34 <filter-name>struts2</filter-name>
35 <filter-class>
36 org.apache.struts2.dispatcher.FilterDispatcher
37 </filter-class>
38 </filter>
39 <filter-mapping>
40 <filter-name>struts2</filter-name>
41 <url-pattern>/*</url-pattern>
42 </filter-mapping>
43</web-app>
44
struts的過濾器配置是有順序的:
按照Struts2的API,filter的順序是
struts-cleanup filter
SiteMesh filter
FilterDispatcher
如果需要配置字符轉(zhuǎn)換過濾器的話,那就安排在FilterDispatcher之前
spring配置文件可以多個,從/WEB-INF/applicationContext*.xml的通配符就可以看出來了
7.struts.xml詳解
在src下建立一個struts.xml的文件:
struts.xml
1<!DOCTYPE struts PUBLIC "-//Apache Software Foundation//DTD Struts Configuration 2.0//EN" "http://struts.apache.org/dtds/struts-2.0.dtd" >
2<struts>
3<!-- 類似struts1中的spring代理管理struts,這里的constant也是將struts交給spring管理 -->
4 <constant name="struts.objectFactory" value="spring"/>
5
6
7<!-- 默認(rèn)的struts-default.xml文件,一定要寫的。如果希望分開多個xml文件來配置action,可以再include幾個struts的xml文件
8例如:自己寫的struts-login.xml等,經(jīng)典的就是這個文件不寫package,在其他分文件中歸類action package,在將個模塊的xml包含進(jìn)來 -->
9 <include file="struts-default.xml"/>
10
11
12<!-- 真正開始編寫action,使用package括住,下面前兩個action是示例樣板
13package的name可以任意,extends照寫,還有一個namespace屬性,
14namespace屬性其實(shí)只指定這個包里面的action的根目錄,默認(rèn)不寫時為本程序的根目錄
15即"/",例如如果namespace="/folder",那么action的根目錄是/folder。
16不同namespace下的action調(diào)用方法不同,result的根目錄也是namespace指定的-->
17
18<!-- package1里面的action調(diào)用方法:
191.在根目錄的jsp頁面:form方式:<form action="hello"> href方式:<a href="網(wǎng)站根目錄/hello.action></a
202.在/folder里面的jsp調(diào)用這個action:form方式:<form action="hello" namespace="/">
21herf方式:<a href="網(wǎng)站根目錄/hello.action"></a>
22這里result指定的hello.jsp是指根目錄下的hello.jsp-->
23<!--<package name="package1" extends="struts-default">
24 <action name="hello" class="helloBean" method="test">
25 <result>hello.jsp</result>
26 </action>
27 </package>
28-->
29<!-- package2里面的action調(diào)用方法:
301.在根目錄的jsp頁面:form方式:<form action="hello" namespace="/folder"> href方式:<a href="網(wǎng)站根目錄/folder/hello.action></a
312.在/folder里面的jsp調(diào)用這個action:form方式:<form action="hello">
32herf方式:<a href="hello.action"></a> 或者寫全路徑<a href="網(wǎng)站根目錄/folder/hello.action"></a>
33這里result指定的hello.jsp是指/folder目錄下的hello.jsp-->
34<!--<package name="package2" extends="struts-default" namespace="/folder">
35 <action name="" class="helloBean" method="test">
36 <result>hello.jsp</result>
37 </action>
38 </package>
39-->
40
41 <package name="login" extends="struts-default" namespace="/login">
42 <action name="login" class="loginAction" method="login">
43 <result name="login">loginSuccess.jsp</result>
44 <result name="none">loginFailed.jsp</result>
45 </action>
46 </package>
47</struts>
48
8.applicationContext.xml詳解
applicationContext.xml
1<?xml version="1.0" encoding="UTF-8"?>
2<beans xmlns="http://www.springframework.org/schema/beans"
3 xmlns:xsi="http://www.w3.org/2001/XMLSchema-instance"
4 xmlns:aop="http://www.springframework.org/schema/aop"
5 xmlns:tx="http://www.springframework.org/schema/tx"
6 xsi:schemaLocation="http://www.springframework.org/schema/beans
7 http://www.springframework.org/schema/beans/spring-beans-2.0.xsd
8 http://www.springframework.org/schema/tx
9 http://www.springframework.org/schema/tx/spring-tx.xsd
10 http://www.springframework.org/schema/aop
11 http://www.springframework.org/schema/aop/spring-aop.xsd">
12
13<!-- 配置數(shù)據(jù)庫連接,使用MyEclipse可以通過對話框配置產(chǎn)生,如果有問題的話就自己copy這一段,然后按照自己的實(shí)際來配置 -->
14 <bean id="dataSource"
15 class="org.apache.commons.dbcp.BasicDataSource">
16 <property name="driverClassName"
17 value="com.mysql.jdbc.Driver">
18 </property>
19 <property name="url" value="jdbc:mysql://localhost:3306/ssh"></property>
20 <property name="username" value="root"></property>
21 <property name="password" value="root"></property>
22 </bean>
23<!-- 數(shù)據(jù)庫訪問sessionFactory 關(guān)鍵的地方是dialect那里指定數(shù)據(jù)庫方言,按照自己使用的是什么數(shù)據(jù)庫來配置,一般都是mySQL
24啦,sql Server的話,自己上網(wǎng)搜一下,mappingResources也是最關(guān)鍵的地方,說明了各個映射文件的位置-->
25 <bean id="sessionFactory"
26 class="org.springframework.orm.hibernate3.LocalSessionFactoryBean">
27 <property name="dataSource">
28 <ref bean="dataSource" />
29 </property>
30 <property name="hibernateProperties">
31 <props>
32 <prop key="hibernate.dialect">
33 org.hibernate.dialect.MySQLDialect
34 </prop>
35 </props>
36 </property>
37 <property name="mappingResources">
38 <list>
39 <value>ssh/pojo/User.hbm.xml</value>
40 </list>
41 </property>
42 </bean>
43</beans>

 applicationContextUser.xml
1 <?xml version="1.0" encoding="UTF-8"?>
2<beans xmlns="http://www.springframework.org/schema/beans"
3 xmlns:xsi="http://www.w3.org/2001/XMLSchema-instance"
4 xmlns:aop="http://www.springframework.org/schema/aop"
5 xmlns:tx="http://www.springframework.org/schema/tx"
6 xsi:schemaLocation="http://www.springframework.org/schema/beans
7 http://www.springframework.org/schema/beans/spring-beans-2.0.xsd
8 http://www.springframework.org/schema/tx
9 http://www.springframework.org/schema/tx/spring-tx.xsd
10 http://www.springframework.org/schema/aop
11 http://www.springframework.org/schema/aop/spring-aop.xsd">
12
13<!-- 配置自己編寫的各個類,在此注冊,在類的編寫中,就可以省去屬性的初始化,因?yàn)閟pring會幫我們初始化 -->
14 <bean id="UserDAO" class="ssh.dao.hibernate.UserDAO">
15 <property name="sessionFactory">
16 <ref bean="sessionFactory"></ref>
17 </property>
18 </bean>
19
20 <bean id="userServiceBean" class="ssh.service.impl.UserServiceImpl">
21 <property name="userDAO">
22 <ref bean="UserDAO"/>
23 </property>
24 </bean>
25
26 <bean id="loginAction" class="ssh.action.UserAction">
27 <property name="userService">
28 <ref bean="userServiceBean"/>
29 </property>
30 </bean>
31</beans>9.構(gòu)造pojo與dao
先建好包結(jié)構(gòu)如下:
a).切換到MyEclipse DB Explorer視圖->雙擊你建的那個連接來打開數(shù)據(jù)庫連接->Table下user表右鍵->Hibernate Reverse Engineering->

->finish:這樣會產(chǎn)生三個文件,數(shù)據(jù)庫user映射的pojo實(shí)體類對象User.java,數(shù)據(jù)庫訪問對象UserDAO.java,數(shù)據(jù)庫映射文件User.hbm.xml
將User.java 與 hbm文件移到pojo包下
上面搞錯了點(diǎn),將UserDAO移到dao.hibernate包下吧
這里的東西涉及到applicationContext.xml的改變,沒有關(guān)系,前面已經(jīng)詳盡講解了各xml文件的意義。
UserDAO已經(jīng)自動生成很多數(shù)據(jù)庫訪問函數(shù),從字面上可以看出是什么意思,大部分函數(shù)是不一定用到的,自己想使用的方法寫在下面說的接口上,再實(shí)現(xiàn)他吧。
我們?yōu)槠鋵憘€UserDAO接口,在dao包下編寫一個IUserDAO.java的接口,并且使UserDAO實(shí)現(xiàn)這個接口
10.編寫服務(wù)
參照代碼吧!
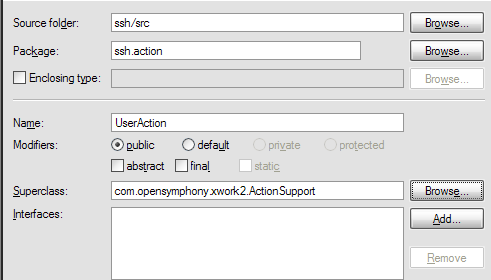
11.編寫action
12.編寫頁面
final我遇到的異常:
appllicationConotext.xml中的org.apache.commons.dbcp.BasicDataSource not found錯誤,可能是沒有添加commons-pool.jar和commons-dbcp.jar和commons-collections.jar
Error creating bean with name 'sessionFactory' defined in ServletContext resource [/WEB-INF/applicationContext.xml]: Invocation of init method failed; nested exception is org.hibernate.MappingException: entity class not found: ssh.dao.User
因?yàn)樽约涸谝苿赢a(chǎn)生的User.java類的時候,忘記修改User.hbm.xml文件的映射實(shí)體類,需要改成
<class name="ssh.pojo.User" table="user" catalog="ssh">
Action class [loginAction] not found - action - file:/D:/workspace2/.metadata/.plugins/com.genuitec.eclipse.easie.tomcat.myeclipse/tomcat/webapps/ssh/WEB-INF/classes/struts.xml
因?yàn)閘ogin action的class我指定為loginAction,所以在spring中的login Bean的id="loginAction"來對應(yīng),但是我卻寫成了login,所以找不到。
org.springframework.orm.hibernate3.HibernateQueryException: unexpected token: model near line 1, column 56 [from ssh.pojo.User as model where model.name= adminand model.password= admin]; nested exception is org.hibernate.hql.ast.QuerySyntaxException: unexpected token: model near line 1, column 56 [from ssh.pojo.User as model where model.name= adminand model.password= admin]
可以從from字符串中看出,我忘記寫空格了。
javax.servlet.ServletException: org.springframework.jdbc.UncategorizedSQLException: Hibernate operation: Cannot open connection; uncategorized SQLException for SQL [???]; SQL state [null]; error code [0]; Cannot create PoolableConnectionFactory (Unknown database 'ssh1'); nested exception is org.apache.commons.dbcp.SQLNestedException: Cannot create PoolableConnectionFactory (Unknown database 'ssh1')
因?yàn)閟pring中的dataSource的 <property name="url" value="jdbc:mysql://localhost:3306/ssh"></property>,我原來指定了ssh1的數(shù)據(jù)庫,我并沒有創(chuàng)建這個數(shù)據(jù),所以改回ssh
javax.servlet.ServletException: org.springframework.dao.InvalidDataAccessResourceUsageException: could not execute query; nested exception is org.hibernate.exception.SQLGrammarException: could not execute query
這個是因?yàn)槲彝洶裺ql字符串中的值用''括起來,例如:
from ssh.pojo.User as model where model.name = admin and model.password = admin
應(yīng)該要變成:
from ssh.pojo.User as model where model.name = 'admin' and model.password = 'admin'
自己改UserDAO中的字符串吧。
No configuration found. Configuring ehcache from ehcache-failsafe.xml found in the classpath:....
如果有這個問題的話,那就參看:http://www.tkk7.com/jianyue/archive/2008/08/28/225415.html
java.lang.NoClassDefFoundError: org/objectweb/asm/CodeVisitor
java.lang.NoClassDefFoundError: org/objectweb/asm/commons/EmptyVisitor
java.lang.NoSuchMethodError: org.objectweb.asm.ClassVisitor.visit
CGLIB Enhancement failed
主要是hibernate與spring包沖突問題,可能有多種情況,都參照一下吧,但是最關(guān)鍵的原則是一個同樣功能的包,
不要將多個版本都放進(jìn)來。根據(jù)這個原則,自己也能夠知道應(yīng)該刪去什么包。
解決方案:參看:http://www.tkk7.com/jianyue/archive/2008/08/28/225246.html
No configuration found for the specified action: in namespace:
那么一定是action配置得不對,不是包的問題,自己詳細(xì)參照一下我的那份action配置說明。
代碼工程/Files/jianyue/ssh.rar
由于空間有限,去掉了包。包的列表如下:
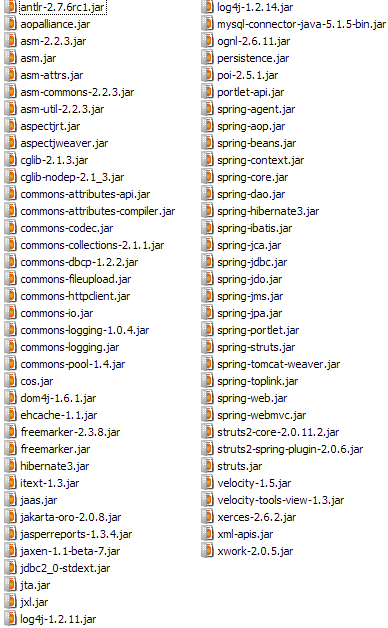
使用QQ中轉(zhuǎn)站的工程資料:http://xianexs.mail.qq.com/cgi-bin/downloadfilepart/svrid264/ssh.rar?svrid=264&fid=43c7ea2ec48f0ab1df6cf19be93fd207f24f786949adb4ba&&txf_fid=64f2ea7b5eab7021495c997ac5512b1e1556cd97&&txf_sid=aaf1d1ab2dd1c1b7301c3909f4df304167a7e99e有時間限制,盡快下。