①在values文件夾下定義TextView的顏色和邊距規則:
顏色規則:notepadcolors.xml
<?xml version="1.0" encoding="utf-8"?>
<resources>
<!-- 頁面 -->
<color name="notepad_paper">#AAFFFF99</color>
<!-- 邊緣 -->
<color name="notepad_lines">#FF0000FF</color>
<!-- 行 -->
<color name="notepad_margin">#90FF0000</color>
<!-- 文本 -->
<color name="notepad_text">#AA0000FF</color>
</resources>
邊距規則:notepaddimens.xml
<?xml version="1.0" encoding="utf-8"?>
<resources>
<dimen name="notepad_margin">30dp</dimen>
</resources>
②創建一個擴展原TextView的新類,并重寫onDraw方法來修改視圖的外觀
package com.yinger;
import android.content.Context;
import android.content.res.Resources;
import android.graphics.Canvas;
import android.graphics.Paint;
import android.util.AttributeSet;
import android.widget.TextView;
public class TodoListItemView extends TextView {
private Paint marginPaint;
private Paint linePaint;
private int paperColor;
private float margin;
public TodoListItemView(Context context, AttributeSet attrs, int defStyle) {
super(context, attrs, defStyle);
// TODO Auto-generated constructor stub
init();
}
public TodoListItemView(Context context, AttributeSet attrs) {
super(context, attrs);
init();
}
public TodoListItemView(Context context) {
super(context);
init();
}
private void init() {
Resources myResources = getResources();
// Create the paint brushes we will use in the onDraw method.
marginPaint = new Paint(Paint.ANTI_ALIAS_FLAG);
marginPaint.setColor(myResources.getColor(R.color.notepad_margin));
linePaint = new Paint(Paint.ANTI_ALIAS_FLAG);
linePaint.setColor(myResources.getColor(R.color.notepad_lines));
// Get the paper background color and the margin width.
paperColor = myResources.getColor(R.color.notepad_paper);
margin = myResources.getDimension(R.dimen.notepad_margin);
}
@Override
protected void onDraw(Canvas canvas) {
// TODO Auto-generated method stub
// Color as paper
canvas.drawColor(paperColor);
// Draw ruled lines
canvas.drawLine(0, 0, 30.0f, 0, linePaint);
canvas.drawLine(0, getMeasuredHeight(),
getMeasuredWidth(), getMeasuredHeight(),
linePaint);
// Draw margin
canvas.drawLine(margin, 0, margin, getMeasuredHeight(), marginPaint);
// Move the text across from the margin
canvas.save();
canvas.translate(margin, 0);
// Use the TextView to render the text.
super.onDraw(canvas);
canvas.restore();
}
}
注:要重寫所有的構造方法,這樣比較保險。
-----------------------------------------------------------我是分隔線-------------------------------------------------------------------
OK,以上,已經實現了TextView的自定義,下面我們看看怎么來引用它(以ListView為例)
③在layout文件夾下創建list item 的布局規定:
todolist_item.xml
<?xml version="1.0" encoding="utf-8"?>
<com.yinger.TodoListItemView
xmlns:android="http://schemas.android.com/apk/res/android"
android:layout_width="fill_parent"
android:layout_height="fill_parent"
android:padding="10dp"
android:scrollbars="vertical"
android:textColor="@color/notepad_text"
android:fadingEdge="vertical"
/>
注意,黃色部分是重點。
④大家熟悉的布局文件,我這里是main.xml,沒啥好說的。
<?xml version="1.0" encoding="utf-8"?>
<LinearLayout xmlns:android="http://schemas.android.com/apk/res/android"
android:orientation="vertical"
android:layout_width="fill_parent"
android:layout_height="fill_parent">
<EditText
android:id="@+id/myEditText"
android:layout_width="fill_parent"
android:layout_height="wrap_content"
android:text="New To Do Item"
/>
<ListView
android:id="@+id/myListView"
android:layout_width="fill_parent"
android:layout_height="wrap_content"
/>
</LinearLayout>
⑤和以前一樣的定義ListView,沒啥區別:
package com.yinger;
import java.util.ArrayList;
import android.app.Activity;
import android.os.Bundle;
import android.view.KeyEvent;
import android.view.View;
import android.view.View.OnKeyListener;
import android.widget.ArrayAdapter;
import android.widget.EditText;
import android.widget.ListView;
public class TextViewDemo extends Activity {
/** Called when the activity is first created. */
@Override
public void onCreate(Bundle savedInstanceState) {
super.onCreate(savedInstanceState);
setContentView(R.layout.main);
// Get references to UI widgets
ListView myListView = (ListView)findViewById(R.id.myListView);
final EditText myEditText = (EditText)findViewById(R.id.myEditText);
final ArrayList<String> todoItems = new ArrayList<String>();
int resID = R.layout.todolist_item;
final ArrayAdapter<String> aa = new ArrayAdapter<String>(this, resID,
todoItems);
myListView.setAdapter(aa);
myEditText.setOnKeyListener(new OnKeyListener() {
public boolean onKey(View v, int keyCode, KeyEvent event) {
if (event.getAction() == KeyEvent.ACTION_DOWN)
if (keyCode == KeyEvent.KEYCODE_DPAD_CENTER)
{
todoItems.add(0, myEditText.getText().toString());
aa.notifyDataSetChanged();
myEditText.setText("");
return true;
}
return false;
}
});
}
}
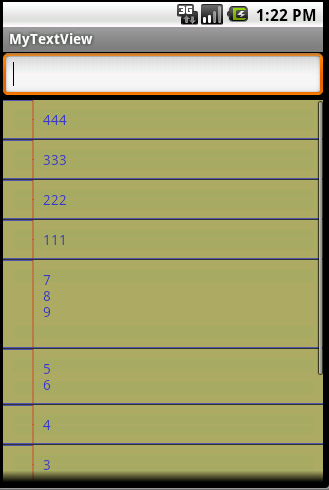
運行結果截圖:
posted on 2011-06-11 21:26
Ying-er 閱讀(7902)
評論(0) 編輯 收藏 所屬分類:
Android