JMF太老了,各種問題得不到解決,Oracle也沒再升級過,如果能找到新東西,最好能把它扔掉。
最近OpenCV比較火,還有人用Java封裝了OpenCV,成立了
JavaCV項目,通過改造VideoInput這個基于C語言的項目,能夠用Java來調用攝像頭,JMF可以扔掉了。
如果想測試,非常簡單,把那些編譯好的jar文件放入Build Path即可,如果是在Windows X86環境下,則只需要把帶Window和x86的包,以及不帶有任何平臺信息包放到Build Path即可。測試的程序可以用項目主頁上面那個Demo。代碼如下:
import java.io.File;
import java.net.URL;
import org.bytedeco.javacv.*;
import org.bytedeco.javacpp.*;
import org.bytedeco.javacpp.indexer.*;
import static org.bytedeco.javacpp.opencv_core.*;
import static org.bytedeco.javacpp.opencv_imgproc.*;
import static org.bytedeco.javacpp.opencv_calib3d.*;
import static org.bytedeco.javacpp.opencv_objdetect.*;
public class Demo {
public static void main(String[] args) throws Exception {
String classifierName = null;
if (args.length > 0) {
classifierName = args[0];
} else {
URL url = new URL("https://raw.github.com/Itseez/opencv/2.4/data/haarcascades/haarcascade_frontalface_alt.xml");
File file = Loader.extractResource(url, null, "classifier", ".xml");
file.deleteOnExit();
classifierName = file.getAbsolutePath();
}
// Preload the opencv_objdetect module to work around a known bug.
Loader.load(opencv_objdetect.class);
// We can "cast" Pointer objects by instantiating a new object of the desired class.
CvHaarClassifierCascade classifier = new CvHaarClassifierCascade(cvLoad(classifierName));
if (classifier.isNull()) {
System.err.println("Error loading classifier file \"" + classifierName + "\".");
System.exit(1);
}
// The available FrameGrabber classes include OpenCVFrameGrabber (opencv_highgui),
// DC1394FrameGrabber, FlyCaptureFrameGrabber, OpenKinectFrameGrabber,
// PS3EyeFrameGrabber, VideoInputFrameGrabber, and FFmpegFrameGrabber.
FrameGrabber grabber = FrameGrabber.createDefault(0);
grabber.start();
// FAQ about IplImage:
// - For custom raw processing of data, createBuffer() returns an NIO direct
// buffer wrapped around the memory pointed by imageData, and under Android we can
// also use that Buffer with Bitmap.copyPixelsFromBuffer() and copyPixelsToBuffer().
// - To get a BufferedImage from an IplImage, we may call getBufferedImage().
// - The createFrom() factory method can construct an IplImage from a BufferedImage.
// - There are also a few copy*() methods for BufferedImage<->IplImage data transfers.
IplImage grabbedImage = grabber.grab();
int width = grabbedImage.width();
int height = grabbedImage.height();
IplImage grayImage = IplImage.create(width, height, IPL_DEPTH_8U, 1);
IplImage rotatedImage = grabbedImage.clone();
// Objects allocated with a create*() or clone() factory method are automatically released
// by the garbage collector, but may still be explicitly released by calling release().
// You shall NOT call cvReleaseImage(), cvReleaseMemStorage(), etc. on objects allocated this way.
CvMemStorage storage = CvMemStorage.create();
// The OpenCVFrameRecorder class simply uses the CvVideoWriter of opencv_highgui,
// but FFmpegFrameRecorder also exists as a more versatile alternative.
FrameRecorder recorder = FrameRecorder.createDefault("output.avi", width, height);
recorder.start();
// CanvasFrame is a JFrame containing a Canvas component, which is hardware accelerated.
// It can also switch into full-screen mode when called with a screenNumber.
// We should also specify the relative monitor/camera response for proper gamma correction.
CanvasFrame frame = new CanvasFrame("Some Title", CanvasFrame.getDefaultGamma()/grabber.getGamma());
// Let's create some random 3D rotation
CvMat randomR = CvMat.create(3, 3), randomAxis = CvMat.create(3, 1);
// We can easily and efficiently access the elements of matrices and images
// through an Indexer object with the set of get() and put() methods.
DoubleIndexer Ridx = randomR.createIndexer(), axisIdx = randomAxis.createIndexer();
axisIdx.put(0, (Math.random()-0.5)/4, (Math.random()-0.5)/4, (Math.random()-0.5)/4);
cvRodrigues2(randomAxis, randomR, null);
double f = (width + height)/2.0; Ridx.put(0, 2, Ridx.get(0, 2)*f);
Ridx.put(1, 2, Ridx.get(1, 2)*f);
Ridx.put(2, 0, Ridx.get(2, 0)/f); Ridx.put(2, 1, Ridx.get(2, 1)/f);
System.out.println(Ridx);
// We can allocate native arrays using constructors taking an integer as argument.
CvPoint hatPoints = new CvPoint(3);
while (frame.isVisible() && (grabbedImage = grabber.grab()) != null) {
cvClearMemStorage(storage);
// Let's try to detect some faces! but we need a grayscale image
cvCvtColor(grabbedImage, grayImage, CV_BGR2GRAY);
CvSeq faces = cvHaarDetectObjects(grayImage, classifier, storage,
1.1, 3, CV_HAAR_DO_CANNY_PRUNING);
int total = faces.total();
for (int i = 0; i < total; i++) {
CvRect r = new CvRect(cvGetSeqElem(faces, i));
int x = r.x(), y = r.y(), w = r.width(), h = r.height();
cvRectangle(grabbedImage, cvPoint(x, y), cvPoint(x+w, y+h), CvScalar.RED, 1, CV_AA, 0);
// To access or pass as argument the elements of a native array, call position() before.
hatPoints.position(0).x(x-w/10) .y(y-h/10);
hatPoints.position(1).x(x+w*11/10).y(y-h/10);
hatPoints.position(2).x(x+w/2) .y(y-h/2);
cvFillConvexPoly(grabbedImage, hatPoints.position(0), 3, CvScalar.GREEN, CV_AA, 0);
}
// Let's find some contours! but first some thresholding
cvThreshold(grayImage, grayImage, 64, 255, CV_THRESH_BINARY);
// To check if an output argument is null we may call either isNull() or equals(null).
CvSeq contour = new CvSeq(null);
cvFindContours(grayImage, storage, contour, Loader.sizeof(CvContour.class),
CV_RETR_LIST, CV_CHAIN_APPROX_SIMPLE);
while (contour != null && !contour.isNull()) {
if (contour.elem_size() > 0) {
CvSeq points = cvApproxPoly(contour, Loader.sizeof(CvContour.class),
storage, CV_POLY_APPROX_DP, cvContourPerimeter(contour)*0.02, 0);
cvDrawContours(grabbedImage, points, CvScalar.BLUE, CvScalar.BLUE, -1, 1, CV_AA);
}
contour = contour.h_next();
}
cvWarpPerspective(grabbedImage, rotatedImage, randomR);
frame.showImage(rotatedImage);
recorder.record(rotatedImage);
}
frame.dispose();
recorder.stop();
grabber.stop();
}
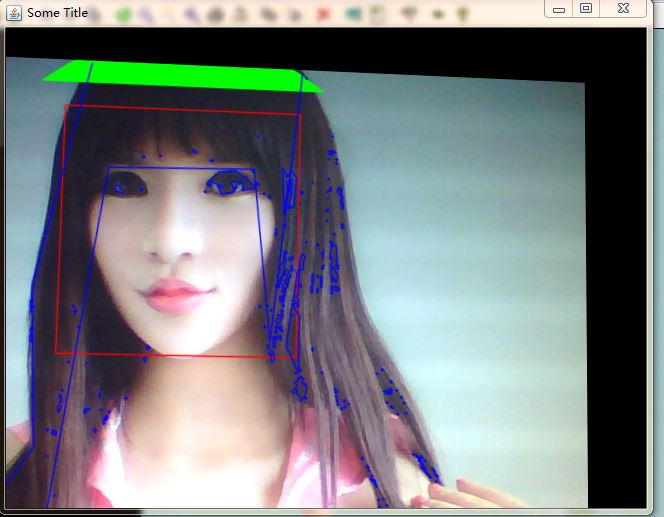
} 不過這個代碼包含了人臉識別,而人臉識別需要下載一個xml文件來定義識別的模式,代碼中那個xml鏈接下載下來的xml文件是會解析出錯的,可能是那個版本比較新,JavaCV還沒跟上,所以解析不了。經過搜索,發現有人提供了一個老版本的xml文件,能夠順利解析,會在視頻中把人臉用綠框框住。
所以,把代碼中的
URL url = new URL("https://raw.github.com/Itseez/opencv/2.4/data/haarcascades/haarcascade_frontalface_alt.xml");
改為
URL url = new URL("https://raw.githubusercontent.com/Danukeru/FOUCAM/master/haarcascade_frontalface.xml");
即可順利運行。
運行后發現很多線條和框框,畫面也是斜的,如下圖所示:
這是用來演示JavaCV對圖像的處理,如果對這些沒有興趣,可以簡單地用以下代碼來顯示攝像頭的圖像:
import org.bytedeco.javacpp.opencv_core.IplImage;
import org.bytedeco.javacv.CanvasFrame;
import org.bytedeco.javacv.FrameGrabber;
public class Demo3 {
public static void main(String[] args) throws Exception {
// The available FrameGrabber classes include OpenCVFrameGrabber (opencv_highgui),
// DC1394FrameGrabber, FlyCaptureFrameGrabber, OpenKinectFrameGrabber,
// PS3EyeFrameGrabber, VideoInputFrameGrabber, and FFmpegFrameGrabber.
FrameGrabber grabber = FrameGrabber.createDefault(1);
grabber.start();
// FAQ about IplImage:
// - For custom raw processing of data, createBuffer() returns an NIO direct
// buffer wrapped around the memory pointed by imageData, and under Android we can
// also use that Buffer with Bitmap.copyPixelsFromBuffer() and copyPixelsToBuffer().
// - To get a BufferedImage from an IplImage, we may call getBufferedImage().
// - The createFrom() factory method can construct an IplImage from a BufferedImage.
// - There are also a few copy*() methods for BufferedImage<->IplImage data transfers.
IplImage grabbedImage = grabber.grab();
CanvasFrame frame = new CanvasFrame("Some Title", CanvasFrame.getDefaultGamma()/grabber.getGamma());
while (frame.isVisible() && (grabbedImage = grabber.grab()) != null) {
frame.showImage(grabbedImage);
}
frame.dispose();
grabber.stop();
}
}
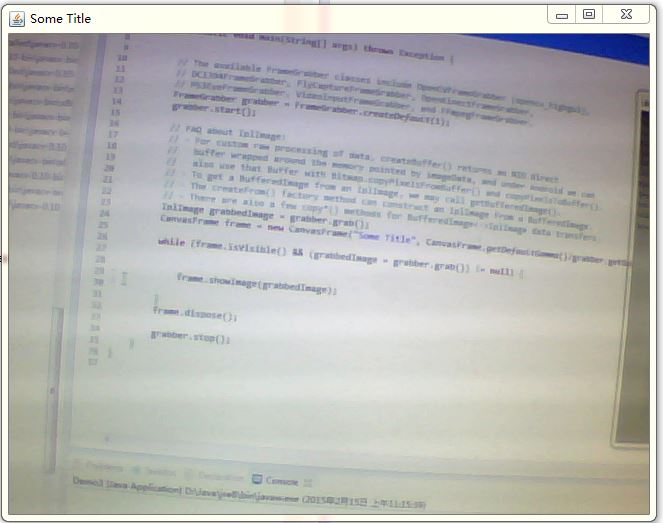
如下圖所示:
當然,這樣只是把攝像頭的圖像顯示出來,沒有任何用處,所以如果你想要處理其中的圖像,就需要增加代碼。例如,如果你需要截取攝像頭的圖像做進一步處理,就可以通過
IplImage的getBufferedImage()方法來得到BufferedImage,然后再處理這個
BufferedImage,例如解析二維碼。
不過,JavaCV默認是把圖像顯示在一個CanvasFrame對象中,這個對象繼承了JFrame,所以只能用作頂層窗口,不能嵌入到其他窗口中。為了能夠把它嵌入到其他窗口,可以修改一下代碼,繼承一個Canvas對象:
public class ImageCanvas extends Canvas {
private BufferedImage img;
@Override public void update(Graphics g) {
paint(g);
}
@Override public void paint(Graphics g) {
// Calling BufferStrategy.show() here sometimes throws
// NullPointerException or IllegalStateException,
// but otherwise seems to work fine.
try {
if (getWidth() <= 0 || getHeight() <= 0) {
return;
}
BufferStrategy strategy = getBufferStrategy();
do {
do {
g = strategy.getDrawGraphics();
if (img != null) {
g.drawImage(img, 0, 0, getWidth(), getHeight(), null);
}
g.dispose();
} while (strategy.contentsRestored());
strategy.show();
} while (strategy.contentsLost());
} catch (NullPointerException e) {
} catch (IllegalStateException e) { }
}
public BufferedImage getImg() {
return img;
}
public void setImg(BufferedImage img) {
this.img = img;
repaint();
}
public void init(){
new Thread(){
public void run(){
boolean error = true;
while(error){
try{
error = false;
createBufferStrategy(2);
}catch(IllegalStateException e){
error = true;
try {
Thread.sleep(100);
} catch (InterruptedException e1) {
// TODO Auto-generated catch block
e1.printStackTrace();
}
}
}
}
}.start();
}
使用的時候就把這個ImageCanvas當作普通的控件加入到窗口中,然后調用init()函數即可。init函數的作用是在控件顯示出來后才調用createBufferStrategy(2)語句,否則會拋出IllegalStateException異常。
這個ImageCanvas使用了雙緩沖機制來顯示視頻(實際上是不間斷地顯示圖像),避免圖像閃爍。在此之前,嘗試了網上找到的雙緩沖代碼,效果都不理想,只有這個能夠不閃爍。
不過用了這個控件來顯示視頻,就不能全屏了。
加入控件后,顯示圖像只需要調用setImg(BufferedImage img)函數即可。也就是把frame.showImage(grabbedImage);
改為
canvas.setImg(grabbedImage.getBufferedImage());