]]>
]]>
Note: Make sure to sign in to your AWS account with the AWS IAM user edXProjectUser credentials.
To begin, follow the steps below.
1. Start the RDS database instance
- In the AWS Console, click Services, then click Relational Database Service to open the Amazon RDS dashboard.
- In the left navigation pane, click Instances. From the list of instances, select edx-photos-db.
- At the top, click Instance actions, and then click Start.
2. Download and explore the exercise code.
- Type the command below in your AWS Cloud9 terminal to make sure you are in the ~/environment directory of your AWS Cloud9 instance.
cd ~/environment - In your AWS Cloud9 environment, download the exercise code by typing the command below in the terminal.
- Unzip the exercise code .zip file by typing the command below in your AWS Cloud9 terminal.
- Open the exercise-xray/FlaskApp/application.py file and explore the code. Notice that the AWS X-Ray libraries, such as aws_xray_sdk.core, xray_recorder, and XRayMiddleware, are now being imported in the application.py file. AWS X-Ray is configured with XRayMiddleware to gather tracing information for different services and report the information back into the AWS cloud.
- Open the exercise-xray/util.py file. Notice that there is a @xray_recorder.capture() decorator, which captures the time needed to resize the uploaded photo to a desired size. This information is reported back to the AWS cloud.
wget https://us-west-2-tcdev.s3.amazonaws.com/courses/AWS-100-ADG/v1.0.0/exercises/ex-xray.zip
unzip ex-xray.zip
The contents of the .zip file should be extracted to a folder with a similar name. You can view the folder on the left tree view.
3. Download and run the AWS X-Ray daemon on your AWS Cloud9 instance.
- Go to the AWS X-Ray daemon documentation link below:
https://docs.aws.amazon.com/xray/latest/devguide/xray-daemon.html - On the documentation page, scroll down until you see a link to Linux (executable)-aws-xray-daemon-linux-2.x.zip (sig). Right-click the link and copy the link address.
- In your AWS Cloud9 instance terminal, type the command below to go to your home directory.
- Type wget and paste the AWS X-Ray daemon hyperlink address that you copied. The command should look like the example below.
- Unzip the AWS X-Ray daemon by typing the command below. Make sure that the name of the .zip file matches the one in the command below.
- Run the AWS X-Ray daemon by typing the command below.
cd ~
unzip aws-xray-daemon-linux-2.x.zip
./xray
4. Run the exercise code and test the application.
- To run the exercise code, you will need to point the Run Configuration to the correct exercise folder. In the Python3RunConfiguration pane at the bottom, in the Command text box, type the text shown below and then click Run.
- Make sure to establish an SSH tunnel to your AWS Cloud9 instance. You may refer to the steps in the previous exercise for creating an SSH tunnel.
- Open http://localhost:5000, log in to the application with your credentials, and upload a photo. Click My photos at the top-right corner of the application. You should see your uploaded photo.
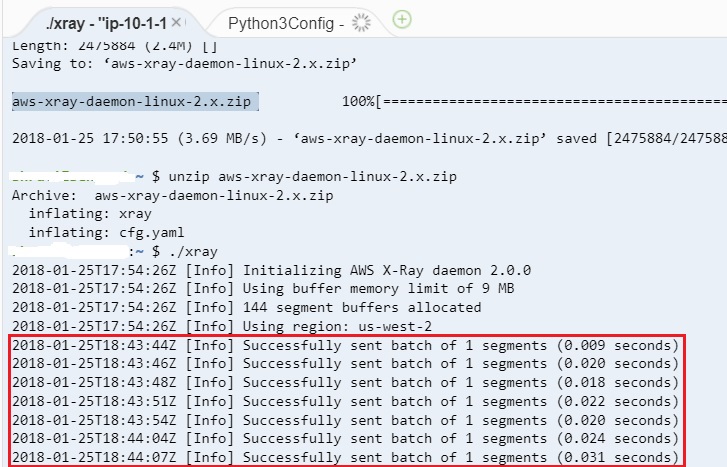
- Go to your AWS Cloud9 instance terminal and notice that the AWS X-Ray daemon is sending diagnostics information to your AWS account. You should see information as shown in the screenshot below.
exercise-xray/FlaskApp/application.py
A message like the one below should appear.
Running on http://0.0.0.0:5000/
5. Explore the diagnostics information collected by AWS X-Ray.
- In the AWS Console, click Services, then click X-Ray to open the AWS X-Ray dashboard.
- If you are using AWS X-Ray for the first time, you may have to click Get Started and then click Cancel to exit the wizard.
- Click Service map in the left navigation menu. The service map has information about AWS services communicating with each other and the processing time each service needs.
- On the left side, click Traces. You should see response times and time taken by each component in the application.
- In the Trace list at the bottom, click the trace item where the Method column contains POST. You should see timing information for all the calls made in your application, as shown in the screenshot below. This particular trace information should be about the POST made to the application to upload a photo. Notice the time needed for Amazon S3, Amazon RDS and Amazon Rekognition to process the photo. You can also see the time needed to resize the image against the resize_image label.
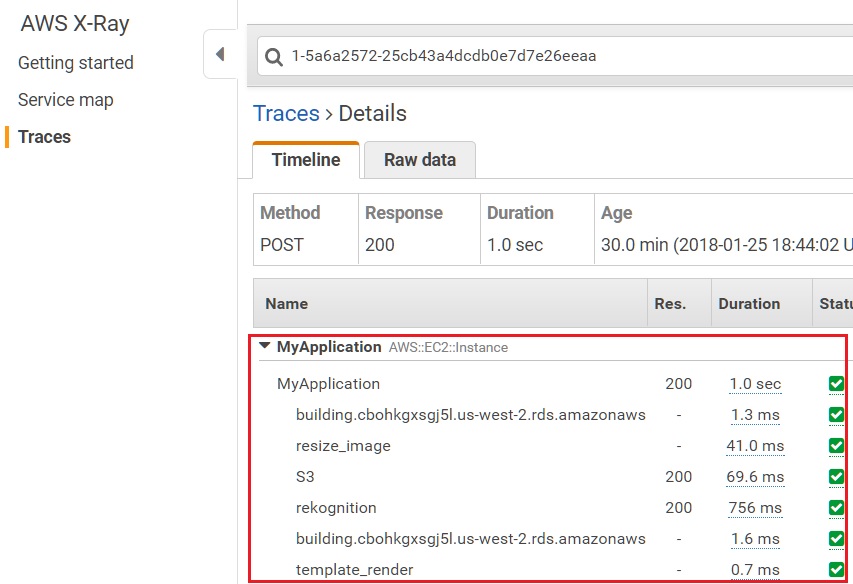
With this diagnostics information, you can now find out which component in your application is taking longer to process.
Optional Challenge 1
AWS X-Ray allows us to add searchable annotations to the trace segment. For more information, see Recording Annotations with the X-Ray SDK for Python.
The code below will pick up the current X-Ray segment from the xray_recorder.
from aws_xray_sdk.core import xray_recorder
...
document = xray_recorder.current_segment()
Inside the homepage route, can you add an annotation to the current segment containing the user's nickname? When this is reported back to AWS Cloud9, you will be able to search traces by username.
Optional Challenge 2
AWS X-ray will capture and report exceptions. Can you add some code to create an exception - for example, a new route that simply divides a number by zero? Run this new code with X-Ray configured. You will see the stack trace captured and viewable in the X-Ray console.
6. Stop the Amazon RDS database instance.
In order to keep your AWS account bill to a minimum, consider stopping the Amazon RDS instance and then starting it again when needed. Follow the steps below to stop the Amazon RDS database instance.
- In the AWS Console, go to the Amazon RDS dashboard.
- In the left navigation pane, click Instances. From the list of instances, select edx-photos-db.
- At the top, click Instance actions, and then click Stop. A prompt will appear. Click Yes, stop now.
]]>
]]>
]]>
Note: Make sure to sign in to your AWS account with the AWS IAM user edXProjectUser credentials.
To get started, follow the instructions below.
1. Create an Amazon RDS database instance.
In this section, you will create an Amazon RDS instance with the properties shown below to store photos and labels. If you are familiar with Amazon RDS, you may want to attempt to complete this section before reading the step-by-step instructions.
Region: Oregon (us-west-2)
Amazon RDS Instance type: MySQL (free tier eligible)
Name of DB instance: edx-photos-db
Master username: master
Master user password: Type a master user password and write it down for later use.
VPC: edx-build-aws-vpc
Database name: Photos
Important: Make a note of the database endpoint.
- In the AWS Console, click Services, then click Relational Database Service to open the Amazon RDS dashboard.
- Make sure you are still in the Oregon AWS Region.
- On the left navigation menu, click Instances.
- Click Launch DB instance.
- Scroll down to the bottom and select the Only enable options eligible for RDS free usage tier option.
- Scroll back to the top and select MySQL.
- Click Next.
- Leave the default selections and scroll down to Settings.
- For DB instance identifier, type edx-photos-db
- For Master username, type master
- Type a password for the master user and confirm the password. Make a note of the password for later use.
- Click Next.
- In the Network & Security section, select edx-build-aws-vpc.
- Scroll down to Database options.
- For Database name, type Photos. Make a note of the database name for later use.
- Leave the rest of the default settings, scroll down to the bottom and click Launch DB instance.
- Click View DB instance details to go to the DB instance details page.
- After the instance launches, scroll down to the Connect section and make a note of the Endpoint for later use.
The endpoint will look like this: sample.cppyk3cpwnox.us-west-2.rds.amazonaws.com.
Note: It should take about five minutes for the instance to launch.
2. Modify the security group of the Amazon RDS database.
In this section, you will modify the security group of the Amazon RDS instance to the security group of the AWS Cloud9 instance.
- On the Amazon RDS database instance page, scroll down to the Details section.
- Under Security and network, click the security group. The security group should have a name like rds-launch-wizard-xxx. A new page displaying the security group you just clicked should open.
- Make a note of the security group ID. You will need it in subsequent exercises.
- On the bottom pane, click Inbound.
- Click Edit.
- In the Source textbox, delete the existing text and type sg. A list of security groups will appear. Select the security group that contains your AWS Cloud9 environment name.
- Click Save.
3. Download the exercise code .zip file and unzip it to your AWS Cloud9 environment.
In this section, you will download the exercise code .zip file and unzip it to your AWS Cloud9 environment. If you feel familiar with the AWS Cloud9 environment from the previous few exercises, you may want to attempt to complete this section before reading the step-by-step instructions.
Exercise code: wget https://s3-us-west-2.amazonaws.com/us-west-2-tcdev/courses/AWS-100-ADG/v1.0.0/exercises/ex-rds.zip
Unzip command: unzip ex-rds.zip
- Type the command below in your AWS Cloud9 terminal to make sure you are in the ~/environment directory of your AWS Cloud9 instance.
cd ~/environment - Type the command below in your AWS Cloud9 terminal to download the Python code for the Amazon RDS database component.
- Unzip the exercise code zip file by typing the command below on your Cloud9 terminal.
wget https://s3-us-west-2.amazonaws.com/us-west-2-tcdev/courses/AWS-100-ADG/v1.0.0/exercises/ex-rds.zip
On the left tree view, you should see the exercise code .zip file named ex-rds.zip.
unzip ex-rds.zip
The contents of the .zip file should be extracted to a folder with a similar name. You can view the folder on the left tree view.
4. Explore the exercise code.
- In your AWS Cloud9 environment, on the left tree view, notice the exercise-rds/SetupScripts/database_create_tables.py file. This script creates the database tables needed for the application. The photo table stores the photos and labels information. The web_user is a restricted privilege user who has access solely to the photos table. The web application is configured to use the web_user and not the master user.
- Open the exercise-rds/FlaskApp/database.py file and explore the code for adding a photo to the database and fetching it back from the database.
5. Run the database script.
- To run the database_create_tables.py script, type the command below in your AWS Cloud9 terminal window.
- You should see a prompt on the screen to configure the database information. Follow the prompts and enter the information as shown below.
Database host: Paste the database endpoint you noted earlier.
Database user: master
Database password: Type the password for the master user.
Database name: Photos
web_user password: Type a password for the web_user. Make a note of the web_user password for later use.
You should see a message that a web_user is created with the required access granted to it.
python3 exercise-rds/SetupScripts/database_create_tables.py
6. Configure environment variables and run and test the code.
- For the code to run successfully, you will need to configure the environment variables with the database details. Under the FlaskApp folder, open the config.py file. Notice that the config.py file is now updated with the database-related environment variables.
- In your AWS Cloud9 environment, on the Run Configuration pane at the bottom, click ENV on the right side. You should see a small list showing the previously configured environment variables.
- To configure the database environment variables, type the environment variable Name and Value as shown in the table below:
Name Value DATABASE_HOST Database endpoint you noted earlier DATABASE_USER web_user DATABASE_PASSWORD Password for the web_user you noted earlier DATABASE_DB_NAME Photos Note: Make sure to delete any white space inserted while copy/pasting.
- To run the code, you will need to point the Run Configuration to the correct exercise folder. On Python3RunConfiguration pane at the bottom, in the Command textbox, type the text shown below and click Run on the left side.
- To test the code, go to your browser and type the IP address of the AWS Cloud9 environment. At the end of the IP address, type :5000
You should see the application running on port 5000. - Click Home and upload a photo. You should see the photo and the Amazon Rekognition labels generated for the photo.
- Click Home. You should see a table with the thumbnail for the photo and the label information. This information is being fetched from the database.
- Try uploading a few more photos and watch as the table on the Home page is populated with the information saved in the database.
exercise-rds/FlaskApp/application.py
You should see a message like this one:
Running on http://0.0.0.0:5000
Optional Challenge
There is a command line mysql client on your Cloud9 instance.
The mysql client takes parameters for the database host and user. A "-p" switch tells the client to prompt you for a password. To connect to your RDS database, run the command below (replace DATABASE_HOST with your RDS database endpoint).
mysql -h DATABASE_HOST -u web_user -p
Can you SELECT the contents of the photo table?
7. Stop the Amazon RDS database instance.
To keep your AWS account bill to a minimum, consider stopping the Amazon RDS instance and then starting it again when needed. Follow the steps below to stop the Amazon RDS database instance.
- In the AWS Console, click Services, then click Relational Database Service to open the Amazon RDS dashboard.
- In the left navigation pane, click Instances. From the list of instances, select edx-photos-db.
- At the top, click Instance actions -> Stop. You will get a prompt. Click Yes, stop now.
]]>
Note: Make sure to sign in to your AWS account with the AWS IAM user edXProjectUser credentials.
To get started, follow the instructions below.
1. Download the exercise code .zip file to your AWS Cloud9 environment.
- Type the command below in your AWS Cloud9 terminal to make sure you are in the ~/environment directory of your AWS Cloud9 instance.
cd ~/environment - Type the command below in your AWS Cloud9 terminal to download the python code for the Amazon Rekognition component.
On the left tree view, you should see the exercise code .zip file named ex-rekognition.zip.
2. Unzip the exercise code .zip file.
- Unzip the exercise code .zip file by typing the command below on your AWS Cloud9 terminal.
- You may want to close any tabs that remain open from previous exercises.
unzip ex-rekognition.zip
The contents of the .zip file should be extracted to a folder with a similar name. You can view the folder on the left tree view.
3. Explore the exercise code.
- Open the exercise-rekognition/FlaskApp/application.py file.
- In the Homepage route function, notice that a Boto 3 client for Amazon Rekognition is created. The image uploaded in the Amazon S3 bucket is passed to the detect_labels API, which returns a list of labels processed by Amazon Rekognition. These labels are then populated on the UI.
4. Run and test the code.
- To run the application.py code, on the top menu bar, click Run -> Run Configurations -> Python3RunConfiguration.
- Important: Notice that the run configuration runs the application.py for the previous exercise.
- Point the run configuration to the correct exercise folder by editing the folder path in the Command text box in the bottom pane.
In that text box, type exercise-rekognition/FlaskApp/application.py - Click Run on the left side. You should see a message like this:
- Go to your browser and type the IP address of the Amazon EC2 instance that hosts your AWS Cloud9 environment. At the end of the IP address, type :5000
The application should now have the functionality related to Amazon Rekognition.
- To test the Amazon Rekognition component, click Home on the application.
- Upload an image. Amazon Rekognition should label the image with the image properties.
Running on http://0.0.0.0:5000/
Optional Challenge
The Boto 3 detect_labels response includes a Confidence value. Can you update the application UI to include the Confidence? Or define a threshold and only display labels over the confidence threshold?
]]>
Note: Make sure to sign in to your AWS account with the AWS IAM user edXProjectUser credentials.
Architecture Diagram

The diagram shown above is the architecture diagram for the application you will build over the duration of the course. The course project is a simple web application in which users log in to their accounts and upload photos to an Amazon S3 bucket, process the photos with Amazon Rekognition to generate labels and then store the photos along with their labels and description in an Amazon RDS database.
The application is deployed on an Amazon EC2 instance with an Application Load Balancer sitting in front of the instance to direct user requests to the instance. Amazon Cognito is used to sign up/sign in users for the application. In order to asynchronously process the photo labels, when a photo is uploaded, an Amazon S3 bucket event notification is issued to an Amazon SNS topic. This triggers a subscribed AWS Lambda function, which talks to Amazon Rekognition. To make the application more distributed, an Amazon SQS queue subscribed to the Amazon SNS topic stores all the incoming requests and an on-premises application polls the queue for processing. AWS X-Ray traces the calls made to all the AWS resources in this application, thereby providing diagnostics information. The application is coded in Python 3 using AWS Cloud9 as the IDE.
In this exercise, you will build the Amazon S3 uploader component of the application. In this component, users will upload a photo to an Amazon S3 bucket.
To begin, follow the instructions below.
1. Create AWS Cloud9 environment and explore the environment.
In this section, you will create an AWS Cloud9 environment and explore the environment.
- In the AWS Console, click Services, then click Cloud9 to open the Cloud9 dashboard.
- Make sure you are in the Oregon region.
- Click Create environment at the top-right corner.
- For Name, type BuildingOnAWS
- Click Next step.
- On the Configure settings page, leave the default selection in the Environment settings section and scroll down to Network settings (advanced).
- For Network (VPC), choose the edx-build-aws-vpc id you wrote down in the third exercise.
- For Subnet, choose the public subnet in edx-build-aws-vpc with the subnet-id you noted in the third exercise.
- Click Next step.
- Review the details and click Create environment. This should launch your AWS Cloud9 environment in a few minutes.
- Upon environment creation, notice the terminal window on the bottom pane. The terminal provides a remote login to the instance on which the AWS Cloud9 environment is hosted, just as you used SSH for remote login in the third exercise. A pre-authenticated AWS CLI is installed in your terminal.
- Explore the terminal by typing this command:
aws ec2 describe-instancesThis should give a JSON output with the all the information of the EC2 instances in your account. - Install Boto 3 on your AWS Cloud9 instance by typing this command:
- At the terminal, type python3 and press ENTER.
- Explore the Python Boto 3 APIs by executing these commands:
- Press CTRL+D to exit the Python interpreter.
sudo pip-3.6 install boto3
import boto3
client = boto3.client('ec2')
client.describe_instances()
2. Create an Amazon S3 bucket to store the application photos.
In this section, you will create an Amazon S3 bucket in your AWS account. This bucket will store your application photos. If you are familiar with Amazon S3, you may want to attempt to complete this section by using the properties below before reading the step-by-step instructions.
Region: Oregon (us-west-2)
Bucket name: Type a unique bucket name to store photos and make a note of it for later use.
- In the AWS Console, click Services, then click S3 to open the S3 dashboard.
- Click Create bucket.
- For Bucket name, type a unique bucket name to store photos. Write down the name of the bucket for later use.
- For Region, make sure you have selected the Oregon (us-west-2) region.
- Click Create.
3. Build the Amazon S3 uploader component of the application in the AWS Cloud9 environment.
In this section, you will build the Amazon S3 uploader component of the application. The Amazon S3 uploader component uploads photos to the Amazon S3 bucket you created in the previous section.
- Type the command below in your AWS Cloud9 terminal to make sure you are in the ~/environment directory of your AWS Cloud9 instance.
cd ~/environment - Type the command below in your AWS Cloud9 terminal to download the Python code for the Amazon S3 uploader component.
wget https://us-west-2-tcdev.s3.amazonaws.com/courses/AWS-100-ADG/v1.0.0/exercises/ex-s3-upload.zipOn the left tree view, you should see the exercise code .zip file named ex-s3-upload.zip. - Unzip the exercise code .zip file by typing the command below in your AWS Cloud9 terminal.
unzip ex-s3-upload.zipThe contents of the .zip file should be extracted to a folder with a similar name. You can view the folder on the left tree view. - Open the exercise-s3-upload/FlaskApp/application.py file and review the code. Notice that an Amazon S3 client has been created to interact with Amazon S3 via the Boto 3 API.
- Install the requirements for the project by executing the command below in your AWS Cloud9 terminal.
- To run the application.py code:
- Select exercise-s3-upload/FlaskApp/application.py in the tree view.
- On the top menu bar, click Run -> Run With -> Python 3. Ensure that you are using the Python 3 runner, as shown in the screenshot below.

- You should see an error message asking for an environment variable named PHOTOS_BUCKET.
- To successfully run the code, you will need to set environment variables. To do so, follow the instructions below:
- On the right side of the Run Configuration pane at the bottom, click ENV, as in the screenshot below.

- In the Name column, type PHOTOS_BUCKET
- In the Value column, type the name of the Amazon S3 bucket you created earlier.
Note: Make sure to delete any white space that was inserted while copy/pasting. - In the Name column, type FLASK_SECRET
The Flask app uses a secret value to encrypt session variables. - In the Value column, type random characters and numbers.
- Save the run configuration by typing a name for the configuration. This saves the run configuration with all the environment variables and the runner information. In the text box next to the Run button, type Python3RunConfiguration, as shown in the screenshot below.

- Run application.py again. This time, it should run successfully. In the terminal, you will see a message like this:
Running on http://0.0.0.0:5000/That means the Python Flask app is now running on port 5000 of the AWS Cloud9 instance.
- To verify that the app is running, you will need to edit the security group of the AWS Cloud9 instance. Go to the EC2 dashboard, locate your AWS Cloud9 instance, and select it.
- In the Description pane at the bottom, click the security group hyperlink. This should open up the security group associated with the AWS Cloud9 instance.
- On the bottom pane, click Inbound.
- Click Edit.
- Click Add Rule.
- For Port Range, type 5000
- For Source, type 0.0.0.0/0
- Click Save.
- Return to your AWS Cloud9 environment. On the top-right corner, click Share, as shown in the screenshot below.

- Copy the IP address displayed in front of Application. This is the public IP address of the AWS Cloud9 instance.
- Go to your browser and type the IP address of the AWS Cloud9 instance followed by :5000 The uploaded component of the project is now up and running!
- Try uploading a few photos via the app. You will notice that the photos are stored in the Amazon S3 bucket that you created earlier.
Note: Your AWS Cloud9 instance has been configured to auto-hibernate your environment to prevent unnecessary charges.
sudo pip-3.6 install -r exercise-s3-upload/FlaskApp/requirements.txt
Optional Challenge
The Boto 3 list_objects method returns a LastModified property. Can you update the application to display photos in LastModified order?
]]>
You will also create an Amazon EC2 instance, SSH into the instance, and configure AWS CLI to explore the AWS CLI commands. Then you will install Boto 3 on the instance and try out some Python scripting on the terminal. Boto 3 is the AWS SDK for Python, making it easier to integrate your Python application, library, or script with AWS services.
To begin, follow the instructions below.
1. Create an AWS IAM policy.
In this section, you will create an AWS IAM customer-managed policy. Customer-managed policies provide more precise control over your policies than AWS managed policies. This policy will have permissions specific to the AWS resources needed for the application you will build in this course.
- In the AWS Management Console, click Services, then click IAM to open the IAM dashboard.
- In the left navigation menu, click Policies.
- Click Create policy.
- Click the JSON tab.
- In the editor textbox, completely replace the sample policy with the following.
{
    "Version": "2012-10-17",
    "Statement": [
        {
            "Sid": "Sid1",
            "Effect": "Allow",
            "Action": [
                "iam:*",
                "rds:*",
                "sns:*",
                "cloudformation:*",
                "rekognition:*",
                "ec2:*",
                "cognito-idp:*",
                "sqs:*",
                "xray:*",
                "s3:*",
                "elasticloadbalancing:*",
                "cloud9:*",
                "lambda:*",
                "tag:GetResources",
                "logs:*",
                "kms:ListKeyPolicies",
                "kms:GenerateRandom",
                "kms:ListRetirableGrants",
                "kms:GetKeyPolicy",
                "kms:ListResourceTags",
                "kms:ReEncryptFrom",
                "kms:ListGrants",
                "kms:GetParametersForImport",
                "kms:ListKeys",
                "kms:GetKeyRotationStatus",
                "kms:ListAliases",
                "kms:ReEncryptTo",
                "kms:DescribeKey"
            ],
            "Resource": "*"
        }
    ]
}
You have successfully created an AWS IAM policy with full access to AWS IAM, Amazon EC2, Amazon S3, Amazon RDS, Amazon SNS, Amazon SQS, Amazon Rekognition, AWS Lambda, Amazon Cognito, AWS Cloud9, AWS X-Ray, and AWS CloudFormation. When you create IAM policies, follow the standard security advice of granting least privilege - that is, granting only the permissions required to perform a task. Determine what users need to do and then craft policies for them that let the users perform only those tasks.
2. Create an AWS IAM user, attach a policy to the user, and generate access keys.
In this section, you will create an AWS IAM user and attach the policy you just created to the user. You will then generate the access keys for the user. Those access keys will be used to make programmatic calls to AWS services via AWS CLI or APIs. If you are familiar with AWS IAM users, you may want to attempt to complete this section before reading the step-by-step instructions.
AWS IAM user name: edXProjectUserAccess type: Programmatic access and AWS Management Console access
Policy: edXProjectPolicy
Important: Download the .csv file with the access keys after creating the user. Also, make sure to click the Send email link to get the email instructions for signing in to the AWS Management Console as edXProjectUser.
Reminder! Be sure to protect your AWS account access keys like you would your credit card numbers or any other sensitive secret.
At the end of this exercise, you will not be using the access keys again. It is a security best practice to remove IAM user credentials that are not needed. After this exercise, make sure to remove the access keys only (not the AWS Console password) for the IAM user - edXProjectUser. See more IAM Best Practices.
- In the AWS Console, click Services, then click IAM to go to the IAM dashboard.
- In the left navigation menu, click Users.
- Click Add user.
- In the User name text box, type edXProjectUser
- For Access type, select Programmatic access and AWS Management Console access.
- For Console password, you may choose either Autogenerated password or Custom password. If you choose Autogenerated, you will be prompted to change your console password when you log in to the AWS Console as the edXProjectUser user. Make sure you take a note of the password created.
- Click Next: Permissions.
- Under Set permissions for edXProjectUser section, click Attach existing policies directly.
- In the search text box for Filter, type edXProjectPolicy. Select edXProjectPolicy from the filtered list.
- Click Next: Review.
- Review the information and click Create user. You should see a success message.
- Click Download .csv to download the access key ID and secret access key.
Note: This is your only chance to download these credentials. - In the Email login instructions column, click Send email. You can send an email to an email address of your choice. This email contains the instructions to sign in to your AWS account with the edXProjectUser AWS IAM user credentials.
- Click Close to return to the console.
- In the left navigation menu, click Dashboard.
- Note the IAM users sign-in link. This is a special URL for IAM users, which includes your account ID. You will see the same URL in the email you just created.
- Sign out of the console, and follow the instructions provided in the email you just received to sign in to the AWS Console as the edXProjectUser AWS IAM user.
3. Create an Amazon EC2 instance and configure AWS CLI with the access keys of the AWS IAM user edXProjectUser.
- Sign-in to your AWS account as the edXProjectUser AWS IAM user.
- Create an Amazon EC2 instance using the properties below. If you are familiar with Amazon EC2, you may want to attempt to complete this portion before reading the step-by-step instructions.
Region: Oregon (us-west-2)
Amazon Machine Image (AMI): Amazon Linux AMI
Instance Type: t2.micro
Network VPC: edx-build-aws-vpc
Subnet: edx-subnet-public-a
Tag: Ex4WebServer
Security group name: Use the security group created in the third exercise, exercise3-sg.
Key Pair: Use the key pair created in the third exercise.
- In the AWS Console, click Services, then click EC2 to go to the EC2 dashboard.
- Make sure you are in the Oregon region.
- From the EC2 dashboard, click Launch Instance.
- On the Choose an Amazon Machine Image (AMI) page, select the Amazon Linux AMI. This AMI is free-tier eligible.
- On the Choose an Instance Type page, select t2.micro.
- Click Next: Configure Instance Details.
- For Network, select edx-build-aws-vpc.
- For Subnet, select edx-subnet-public-a in the us-west-2a availability zone.
- Click Next: Add Storage. Skip through this page and click Next: Add Tags.
- Click Add Tag.
- In the Key textbox, type Name.
- In the Value textbox, type Ex4WebServer.
- Click Next: Configure Security Group. Select the Select an existing security group option.
- From the list of security groups, select exercise3-sg.
- Click Review and Launch.
- On the Review Instance Launch page, review the details and click Launch.
- When prompted for a key pair, select Choose an existing key pair, and then choose the key pair you created in the third exercise.
- Select the acknowledgement check box, and then click Launch Instances.
- Click View Instances to return to the instances page.
- On the Instances page, you can view the status of the launch. It can take a few minutes for the instance to be ready so that you can connect to it. Check that your instance has passed its status checks. You can view this information in the Status Checks column.
- Once the instance is ready, select the instance and note down the IPv4 Public IP found in the Descriptions tab at the bottom.
- Connect to the instance using SSH. You may refer to the instructions in the third exercise for connecting to the instance.
- Open the credentials.csv file that you downloaded earlier. Find the entry for edXProjectUser, and note the values for Access Key Id and Secret Access Key.
- On the instance terminal, type the below command.
- Follow the prompts on the screen and paste in the values for Access Key Id and Secret Access Key.
- For Region, type us-west-2.
- For Default output format, press ENTER.
You have now configured the AWS CLI so that any CLI calls will operate with the credentials of the AWS IAM user edXProjectUser. - Now query the information about the Amazon EC2 instances in your account. Type the command below.
aws ec2 describe-instancesYou should see a JSON output with all the information of the Amazon EC2 instances in your account. This means that you were able to successfully execute the AWS CLI command with the permissions attached to the edXProjectUser.
aws configure
4. Install Boto 3 on the instance and explore Boto 3 APIs.
- First install Python 3 and the Boto 3 SDK. On the Amazon EC2 instance terminal, type the commands below.
- To start using Boto 3, type python3 on the instance terminal and press ENTER. You should now be able to execute Python commands from your instance terminal.
- Import boto3 and create a client for the corresponding AWS service you wish to use. In this case, you can explore the EC2 APIs for Boto 3 by creating the EC2 client. Type the following.
import boto3You should see a JSON output similar to the one given by the AWS CLI command.
client = boto3.client('ec2')
client.describe_instances() - Now, type the command below.
- Press Ctrl-D to exit the python interpreter.
sudo yum -y install python36
sudo pip-3.6 install boto3
client.describe_key_pairs()
Optional Challenge
In this exercise, you configured an access key (access key ID and secret access key) on your EC2 instance. Later in the course, we will introduce IAM roles. You may want to read ahead a little, and look at IAM Roles for Amazon EC2.
Can you see a way to complete this exercise using an IAM role on the instance, rather than the access keys you just used?
5. Terminate the Amazon EC2 instance.
In this section, you will terminate the Amazon EC2 instance by selecting the instance in the Amazon EC2 dashboard and clicking Actions -> Instance State -> Terminate .
- In the console, click Services, then click EC2 to open the EC2 dashboard.
- In the navigation pane, click Instances. In the list of instances, select the Ex4WebServer instance.
- Click Actions, Instance State, Terminate.
- Click Yes, Terminate when prompted for confirmation.
- Amazon EC2 shuts down and terminates your instance. After your instance is terminated, it remains visible on the console for a short while, and then the entry is deleted.
]]>
You will also create an Amazon EC2 instance and learn how to connect to it using an SSH client. You use an SSH client for remote login and administration over an authenticated secure channel. You will then look at the log files on the instance and extract information from the instance metadata and user data script.
To get started, follow the steps below.
1. Launch an AWS CloudFormation template to create VPC and subnets.
In this section, you will create a VPC and subnets by launching an AWS CloudFormation template. If you are familiar with AWS CloudFormation, you may want to attempt to complete this section by using the properties below before reading the step-by-step instructions.
Region: Oregon (us-west-2)
CloudFormation template: Download template
Name of the stack: edx-vpc-stack
- In the AWS Console, click Services, then click CloudFormation to open the CloudFormation dashboard.
- Make sure you are still in the Oregon AWS Region.
- Click Create Stack.
- Download the AWS CloudFormation template to create a VPC and save it locally on your computer.
- To select the AWS CloudFormation template you just downloaded, click Choose file.
- Click Next.
- In the Stack name textbox, type edx-vpc-stack.
- Click Next. Skip the Options page and click Next.
- Click Create. You will notice that the status of the template is CREATE_IN_PROGRESS. The template should finish creating in a minute.
- In your AWS Management Console home page, in the AWS services search textbox at the top, type VPC, and then select VPC to open the VPC dashboard.
- In the VPC dashboard, on the left navigation menu, click Your VPCs. You will see a VPC named edx-build-aws-vpcin the list. Write down the vpc-id of the edx-build-aws-vpc. You will need the vpc-id in subsequent exercises.
- In the VPC dashboard, on the left navigation menu, click Subnets. You will see four subnets starting with edx-subnet-xxxx. Write down the subnet-id of edx-subnet-public-a. You will need the subnet-id in subsequent exercises.
2. Launch an Amazon EC2 instance with a user data script in a VPC.
In this section, you will launch an Amazon EC2 instance with an user data script. If you are familiar with Amazon EC2, you may want to attempt to complete this section by using the properties below before reading the step-by-step instructions.
Region: Oregon (us-west-2)
Amazon Machine Image (AMI): Amazon Linux AMI
Instance Type: t2.micro
Network VPC: edx-build-aws-vpc
Subnet: edx-subnet-public-a
User data script: Download
Tag: Ex3WebServer
Security group name: exercise3-sg
Security group rules: Allow HTTP and SSH
Key Pair: Create a new key pair and save it for later use.
- In the AWS Console, click Services, then click EC2 to open the EC2 dashboard.
- At the top right corner, select the US West (Oregon) region.
- From the EC2 dashboard, click Launch Instance.
- On the Choose an Amazon Machine Image (AMI) page, select Amazon Linux AMI by clicking Select. This AMI is free-tier eligible.
- On the Choose an Instance Type page, select t2.micro.
- Click Next: Configure Instance Details.
- For Network, select edx-build-aws-vpc.
- For Subnet, select edx-subnet-public-a.
- Leave the defaults and scroll down to the Advanced Details section and expand it.
- Download the user data script and copy and paste the contents of the script in the text area.
- Click Next: Add Storage. Skip through this page and click Next: Add Tags.
- Click Add Tag.
- In the Key textbox, type Name
- In the Value textbox, type Ex3WebServer
- Click Next: Configure Security Group. Note that the wizard gives you an option to create a new security group or select an existing one. For this exercise, leave the default chosen option, Create a new security group.
- For Security group name, type exercise3-sg
- Click Add Rule.
- For Type, leave Custom TCP Rule selected.
- For Port Range, type 80
- For Source, type 0.0.0.0/0
- Note: The inbound rule for SSH is added by default.
- Click Review and Launch.
- On the Review Instance Launch page, review the details and click Launch.
- When prompted for a key pair, select Create a new key pair, enter a name for the key pair, and then click Download Key Pair. Note: This is the only chance for you to save the private key file, so be sure to download it. You will use the same key pair for all subsequent exercises in the course. Save the private key file in a safe place. You'll need to provide the name of your key pair when you launch an instance and the corresponding private key each time you connect to the instance.
- Select the acknowledgement check box, and then click Launch Instances.
- Click View Instances to return to the instances page.
- On the Instances page, you can view the status of the launch. It can take a few minutes for the instance to be ready so that you can connect to it. Check that your instance has passed its status checks. You can view this information in the Status Checks column.
Note: It takes a few minutes for the status checks to pass. Wait until the status checks changes from Initializing to 2/2 checks passed. - Once the instance is ready, select the instance and note down the IPv4 Public IP found in the Descriptions tab at the bottom.
- Paste the public IP address of your instance in your web browser to display the welcome web page. This page is now displaying dynamic information about your server.
3. Connect to your Amazon EC2 instance.
In this section, you will connect to your Amazon EC2 instance via SSH. An SSH connection requires port 22 to be open on your network. You may need to contact your network administrator to ensure that this is open.
For MAC/Linux users:
- Open the Terminal application.
- Type the commands below. In both commands, replace PATH-TO-PEM-FILE with a reference to the .pem file that you downloaded while launching the instance. In the second command, replace PUBLIC-IP with the IPv4 Public IP of the instance.
- You will see a prompt like the one below. Answer yes to the prompt.
chmod 400 PATH-TO-PEM-FILE
ssh -i PATH-TO-PEM-FILE ec2-user@PUBLIC-IP
The authenticity of host '54.201.7.240 (54.201.7.240)' can't be established. ECDSA key fingerprint is SHA256:TrCPkFBL0F+pTp3LH+UGFPhGjl7N4qaoLucu21RWsRM. Are you sure you want to continue connecting (yes/no)?
For Windows users:
- Install PuTTY.
- PuTTY does not natively support the private key format (.pem) generated by Amazon EC2. PuTTY has a tool named PuTTYgen, which can convert keys to the required PuTTY format (.ppk). You must convert your private key into this format (.ppk) before attempting to connect to your instance using PuTTY. To convert your private key (.pem file) using PuTTYgen, follow the instructions below:
- Start PuTTYgen.
- Under Type of key to generate, select RSA.
- Click Load. By default, PuTTYgen displays only files with the extension .ppk. To locate your .pem file, select the option to display files of all types.
- Select your .pem file for the key pair that you specified when you launched your instance, and then click Open. Click OK to dismiss the confirmation dialog box.
- Click Save private key to save the key in the format that PuTTY can use. PuTTYgen displays a warning about saving the key without a passphrase. Click Yes.
- Specify the same name for the key that you used for the key pair (for example, my-key-pair). PuTTY automatically adds the .ppk file extension.
Your private key is now in the correct format for use with PuTTY. You can now connect to your instance using PuTTY's SSH client.
- Start PuTTY.
- In the Category pane, click Session. In the Host Name text box, type ec2-user@IP-ADDRESS, where IP-ADDRESS is the public IP address of your Amazon EC2 instance.
- In the Category pane, expand Connection, expand SSH, and then click Auth.
- Click Browse.
- Select the .ppk file that you generated for your key pair, and then click Open.
- If you plan to start this session again later, you can save the session information for future use. In the Categorytree, select Session, enter a name for the session in Saved Sessions, and then click Save.
- Click Open to start the PuTTY session. PuTTY will ask whether you wish to cache the server’s host key. Click Yes.
4. View log file, query instance metadata, and user data.
In this section, you will inspect the cloud-init logs to verify the steps in the UserData script executed on the Amazon EC2 Instance. Then, you will query the instance metadata service from the Amazon EC2 instance so that you can see how your application is printing information about itself on the welcome page.
- To view the log file, type the command below in your instance terminal.
- To view the instance metadata, type the command below:
- Execute the command below to get the instance identity document of your instance:
- Execute the command below to get the instance public IP address:
- Execute the command below to get the MAC address of the instance:
- Execute the command below to get the VPC ID in which the instance resides. Make sure to replace Your-MAC in the command below with the MAC address of your instance:
- Execute the command below to get the subnet-id in which the instance resides. Make sure to replace Your-MACin the command below with the MAC address of your instance:
- Execute the command below to get the instance user data:
- Go to the EC2 dashboard in your console, locate the Amazon EC2 instance you created and verify the public IP address, the VPC ID and the subnet-id of the instance you just queried in the instance terminal. You should be able see this information in the Description tab at the bottom.
cat /var/log/cloud-init-output.log
curl http://169.254.169.254/latest/meta-data/
curl http://169.254.169.254/latest/dynamic/instance-identity/document
curl http://169.254.169.254/latest/meta-data/public-ipv4
curl http://169.254.169.254/latest/meta-data/mac
curl http://169.254.169.254/latest/meta-data/network/interfaces/macs/Your-MAC/vpc-id
curl http://169.254.169.254/latest/meta-data/network/interfaces/macs/Your-MAC/subnet-id
curl http://169.254.169.254/latest/user-data
5. Terminate the Amazon EC2 instance.
In this section, you will terminate the Amazon EC2 instance by selecting the instance in the EC2 dashboard and clicking Actions -> Instance State -> Terminate .
- In the AWS Console, click Services, then click EC2 to open the EC2 dashboard.
- In the navigation pane, click Instances. In the list of instances, select the Ex3WebServer instance.
- Click Actions, Instance State, Terminate.
- Click Yes, Terminate when prompted for confirmation.
- Amazon EC2 shuts down and terminates your instance. After your instance is terminated, it remains visible on the console for a short while, and then the entry is deleted.
]]>
To get started, follow the steps below.
1. Launch an Amazon EC2 instance with a user data script.
In this section, you will launch an Amazon EC2 instance with a user data script. If you are familiar with Amazon EC2, you may want to attempt to complete this section by using the properties below before reading the step-by-step instructions.
Region: Oregon (us-west-2)
Amazon Machine Image (AMI): Amazon Linux AMI
Instance Type: t2.micro
User data script: Download
Tag: SamplePythonFlaskApp
Security group name: exercise2-sg
Security group rules: Allow HTTP
Key Pair: Proceed without a key pair
- In the AWS Console, click Services, then click EC2 to open the EC2 dashboard.
- At the top-right corner, select the US West (Oregon) region.
- From the EC2 dashboard, click Launch Instance.
- On the Choose an Amazon Machine Image (AMI) page, select Amazon Linux AMI by clicking Select. This AMI is free-tier eligible.
Note: Do not select the Amazon Linux 2 AMI option. - On the Choose an Instance Type page, you can select the hardware configuration of your instance. Select t2.micro.
- Click Next: Configure Instance Details.
- On the Configure Instance Details page, leave the defaults and scroll down to the Advanced Details section and expand it.
- In the User data section, leave As text selected.
- Download the user data script and copy and paste the contents of the script in the text area.
- Click Next: Add Storage. Skip through this page and click Next: Add Tags.
- Click Add Tag. Tags enable you to categorize your AWS resources in different ways - for example, by purpose, owner, or environment.
- In the Key textbox, type Name
- In the Value textbox, type SamplePythonFlaskApp
- Click Next: Configure Security Group. Note that the wizard gives you an option to create a new security group or select an existing one. For this exercise, accept the default chosen option, Create a new security group.
- For Security Group Name, type exercise2-sg
- In the security group table, delete the SSH rule by clicking the X button at the end of the row.
- Click Add Rule.
- For Type, leave Custom TCP Rule selected.
- For Port Range, type 80
- For Source, type 0.0.0.0/0
- Click Review and Launch.
- On the Review Instance Launch page, review the details and click Launch.
- When prompted for a key pair, select Proceed without a key pair.
- Select the acknowledgement check box, and then click Launch Instances.
- Click View Instances to return to the Instances page.
- On the Instances page, you can view the status of the launch. It can take a few minutes for the instance to be ready so that you can connect to it. Check that your instance has passed its status checks. You can view this information in the Status Checks column.
Note: It takes a few minutes for the status checks to pass. Wait until the status checks changes from Initializingto 2/2 checks passed. - Once the instance is ready, select the instance and write down the IPv4 Public IP found in the Descriptions tab at the bottom.
2. Test the sample app running on your instance
- Open a browser and type the public IP of the Amazon EC2 instance you copied earlier.
- You should see a sample Python app running on your Amazon EC2 instance.
Congratulations! You have launched your first web server in AWS.
3. Terminate the Amazon EC2 instance
In this section, you will terminate the Amazon EC2 instance by selecting the instance in EC2 dashboard and clickingActions -> Instance State -> Terminate .
- In the AWS Console, click Services, then click EC2 to open the EC2 dashboard.
- In the navigation pane, click Instances. In the list of instances, select the SamplePythonFlaskApp instance.
- Click Actions, Instance State, Terminate.
- Click Yes, Terminate when prompted for confirmation.
- Amazon EC2 shuts down and terminates your instance. After your instance is terminated, it remains visible on the console for a short while, and then the entry is deleted.
]]>
1. Go to the Amazon Web Services home page and sign up for an account.
- Go to the Amazon Web Services home page.
- Click Create a Free Account.
- On the sign-in page, click Create an Account.
Note: This might be unavailable in your browser if you previously signed in to the AWS Management Console. In that case, click Sign in to a different account, and then click Create a new account. - Type the requested account information, and then click Continue.
- Choose Personal or Professional. Note: These two account types are identical in functionality. You can choose a personal account for your personal projects or choose professional for use within your company, an educational institution, or an organization.
- Type the requested company or personal information.
- Read the AWS Customer Agreement, and then check the box.
- Click Create Account and Continue.
2. Add a payment method.
- On the Payment Information page, add a payment method by typing the requested information associated with your payment method.
- Click Secure Submit.
3. Verify your phone number.
- On the Phone Verification page, type a phone number that you can use to accept incoming phone calls.
- Enter the code displayed in the security check.
- When you're ready to receive a call, click Call me now. In a few moments, an automated system will call you.
- Type the provided PIN on your phone's keypad. After the process has completed, click Continue.
4. Choose a support plan and sign in to your console.
- On the Select a Support Plan page, select the Basic Plan included in the free tier.
- Click Sign in to Console to sign in to your console.
]]>