IndexInput/IndexOutput類系
綜述:Lucene在存儲和讀取索引的時候,把文件內容都當作字節來對待。Int型拆分成1-5個byte分別存儲;float則拆分成1-10個byte分別存儲。Char型拆分成1-3個byte來存儲。
1. IndexInput/IndexOutput類系的層次圖
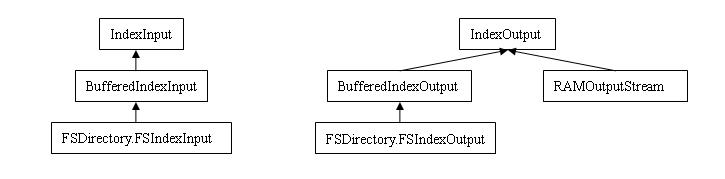
其中,FSDirectory.FSIndexInput和FSDirectory.FSIndexOutput是FSDirectory的內部類(protected static)。
2.部分代碼說明
IndexInput/IndexOutput類
在綜述里說過,Lucene把文本都以字節為單位進行處理。下面是IndexInput/IndexOutput部分方法的代碼清單,從中我們能清楚的理解Lucene的文本處理方式。
writeInt(int)方法把int型變量處理成4個字節,從高位到低位分別存儲。
1
 public void writeInt(int i) throws IOException
  {
{
2 writeByte((byte) (i >> 24)); // 寫高8位
3 writeByte((byte) (i >> 16)); // 寫次高8位
4 writeByte((byte) (i >> 8)); // 寫次次高8位
5 writeByte((byte) i); //寫低8位
6 }
}
writeVInt(int)方法把int型變量處理成1-5個字節,從低位到高位分別存儲。值小的,占用的字節數就少;值大的,占用的字節數就多。這個就是Lucene壓縮存儲的基石了。
1 public void writeVInt(int i) throws IOException {
2
 while ((i & ~0x7F) != 0) { // 當最高位不為0,執行循環體
3 writeByte((byte) ((i & 0x7f) | 0x80)); // 寫入低7位,最高位置1
4 i >>>= 7; // 向右偏移7位,也就是往高位移動7位
5 }
}
6 writeByte((byte) i); // 寫入數據最高位(肯定不足7位了),最高位顯然是0
7 }
IndexInput中的readInt()和readVInt()用來讀取文件內容。
readInt()在讀取時,把讀取的4個字節從高位到底位依次拼接。這一點在下面的代碼中可以很容易看出來。
1 public int readInt() throws IOException {
2 return ((readByte() & 0xFF) << 24) | ((readByte() & 0xFF) << 16)
3 | ((readByte() & 0xFF) << 8) | (readByte() & 0xFF);
4 }
readVInt()稍微有點復雜,它的讀取順序是由低位到高位,步驟如下:
(1).讀入一個字節存入變量b
(2).b取后7位,存入變量i;若b首位是0,則返回i
(3).讀取下個字節存入b,b往左偏移7*(n-1)位后與i拼接后存入i,轉到(2)
注:
A.n為循環次數
B.其實只要理解了writeVInt(int)的寫入方式后,readVInt()就不難理解了。
下面是readVInt()的代碼清單:
1 public int readVInt() throws IOException {
2 byte b = readByte(); // 讀取第一個字節
3 int i = b & 0x7F; // 取后7位
4 for (int shift = 7; (b & 0x80) != 0; shift += 7) { // 當該字節首位不為0,執行循環體
5 b = readByte(); // 讀取下個字節
6 i |= (b & 0x7F) << shift; // 取該字節后7位,偏移到高位,跟原i值拼接
7 }
8 return i;
9 }
至于writeLong(long),它在形式上把long拆成2個int來處理;writeVLong(long)/readVLong()思路(代碼)跟writeVInt(int)/readVLong()除了方法名之外,完全一樣;realLong()通過兩次readInt(),第一個值偏移32位后拼接第二個值。
writeChars(char[],int,int)用來把一個符合UTF-8編碼的字符數組寫入文件,它同樣把字符拆分成字節來對待。對每個字符,按照其有效位數n(去掉高位的0)的不同,采用有三種不同的寫入方法:
(1).0< n <=7,取后7位,首位置0寫入文件
(2).7< n <=11或者n=0,取高1-5位,首3位置110;取后6位,首2位置10;寫入文件
(3).11< n <=16,取高0-4位,首4位置1110;取中6位,首2位置10;取后6位,首2位置10;寫入文件
其代碼及注釋如下:
1 public void writeChars(char[] s, int start, int length) throws IOException {
2 // start為開始的字符在char[]中的位置,length為需要寫的字符的個數
3 final int end = start + length;
4 for (int i = start; i < end; i++) { // 循環遍歷char[]中從start到end的字符
5 final int code = (int) s[i];
6 if (code >= 0x01 && code <= 0x7F)
7 // code值在0x01-0x7F,直接寫入
8 // code的有效位數為1-7位
9 writeByte((byte) code);
10 else if (((code >= 0x80) && (code <= 0x7FF)) || code == 0) {
11 // code值在0x80-0x7FF或者為0,則分兩個字節寫入
12 // code的有效位數8-11位
13 writeByte((byte) (0xC0 | (code >> 6))); // 寫高2-5位,首3位置110
14 writeByte((byte) (0x80 | (code & 0x3F))); // 寫低6位,首2位置10
15 } else {
16 //0x7FF之后的用3個字節寫入,code有效位數12-16位
17 writeByte((byte) (0xE0 | (code >>> 12))); // 寫高0-4位,首4位置1110
18 writeByte((byte) (0x80 | ((code >> 6) & 0x3F))); //寫此高位6位,首2位置10
19 writeByte((byte) (0x80 | (code & 0x3F))); //寫低6位,首2位置10
20 }
21 }
22 }
writeChars(String, int, int)思路(代碼)跟上面是一樣的。
與writeChars(char[], int, int)對應的readChars(char[], int, int)代碼及注釋如下:
1 public void readChars(char[] buffer, int start, int length)
2 throws IOException {
3 final int end = start + length;
4 for (int i = start; i < end; i++) {
5 byte b = readByte(); // 讀取一個字節
6 if ((b & 0x80) == 0) // 如果首位不為1,說明該字節單獨為一字符
7 buffer[i] = (char) (b & 0x7F);
8 else if ((b & 0xE0) != 0xE0) { // 首4位不為1110
9 buffer[i] = (char) (((b & 0x1F) << 6) | (readByte() & 0x3F));
10 } else {
11 buffer[i] = (char) (((b & 0x0F) << 12)
12 | ((readByte() & 0x3F) << 6) | (readByte() & 0x3F));
13 }
14 }
15 }
writeString(String)用來寫入字符串。它先寫入該字符串的長度,然后調用writeChars(String, int, int)寫入字符串。代碼及注釋如下:
1 public void writeString(String s) throws IOException {
2 int length = s.length(); // 字符串長度
3 writeVInt(length); // 寫入字符串長度
4 writeChars(s, 0, length); //寫入字符串
5 }
readString()在讀取的時候利用了IndexInput類的私有變量(private char[] chars)來緩存字符串,唯一需要注意的就是在需要時,要給char擴充容量。代碼及注釋如下:
public String readString() throws IOException {
int length = readVInt();
if (chars == null || length > chars.length) // 需要時,給chars擴容
chars = new char[length];
readChars(chars, 0, length);
return new String(chars, 0, length);
}
BufferedIndexInput/BufferedIndexOutput類
BufferedIndexInput/BufferedIndexOutput依然是抽象類,它們給出了部分IndexInput/IndexOutput未曾實現的抽象方法,如getFilePointer(),writeByte()/readByte()等等。還提供了writeBytes()/readBytes()這樣的在索引優化合并時使用的方法。
BufferedIndexOutput中的變量說明:
1 static final int BUFFER_SIZE = 16384; // buffer的總容量
2
3 private final byte[] buffer = new byte[BUFFER_SIZE]; // 用于寫文件時的緩沖區
4 private long bufferStart = 0; // position in file of buffer: buffer 在文件中的偏移量
5 private int bufferPosition = 0; // position in buffer : 在buffer中的偏移量
writeByte(byte)為往buffer中寫入byte,代碼比較簡單,如下:
1 public void writeByte(byte b) throws IOException {
2 if (bufferPosition >= BUFFER_SIZE) // 注意buffer裝滿時需要flush()
3 flush();
4 buffer[bufferPosition++] = b;
5 }
writeBytes(byte[], int, int)從名字就知道是存儲一個byte數組。代碼及注釋如下:
1 public void writeBytes(byte[] b, int offset, int length) throws IOException { // 該方法在索引優化合并時使用
2 // offset: 首個字節在b中的位置; length: 序列長度(字節數)
3 int bytesLeft = BUFFER_SIZE - bufferPosition; // bytesLeft: buffer剩余容量
4 // is there enough space in the buffer?
5 if (bytesLeft >= length) { // 剩余容量可以放下長度length的字節數
6 // we add the data to the end of the buffer
7 System.arraycopy(b, offset, buffer, bufferPosition, length);
8 bufferPosition += length;
9 // if the buffer is full, flush it
10 if (BUFFER_SIZE - bufferPosition == 0)
11 flush();
12 } else { // 剩余容量放不下
13 // is data larger then buffer?
14 if (length > BUFFER_SIZE) { // BUFFER_SIZE < length 時
15 // we flush the buffer
16 if (bufferPosition > 0)
17 flush();
18 // and write data at once
19 flushBuffer(b, offset, length);
20 bufferStart += length;
21 } else { // bytesLeft < length < BUFFER_SIZE 時,分2次寫入
22 // we fill/flush the buffer (until the input is written)
23 int pos = 0; // position in the input data
24 int pieceLength; // 一次往buffer中寫入的字節數
25 while (pos < length) { // 我仰天狂吼:為什么?為什么要用循環?!為什么?天呀,為什么你如此偏愛它?
26 // 剩余字節數(length - pos)小于bytesLeft,pieceLength = lenght - pos,否則,pieceLength = bytesLeft
27 pieceLength = (length - pos < bytesLeft) ? length - pos
28 : bytesLeft;
29 System.arraycopy(b, pos + offset, buffer, bufferPosition, pieceLength);
30 pos += pieceLength;
31 bufferPosition += pieceLength; // 改變bufferPosiotion
32 // if the buffer is full, flush it
33 bytesLeft = BUFFER_SIZE - bufferPosition; // 計算剩余容量
34 if (bytesLeft == 0) { // b裝滿則flush()
35 flush();
36 bytesLeft = BUFFER_SIZE; // flush()后bytesLeft自然就要跟 BUFFER_SIZE 一樣了
37 }
38 }
39 }
40 }
41 }
flush():把buffer中內容寫入文件,清空buffer。代碼及注釋如下:
1 public void flush() throws IOException {
2 flushBuffer(buffer, bufferPosition); // buffer中的內容寫入文件
3 bufferStart += bufferPosition; // 更改buffer在文件中的偏移量
4 bufferPosition = 0; // buffer為空,則 bufferPosition = 0
5 }
readByte(): 從buffer中讀取一個字節。
1 public byte readByte() throws IOException {
2 if (bufferPosition >= bufferLength) //當前讀取位置超過buffer中內容有效長度,refill()
3 refill();
4 return buffer[bufferPosition++];
5 }
refill():重新裝填buffer。
1 private void refill() throws IOException {
2 long start = bufferStart + bufferPosition; // 計算在文件中的偏移位置
3 long end = start + bufferSize; // 結束位置
4 if (end > length()) // don't read past EOF: 超出文件大小
5 end = length();
6 int newLength = (int) (end - start); // 能讀取的長度
7 if (newLength <= 0)
8 throw new IOException("read past EOF");
9
10 if (buffer == null) { // 需要初始化buffer
11 buffer = new byte[bufferSize]; // allocate buffer lazily
12 seekInternal(bufferStart);
13 }
14 readInternal(buffer, 0, newLength); // 這里才是真正的裝填buffer
15 bufferLength = newLength; // 設置buffer中有效字節數
16 bufferStart = start; // 設置buffer在文件中的偏移量
17 bufferPosition = 0; // 當前buffer中的偏移量
18 }
readBytes(byte[], int, int, boolean):讀取字節數組,跟writeBytes()一樣,在索引優化合并時使用。源碼中的注釋本身已足夠清晰了,我就偷了回懶,沒寫自己的注釋,就粘過來了。
1 public void readBytes(byte[] b, int offset, int len, boolean useBuffer)
2 throws IOException {
3
4 if (len <= (bufferLength - bufferPosition)) {
5 // the buffer contains enough data to satisfy this request
6 if (len > 0) // to allow b to be null if len is 0
7 System.arraycopy(buffer, bufferPosition, b, offset, len);
8 bufferPosition += len;
9 } else {
10 // the buffer does not have enough data. First serve all we've got.
11 int available = bufferLength - bufferPosition;
12 if (available > 0) {
13 System.arraycopy(buffer, bufferPosition, b, offset, available);
14 offset += available;
15 len -= available;
16 bufferPosition += available;
17 }
18 // and now, read the remaining 'len' bytes:
19 if (useBuffer && len < bufferSize) {
20 // If the amount left to read is small enough, and
21 // we are allowed to use our buffer, do it in the usual
22 // buffered way: fill the buffer and copy from it:
23 refill();
24 if (bufferLength < len) {
25 // Throw an exception when refill() could not read len
26 // bytes:
27 System.arraycopy(buffer, 0, b, offset, bufferLength);
28 throw new IOException("read past EOF");
29 } else {
30 System.arraycopy(buffer, 0, b, offset, len);
31 bufferPosition = len;
32 }
33 } else {
34 // The amount left to read is larger than the buffer
35 // or we've been asked to not use our buffer -
36 // there's no performance reason not to read it all
37 // at once. Note that unlike the previous code of
38 // this function, there is no need to do a seek
39 // here, because there's no need to reread what we
40 // had in the buffer.
41 long after = bufferStart + bufferPosition + len;
42 if (after > length())
43 throw new IOException("read past EOF");
44 readInternal(b, offset, len);
45 bufferStart = after;
46 bufferPosition = 0;
47 bufferLength = 0; // trigger refill() on read
48 }
49 }
50 }
FSIndexInput/FSIndexOutput類
FSIndexInput/FSIndexOutput繼承自BufferedIndexInput/BufferedIndexOutput,它最終補充實現了該類系所需提供服務的全部實現。
FSIndexOutput的flushBuffer(byte[], int, int)方法,它的功能在于真正的完成buffer到文件的數據存儲。
1 public void flushBuffer(byte[] b, int offset, int size)
2 throws IOException {
3 file.write(b, offset, size); // 寫文件
4 }
與flushBuffer()對應的,readInternal(byte[], int, int)從底層真正的把數據從文件提取到buffer中。
1 protected void readInternal(byte[] b, int offset, int len) // 從文件中讀取內容到buffer
2 throws IOException {
3 synchronized (file) { // file需要同步訪問
4 long position = getFilePointer(); // 獲取當前文件讀取位置
5 if (position != file.position) { // file定位到當前讀取位置
6 file.seek(position);
7 file.position = position;
8 }
9 int total = 0;
10 do {
11 /**//* 一般情況下,此循環體只會執行一次,只有在第一次循環時,file中內容不能使b全部裝滿,
12 * 這時,total < len,而下次循環,已讀到文件尾部,i = -1,拋出異常。
13 * 也就是說,當b不能讀滿時,此方法必會拋出異常
14 */
15 int i = file.read(b, offset + total, len - total);
16 if (i == -1)
17 throw new IOException("read past EOF");
18 file.position += i;
19 total += i;
20 } while (total < len);
21 }
22 }
RAMOutputStream類
RAMOutputStream繼承自IndexOutput,是用于處理在內存中建索引時的寫數據類,它在實例化是需要RAMFile類型的參數。實現了IndexOutput的writeByte()方法,也提供了在索引間拷貝數據用的writeBytes()和writeTo()方法。
writeByte():往內存緩沖區中寫一個字節數據。
1 public void writeByte(byte b) throws IOException { // 寫單個字節到buffer,如果當前buffer已滿,則切換到下個buffer
2 if (bufferPosition == bufferLength) {
3 currentBufferIndex++;
4 switchCurrentBuffer(); // 切換buffer
5 }
6 currentBuffer[bufferPosition++] = b; // 寫入 b
7 }
writeBytes():索引間拷貝數據用。
1 public void writeBytes(byte[] b, int offset, int len) throws IOException {
2 while (len > 0) { //
3 if (bufferPosition == bufferLength) { // 如果buffer裝滿,切換下個buffer
4 currentBufferIndex++;
5 switchCurrentBuffer(); // 切換buffer
6 }
7
8 int remainInBuffer = currentBuffer.length - bufferPosition; // buffer中剩余容量
9 int bytesToCopy = len < remainInBuffer ? len : remainInBuffer; // 實際拷貝長度
10 System.arraycopy(b, offset, currentBuffer, bufferPosition,
11 bytesToCopy); // 拷貝
12 offset += bytesToCopy; // 調整偏移量
13 len -= bytesToCopy; // 調整長度
14 bufferPosition += bytesToCopy; // 調整buffer中當前位置
15 }
16 }
writeTo(IndexOutput):把數據從當前內存緩沖區寫到參數指定的IndexOutput中。
1 public void writeTo(IndexOutput out) throws IOException { // 拷貝整個緩沖區數據到out
2 flush();
3 final long end = file.length; // file總長度
4 long pos = 0; // 開始偏移位置
5 int buffer = 0; // buffer索引
6 while (pos < end) {
7 int length = BUFFER_SIZE;
8 long nextPos = pos + length;
9 if (nextPos > end) { // at the last buffer
10 length = (int) (end - pos);
11 }
12 out.writeBytes((byte[]) file.getBuffer(buffer++), length); // 拷貝數據
13 pos = nextPos; // 更改偏移位置
14 }
15 }