γ³ΕεêéεQ¨δΫ†ηΠ¹φΘÄφü?nbsp;
1εQ?WAS\java\jre\lib\security\java.security, 〴〴secrity provider list顨φ‰·εêΠφ€âSun JSSE
# List of providers and their preference orders (see above):
#
#security.provider.1=com.ibm.crypto.fips.provider.IBMJCEFIPS
security.provider.1=com.ibm.crypto.provider.IBMJCE
security.provider.2=com.ibm.jsse.IBMJSSEProvider
security.provider.3=com.ibm.jsse2.IBMJSSEProvider2
security.provider.4=com.ibm.security.jgss.IBMJGSSProvider
security.provider.5=com.ibm.security.cert.IBMCertPath
security.provider.6=com.ibm.crypto.pkcs11impl.provider.IBMPKCS11Impl
security.provider.7=com.ibm.security.cmskeystore.CMSProvider
security.provider.8=com.ibm.security.jgss.mech.spnego.IBMSPNEGO
security.provider.9=com.ibm.security.sasl.IBMSASL
security.provider.10=com.ibm.xml.crypto.IBMXMLCryptoProvider
security.provider.11=com.ibm.xml.enc.IBMXMLEncProvider
security.provider.12=org.apache.harmony.security.provider.PolicyProvider
2εQ?ΨcΜηΒ\εس顨φ‰·εêΠφ€âSun JSSE γö³jarε¨?br style="word-wrap: break-word; margin: 0px; padding: 0px; word-break: break-all; list-style-type: none; line-height: normal;" />
3εQâδΫ†γö³δΜΘγ†¹ι΅¨φ‰·εêΠφ€âηΑÉγî®Sun JSSE provider
ε€®φ·èδΗΣδΗ™φ†èδΗ≠εQ¨φî·φ¨¹φùÉε®¹εΑÜη°®η°Κ IBM Technical Support γö³εè·γî®δΚé WebSphere δΚßε™¹γö³ηΒ³φΚêψĹεΖΞεÖΖ壨εÖΕδΜ•εÖÉ㥆εQ¨δΜΞεèäδΗÄδΚ¦εè·δΜΞηΩ¦δΗÄφ≠ΞεΔûεΦΚφ²®γö?IBM φî·φ¨¹δΫ™ιΣ¨γö³φäÄφ€·ε£¨φ•ΑφÄùφÉ≥ψÄ?/em>
φ€Äφ•ΑεΩΪφä?/h2>
φ¨âγÖßφÉ·δΨ΄εQ¨φàëδΜ§εΑÜιΠ•εÖàφèêδΨ¦εÖ≥δΚéφï¥δΗΣ WebSphere® ΫCë÷¨Κγö³δΗÄδΚ¦ι΅çηΠ¹φ•Αι½ΜοΦö
- IBM Support Assistant γö?4.0.1 γâ? εàöεàöεèëεΗÉψIJιÉ®εàÜδΗΜηΠ¹εΔûεΦΚεäüηÉΫε¨Öφ΄§δΜΘγêÜφ€çεäΓεô®γö³η΅Σεä®ιÖçΨ|°ψĹφîΙ‰q¦γö³ε·ΤDàΣεQ¨δΜΞεèäδΗÄδΗΣι΅çηΠ¹γö³φ•ΑεΖΞεÖχPΦöMedia ViewerεQ¨φ≠ΛεΖΞεÖΖδΫΩεΨ½δΜéη·ΗεΠ?IBM Education Assistant Ϋ{âφùΞφΚêδΗ΄ηΫΫδΗΑε·¨γö³εÜÖε°ΙρqΕε€® IBM Support Assistant δΗ≠ε€®ΨUΩφà•Φ¦»ùΚΩφüΞ〴η·ΞεÜÖε°Ιεè‰εΨ½ιùûεΗΗε°Ιφ‰™ψÄ?/li>
- IBM Support Assistant Version 4 δΗ≠εèëεΗÉφà•φ¦¥φ•ΑδΚ?a cmimpressionsent="1">塆δΗΣφ•ΑεΖΞεÖ?/a>εQ¨ε¨Öφ΄§οΦö
- Assist On Site
- IBM Thread and Monitor Dump Analyzer
- IBM Monitoring and Diagnostic Tools for Java™ - Dump Analyzer γö³φ•Αγâàφ€§
- ε·?Memory Dump Diagnostic for Java (MDD4J) γö³φ•Αφ¦¥φ•ΑεQ¦φ≠Λφ¦¥φ•ΑδΜçεΛ³δΚéφΒ΄η·ïγâàφ€§ι‰Ε¨DΒοΦ¨δΫÜφ‰·φàëδΜ§φ≠Θε€®εêëεÖ§εΦÄεèëεΗÉγâàηΩà‰q¦ψÄ?/li>
- Visual Configuration Explorer (VCE) γö³φ•Αφ¦¥φ•ΑψÄ?/li>
ιÄöηΩ΅‰qôδΚ¦φ¦¥φ•ΑεQ¨ηΠ¹δΜ?IBM Support Assistant Version 3 ΩUάLΛçεà?Version 4 γö³φâÄφ€âι½°ιΔ‰γΓ°ε°öεΖΞεÖΖιÉΫεΖ≤ε°¨φàêδΚÜηΫ§φçΔψÄ?/p>
- IBM Guided Activity Assistant ε¦Δι‰üΨlßγ°΄φâ©ε±ïφ≠ΛεΖΞεÖδhâÄφèêδΨ¦γö³εÜÖε°ΙοΦö
- φ€ÄεàùδΚéδΗäφ€àε€?IBM Guided Activity Assistant γö?alphaWorks γâàφ€§δΗ≠ε°ΘεΗÉφé®ε΅Κγö³γî®δΚé JVM ι½°ιΔ‰Φ΄°ε°öεQàφ¨²ηΒ½ςÄ¹ε¥©φΚÉψĹεÜÖε≠‰ηĽεΑΫΫ{âγ≠âεQâγö³εΔûεΦΚεÜÖε°ΙγéΑε€®δΙüε€® IBM Support Assistant δΗäεè·γî®ψÄ?/li>
- γî®δΚé WebSphere Process Server δΗ≠γö³ι½°ιΔ‰Φ΄°ε°öγö³φ•ΑεÜÖε°Ιû°ÜδΚéφ€§φ€àε€?IBM Support Assistant δΗäγö³ IBM Guided Activity Assistant δΗ≠ιΠ•΄ΤΓι€≤ιùΔψÄ?/li>
- ε·?IBM Monitoring and Diagnostic Tools for Java - Garbage Collection and Memory Visualizer (GCMV) ε£?IBM Thread and Monitor Dump Analyzer (TMDA) εΖΞεÖΖδΫΩγî®φ¨΅ε·Φγö³η΄Ξρq≤φ¦¥φ•ΑψÄ?/li>
- ‰q‰εèëεΗÉδΚÜε·?alphaWorks δΗ≠γö³ε΅†δΗΣεΖΞεÖΖγö³φ¦¥φ•éΆΦ¨ε¨Öφ΄§εQ?
- Database Connection Pool Analyzer for IBM WebSphere Application Server
- IBM Thread and Monitor Dump AnalyzerεQàδΙüε€?IBM Support Assistant δΗ≠εè·γî®οΦâ
- IBM Pattern Modeling and Analysis Tool for Java Garbage CollectorεQàδΙüε€?IBM Support Assistant δΗ≠εè·γî®οΦâψÄ?/li>
- ε·ΙδΚéφ³üεÖ¥≠ëΘγö³η·ΜηÄÖοΦ¨WebSphere Application Server V7.0 εÖ§εΦÄ΄Ι΄η·ïη°Γεà£φ≠Θε€®εÖ®ε䦉q¦ηΓ¨δΗ≠ψÄ?a cmimpressionsent="1">η°âK½°φ≠ΛγΪôγ²?/a>δΜΞδΚÜηßΘφ€âεÖ≥δΗ΄δΗÄδΗΣγâàφ€§γö³ WebSphere Application Server γö³φ•Αι½’d£¨δΩΓφ¹·ψÄ?/li>
- φàëδΜ§ε€®δΜΞεâçγö³ε΅†γ·΅φ•΅γΪ†δΗ≠φé®ηçêηΩ΅γö?WebSphere Support Technical Exchange Ψp’dà½φ≠Θε€®ε·“é•Αγö?#8220;Open Mic”εΫΔεΦè‰q¦ηΓ¨η·ïιΣ¨εQ¨ε€®‰qôγßçεΫΔεΦèδΗ≠οΦ¨φüêδΗΣγâΙε°öφäÄφ€·ιΔÜεüüγö³εÖ§η°ΛδΗ™ε°Εû°ÜφéΞεè½ι½°ιΔ‰εΤàδΗάL¨¹δΗéεè½δΦ½ηΩ¦ηΓ¨γö³η°®η°ΚεQ¨ηĨδΗçφ‰·δΗΜηΠ¹ι¦ÜδΗ≠δΚéεΖ≤ε΅ÜεΛ΅εΞΫγö³φΦîΫCΚφ•΅ΫE―ùIJηΩôΩUçφ•ΑεΫΔεΦèγö³γ§§δΗÄφ€üφö²ε°öδΚé 8 φ€?7 φ½ΞηΩ¦ηΓ¨οΦ¨ε±äφ½Ε‰q‰εΑÜφ€âεÖ≥δΚ?WebSphere Application Server ε°âεÖ®φÄßγö³γ†îη°®δΦöψIJη·Ζε¦ûη°Ω WebSphere Support Technical Exchange Ψ|ëγΪôδΜΞδΚÜηßΘφ¦¥φ•Α壨φ¦¥εΛöγö³γ†îη°®δΦöψÄ?/li>
- φàëδΜ§δΜΞεâçφ¦ë÷€®φ€§δΗ™φ†èδΗ≠φèêεàΑ‰q?strong>γüΞη·Üι¦ÜιîΠεQàε€® IBM Support Ψ|ëγΪôδΗäεà¦εΜΚγ¦ΗεÖœx•΅φΓΘγö³ι¦ÜεêàεQâ壨γâΙηâ≤φ•΅φΓΘεQàφîΕι¦Üγî®δΚéφ·èδΗΣεçïγ΄?IBM δΚßε™¹δΗ≠γö³φî·φ¨¹γö³φ€ÄεΗΗηß¹δΩΓφ¹·εQâψIJεΑ܉qôδΗΛδΗΣφΠ²εΩκä¦ΗΨl™εêàεQ?a cmimpressionsent="1">γéΑε€®εè·δΜΞδΫΩγî®φ•Αγö³γüΞη·Üι¦ÜιîΠεQ¨δΜéηÄ¨δ΄…εΨ½ε°¨εÖ®ε€®εçïδΗΣδΫçγΫ°φüΞφâΨη°ΗεΛö WebSphere δΚßε™¹γö³φâÄφ€âεè·γî®γâΙηâ≤φ•΅φΓΘιΓΒιùΔεè‰εΨ½ιùûεΗΗε°Ιφ‰™ψÄ?/li>
- φ€§δΗ™φ†èγö³γÉ≠εΩÉη·ΜηÄÖεè·ηÉΫε·ΙΨUΔγö°δΙ?Running IBM WebSphere Application Server on System p and AIX Optimization and Best Practices ιùûεΗΗφ³üεÖ¥≠ëΘοΦ¨η·ΞγΚΔγö°δΙΠγ¦°εâçδΜΞεÖ§εÖόpçâφΓàγö³εΫΔεΦèφèêδΨ¦ψÄ?/li>
Ψlßγ°΄εÖœx≥®δΗéφî·φ¨¹γ¦ΗεÖ≥γö³εê³δΗΣΨ|ëγΪôδΜΞεèäφ€§δΗ™φ†èοΦ¨δΜΞηéΖεΨ½φ€âεÖœxàëδΜ§φâÄΦ³ΑεàΑγö³εÖΕδΜ•εΖΞεÖοLö³φ•Αι½ΜψÄ?/p>
φéΞδΗ΄φùΞη°©φàëδΜ§Ψlßγ°΄δΜäεΛ©γö³δΗΜιΔ?#8230;…
“εÜçεΛöδΗÄδΗΣεΖΞεÖδhàëû°όpΠ¹û°•εèΪδΚ?#8221;
φàëδΜ§ε€®δΗé WebSphere δΚßε™¹γî®φàΖ‰q¦ηΓ¨φ€âεÖ≥ι½°ιΔ‰Φ΄°ε°öγö³δΚΛηΑàφ½ΕεQ¨ι¹΅εàΑγö³δΗÄδΗΣεΗΗηß¹ι½°ιΔ‰φ‰·“φàëγéΑε€®εΚîη·Ξδ΄…γî®ε™ΣδΗΣεΖΞεÖχPΦü”φ€§δΗ™φ†èη΅ΣδΜéεΦÄεß΄δΜΞφùΞοΦ¨εΖ≤φèè‰qνCΚÜεΠ²δΫïδΜΞεèäδΫïφ½ΕδΫΩγî®η°ΗεΛöι½°ιΔ‰Φ΄°ε°öεΖΞεÖΖεQ¨δΫÜφ‰·εΠ²φû€εÉè‰qôφ†ΖδΗÄ΄ΤΓδΗÄδΗΣε€ΑδΜ΄γΜçεΖΞεÖΖεQ¨ηΖüμtΣφ·èδΗΣεè·γî®γö³εΖΞεÖΖû°ÜδΦöεÖÖφΜΓδΚÜφ¨ëφà‰οΦ¨ηΠ¹γΓ°ε°öε™ΣδΗΣεΖΞεÖδh€ÄιIJεêàδΚéδ™QδΫïγΜôε°öγö³φÉÖε≈ûû°±φ¦¥δΗçγî®η·¥δΚÜψIJγî±δΚéφ¦¥ρqΩεΛßγö? IBM WebSphere Support ΫCë÷¨Κφ‰·γ¦ΗεΫ™εä®φĹγö³εΖΞεÖΖεΦÄεèëδùhεë‰γΛΨε¨χôΩôδΗÄδΚ΄ε°ûεQ¨ι½°ιΔ‰εè‰εΨ½ηΩ¦δΗÄφ≠ΞεΛçφù²ε¨•εQ¨ηΩôφ³èεë≥γùÄεè·γî®γö³εΖΞεÖΖι¦Üεß΄γΜàεè‰ε¨•δΗçε°öεQ¨ι£àε·Ιγ¦ΗδΦΦγö³ι½°ιΔ‰εQ¨φüêδΗÄεΛ©δ΄…γî®γö³φ€ÄδΫ¦_ΖΞεÖΖεè·ηÉΫ倮塆δΗΣφ€àεêéεΖ≤γΜèδΗçδΗÄφ†ΖδΚÜψÄ?/p>
φàëδΜ§γö³εΗ¨φ€¦ε€®δΚéοΦ¨φ€§φ•΅û°ÜδΊ™φ²®ι‰êφ‰éφüêδΚ¦γ¦°εâçεè·γî®γö³δΗΜηΠ¹ι½°ιΔ‰Φ΄°ε°öεΖΞεÖΖψIJφ²®û°Üε€®δΗ΄ιùΔφâë÷àΑΫéÄεçïγö³εè²ηÄÉηΓ®φ†ϊ|Φ¨εÖΕδΗ≠ε€®εçïδΗΣε€Αφ•“é‰ΨΫCόZΚÜφ²®ε€®δΗ?WebSphere Support εêàδΫ€φ½Εεè·ηÉΫι¹΅εàΑγö³φ€ÄεΗΗηß¹ι½°ιΔ‰Φ΄°ε°öεΖΞεÖΖεQ¨γâΙεàΪφ‰·φ€âεÖ≥ IBM WebSphere Application Server ε£?Java ηôöφ΄üφ€ΚοΦàJava Virtual MachineεQ¨JVMεQâγö³εΖΞεÖΖψIJηΩôδΚ¦ηΓ®φ†ΦεΤàδΗçη·Πû°ΫοΦ¨φâÄφèêδΨ¦γö³δΩΓφ¹·ε€®φÄßη¥®δΗäφ‰·δΗçε°¨Ψüéγö³——妆亙倮φ€§φ•΅εèëηΓ®δΙ΄εêéοΦ¨εΖΞεÖΖû°ÜγëτΨl≠εèëε±ïφîΙ‰q¦οΦ¨ρqΕδΗîδΗçεê¨γö³δùhû°ÜδΜΞδΗçεê¨γö³φ•ΙεΦèη·³δΜΖεê³δΗΣεΖΞεÖ½ςIJγ³ΕηĨοΦ¨δΗçγ°Γφ²®φ€ÄΨlàδ΄…γî®γö³εΖΞεÖΖφ‰·δΜÄδΙàοΦ¨φ≠ΛδΩΓφ¹·ιÉΫεè·δΫ€δΗΚφ€âδΜΖεÄΦγö³εàùεß΄εè²ηÄÉγ²ΙψIJεΠ²φû€φ²®Φ³ΑειyεèëγéΑ‰qôγßçφ•“é≥ïεΨàφàêεäüοΦ¨η·Ζεëäη·âφàëδΜ§οΦ¨δΜΞδΨΩφàëδΜ§ηÉΫεΛüδΗόZΜäεêéγö³δΗ™φ†èη°Γεà£ε°öφ€üγö³φ¦¥φ•ΑψÄ?/p>
φàëδΜ§ιÄâφ΄©γö³εΖΞεÖ?/h2>
ε€®φéΞηßΠεàΑεÖΖδΫ™γö³ηΓ®φ†ιgΙ΄εâçοΦ¨΄²ÄφüΞδΗÄδΗ΄φàëδΜ§ε€®Ψl³εêà‰qôδΚ¦δΩΓφ¹·φ½Εδ΄…γî®γö³φ¨΅ε·Φεéüεàôφ‰·φ€âεΗ°εä©γö³οΦö
- εè·γî®φÄ?/strong>
δΗ?IBM Support Ψl³γ̡㦥φéΞφà•ι½¥φéΞφèêδΨ¦γö³εΛßεΛöφïΑι½°ιΔ‰γΓ°ε°öηΒ³φΚêδΗÄφ†χPΦ¨φ€§φ•΅δΗ™ι½®ι¦ÜδΗ≠δΚéεè·δΜ?IBM εÖçη¥ΙηéΖεΨ½γö³εΖΞεÖ½ςIJηΩôρqΕδΗçφ‰·η·¥δΗçε≠‰ε€®εÖΕδΜ•εΖΞεÖχPΦ¦IBMεQàγâΙεàΪφ‰· Tivoli®εQâ壨εÖΕδΜ•ηΫ·δögδΨ¦εΚîεïÜφèêδΨ¦δΚÜεê³γßçφîΕη¥Ιγö³ι½°ιΔ‰γΓ°ε°öεΖΞεÖχPΦ¨φ²®εè·δΜΞδ΄…γî®ε°ÉδΜ§φùΞηΑÉφüΞ WebSphere ι½°ιΔ‰ψIJεÖΕδΗ≠φ€âδΚ¦εΖΞεÖδhèêδΨ¦γö³εäüηÉΫ‰q€ηΩ€≠ëÖε΅ΚδΚÜηΩô顨φèêεàΑγö³εÖçη¥ΙεΖΞεÖΖγö³η¨É妥ψIJγ³ΕηĨοΦ¨û°±φ€§φ•΅γö³γ¦°γö³ηĨη®ÄεQ¨δΜΞεèäδΊ™δΚÜγΓ°δΩùφ·èδΗΣδùhιÉΫφ€âη°âK½°‰qôδΚ¦ηΒ³φΚêγö³εê¨Ϋ{âηÉΫεä¦οΦ¨‰qôδΚ¦ηΓ®φ†Φγ€¹γïΞδΚÜεïÜδΗö娕γö³εΖΞεÖ½ςÄ?/p>
- εè·η°Ωι½°φÄ?/strong>
ε€®η·³δΦΑι½°ιΔ‰γΓ°ε°öεΖΞεÖδh½ΕεQ¨IBM û°ÜηÄÉηôëφâÄφ€âγö³γ¦ΗεÖ≥εÄôιÄâεΖΞεÖχPΦ¨ηĨδΗçΫéΓηΩôδΚ¦εΖΞεÖΖι©Μγïôε€®δΫïεΛ³ψIJδΗç‰q΅ε€®δΗÄηà§φÉÖεÜΒδΗ΄εQ¨IBM Support δΜÖφîΕι¦?IBM Support Assistant φèêδΨ¦γö³εÖ§εÖ±εψ^εèνCΗ≠γö³γ΄§γΪ΄εΖΞεÖχPΦàιôΛιùûε≠‰ε€®φîâô¦ÜεÖΕδΜ•εΖΞεÖΖγö³φäÄφ€·εéü妆οΦâψIJIBM Support Assistant φ‰·δΗ≠εΛ°ε≠‰ε²®εΚ™εQ¨γ¦°εâçγî®δΚéφüΞφâΨφâÄφ€âγö³εΖΞεÖΖψĹγî®δΚéε°âηΘÖ壨φéΞφîΕγéΑφ€âεΖΞεÖΖγö³ε°öφ€üφ¦¥φ•éΆΦ¨δΜΞεèäγî®δΚéεà©γî®εΛöδΗΣεΖΞεÖΖ壨εÖΕδΜ•ι½°ιΔ‰γΓ°ε°öεäüηÉΫδΙ΄ι½¥γö³ι¦ÜφàêφΫ€εä¦εQàδΨ΄εΠ²οΦ¨û°ÜεΖΞεÖΖδΗéη·äφ•≠φîâô¦Üε£?PMR φäΞεëäεäüηÉΫη¹îγ≥ΜηΒδhùΞεQ¨φà•ηÄÖεΑÜδΗÄδΗΣεΖΞεÖοLö³ηΨ™ε΅ΚδΫ€δΊ™ηΨ™εÖΞφèêδΨ¦ΨlôεèΠδΗÄδΗΣεΖΞεÖχPΦ¨Ϋ{âγ≠âεQâψÄ?/p>
- η¨É妥
‰qô顨εà½ε΅Κγö³εΖΞεÖΖδΜÖιôêδΚéε°ΔφàΖε£?IBM Support ε¦Δι‰üΨlèεΗΗγî®δΚéε€®φ¥Μεä®δΗ≠εΗ°εä©εàÜφûêι½°ιΔ‰Φ΄°ε°öφû³δögγö³εΖΞεÖχPΦ¨ηĨδΗçε¨Öφ΄§φîâô¦Üι½°ιΔ‰Φ΄°ε°öφû³δögφà•ηÄÖφ¨΅ε·Φφà•εÖ®ιùΔεΗ°εä©ι½°ιΔ‰Φ΄°ε°ö‰q΅γ®΄γö³εΖΞεÖ½ςÄ?/p>
- γî®δΚéγ¦Ηεê¨γî®ιÄîγö³εΛöδΗΣεΖΞεÖΖ
ιöèγùÄεΖΞεÖΖγö³εèëε±ï壨φ•ΑεΖΞεÖοLö³ε΅ΚγéΑεQ¨ε€®φ€ÄεΛßιôêεΚΠε€ΑδΩÉηΩ¦εà¦φ•Αγö³εêçδΙâδΗ΄εQ¨δΜΞεèäδΊ™δΚÜιΦ™εäόp°ΗεΛöφ³üεÖ¥ηΕΘγö³εΖΞεÖοLΦ•εÜôδùhεë‰ε¹öε΅χôΒAγ¨°οΦ¨εΩÖε°öε≠‰ε€®εäüηÉΫδΗäγö³ι΅çεè†ψÄ²ε¦†φ≠ΛοΦ¨φ²®εΑÜεèëγéΑ‰qôδΚ¦ηΓ®φ†ΦδΗ≠φ€âδΚ¦ε€Αφ•Ιεà½ε΅όZΚÜγî®δΚéεê¨δΗÄδΗΣγ¦°γö³γö³εΛöδΗΣεΖΞεÖΖψÄ²ε€®‰qôδΚ¦φÉÖεÜΒδΗ΄οΦ¨û°ÜφèêδΨ¦φ€âεÖ¨ôΩôδΚ¦εΖΞεÖΖδΙ΄ι½¥γö³ι΅çηΠ¹ε¨ΚεàΪγö³δΩΓφ¹·οΦ¨δΜΞεΗ°εä©φ²®φ¨ëιÄâφ€ÄιIJεêàι€ÄηΠ¹γö³εΖΞεÖΖψIJδΗÄηà§φÉÖεÜΒδΗ΄εQ¨εΑÜδΦöφ€âδΗÄδΗΣεΖΞεÖ·²ΔΪφ†΅η·ÜδΗ?strong>δΗΜηΠ¹εΖΞεÖΖεQàγî®Ψ_½δΫ™ε≠½εû΄ηΓ®γΛΚεQâοΦ¨φàëδΜ§δΦΑη°Γε°Éφ‰·φ²®ε€®û°ùη·ïφâßηΓ¨γâΙε°öι½°ιΔ‰Φ΄°ε°öδΜ’däΓφ½Εφ€ÄιIJεêàιΠ•εÖàû°ùη·ïγö³εΖΞεÖ½ςIJγ³ΕηĨοΦ¨εΠ²φû€φ²®εÖΖφ€âε·ΙεèΠδΗÄδΗΣεΖΞεÖοLö³γâΙε°öγâΙεΨ¹γö³γâΙ¨Däι€ÄηΠ¹οΦ¨φ²®δΙüεè·δΜΞδΫΩγî®φ¦ΩδΜΘεΖΞεÖΖψIJδΗÄηà§φùΞη°‘¨Φ¨IBM Support δΗΜηΠ¹η΅¥εä¦δΚéε·Ιφ·èδΗΣιΔÜεüüδΗ≠φ¨΅ε°öγö³δΗΜηΠ¹εΖΞεÖΖ‰q¦ηΓ¨εΔûεΦΚ壨φî·φ¨¹οΦ¨ρqΕδΗîιöèγùÄφ½âô½¥γö³φé®ΩUΜοΦ¨û°ÜδΦöû°Ϋι΅èφääφ¦ΩδΜΘεΖΞεÖΖδΗ≠φ€âδ≠hεÄΦγö³φ•ΑεäüηÉΫεêàρqΕεàΑδΗΜηΠ¹εΖΞεÖΖδΗ≠ψÄ?/p>
-
φî·φ¨¹
ηôΫγ³ΕφàëδΜ§εΗ¨φ€¦δΫΩφ•Αγö³εΖΞεÖΖ壨φ•Αγö³εΖΞεÖΖεäüηÉΫû°ΫεΩΪεè·γî®εQ¨δΫ܉qôφ€âφ½Εφ³èεë≥γùÄε€®γΦ•εÜôε°ÉδΜ§δΙ΄εêéιöèεç?#8220;φ¨âεéüφ†?#8221;δΫΩε°ÉδΜ§εè·γî®ψIJεèΠδΗÄφ•öwùΔεQ¨φàëδΜ§η°Λη·ÜεàΑη°ΗεΛöγî®φàΖφɨôΠ¹ρqΕδΗîι€ÄηΠ¹εè·ιù†ε£¨εè·δΩΓηΒ•γö³εΖΞεÖΖIBM WebSphere Support φèêδΨ¦γö³φ·èδΗΣεΖΞεÖΖδΗéη°Ηεè·εçèη°°γ¦ΗεÖ≥η¹îοΦ¨η°Ηεè·εçèη°°ε°öδΙâδΚÜη·ΞεΖΞεÖΖφ‰·εêΠεè½φî·φ¨¹γö³φùΓδögψIJοΦàδΗçεΨ½û°Üφ€§φ•΅δΗ≠γö³δ™QδΫïδΩΓφ¹·γêÜηßΘδΊ™ηΠÜ㦕φà•εè•δΜΘδ™QδΫïη°Ηεè·εçèη°°δΗ≠φèêδΨ¦γö³δΩΓφ¹·ψIJοΦâδΗçηΩ΅ε€®δΗÄηà§φÉÖεÜΒδΗ΄εQ?/p>
- ιÄöηΩ΅ IBM Support Assistant δΚΛδΜ‰δΫÜφ¨΅ε°öδΊ™φäÄφ€·ιΔ³ηßàγâàγö³εΖΞεÖΖδΜΞεèäιÄöηΩ΅ alphaWorks δΚΛδΜ‰γö³εΖΞεÖ·²ΔΪη°ΛδΊ™φ‰?#8220;φ¨âεéüφ†?#8221;φèêδΨ¦γö³ψIJεΠ²φû€εè•εΨ½δΚÜφàêεäüρqΕεΨ½εàΑεΙΩφ≥¦δ΄…γî®οΦ¨η°ΗεΛöηΒΖεàùδΜΞηΩôΩUçφ•ΙεΦèεèëεΗÉγö³εΖΞεÖΖεQàηôΫγ³ΕδΗçδΗÄε°öφ‰·εÖ®ιÉ®εQâφ€ÄΨlàεΑÜφàêδΊ™εè½φî·φ¨¹γö³φ†΅ε΅ÜεΖΞεÖΖψIJηΩôδΚ¦εΖΞεÖΖδΗÄηà§φ‰·ιùûεΗΗδΦ‰εΦ²γö³οΦ¨εΠ²φû€φ≤Γφ€âφ¦¥εΞΫγö³φ¦ΩδΜΘεΖΞεÖΖεè·γî®οΦ¨φ²®εè·δΜΞιùûεΗΗηà£ιIJε€ΑδΫΩγî®ε°ÉδΜ§ψÄ?/li>
- ιÄöηΩ΅ IBM Support Assistant δΚΛδΜ‰ρqΕδΗîφ€Σφ¨΅ε°öδΊ™φäÄφ€·ιΔ³ηßàγâàγö³εΖΞεÖΖε€®εÖΕη°Ηεè·εçèη°°ηß³ε°öγö³φùΓφ§ΨδΗ΄εè½εàΑφ≠ΘεΦèφî·φ¨¹οΦàγî±ε°ÉδΜ§γö³εà¦δΫ€ηÄÖφà• IBM WebSphere Support φèêδΨ¦φî·φ¨¹εQâψIJIBM δΗÄηà§δΊ™εè½φî·φ¨¹γö³εΖΞεÖΖφèêδΨ¦δΚÜεΗ°εä©ε£¨Ψ~ΚιôΖφäΞεëäψÄ?/li>
- ι½°ιΔ‰δΗéεäüηÉ?
δΗ΄ιùΔγö³ηΓ®φ†ιgΗΜηΠ¹φ¨âγÖßε°ÉδΜ§η·Μεè•γö³φû³δögΨc’dû΄‰q¦ηΓ¨Ψl³γΜ΅ψIJεÖΕδΗ≠δΙüεà½ε΅ΚδΚÜεè·δΜΞδ΄…γî®φ·èΩUçφû³εΜΚεàÜφûêφùΞΦ΄°ε°öγö³ι½°ιΔ‰γ±Μεû΄ψÄ²ε€®ηΑÉφüΞφüêδΗΣι½°ιΔ‰φ½ΕεÜ≥ε°öεΠ²δΫïηΩ¦ηΓ¨γö³φ½ΕεÄôοΦ¨εäΓεΩÖη°νCΫè‰qôδΗÄγ²èVIJεΫ™φ²®ι€ÄηΠ¹εΩΪιÄüεè²ηÄÉγö³φ½ΕεÄôοΦ¨‰qôγßçδΜΞφû³δΜΕδΊ™δΗ≠εΩÉγö³ηßÜε¦υNÄöεΗΗιùûεΗΗφ€âγî®εQ¦δΨ΄εΠ²οΦ¨φ²®ιùΔε·“éüêΩUçγâΙε°öγ±Μεû΄γö³φ½ΞεΩ½φà•ηù{ε²®φ•΅δΜ”ûΦ¨ρqΕδΗîφ²®ι€ÄηΠ¹εΩΪιÄüφüΞφâΨφüêδΗΣεè·γî®δΚéεàÜφûêη·Ξφ•΅δΜΕγö³εΖΞεÖΖψIJγ³ΕηĨοΦ¨δΜΞεâçγö?#8220;φùÉε®¹φî·φ¨¹”δΗ™φ†èγî®δΚ΄ε°ûη·¹φ‰éοΦ¨ηΠ¹φèêιΪ‰φïàγé΅οΦ¨ι½°ιΔ‰Φ΄°ε°ö‰q΅γ®΄εΚîη·Ξι¹Βεσ@ε°öδΙâηâ·εΞΫγö³η°Γεà£οΦ¨η·Ξη°Γεà£εüΚδΚéι½°ιĉ㽡γäΕεèäεÖΕεè·ηÉΫγö³φ†“éΚêεQ¨εΤàδΗîδΗçφâßηΓ¨ιöèφ€Κφ™çδΫ€φà•ηÄ?#8220;εèΣφ‰·ε¦†δΊ™ι²ΘδΚ¦φû³δögε≠‰ε€®”ηĨεàÜφûêεê³δΗΣφû³δΜΕψIJφ½†η°Κφ‰·ε™Σγßçφ•ΙεΦèεQ¨ηΩôδΚ¦ηΓ®φ†ΦιÉΫεΚîη·ΞηÉΫεΛüεΗ°εä©φ²®ψÄ?/p>
φà•ηÄÖοΦ¨φ²®εè·ηÉΫεΗ¨φ€¦εà©γî?IBM Guided Activity Assistant φà•δΜΞεâçγö³δΗ™φ†èδΗ≠φèêεàΑγö³εÖΕδΜ•φüêδΗΣι½°ιΔ‰Φ΄°ε°öφ¨΅ε·ΦηΒ³φΚêεQ¨δΜΞεΗ°εä©φ²®εÜ≥ε°öδΫïφ½ΕφΘÄφüΞφ·èδΗΣφû³δΜΕ壨δΫΩγî®φ·èδΗΣεΖΞεÖΖεè·ηÉΫφ‰·φ€ÄιΪ‰φïàγö³ψÄ?/p>
δΗ΄ιùΔ塆δΗΣιÉ®εàÜδΗ≠γö³εΖΞεÖΖηΓ®φ†Φû°Üφ¨âγÖßε°ÉδΜ§φâÄγî®δΚéγö³φû³δΜΕηΩ¦ηΓ¨γΜ³Ψl΅οΦö
- γî®δΚé JVM γîüφàêγö³δΩΓφ¹·γö³εΖΞεÖΖ
- γî®δΚéφ½Ξεٽ壨ηΖüμtΣφ•΅δΜΕγö³εΖΞεÖΖ
- γî®δΚéιùôφĹιÖçΨ|°φ•΅δΜΕ壨γ¦ΗεÖ≥δΩΓφ¹·γö³εΖΞεÖ?/a>ψÄ?/li>
φ·èδΗΣηΓ®φ†ΦεêéιùΔφ‰·φ·èδΗΣεΖΞεÖ·²΅ΣεΖόqö³φ•΅φΓΘδΗ≠ε·Ιφ·èδΗΣεΖΞεÖΖγö³φèè‰qéΆΦ¨δΜΞεèäφ·èδΗΣεΖΞεÖΖγö³δΗÄηà§γâΙεΨ¹γö³εΛßη΅¥ΨlÜεàÜψÄ?/p>
γî®δΚé JVM γîüφàêγö³δΩΓφ¹·γö³εΖΞεÖΖ
φ≠Λγ±Μφû³δögε¨Öφ΄§εQ?/p>
-
Verbose Garbage Collection (verboseGC) φ½ΞεΩ½δΙüη°Ηφ‰·φ€ÄεΗΗηß¹γö?JVM η·äφ•≠Ψc’dû΄ψIJε°Éφ‰³ΓΛΚδΚÜφï¥δΗ?JVM γîüε≠‰φ€üι½¥εQ¨εê³δΗΣεûÉε€ë÷¦ûφîΕεë®φ€üγö³ôεΚεΚèψIJε°ÉδΫ€δΊ™Φ΄°ε°öι½°ιΔ‰φ½Εγö³δΗÄôεΙεàùεß΄γö³ηΨÖεä©εΖΞεÖΖεQ¨εΗΗεΗΗεÖΖφ€âδΗçεè·δΦΑι΅èγö³δΜΖεÄϊ|Φ¨γî®δΚé΄²Ä΄Ι΄ε£¨η·äφ•≠εèçεΗΗγö³εÜÖε≠‰εàÜιÖçι½°ιΔ‰οΦ¨δΨ΄εΠ²εÜÖε≠‰φ≥³φΦèψĹγΔéγâ΅οΦ¨δΜΞεèäδΗ? GC φ€âεÖ≥γö³φÄßηÉΫι½°ιΔ‰Ϋ{âγ≠âψÄ?/p>
-
ΨUΩγ®΄ηΫ§ε²®δΙüφ‰·δΗÄΩUçφû¹δΗΚεΗΗηß¹γö³ JVM η·äφ•≠Ψc’dû΄ψIJγΚΩΫE΄ηù{ε²®οΦàδΙüγßΑδΗ?javacoreεQâεè·δΜΞφ†Ιφç°γ°ΓγêÜεë‰γö³η·Ζφ±²ηßΠεèëοΦ¨φà•ηÄÖε€® JVM δΗ≠ι¹΅εàΑφüêΩUçγâΙ¨DäφÉÖεÜâ|½Εη΅Σεä®ηßΠεèëψIJγΚΩΫE΄ηù{ε²®φ‰·δΗÄδΗΣφ•΅φ€§φ•΅δΜ”ûΦ¨εÖΕδΗ≠ε¨ÖεêΪ JVM γäΕφĹγö³εÖ≥ιî°φ•öwùΔγö³δΗÄδΗΣγ¦Ηε·ΙηΨÉγü≠γö³εΩΪγÖßψIJη·ΞεΩΪγÖßφ€ÄεΗΗγî®γö³ιÉ®εàÜφ‰· JVM δΗ≠εΫ™εâçφ¥Μεä®γΚΩΫE΄γö³εà½ηΓ®εQ¨γΚΩΫE΄ηù{ε²®δΙü妆φ≠ΛηĨεΨ½εêçψIJγΚΩΫE΄ηù{ε²®φ€ÄεΗΗηß¹γö³γî®ιÄîφ‰·η·äφ•≠ JVM δΗ≠ε΅ΚγéΑφ¨²ηΒ½ςĹεè‰φÖΔψÄ¹ε¥©φΚÉφà• CPU εç†γî®γé΅ηΩ΅ιΪ‰γö³εéü妆ψÄ?
-
ε†Üηù{ε²?/strong>φ‰·δΙüεè·γî± JVM γîüφàêγö³εèΠδΗÄΩUçε≈ûεΦèγö³ηΫ§ε²®εQ¨εè·δΜΞφ¨âι€ÄγîüφàêεQ¨δΙüεè·δΜΞε€®φΜΓ≠ë≥γâΙ¨DäφùΓδΜΕφ½Εη΅Σεä®γîüφàêψIJιÄöεΗΗεQ¨ε†ÜηΫ§ε²®ιÄöεΗΗφ‰·δΗÄδΗΣιùûεΗΗεΛßγö³φ•΅δΜ”ûΦ¨εÖΕδΗ≠ε¨ÖεêΪεΫ™εâç JVM ε†ÜδΗ≠φâÄφ€âε·Ιη±Γγö³δΗÄδΗΣεà½ηΓ®ψIJε°Éγî®δΚéε€®ε΅ΚγéΑεÜÖε≠‰δΗç≠ë≥γö³φÉÖεÜΒδΗ΄φâßηΓ¨φΖ±εÖΞεàÜφûêψÄ?/p>
-
Ψp»ùΜüε†Üφà•φ†ΗεΩÉε†?/strong>φ‰·εΦÄιîÄφ€ÄεΛßγö³ε†ÜοΦ¨δΫÜδΙüφ‰·φ€Äε°¨φï¥γö³ε†ÜψIJε°Éφ‰·δΗÄδΗΣεΖ®εΛßγö³δΚ¨ηΩ¦εàΕφ•΅δΜ”ûΦ¨εèçφ‰†δΚ?JVM ‰q¦γ®΄γö³εÖ®ιÉ®εÜÖε°ΙοΦöφ·èδΗÄδΗ? Java ε·Ιη±ΓεèäεÖΕε≠½φ°ΒψĹφ·èδΗÄδΗΣγΚΩΫE΄ψĹφ·èδΗΣεÜÖε≠‰ε¨ΚεüüοΦ¨Ϋ{âγ≠âψIJγ≥ΜΨlüηù{ε²®γö³φ€Äεàùγî®ιÄîφ‰·ε€®εÖΕδΜ•γ±Μεû΄γö³ηΫ§ε²®δΗçηÉωφà•φ½†φ≥ïγîüφàêφ½ΕεQ¨εΗ°εä©η·äφ•≠奩φΚÉψĹφ¨²ηΒδhà•εΛçφù²γö³εÜÖε≠‰εàÜιÖçι½°ιΔ‰ψIJδΗç‰q΅οΦ¨γîΉÉΚéΨp»ùΜüηΫ§ε²®ιùûεΗΗε°¨φï¥εQ¨ε°ÉδΙüηÉΫγî®φùΞηéΖεè•φ€âεÖ≥ WebSphere Application Server ‰qêηΓ¨φ½ΕεΫ™εâçγäΕφĹγö³εΛöφ•ΙιùΔδΩΓφ¹·οΦ¨γîöη΅≥φ€âεÖ≥ε€®η·Ξ‰qêηΓ¨φ½ΕδΗ≠φâßηΓ¨γö³εΚîγî®γ®΄εΚèγö³δΩΓφ¹·ψÄ?
‰qô顨γö³φ€âδΚ¦φû³δΜΕγö³εêçγßΑ壨γ±Μεû΄γâΙε°öδΚé IBM JDKεQ¦εÖΕδΜ•δΨ¦εΚîεïÜγö?JDK εè·ηÉΫδΚßγîüγ¦φÄΦΦγö³φ•΅δΜΕψIJφ€âεÖ¨ôΩôδΚ¦γ±Μεû΄γö³φû³δögγö³ηΩ¦δΗÄφ≠Ξη·ΠΨlÜδΩΓφ¹·οΦ¨η·Ζεè²ι‰?#8220;φùÉε®¹φî·φ¨¹”δΗ™φ†èγî®δΚéε°ûιôÖφïÖιö€η·äφ•≠γö³εäüηÉΫ壨εΖΞεÖΖψÄ?/p>
ηΓ?1. γî®δΚé JVM γîüφàêγö³δΩΓφ¹·γö³εΖΞεÖΖ
| φû³δögΨc’dû΄ | ι½°ιΔ‰Ψc’dû΄ | εÖΗεû΄ηΨ™εÖΞ | εè·γî®γö³εΖΞεÖ?/th> |
|---|---|---|---|
| Verbose Garbage Collection φ½ΞεΩ½ (verbosegGC) |
|
| |
| Java ηΫ§ε²®/javacore |
|
| |
| ΨUΩγ®΄ |
|
| |
| ε†Üηù{ε²?/td> |
|
| |
| Ψp»ùΜüφà•φ†ΗεΩÉηù{ε²?/td> |
|
|
|
εΖΞεÖΖφèèηΩΑ
-
IBM Monitoring and Diagnostic Tools for Java - Garbage Collection and Memory Visualizer (GCMV)
δΗÄδΗΣη·ΠΨlÜγö³ GC φïΑφç°εè·ηßÜ娕εô®εQ¨γî®δΚéεàÜφûêεΤàΨl‰εàΕφâÄφ€?IBM η·ΠγΜÜ GC φ½ΞεΩ½——Xtgc ηΨ™ε΅ΚεQàεΤàδΗîεè·φâ©ε±ïεàΑεàÜφûê壨Ψl‰εàΕεÖΕδΜ•εΫΔεΦèγö³ηΨ™εÖΞοΦâψIJε°ÉφèêδΨ¦δΚÜεΙΩφ≥¦γö³η·ΠγΜÜ GC φïΑφç°εÄΦγö³ε¦ë÷≈ûφ‰³ΓΛΚεQ¨εΤàεΛ³γêÜ optthruputψĹoptavgpause ε£?gencon GC φ®ΓεΦèψIJε°ÉεÖδh€âεéüεß΄φ½ΞεΩ½ψĹηΓ®φ†ΦεΦèφïΑφç°ε£¨ε¦ΨηΓ®ηßÜε¦ΨοΦ¨ρqΕδΗîεè·δΜΞû°ÜφïΑφç°δΩùε≠‰εàΑ jpeg φà?.csv φ•΅δögεQàγî®δΚéε·Φε΅ΚεàΑγîΒε≠êηΓ®φ†ΦεQâψÄ?/p>η·Ζεè²ι‰?IBM Support Assistant δΗ≠γö³ε°¨φï¥φèèηΩΑψÄ?
ηΨ™εÖΞεQöverbosegc φ½ΞεΩ½
ηΨ™ε΅ΚεQöε¦ΨεΫΔηΓ®ΫCΚε≈ûεΦèψĹhtmlψĹjpeg φà?csv φ•΅δög
φî·φ¨¹εQöφ≠ΛεΖΞεÖΖγî?IBM φèêδΨ¦φî·φ¨¹εQ¨γ¦°εâçφ‰·γî®δΚéεÖΕφâÄε€®ιΔÜεüüγö³δΗΜηΠ¹εΖΞεÖΖψÄ?/p> -
IBM Pattern Modeling and Analysis Tool (PMAT) for Java Garbage Collector
εàÜφûê IBM η·ΠγΜÜ GC ηΖüηΗΣεQ¨εàÜφû?Java ε†Üδ΄…γî®φÉÖεÜΒοΦ¨ρqΕεüΚδΚ?Java ε†Üδ΄…γî®φÉÖεÜκäö³φ®ΓεΦèεΜΚφ®ΓφèêδΨ¦ι΅çηΠ¹ιÖçγΫ°εΜχô°°ψIJφ≠ΛεΖΞεÖΖεÖàδΚéδΗäιùΔγö?IBM Monitoring and Diagnostic Tools for Java - Garbage Collection and Memory Visualizer (1)εQ¨εΤàφèêδΨ¦δΚÜδΗÄδΗΣεè·ηÉΫγ¦ΗεΫ™φ€âγî®γö³δΗçεê¨ιÄèηßÜε¦ΨψÄ?/p>η·Ζεè²ι‰?IBM Support Assistant φà?alphaWorks δΗ≠γö³ε°¨φï¥φèèηΩΑψÄ?
ηΨ™εÖΞεQöverbosegc φ½ΞεΩ½
ηΨ™ε΅ΚεQöverbosegc φ½ΞεΩ½γö³ε¦ΨεΫΔφà•ηΓ®φ†ΦηΓ®γΛΚεΫΔεΦè
εÖΕδΜ•εäüηÉΫεQöεÖ≥δΚ?JVM εè²φïΑγö³δΗÄηà§εΨèη°?
φî·φ¨¹εQöφäÄφ€·ιΔ³ηßàγâàεQ¨φ¨âεéüφ†ΖφèêδΨ¦ψÄ?/p> -
Diagnostic Tool for Java Garbage Collector
ιÄöηΩ΅η·’dè•η·ΠγΜÜεûÉε€Ψε¦ûφîΕγö³ηΨ™ε΅ΚοΦ¨ρqΕδώîγîüφ•΅φ€§ε£¨ε¦ë÷≈ûεè·ηßÜ娕ηΓ®ΫCΚε≈ûεΦèεèäγ¦ΗεÖ≥Ψlüη°ΓδΩΓφ¹·εQ¨δΜéηĨεΗ°εä©φΘÄφüΞηΩêηΓ¨ε€® JVM δΗ΄γö³εΚîγî®ΫE΄εΚèγö³εûÉε€ë÷¦ûφîΕγâΙεΨ¹ψÄ?η·Ζεè²ι‰?alphaWorks δΗ≠γö³ε°¨φï¥φèèηΩΑψÄ?
ηΨ™εÖΞεQöverbosegc
ηΨ™ε΅ΚεQöφ•΅φ€§ε£¨ε¦ë÷≈ûεè·ηßÜ娕ηΓ®ΫCΚε≈ûεΦ?
φî·φ¨¹εQöφ¨âεéüφ†ΖφèêδΨ¦γö³εΖΞεÖ½ςÄ?/p>
γî®δΚé Java ηΫ§ε²®/javacoreεQ?/p>
-
IBM Thread and Monitor Dump Analyzer (TMDA)
εàÜφûêδΗÄδΗΣφà•εΛöδΗΣ Java ΨUΩγ®΄ηΫ§ε²®φà?javacoreεQ¨εΤàη·äφ•≠γ¦ëηßÜεô®ιî¹ε£¨γΚΩΫE΄φ¥Μεä®οΦ¨δΜΞδΨΩΦ΄°ε°öφ¨²η™vψĹφ≠Μιî¹ε£¨ηΒ³φΚêδΚâγî®φà•γ¦ëηßÜεô®γ™âôΔàγö³φ†ΙφΚêψÄ?/p>η·Ζεè²ι‰?IBM Support Assistant φà?alphaWorks δΗ≠γö³ε°¨φï¥φèèηΩΑψÄ?
ηΨ™εÖΞεQöγî®δΚéφ‰ΨΫCΚγ¦ΗεÖ≥γΚΩΫE΄εéÜεè≤η°ΑεΫïγö³εçïδΗΣφà•εΛöδΗ?javacore
ηΨ™ε΅ΚεQöεüΚδΚ?GUI γö³ηßÜε¦?
εÖΕδΜ•δΩΓφ¹·εQöεÖ≥δΚ?Analysis of hangs, deadlocks, and resource contention or monitor bottlenecks using IBM Thread and Monitor Dump Analyzer for Java Technology γö³γΫëΨl€εΙΩφ£?
φî·φ¨¹εQöφäÄφ€·ιΔ³ηßàγâàεQ¨φ¨âεéüφ†ΖφèêδΨ¦εQ¨δΫÜφ‰·φ‰·η·ΞιΔÜεüüγö³δΗΜηΠ¹εΖΞεÖΖψÄ?/p> -
ThreadAnalyzer
φèêδΨ¦ Java ΨUΩγ®΄ηΫ§ε²®φà?javacore γö³εàÜφûêοΦ¨δΨ΄εΠ²φùΞη΅Σ WebSphere Application Server γö³ηù{ε²®φà• javacoreψIJεè·δΜΞε€®δΗçεê¨γö³γώîεàΪεàÜφûêγΚΩΫE΄δ΄…γî®φÉÖεÜΒοΦ¨δΜéιΪ‰ΨUßε¦ΨεΫΔηßÜε¦ë÷ΦÄεß΄οΦ¨γ³ΕεêéφΖ±εÖΞεàΑεê³δΗΣγΚΩΫE΄γö³η·ΠγΜÜη°ΑεΫïψIJεΠ²φû€γΚΩΫE΄ηù{ε²®δΗ≠ε≠‰ε€®δΜ÷MΫïφ≠Μιî¹εQ¨ThreadAnalyzer û°ÜφΘÄ΄Ι΄εΤàφäΞεëäε°ÉδΜ§ψIJφ≠ΛεΖΞεÖΖεÖàδΚéδΗäιùΔγö?IBM Thread and Monitor Dump Analyzer εΖΞεÖΖ (4)εQ¨δΫÜφ‰·εÖΕεäüηÉΫεΖ≤ι¦ÜφàêεàΑεêéηÄÖδΙ΄δΗ≠οΦ¨εêéηÄÖφ≠Θε€®φàêδΗχô·ΞιΔÜεüüγö³δΗΜηΠ¹εΖΞεÖ½ςÄ?η·Ζεè²ι‰?IBM Support Assistant δΗ≠γö³ε°¨φï¥φèèηΩΑψÄ?
ηΨ™εÖΞεQöJava ΨUΩγ®΄ηΫ§ε²®/javacore
ηΨ™ε΅ΚεQöγΚΩΫE΄γö³ε¦ë÷≈ûηßÜε¦ΨψĹεä†ηΫΫεΛöδΗΣγΚΩΫE΄ηù{ε²®δΜΞφ‰³ΓΛΚΨUΩγ®΄εéÜεè≤η°ΑεΫïγö³ηÉΫεä?
φî·φ¨¹εQöφäÄφ€·ιΔ³ηßàγâàεQ¨φ¨âεéüφ†ΖφèêδΨ¦εQ¨δΫÜφ‰·φ‰·η·ΞιΔÜεüüγö³δΗΜηΠ¹εΖΞεÖΖψIJφ≠ΛεΖΞεÖΖεè·ηÉΫδΦöιÄêφ≠ΞφΖ‰φ±ΑεQ¦η·Ζû°Ϋεè·ηÉΫδ΄…γî?IBM Thread and Monitor Dump AnalyzerψÄ?/p>
-
IBM Lock Analyzer for Java
φ½®ε€®ε·Ιεä®φĹεΚîγî®γ®΄εΚèφâßηΓ¨ιî¹εàÜφûêεQ¨δΜΞδΨΩγΣ¹ε΅ΚεÖΖφ€âεè·ηÉΫεΣ³ε™çφÄßηÉΫγö³ιî¹δΚâγî®γö³γΚΩΫE΄ψIJφ≠ΛεΖΞεÖΖγîΉÉΗΛδΗΣε¨ÖΨl³φàêεQ?- ΫW§δΗÄδΗΣε¨ÖδΗéεψ^εèΑγ¦ΗεÖΜIΦ¨ρqΕφèêδΨ¦εàΑ JVM γö³ηΩûφéΞοΦ¨δΜΞδΨΩφîâô¦Üφ€âεÖ≥φ≠Θε€®‰qêηΓ¨γö³εΚîγî®γ®΄εΚèγö³ιî¹γΜüη°ΓδΩΓφ¹·ψIJηΩôδΗΣε¨Öε€®ηΩêηΓ¨φ½Ειöèεê¨ηΠ¹γ¦ëηßÜγö³εΚîγî®ΫE΄εΚèδΗÄηΒ·²Ω¦ηΓ¨εä†ηΫΫψÄ?
- ΫW§δΚ¨δΗΣε¨ÖδΗéεψ^εèΑφ½†εÖΜIΦ¨ρqΕφèêδΨ¦δΚÜε¦ë÷≈ûγî®φàΖγï¨ιùΔψÄ?
η·Ξε¦ΨεΫΔγî®φàοLï¨ιùΔηΩûφéΞεàΑρq¦_èΑε¨ÖοΦ¨ρqΕφèêδΨ¦φâÄι€Äγö³φéßεàΕ壨εàÜφûêδΜΞγΓ°ε°öφÄßηÉΫΨpüγ≥ïγö³ιî¹ψÄ?/p>
η·Ζεè²ι‰?alphaWorks δΗ≠γö³ε°¨φï¥φèèηΩΑψÄ?
ηΨ™εÖΞεQöδΜé JVM φîâô¦Üγö³γΜüη°ΓδΩΓφ¹?
ηΨ™ε΅ΚεQöιî¹γö³ε¦ΨεΫΔηßÜε¦?
φî·φ¨¹εQöφ¨âεéüφ†ΖφèêδΨ¦γö³εΖΞεÖ½ςÄ?/p>
γî®δΚéε†Üηù{ε²®οΦö
-
Memory Dump Diagnostic for Java (MDD4J)
εàÜφûêφ≠Θε€®‰qêηΓ¨ WebSphere Application Server φà•δ™QδΫïεÖΕδ̕㴧γΪ?Java εΚîγî®ΫE΄εΚèγö?JVM δΗ≠εΗΗηß¹φ†ΦεΦèγö³εÜÖε≠‰ηΫ§ε²®εQàε†ÜηΫ§ε²®εQâψIJεÜÖε≠‰ηù{ε²®εàÜφûêφ½®ε€®γΓ°ε°?Java ε†ÜδΗ≠εè·ηÉΫφ‰·εÜÖε≠‰φ≥³ι€≤φ†ΙφΚêγö³φïΑφç°Ψl™φû³ψIJη·ΞεàÜφûê‰q‰γΓ°ε°öεΚîγî®γ®΄εΚèγö³ Java ε†Üεç†γî®γ©Κι½¥γö³δΗΜηΠ¹η²΅δΚ΄ηÄÖ壨ε°ÉδΜ§γö³φâÄε±ûεÖ≥ΨpÖRIJφ≠ΛεΖΞεÖΖηÉΫεΛüεàÜφûêδΜéι¹΅εà? OutOfMemoryError ι½°ιΔ‰γö³γîüδΚßγé·εΔÉεΚîγî®γ®΄εΚèφ€çεäΓεô®δΗ≠ηéΖεΨ½γö³ιùûεΗΗεΛßγö³εÜÖε≠‰ηΫ§ε²®εQàεΑÜι€ÄηΠ?2 GB φà•φ¦¥εΛöγö³ RAMεQâψIJMDD4J φâ©ε±ïδΚÜδΗ΄ιùΔηΨÉφ½ßγö³ IBM HeapAnalyzer (8) γö³εäüηÉΫοΦ¨û°Ϋγ°ΓδΗΛδΗΣεΖΞεÖΖγö³γî®φàοLï¨ιùΔε°¨εÖ®δΗçεê¨ψÄ?/p>η·Ζεè²ι‰?IBM Support Assistant δΗ≠γö³ε°¨φï¥φèèηΩΑψÄ?
ηΨ™εÖΞεQöφùΞη΅Σηôöφ΄üφ€Κ (JVM) γö³εÜÖε≠‰ηù{ε²®οΦàε†Üηù{ε²®οΦâ
ηΨ™ε΅ΚεQöδΚΛδΚ£εΦèφäΞεëäεQ¨εÖΕδΗ≠φ‰ΨΫCόZΗΜηΠ¹γö³εÜÖε≠‰φ≥³ι€≤εè·γ•ëδΙ΄εΛ³εQ¨δΜΞεèäφ€âεÖ¨ôΩôδΚ¦φ≥³ι€≤γö³η·ΠγΜÜδΩΓφ¹·ψÄ?
εÖΕδΜ•εäüηÉΫεQöφ™çδΫ€εçïδΗΣηù{ε²®ψIJφ€âδΚ¦γâàφ€§φèêδΨ¦δΚÜεΛöδΗΣηΫ§ε²®γö³φ·îηΨÉεàÜφûêψÄ?
φî·φ¨¹εQöφ≠ΛεΖΞεÖΖγî?IBM φèêδΨ¦φî·φ¨¹εQ¨γ¦°εâçφ‰·γî®δΚéεÖΕφâÄε€®ιΔÜεüüγö³δΗΜηΠ¹εΖΞεÖΖψÄ²ε€®φ€§φ•΅Ψ~•εÜôδΙ΄ιôÖεQ¨IBM Support Assistant δΗ≠γö³φ€Äφ•Αγâàφ€§δΊ™ Beta γâàψÄ?/p> -
HeapAnalyzer
HeapAnalyzer η·’dè•εçïδΗΣ Java εÜÖε≠‰ηΫ§ε²®εQàε†ÜηΫ§ε²®εQâοΦ¨ρqΕδ΄…φ²®ηÉΫεΛüφΒèηßàηù{ε²®δΜΞφüΞ〴εÖΕεÜÖε°èVIJφ≠ΛεΖΞεÖΖφ‰·δΗäιùΔγö³ Memory Dump Diagnostic for Java (MDD4J) εΖΞεÖΖ(7) γö³εâçμwΪοΦ¨εêéηÄÖγéΑε€®ε¨ÖεêΪεâçηÄÖγö³εΛßεΛöφïΑεäüηÉΫψIJεΫ™φ½”ûΦ¨HeapAnalyzer δΗ≠γö³εéüεß΄φ†ëφΒèηßàεäüηÉΫφ·îε€?MDD4J δΗ≠φ¦¥εä†γ¹Β΄zÖRIJεèΠδΗÄφ•öwùΔεQ¨HeapAnalyzer Ψ~όZΙè MDD4J δΗ≠γö³φüêδΚ¦φ¦¥ε°¨ε•³γö³φ≥³ι€≤εΪ¨γ•ë΄²Ä΄Ι΄γ°½φ≥ïοΦ¨ρqΕδΗîδΗçφî·φ¨¹εΛöδΗΣηù{ε²®γö³φ·îηΨÉεàÜφûêψÄ?/p>η·Ζεè²ι‰?alphaWorks δΗ≠γö³ε°¨φï¥φèèηΩΑψÄ?
ηΨ™εÖΞεQöεçïδΗ?java ε†Üηù{ε²?
ηΨ™ε΅ΚεQöεè·γ•ëε·Ιη±Γγö³ε¦ë÷≈ûηßÜε¦Ψ壨ε†Ü΄Ιèηßàεô?
φî·φ¨¹εQöφ¨âεéüφ†ΖφèêδΨ¦γö³εΖΞεÖ½ςÄ?/p> -
HeapRoots
HeapRoots η·’dè• Java ε†Üηù{ε²®φ•΅δΜΕεΤàφèêδΨ¦γî®δΚéεàÜφûêφïΑφç°γö³εëΫδΜΛψIJηΩôδΚ¦εëΫδΜΛε·ΙφïΑφç°‰qêηΓ¨Ϋé½φ≥ïεQ¨φà•φüΞη·Δφ€âεÖ≥η·ΞφïΑφç°γö³δΩΓφ¹·ψIJHeapRoots φèêδΨ¦δΚÜεëΫδΜΛηΓ¨δΚΛδΚ£εΦèγï¨ιùΔοΦ¨φ²®εè·δΜΞε€®εÖΕδΗ≠ηΨ™εÖΞεëΫδΉoρqΕηéΖεè•γΜ™φû€ψÄ?η·Ζεè²ι‰?alphaWorks δΗ≠γö³ε°¨φï¥φèèηΩΑψÄ?
ηΨ™εÖΞεQöε†ÜηΫ§ε²®φ•΅δög
ηΨ™ε΅ΚεQöεè·γ•ëε·Ιη±Γγö³ε¦ë÷≈ûηßÜε¦Ψ壨ε†Ü΄Ιèηßàεô?
φî·φ¨¹εQöφ¨âεéüφ†ΖφèêδΨ¦γö³εΖΞεÖ½ςÄ?/p>
γî®δΚéΨp»ùΜü/φ†ΗεΩÉηΫ§ε²®εQ?/p>
-
IBM Monitoring and Diagnostic Tools for Java - Dump Analyzer
δΗÄδΗΣεè·φâ©ε±ïγö³εΖΞεÖδhΓÜφû”ûΦ¨ε°Éη·Μεè?IBM JVM δΚßγîüγö³γ≥ΜΨlüηù{ε²®φà•φ†ΗεΩÉφ•΅δögεQ¨εΤàι£àε·Ιη·Ξηù{ε²®ηΩêηΓ¨εê³ΩUçεê³φ†οLö³εàÜφûêφ®Γεù½δΜΞη·äφ•≠εΗΗηß¹ι½°ιΔ‰οΦ¨φà•φèêδΨ¦φ€âεÖ¨ô·Ξ JVM 壨εΫ™εâçηΩêηΓ¨ε€®η·?JVM δΗ≠γö³δΜ÷MΫïδΗ≠ι½¥δΜΕφà•εΚîγî®ΫE΄εΚèγö³εÜÖιÉ®γäΕφĹγö³φΖ±εÖΞδΩΓφ¹·ψÄ²γ¦°εâçοΦ¨φèêδΨ¦δΚÜγî®δΚéε·Ιη·ΗεΠ²φ≠Μιî¹ψĹφ¨²ηΒ½ςÄ¹ε¥©φΚÉψĹεÜÖε≠‰φÉÖεÜκä≠âεΗΗηß¹ JVM ι½°ιΔ‰φâßηΓ¨εüΚφ€§εàÜφûêεäüηÉΫγö³φ®Γεù½ψIJδΫ€δΗΚε·Ιη·ΞεüΚφ€§εΖΞεÖοLö³ηΓΞεÖÖεQ¨WebSphere Applicationi Server Modules for Dump Analyzer φèêδΨ¦δΚÜιô³εä†γö³φ®Γεù½εQ¨εè·φ‰³ΓΛΚ JVM δΗ≠γö³ WebSphere Application Server ‰qêηΓ¨φ½Εγö³δΗÄηà§γäΕφĹοΦ¨δΜΞεèäφ€âεÖ≥εΛöδΗΣ WebSphere Application Server ε≠êγ≥ΜΨlüγö³η·ΠγΜÜδΩΓφ¹·ψÄ?/p>η·Ζεè²ι‰?IBM Support Assistant δΗ≠γö³ε°¨φï¥φèèηΩΑψÄ?
ηΨ™εÖΞεQöγî± JVM ιô³εΗΠγö?jextract εΖΞεÖΖ‰q¦ηΓ¨ιΔ³εΛ³γêÜγö³φ†ΦεΦè娕γ≥ΜΨlüηù{ε²?
ηΨ™ε΅ΚεQöφ‰ΨΫCόZΗÄδΗΣφäΞεëäοΦ¨εÖΕδΗ≠ε¨ÖεêΪγî±φ¨΅ε°öγö³εàÜφûêφ®Γεù½φèêεè•γö³δΩΓφ¹·οΦ¨‰q‰ε¨ÖεêΪφ€âεÖœxΫ€ε€®ι½°ιΔ‰γö³ηß²ε·üΨl™φû€γö³γ°Äγü≠φë‰ηΠ¹οΦ¨δΜΞεèäδΗÄδΗΣφèêδΨ¦φΖ±εÖΞδΩΓφ¹·γö³η·ΠγΜÜδΩΓφ¹·ιÉ®εàÜψÄ?
εÖΕδΜ•εäüηÉΫεQöφèêδΨ¦δΚΛδΚ£εΦèφ®ΓεΦèδΜΞφâ΄εä®φΘÄφüΞηù{ε²®γö³εÜÖε°ΙψÄ²δ΄…εΨ½γî®φà·²ÉΫεΛüγΦ•εÜôη΅ΣεΖόqö³φ•Αγö³δΗ™ι½®εàÜφûêφ®Γεù½ρqΕεΑÜφ®Γεù½φΖ’dä†εàΑη·ΞεΖΞεÖΖψÄ?
φî·φ¨¹εQöφ≠ΛεΖΞεÖΖγî?IBM φèêδΨ¦φî·φ¨¹εQ¨γ¦°εâçφ‰·γî®δΚéεÖΕφâÄε€®ιΔÜεüüγö³δΗΜηΠ¹εΖΞεÖΖψÄ?/p>
γî®δΚéφ½Ξεٽ壨ηΖüμtΣφ•΅δΜΕγö³εΖΞεÖΖ
γî®δΚé‰qôδΚ¦Ψc’dû΄γö³φû³δΜΕγö³΄z’dä®ε¨Öφ΄§εQ?/p>
-
φ½ΞεΩ½η°ΑεΫïιÄöεΗΗγî®δΚéε€®φ½ΞεΩ½φ•΅δΜΕδΗ≠η°ΑεΫïφ²®εΗ¨φ€¦ηΖüμtΣγö³ι΅çηΠ¹δΚ΄δögψIJφ½ΞεΩ½η°ΑεΫïγî®δΚéφ¨΅ΫCΚοΦö
- ι΅çηΠ¹γö³γäΕφĹφ¦¥φîΙοΦ¦δΨ΄εΠ²εQ¨εΫ™φüêδΗΣφ€çεäΓεê·εä®φà•ε¹€φ≠Δγö³φ½ΕεÄôψÄ?/li>
- η≠ΠεëäεQ¦δΨ΄εΠ²οΦ¨εΫ™φ²®φ≠Θε€®εÜôεÖΞγö³γΘ¹γ¦‰γ©Κι½¥δΗç≠ë≥γö³φ½ΕεÄôψÄ?/li>
- ιîôη··εQ¦δΨ΄εΠ²οΦ¨εΫ™φ²®γö³δΜΘγ†¹γî±δΚéιΔ³φ€üγö³φ€çεäΓδΗçεè·γî®ηĨδΗçεÜçηÉΫεΛüγëτΨl≠φâßηΓ¨γö³φ½ΕεÄôψÄ?
φ½ΞεΩ½η°ΑεΫïιÄöεΗΗφ‰·εß΄Ψlàεê·γî®γö³εQ¨ε¦†φ≠Λφ½ΞεΩ½η°ΑεΫïδΜΘγ†¹εΩÖôε÷MΫ™ΩU·γ¦ΗεΫ™εΑèεQ¨ηΩôιÄöεΗΗφ‰·φ²®εΚîη·Ξφ≥®φ³èγö³ι΅çηΠ¹δΚ΄ôεèVÄ?
-
ηΖüηΗΣιÄöεΗΗγî®δΚéη°ΑεΫïε€®ηΑÉη·ïδΜΘγ†¹ι½°ιΔ‰φ½Εεè·ηÉΫφ€âγî®γö³δ™QδΫïδΩΓφ¹·ψIJηΖüμtΣιÄöεΗΗγî®δΚéφ¨΅γΛΚηΑÉγî®δΚÜε™ΣδΚ¦φ•Ιφ≥ïψĹεêëφ•“é≥ïδΦ†εÖΞδΚÜε™ΣδΚ¦φïΑφç°οΦàφà•δΜéφ•“é≥ï‰qîε¦ûδΚÜδΜÄδΙàεÄϊ|ΦâδΜΞεèäε·ΙδΜΘγ†¹ηΨΙγï¨δΙ΄εΛ•γö³εÖΕδΜ•φ•“é≥ïγö³ηΑÉγî®ηΩîε¦ûδΚÜδΜÄδΙàφïΑφç°ψIJηΖüμtΣδΚ΄δΜΕδΫ™ΩU·εè·ηÉΫφ·îηΨÉεΛßεQ¨ε¦†φ≠ΛεèΣφ€âε€®η·äφ•≠ι½°ιΔ‰φ½Εεê·γî®ψIJγî±δΚéηΖüμtΣδΚ΄δΜΕγö³εÜÖε°Ιφû¹δΊ™η·ΠγΜÜεQ¨ηĨδΗîφ‰·φäÄφ€·δΩΓφ¹·ο֨妆φ≠ΛΨlèεΗΗεèΣε·ΙΨ~•εÜôεΚîγî®ΫE΄εΚèγö³δùhφ€âδ≠hεÄΙ{IJφâ™εΦÄηΖüηΗΣγö³φÉÖεÜΒδΗ΄εQ¨εΚîη·ΞηÉΫεΛüδΚÜηßΘε€®δΜΘγ†¹δΗ≠εè·ηÉΫε΅ΚγéΑγö³δΜ÷MΫïι½°ιΔ‰ψÄ?
ηΓ?2. γî®δΚéφ½Ξεٽ壨ηΖüμtΣφ•΅δΜΕγö³εΖΞεÖΖ
| φû³δögΨc’dû΄ | ι½°ιΔ‰Ψc’dû΄ | εÖΗεû΄ηΨ™εÖΞ | εè·γî®γö³εΖΞεÖ?/th> |
|---|---|---|---|
| φùΞη΅ΣεΛöδΗΣδΚßε™¹γö³φ½ΞεΩ½φ•΅δΜ?/td> |
|
| |
| WebSphere ηΖüηΗΣεQàδΗÄηà§οΦâ |
|
| |
| WebSphere Application Server ηΖüηΗΣε£?HTTP φè£δögηΖüηΗΣ |
|
| |
| WebSphere Application Server ηΖüηΗΣεQàηΩûφéΞεΖΞεÖχPΦâ |
|
| |
| JVM verboseGC ηΖüηΗΣ |
|
|
εΖΞεÖΖφèèηΩΑ
-
Log AnalyzerεQàδΜΞεèäγ¦ΗεÖ≥γö³ Symptom EditorεQ?/strong>
δΗÄδΗΣε¦ΨεΫΔγî®φàοLï¨ιùΔοΦ¨φèêδΨ¦γî®δΚé΄ΙèηßàψĹεàÜφûê壨εÖ¨ô¹îεΛöδΗΣδΚßε™¹δΚßγîüγö³φ½ΞεΩ½γö³εçïδΗΣη¹îγΜ€γ²èVIJφ≠ΛεΖΞεÖΖφ‰·φ¦¥ρqΩφ≥¦γö?IBM η΅ΣδΗΜη°Γγ°½΄z’dä®γö³δΗÄιÉ®εàÜψÄ?/p>η·Ζεè²ι‰?IBM Support Assistant δΗ≠γö³ε°¨φï¥φèèηΩΑψÄ?
ηΨ™εÖΞεQöφùΞη΅?IBM 壨εÖΕδΜ•δΨ¦εΚîεïÜφé®ε΅Κγö³η°ΗεΛöη YδΜΕδώîε™¹γö³εΛöδΗΣφ½ΞεΩ½φ•΅δög
ηΨ™ε΅ΚεQöεüΚδΚ?GUI γö³ηßÜε¦ë÷£¨φ½ΞεΩ½φ•΅δögεÖ¨ô¹î
εÖΕδΜ•εäüηÉΫεQöηÉΫεΛüδΩùε≠‰ιÖçΨ|°δΜΞεΗ°εä©εÖΕδΜ•φî·φ¨¹εΖΞγ®΄εΗàηΩ¦ηΓ¨ηΩ¦δΗÄφ≠Ξγö³εàÜφûêψIJφèêδΨ¦δΚÜιÖçεΞ½γö?Symptom Editor εΖΞεÖΖφùΞεà¦εΜΚφ²®η΅ΣεΖ±γö³γ½΅γäΕφïΑφç°εΚ™ψÄ?
φî·φ¨¹εQöγ¦°εâçφ‰·εÖΕφâÄε€®ιΔÜεüüγö³δΗΜηΠ¹εΖΞεÖΖψÄ?/p> -
Trace Analyzer for WebSphere Application Server
δΗÄδΗΣιΪ‰εΚΠδΚΛδΚ£εΦèγö³ε°ûγî®εΖΞεÖχPΦ¨δΫΩφ²®ηÉΫεΛüη·ΠγΜÜ΄ΙèηßàψĹφΘÄφüΞ壨φê€γÉΠ WebSphere Application Server δΗ≠γö³εΛçφù²ηΖüηΗΣφ•΅δögψÄ?/p>η·Ζεè²ι‰?alphaWorks δΗ≠γö³ε°¨φï¥φèèηΩΑψÄ?
ηΨ™εÖΞεQöWebSphere Application Server trace.logεQ¦εΠ²φû€εê·γî®δΚÜιΪ‰γώîφ½ΞεΩ½η°ΑεΫïεQ¨εàô‰q‰φî·φ¨¹φ¦¥εΛöγö³ηΨ™εÖΞ
ηΨ™ε΅ΚεQöεäüηÉΫεΦΚεΛßγö³ε¦ë÷≈ûηßÜε¦ΨεQ¨εΗΠΫ{¦ιÄâεô®ε£¨φê€γ¥ΔηßÜε¦?
εÖΕδΜ•εäüηÉΫεQöηÉΫεΛüδΩùε≠‰ιÖçΨ|°δΜΞεΗ°εä©εÖΕδΜ•φî·φ¨¹εΖΞγ®΄εΗàηΩ¦ηΓ¨ηΩ¦δΗÄφ≠Ξγö³εàÜφûê
φî·φ¨¹εQöφ¨âεéüφ†ΖφèêδΨ¦εQ¨δΫÜγ¦°εâçφ‰·εÖΕφâÄε€®ιΔÜεüüγö³δΗΜηΠ¹εΖΞεÖΖψÄ?/p> -
IBM Trace and Request Analyzer for WebSphere Application Server
εΗ°εä©φüΞφâΨιùûφ≠ΘεΗΗεög‰qüψĹγ≥ΜΨlüηΩêηΓ¨γΦ™φÖΔφà•Ψp»ùΜüηΓ®γéΑδΗΚφ¨²ηΒοL³Εεêéεèàφ¹ΔεΛçγö³φÉÖεÜκäö³φ†“éΚêψIJφ≠ΛεΖΞεÖΖ΄²Äφü?WebSphere Application Server ε£?HTTP φè£δögδΗ≠γö³ηΖüηΗΣφ•΅δögεQ¨ιÄöηΩ΅‰qôδΚ¦φ•΅δögΦ΄°ε°öεê³δΗΣη·δh±²εQ¨εΤàφâë÷΅ΚγâΙε°öφ™çδΫ€ι€ÄηΠ¹ηä±ιïΩφ½Ει½¥ε°¨φàêγö³ε¨ΚεüüεQ¨δΜéηĨεΗ°εä©φ²®΄²ÄφüΞηΖüμtΣδΗ≠γö³εè·γ•ëε¨ΚεüüοΦ¨δΜΞγΓ°ε°öφ‰·εêΠε≠‰ε€®ι½°ιΔ‰ψIJγî®φàδh€âφ½ΕεΑÜφ≠ΛεΖΞεÖΖδΗéδΗäιùΔγö? Trace Analyzer for WebSphere Application Server (12) φêûφΊ€φΖÜοΦ¨δΫÜδΚ΄ε°ûδΗäε°ÉδΜ§φ‰·ε°¨εÖ®δΗçεê¨γö³ψIJφ≠ΛεΖΞεÖΖδΗΞφ†Φε€Αι¦ÜδΗ≠δΚéû°Ϋεè·ηÉΫη΅Σεä®ε€Αφâë÷΅ΚφÄßηÉΫι½°ιĉ壨εög‰qüοΦ¨ηÄ?Trace Analyzer φ‰·ιÄöγî®εΖΞεÖΖεQ¨δΗΜηΠ¹γî®δΚéφâ΄εä®φΘÄφüΞηΖüμtΣψÄ?/p>η·Ζεè²ι‰?alphaWorks δΗ≠γö³ε°¨φï¥φèèηΩΑψÄ?
ηΨ™εÖΞεQöHTTP φ€çεäΓεô®φ½ΞεΩ?(http_plugin.log) ε£?WebSphere Application Server ηΖüηΗΣφ½ΞεΩ½ (trace.log)
ηΨ™ε΅ΚεQöηΓ®φ†ΦεàÜφûêηßÜε¦?
φî·φ¨¹εQöφ¨âεéüφ†ΖφèêδΨ¦εQ¨δΫÜγ¦°εâçφ‰·εÖΕφâÄε€®ιΔÜεüüγö³δΗΜηΠ¹εΖΞεÖΖψÄ?/p> -
Database Connection Pool Analyzer for IBM WebSphere Application Server
ι΅΅γî®εê·εèëεΦèεàÜφûêεΦïφ™éφùΞεΗ°εä©φ²®ηßΘεÜ≥δΗé Java Database Connectivity (JDBC) ‰qûφéΞφ±†γ¦ΗεÖ≥γö³ι½°ιΔ‰εQ¨εΤàη·äφ•≠ JDBC ‰qûφéΞφ≥³ι€≤ψIJφ≠ΛεΖΞεÖΖεàÜφûê JDBC ‰qûφéΞφ±†γ°ΓγêÜεô®ηΖüηΗΣεQ¨εΤàφèêδΨ¦δΜΞδΗ΄εäüηÉΫεQ?/p>- JDBC φïΑφç°φΚêεàÜφûêψÄ?/li>
- JDBC ‰qûφéΞφ±†ιÖçΨ|°εàÜφûêψÄ?/li>
- JDBC ‰qûφéΞε¦ΨηΓ®ηßÜε¦ΨψÄ?/li>
- getConnection φ•“é≥ïγö?Java ε†Üφ†àηΖüηΗΣηßÜε¦ΨψÄ?/li>
φ€âεÖ≥δΫΩγî®φ≠ΛεΖΞεÖΖεàÜφûêηΩûφéΞφ±†ι½°ιΔ‰φâÄι€ÄηΠ¹γö³ WebSphere Application Server ηΖüηΗΣη°³ΓΫ°εQ¨η·Ζεè²ι‰Ö MustGather δΩΓφ¹·ψÄ?/p>
η·Ζεè²ι‰?alphaWorks δΗ≠γö³ε°¨φï¥φèèηΩΑψÄ?
ηΨ™εÖΞεQöJDBC ηΖüηΗΣφ½ΞεΩ½
ηΨ™ε΅ΚεQöφ½ΞεΩ½γö³ηΓ®φ†Φ壨ε¦ΨεΫΔεàÜφû?
φî·φ¨¹εQöφ¨âεéüφ†ΖφèêδΨ¦εQ¨δΫÜγ¦°εâçφ‰·η·ΞιΔÜεüüγö³δΗΜηΠ¹εΖΞεÖ½ςÄ?/p>
γî®δΚéιùôφĹιÖçΨ|°φ•΅δΜΕ壨γ¦ΗεÖ≥δΩΓφ¹·γö³εΖΞεÖ?/h2> ηΓ?3. δΗéιùôφĹιÖçΨ|°γ¦ΗεÖ≥γö³φ•΅δög
| φû³δögΨc’dû΄ | ι½°ιΔ‰Ψc’dû΄ | εÖΗεû΄ηΨ™εÖΞ | εè·γî®γö³εΖΞεÖ?/th> |
|---|---|---|---|
| φùΞη΅ΣεΛöδΗΣδΚßε™¹γö³ιÖçΨ|°φ•΅δΜ?/td> |
|
| |
| WebSphere Application Server http φè£δögιÖçγΫ°φ•΅δög |
|
| |
| WebSphere Application Server ιÖçγΫ°εQàδΜé‰qêηΓ¨φ½ΕδΗ≠η·’dè•εQ¨φ½†γ¦¥φéΞεè·ηß¹γö³φ•΅δΜ”ûΦâ |
|
|
|
| WebSphere Application Server Ψc’dä†ηΫΫεô®ιÖçγΫ°εQàδΜé‰qêηΓ¨φ½ΕδΗ≠η·’dè•εQ¨φ½†γ¦¥φéΞεè·ηß¹γö³φ•΅δΜ”ûΦâ |
|
|
|
| WebSphere δΚßε™¹ε°âηΘÖ |
|
| |
| εΛöδΗΣδΚßε™¹ιÖçγ۰壨ηΩêηΓ¨φ½ΕΨ|ëγΜ€γäΕφÄ?/td> |
|
|
εΖΞεÖΖφèèηΩΑ
-
Visual Configuration Explorer (VCE)
φèêδΨ¦δΗÄΩUçεè·ηßÜ娕ψĹφéΔγ¥Δ壨εàÜφûêδΗçεê¨φùΞφΚêγö³ιÖçΨ|°δΩΓφ¹·γö³φ•“é≥ïεQ¨δΨ΄εΠ?WebSphere Application ServerψĹWebSphere MQ ε£?DB2ψIJφ≠ΛεΖΞεÖΖεÖ¹η°Ηφ²®οΦö- φ·îηΨÉγ¦ΗεꨉqêηΓ¨φ½Εγé·εΔÉγö³δΗçεê¨εΩΪγÖßψÄ?/li>
- εà¦εΨèε¦ΨηΓ®εQ¨ι΅΅γî®ε¦ΨεΫΔφ†ΦεΦèφ‰ΨΫCΚιÖçΨ|°δΩΓφ¹·οΦ¨ε¨Öφ΄§ιÖçγΫ°εÖÉ㥆δΙ΄ι½¥γö³δΗΜηΠ¹εÖ≥ΨpÖRÄ?/li>
- η°âK½°η·ΠγΜÜγö³ιÖçΨ|°ε±ûφÄßψÄ?/li>
- ε€®ιÖçΨ|°εÜÖ壨ηΖ®ιÖçγΫ°φê€γÉΠε±ûφÄßψÄ?/li>
- φ·îηΨÉιÖçγΫ°ψÄ?/li>
- ε€®δΗçεê¨γö³δΚßε™¹γö³ιÖçΨ|°δΩΓφ¹·δΙ΄ι½¥εΨèγΪ΄η¹îΨpÖRÄ?/li>
- δΩùε≠‰ε£¨φ¹ΔεΛçεΖΞδΫ€ψÄ?
- ε€®ι½°ιΔ‰γΓ°ε°öεΖΞδΫ€δΗ≠δΗéεÖΕδΜ•δùh‰q¦ηΓ¨εçèδΫ€ψÄ?/li>
- 倮㴧γΪ΄γé·εΔÉφà•ε°ΔφàΖφ€?φ€çεäΓεô®γé·εΔÉδΗ≠εΖΞδΫ€ψÄ?/li>
η·Ζεè²ι‰?IBM Support Assistant δΗ≠γö³ε°¨φï¥φèèηΩΑψÄ?
ηΨ™εÖΞεQöδΜé VCE ιô³εΗΠγö?VCE ‰q€γ®΄φîâô¦Üεô®εΖΞεÖΖδΗ≠δΚßγîüγö?JAR φ•΅δög
ηΨ™ε΅ΚεQöιÖçΨ|°γö³ε¦ë÷≈ûφèèηΩΑψIJιÖçΨ|°γö³εΖ°εΦ²φäΞεëäεQàδΩùε≠‰δΊ™ XML φ†ΦεΦèεQ?
εÖΕδΜ•εäüηÉΫεQöηÉΫεΛüδΩùε≠‰ιÖçΨ|°οΦ¨δΜΞεΗ°εä©εÖΕδΜ•φî·φ¨¹εΖΞΫE΄εΗà‰q¦ηΓ¨‰q¦δΗÄφ≠Ξγö³εàÜφûêψIJφèêδΨ¦δΚÜιÖçεΞ½γö?Symptom Editor εΖΞεÖΖφùΞεà¦εΜΚφ²®η΅ΣεΖ±γö³γ½΅γäΕφïΑφç°εΚ™ψÄ?
φî·φ¨¹εQöφäÄφ€·ιΔ³ηßàγâàεQ¨δΫÜε°Éφ‰·εÖΕφâÄε€®ιΔÜεüüγö³δΗΜηΠ¹εΖΞεÖΖψÄ?/p> -
IBM Web Server Plug-in Analyzer for WebSphere Application Server
εΗ°εä©εèëγéΑδΗ?WebSphere Application Server γö?HTTP φè£δögΨl³δögγ¦ΗεÖ≥γö³φΫ€ε€®ι½°ιΔ‰ψIJφ≠ΛεΖΞεÖΖεê¨φ½ΕεàÜφûêφè£δögιÖçγ۰壨ε·ΙεΚîγö³ηΖüηΗΣφ•΅δögεQ¨γ³ΕεêéεΚîγî®φ®ΓεΦèη·ÜεàΪγ°½φ≥ïοΦ¨δΜΞδΨΩεêëγî®φàΖεèëε΅Κφ€âεÖ¦_è·ηÉΫγö³δΗçδΗÄη΅¥φÄßγö³η≠ΠφäΞψIJφ≠ΛεΖΞεÖΖφèêδΨ¦ιÖçγ۰壨ηΖüμtΣφ•΅δΜΕδΗ≠γö? HTTP ‰qîε¦ûδΜΘγ†¹εà½ηΓ®ψĹURI 壨εè·γî®ι¦ÜΨüΛγö³ε¦ë÷≈ûηΓ®γΛΚεΫΔεΦèεQ¨δΜΞεèäφ€çεäΓεô®φ΄™φâëψÄ?/p>η·Ζεè²ι‰?alphaWorks δΗ≠γö³ε°¨φï¥φèèηΩΑψÄ?
ηΨ™εÖΞεQöWebSphere φè£δögφ½ΞεΩ½φ•΅δög (http_plugin.log) ε£?WebSphere Application Server ηΖüηΗΣφ•΅δög (trace.log)ψÄ?
ηΨ™ε΅ΚεQöφ‰ΨΫC? plugin-cfg.xml φ•΅δögε£?trace.log εàÜφûêδΗ≠γö³ι¦ÜγΨΛ壨φàêεë‰φ΄™φâëγö³εè·ηßÜφ‰†εΑ³ψÄ?
φî·φ¨¹εQöφ¨âεéüφ†ΖφèêδΨ¦εQ¨δΫÜγ¦°εâçφ‰·εÖΕφâÄε€®ιΔÜεüüδΗ≠γö³δΗΜηΠ¹εΖΞεÖ½ςÄ?/p> -
Configuration Validator
φ≠ΛεΖΞεÖδh‰· WebSphere ΫéΓγêÜφéßεàΕεèΑγö³δΗÄιÉ®εàÜεQ¨ε°ÉεΗ°εä©Φ΄°ε°ö壨φüΞγ€? WebSphere Application Server δΗ≠γö³εΫ™εâçιÖçγΫ°δΗ≠ε≠‰ε€®γö³ι½°ιΔ‰ψÄ?/p>η·Ζεè²ι‰?WebSphere Application Server δΩΓφ¹·δΗ≠εΩÉγö³ε°¨φï¥φèè‰qΑψÄ?
ηΨ™εÖΞεQöφ™çδΫ? WebSphere Application Server γö³φüêδΗΣηΩêηΓ¨ε°ûδΨ΄οΦ¨εè·ιÄöηΩ΅ΫéΓγêÜφéßεàΕεèΑηΩ¦ηΓ¨η°Ωι½°ψÄ?
ηΨ™ε΅ΚεQöιÖçΨ|°ι½°ιΔ‰γö³ηΓ®φ†ΦηßÜε¦ΨεQàεçï㴧γö³ιîôη··ψĹη≠ΠεëäιÄâιΓΙεQ¦γ°ΓγêÜφéßεàΕεèΑδΗ≠εè·γî®γö³δΩΓφ¹·εQâψÄ?
φî·φ¨¹εQöε¨Öφ΄§δΊ™ WebSphere Application Server γö³δΗÄιÉ®εàÜεQ¨φ€çδΜéδΗéδΗ÷Mώîε™¹γ¦Ηεê¨γö³φî·φ¨¹΄Ι¹γ®΄ψÄ?/p> -
Classloader Viewer
φèêδΨ¦ WebSphere Application Server γö³φüêδΗΣε°ûδΨ΄δΗ≠εΫ™εâç΄z’dä®γö³φâÄφ€âγ±Μεä†ηù≤εô®ε£¨ε°ÉδΜ§εΖ≤εä†ηΫΫγö³φâÄφ€âγ±Μγö³η·ΠΨlÜφΗÖεçïψIJηΩôεè·δΜΞεΗ°εä©η·äφ•≠δΗÄΨp’dà½δΗéγ±Μεä†ηù≤γ¦ΗεÖ≥γö³ι½°ιΔ‰οΦ¨δΨ΄εΠ²φ€ΣηÉΫεä†ηù≤φâÄι€Äγö³γ±ΜψĹεä†ηΫΫδΚÜφüêδΗΣΨc»ùö³φ³èεΛ•γâàφ€§ψĹεΛöδΗΣγ±ΜδΙ΄ι½¥γö³εè·ηß¹φÄßι½°ιΔ‰οΦ¨Ϋ{âγ≠âψÄ?/p>η·Ζεè²ι‰?WebSphere Application Server δΩΓφ¹·δΗ≠εΩÉγö³ε°¨φï¥φèè‰qΑψÄ?
ηΨ™εÖΞεQöφ™çδΫ? WebSphere Application Server γö³φüêδΗΣηΩêηΓ¨ε°ûδΨ΄οΦ¨εè·ιÄöηΩ΅ΫéΓγêÜφéßεàΕεèΑηΩ¦ηΓ¨η°Ωι½°ψÄ?
ηΨ™ε΅ΚεQöWebSphere Application Server ΫéΓγêÜφéßεàΕεèνCΗ≠γö³φ†ëεΫΔγΜÜεàÜηßÜε¦ΨοΦ¦εè·δΩùε≠‰εàΑφ•΅δögδΜΞδΨΩδΜΞεêéεàÜφûêψÄ?
φî·φ¨¹εQöε¨Öφ΄§δΊ™ WebSphere Application Server γö³δΗÄιÉ®εàÜεQ¨φ€çδΜéδΗéδΗ÷Mώîε™¹γ¦Ηεê¨γö³φî·φ¨¹΄Ι¹γ®΄ψÄ?/p> -
Install Verification Utility (IVU)
δΫ€δΊ™δΗÄδΗΣε€® WebSphere Application Server δΗ≠εè·γî®γö³εêçδΊ™“installver”γö³γ®΄εΚèφùΞδΚΛδΜ‰εQ¨φ≠ΛΫE΄εΚèε·“éû³φàêεΫ™εâ?WebSphere Application Server ε°âηΘÖγö³φ•΅δΜΕφâßηΓ¨φ†ΓιӨ壨εQ¨εΤàû°Üφ†ΓιӨ壨δΗ?WebSphere Application Server ιô³εΗΠφà•ε€®η·ΞεΖΞεÖΖδΜΞεâçγö³φâßηΓ¨‰q΅γ®΄δΗ≠γîüφàêγö³εè²ηÄÉφ•΅δΜΕε¹öφ·îηΨÉψIJφ≠ΛεΖΞεÖΖεΗ°εä©΄²Ä΄Ι΄ηΔΪㆥεùèγö³ε°âηΘÖοΦ¨δΨ΄εΠ²εQ¨εè·ηÉΫε°âηΘÖδΚÜδΩ°φîΙφà•δΩ°ηΓΞγ®΄εΚèγ³Εεêéεç¥ι¹½εΩ‰δΚÜψÄ?/p>η·Ζεè²ι‰?WebSphere Application Server δΩΓφ¹·δΗ≠εΩÉγö³ε°¨φï¥φèè‰qΑψÄ?
ηΨ™εÖΞεQöWebSphere Application Server φ•΅δögεQ¨δ΄…γî?verifyinstallver.bat φà?.sh ‰qêηΓ¨η·ΞεΖΞεÖ½ςÄ?
ηΨ™ε΅ΚεQöφ¨΅ΫCΚφàêεäüγö³φ•΅δög΄²ÄφüΞγö³φΕàφ¹·ψÄ?
φî·φ¨¹εQöε¨Öφ΄§δΊ™ WebSphere Application Server γö³δΗÄιÉ®εàÜεQ¨φ€çδΜéδΗéδΗ÷Mώîε™¹γ¦Ηεê¨γö³φî·φ¨¹΄Ι¹γ®΄ψÄ?/p> -
IBM Port Scanning Tool
ε€®δώîε™¹γö³ε°âηΘÖψĹιÖçΨ|°φà•΄»Ä΄zΜηΩ΅ΫE΄δΗ≠φâΪφèèεè·γî®γö³γΪ·εèΘοΦ¨δΜΞεΗ°εä©ι‰≤φ≠ΔγΪ·εèΘεÜ≤ΫH¹ψÄ?/p>η·Ζεè²ι‰?IBM Support Assistant δΗ≠γö³ε°¨φï¥φèèηΩΑψÄ?
ηΨ™εÖΞεQöηΠ¹΄²ÄφüΞγö³γΪ·εèΘεè·²¨Éε¦?
ηΨ™ε΅ΚεQöεà½ε΅όZ™QδΫïφ≠Θε€®δ΄…γî®γö³γΪ·εèΘ壨δ™QδΫïεè·ηÉΫγö³εÜ≤γΣ¹γö³φäΞεë?
φî·φ¨¹εQöφäÄφ€·ιΔ³ηßàγâàεQ¨δΫÜγ¦°εâçφ‰·εÖΕφâÄε€®ιΔÜεüüγö³δΗΜηΠ¹εΖΞεÖΖψÄ?/p>
φÄ»ùΜ™
φàëδΜ§ε·Ιγî®δΚ?WebSphere δΚßε™¹γö³δΗÄδΚ¦φ€ÄεΗîR¹΅εàΑγö³ι½°ιΔ‰Φ΄°ε°öεΖΞεÖΖγö³φΠ²‰qΑεàΑφ≠ΛεΑ±Ψl™φùüδΚÜοΦ¨ρqΕφèêδΨ¦δΚÜδΗÄδΚ¦εΗ°εä©φ²®Φ΄°ε°öδΫïφ½Εφ€ÄιIJεêàδΫΩγî®φ·èδΗΣεΖΞεÖΖγö³δΩΓφ¹·ψIJδΫÜφ³Ωφ≠ΛδΩΓφ¹·û°ÜεΗ°εä©φ²®‰qÖιÄü壨û°Ϋεè·ηÉΫιΪ‰φïàε€Αεê·εä®ι½°ιΔ‰ηßΘεÜ≥δΜ’däΓψIJη·Ζη°νCΫèεQ¨IBM φèêδΨ¦γö³εΖΞεÖΖι¦Üε€®δΗçφ•≠ε€Αεèëε±ï壨εΔûεä†ο֨妆φ≠ΛεäΓεΩÖε°öφ€ü΄²ÄφüΞφ€âεÖœx·èδΗΣεΖΞεÖοLö³φ€Äφ•νCΩΓφ¹·οΦ¨ρqΕδΜéι½°ιΔ‰Φ΄°ε°öεΖΞδΫ€γö³εâçφ≤ΩηΩîε¦ûεàΑφ€§δΗ™φ†èδΜΞδΚÜηßΘφ¦¥εΛöφ•Αι½ΜψÄ?/p>
εΠ²φû€δΜçγ³ΕδΫΩγî®Ψ~Κγ€¹γö³γ±Μεä†ηù≤Ϋ{•γïΞ:PARENT_FIRST, γîΉÉΚéBSFη΅Σημnεä†ηù≤ΨcΜοΦ¨ε·ΤD΅¥δΫΩγî®org.eclipse.osgi.framework.internal.core.BundleLoaderηΘÖηù≤εô®φùΞηΘÖηù≤εQ¨ε€®‰qôδΗΣηΘÖηù≤εô®γώîεàΪοΦ¨δΦιgΙéεèëγéΑδΗçδΚÜJavaScriptEngineΨcΜοΦ¨ε°ûιôÖδΗäJavaScriptEngine壨BSFManagerεê¨ε€®δΗÄδΗΣε¨ÖδΗ≠ψÄ?/p>
δΗÄδΗΣεè·ηΓ¨γö³ηßΘεÜ≥φ•“é≥ïφ‰·οΦ¨û°Üη·Ξbaf.jar(JavaScriptEngineΨcάLâÄε€®jarε¨?φ΄·²¥ùεàΑjre/lib/extγ¦°εΫïδΗ΄οΦ¨εàôorg.eclipse.osgi.framework.internal.core.BundleLoaderΨcΜηΘÖηΫΫεô®δΗÄε°öηÉΫφâë÷àΑεQ¨ε¦†δΗχô·ΞJDKεä†ηù≤ôεΚεΚèε€®org.eclipse.osgi.framework.internal.core.BundleLoaderδΙ΄εÖàψÄ?/p>
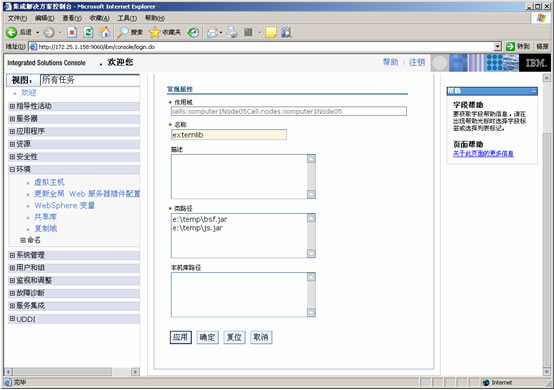
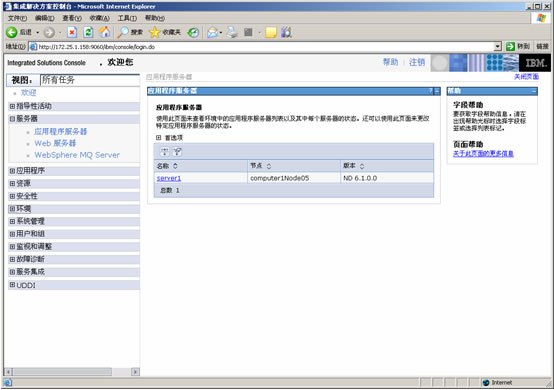
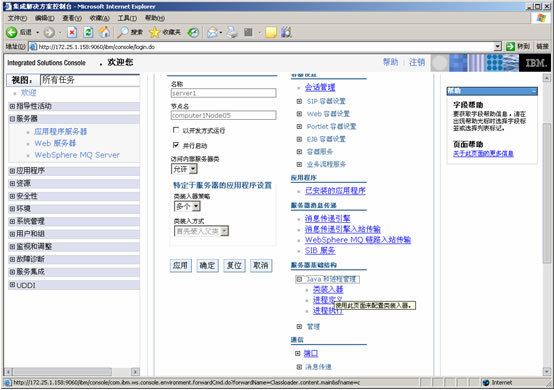
γ³ΕηĨοΦ¨Ψp»ùΜüΫéΓγêÜεë‰εΛ³δΚéε°âεÖ®γö³ηÄÉηôëεQ¨δΗçεê¨φ³èε€®jreδΗ΄φîΨΨ|°bsf.jarε¨ÖψÄ²γ€΄φùΞεèΣεΨ½εèΠε·÷MΜ•φ≥ïψIJιÄöηΩ΅ι‰Öη·ΜδΗ΄ιùΔγö³φ•΅γΪ†οΦ¨γêÜηßΘWAS6.1γö³εä†ηΫΫφ•ΙεΦèοΦ¨εè·γüΞεà¦εΨèεΚîγî®ΫE΄εΚèεÖΉÉμnεΚ™εè·δΜΞηßΘεܨôΩôδΗÄι½°ιΔ‰ψIJεè²ηÄÉοΦöε€®εΚîγî®γ®΄εΚèφ€çεäΓεô®ΨUßεàΪδΫΩγî®εÖΉÉμnεΚ?/strong>ψIJφ≥®φ³èοΦöε€®εΚîγî®γ®΄εΚèγώîεàΪδ΄…γî®εÖ±δΚΪεΚ™ρqΕδΗçηÉΫηßΘεܨôΩôδΗΣι½°ιΔ‰οΦ¨εΠ²φû€η·Ξγ±Μφ≤Γφ€âδΫΩγî®η΅ΣεΖ±γö³ClassLoaderεàôεΚîεè·ηΓ¨ψÄ?/p> η·ΠγΜÜφ™çδΫ€φ≠ΞιΣΛεQ?/p> 1ψĹφâ™εΦÄWAS6.1φéßεàΕεèéΆΦ¨εà¦εΨèεÖΉÉμnεΚ?/p> 2ψÄ¹ε€®εΚîγî®ΫE΄εΚèφ€çεäΓεô®γώîεàΪδ΄…γî®εÖ±δΚΪεΚ™ φ•ΑεΨèΨcΜηΘÖηΫΫεô®εQ¨φ≥®φ³èοΦ¨‰qô顨ιÄ?nbsp;Ψc’dΖ≤ηΘÖεÖΞδΗîφ‰·εÖàδ΄…γî®εΚîγî®γ®΄εΚèηΘÖηΫΫεô® ιÄâιΓΙ δΩùε≠‰ ΨcΜηΘÖηΫΫεô®εà¦εΨèε°¨φàê φ•ΑεΨèεÖΉÉμnεΚ™γö³εΦïγî® ιÄâφ΄©εΖ≤γΜèιÖçγΫ°εΞΫγö³εÖΉÉμnεΚ?br /> ‰qôφ‰·ιÖçγΫ°ε°¨γö³φ†Ζε≠ê δΜΞδΗ΄δΗΚεè²ηÄÉφ•΅γΪ?br /> ----------------------------------------------------------------------------------------------------------------------------------------------------------------------------------------- ψÄÄψÄÄ12εQ?εQ?φ≠ΞιΣΛ2εQöφΖΜεä†δΗÄδΗΣEJBφ®Γεù½ε£¨εΖΞεÖΖJAR ψÄÄψÄÄδΗ΄ιùΔεQ¨εΨÄεΚîγî®ΫE΄εΚèδΗ≠φΖΜεä†δΗÄδΗΣEJBεQ¨ε°ÉδΙüδΨùηΒ•VersionChecker JARφ•΅δögψÄ²ε€®φ≠ΛοΦ¨ε€®EARγö³φ†Ιγ¦°εΫïφΖ’dä†δΗÄδΗΣVersionCheckerV2.jarφ•΅δögψÄ²ε€®‰qôδΗΣJARφ•΅δögδΗ≠γö³VersionCheckerΨcΜηΩîε¦ûδΚÜVersion 2.0ψÄ²δΊ™δΚÜδΩùη·¹φâ©ε±ïγ±Μεä†ηù≤δΗ≠γö³εΖΞεÖΖJARεè·γî®εQ¨ε€®EJBφ®Γεù½γö³manifestφ•΅δögδΗ≠φΖΜεä†δΗÄδΗΣεΦïγî®οΦ¨εΠ²δΨ΄12-8εQ?/p> ψÄÄψÄÄδΨ?2-8φ¦¥φ•ΑEJBφ®Γεù½γö³MANIFEST.MFφ•΅δög ψÄÄψÄÄManifest-Version: 1.0 ψÄÄψÄÄClass-Path: VersionCheckerV2.jar ψÄÄψÄÄγéΑε€®γö³γΜ™φû€φ‰·εQöφ€âδΗÄδΗΣWebφ®Γεù½εQ¨ε€®ε°Éγö³WEB-INF/classesγ¦°εΫïδΗ΄ιùΔφ€âδΗÄδΗΣservletεQ¨ε€®WEB-INF/libγ¦°εΫïδΗ΄ιùΔφ€âVersionCheckerV1.jarφ•΅δögψIJηΩ‰φ€âδΗÄδΗΣEJBφ®Γεù½εΦïγî®δΚÜEARφ†Ιγ¦°εΫïδΗ΄ιùΔγö³VersionCheckerV2.jarεΖΞεÖΖJARψIJδΫ†φ€üφ€¦Webφ®Γεù½ηΘÖεÖΞVersionCheckerΨcάL•΅δΜΕγö³γâàφ€§φ‰·δΜÄδΙàοΦüφ‰·WEB-INF/libδΗ΄γö³Version 1.0‰q‰φ‰·εΖΞεÖΖJARδΗ΄ιùΔγö³Version 2.0εQüφΒ΄η·ïγΜ™φû€εΠ²δΨ?2-9εQ?/p> ψÄÄψÄÄδΨ?2-9Ψc’dä†ηΫΫδΨ΄2 ψÄÄψÄÄVersionChecker called from Servlet ψÄÄψÄÄVersionChecker is v2.0. ψÄÄψÄÄLoaded bycom.ibm.ws.classloader.CompoundClassLoader@26282628 Local ClassPath: ψÄÄψÄÄC:\WebSphere\AppServer\profiles\AppSrv02\installedApps\kcgg1d8Node02Cel l\ClassloaderExample.ear\ClassloaderExampleEJB.jar;C:\WebSphere\AppServ er\profiles\AppSrv02\installedApps\kcgg1d8Node02Cell\ClassloaderExample .ear\VersionCheckerV2.jar Delegation Mode: PARENT_FIRST VersionChecker called from EJB VersionChecker is v2.0. Loaded bycom.ibm.ws.classloader.CompoundClassLoader@26282628 ψÄÄψÄÄLocal ClassPath: ψÄÄψÄÄC:\WebSphere\AppServer\profiles\AppSrv02\installedApps\kcgg1d8Node02Cel l\ClassloaderExample.ear\ClassloaderExampleEJB.jar;C:\WebSphere\AppServ er\profiles\AppSrv02\installedApps\kcgg1d8Node02Cell\ClassloaderExample .ear\VersionCheckerV2.jar ψÄÄψÄÄDelegation Mode: PARENT_FIRST ψÄÄψÄÄφ≠ΘεΠ²φâÄ〴εàΑγö³οΦ¨εΫ™εê¨φ½ΕηΑÉγî®EJBφ®Γεù½ε£¨Webφ®Γεù½εQ¨VersionCheckerφ‰·Version 2.0ψIJεΫ™γ³”ûΦ¨εéü妆φ‰·οΦöWARΨc’dä†ηΫΫεô®û°Üη·Ζφ±²εßîφâ‰γΜôδΚÜγàΕΨc’dä†ηΫΫεô®ηĨδΗçφ‰·δΜ•η΅ΣεΖ±εQ¨φâÄδΜΞεΖΞεÖΖJARû°όpΔΪεê¨δΗÄδΗΣγ±Μεä†ηù≤εô®εä†ηΫΫοΦ¨ηĨφ½†ι€ÄηÄÉηôëη·δh±²φ‰·φùΞη΅ΣδΚéservlet‰q‰φ‰·EJBψÄ?/p> ψÄÄψÄÄ12εQ?εQ?φ≠ΞιΣΛ 3εQöφîΙεè‰WARΨc’dä†ηΫΫγö³εßîφâ‰φ®ΓεΦè ψÄÄψÄÄγéΑε€®φ‰·εêΠεΗ¨φ€¦Webφ®Γεù½δΫΩγî®WEB-INF/libγ¦°εΫïδΗ΄ιùΔγö³VersionCheckerV1.jarφ•΅δögεQüδΊ™δΚÜηΩôδΗΣγ¦°γö³οΦ¨ι€ÄηΠ¹εÖàû°Üγ±Μεä†ηù≤εßîφâ‰φ®ΓεΦèδΜéparent firstφîΙδΊ™parent lastψÄ?br />ψÄÄ ψÄÄψÄÄ1. ε€®εêëε·Φφ†èιÄâφ΄©Enterprise ApplicationsεQ?/p> ψÄÄψÄÄ2. ιÄâφ΄©ClassloaderExampleεΚîγî®ΫE΄εΚèεQ?/p> ψÄÄψÄÄ3. ε€®φ®Γεù½ιÉ®εàÜιÄâφ΄©Manage modules εQ?/p> ψÄÄψÄÄ4. ιÄâφ΄©ClassloaderExampleWebφ®Γεù½εQ?/p> ψÄÄψÄÄ5. û°Üγ±Μεä†ηù≤ôεΚεΚèδΩ°φîΙφàêεΚîγî®γ®΄εΚèγ±Μεä†ηù≤δΦ‰εÖà(PARENT_LAST)ψIJη°ΑδΫèοΦ¨‰qôδΗΣφùΓγ¦°εΚîη·ΞΩUνCΊ™WARΨc’dä†ηΫΫδΦ‰εÖàοΦ¨εè²ηß¹ “Ψc’dä†ηΫ?εßîφâ‰φ®ΓεΦè”εQ?/p> ψÄÄψÄÄ6. εçïε΅ΜOK. ψÄÄψÄÄ7. δΩùε≠‰ιÖçγΫ°εQ?/p> ψÄÄψÄÄ8. ι΅çφ•Αεê·εä®εΚîγî®ΫE΄εΚèψÄ?/p> ψÄÄψÄÄWEB-INF/libδΗ΄γö³VersionCheckerV1‰qîε¦ûversion of 1.0ψIJεè·δΜΞε€®δΨ?2-10δΗ≠〴εàéΆΦö ψÄÄψÄÄδΨ?2-10Ψc’dä†ηΫΫδΨ΄3 ψÄÄψÄÄVersionChecker called from Servlet ψÄÄψÄÄVersionChecker is v1.0. ψÄÄψÄÄLoaded bycom.ibm.ws.classloader.CompoundClassLoader@4d404d40 ψÄÄψÄÄLocal ClassPath: ψÄÄψÄÄC:\WebSphere\AppServer\profiles\AppSrv02\installedApps\kcgg1d8Node02Cel l\ClassloaderExample.ear\ClassloaderExampleWeb.war\WEB-INF\classes;C:\W ψÄÄψÄÄebSphere\AppServer\profiles\AppSrv02\installedApps\kcgg1d8Node02Cell\Cl assloaderExample.ear\ClassloaderExampleWeb.war\WEB-INF\lib\VersionCheck ψÄÄψÄÄerV1.jar;C:\WebSphere\AppServer\profiles\AppSrv02\installedApps\kcgg1d8 ψÄÄψÄÄNode02Cell\ClassloaderExample.ear\ClassloaderExampleWeb.war ψÄÄψÄÄDelegation Mode: PARENT_LAST ψÄÄψÄÄVersionChecker called from EJB ψÄÄψÄÄVersionChecker is v2.0. ψÄÄψÄÄLoaded bycom.ibm.ws.classloader.CompoundClassLoader@37f437f4 ψÄÄψÄÄLocal ClassPath: ψÄÄψÄÄC:\WebSphere\AppServer\profiles\AppSrv02\installedApps\kcgg1d8Node02Cel ψÄÄψÄÄl\ClassloaderExample.ear\ClassloaderExampleEJB.jar;C:\WebSphere\AppServ ψÄÄψÄÄer\profiles\AppSrv02\installedApps \kcgg1d8Node02Cell\ClassloaderExample .ear\VersionCheckerV2.jar ψÄÄψÄÄDelegation Mode: PARENT_FIRST ψÄÄψÄÄεΠ²φû€δΫ†δ΄…γî®γ±Μεä†ηù≤εô®γö³φê€γÉΠεäüηÉΫεQ¨φê€γ¥?VersionChecker*εQ¨δΦöεΨ½εàΑε¦?2-9εQ?/p> ψÄÄψÄÄε¦?2-9Ψc’dä†ηΫΫφüΞ〴εô®φê€γÉΠεäüηÉΫ ψÄÄψÄÄδΨ?2-11φ‰³ΓΛΚφΚêδΜΘγ†?/p> ψÄÄψÄÄδΨ?2-11Ψc’dä†ηΫΫφüΞ〴εô®φê€γÉΠεäüηÉΫ ψÄÄψÄÄWAS Module Compound Class Loader (WAR class loader): ψÄÄψÄÄfile: / C: / WebSphere / AppServer / profiles / AppSrv02 / ψÄÄψÄÄinstalledApps / kcgg1d8Node02Cell / ClassloaderExample.ear / ψÄÄψÄÄClassloaderExampleWeb.war / WEB-INF / lib / VersionCheckerV1.jar ψÄÄψÄÄWAS Module Jar Class Loader (Application class loader): ψÄÄψÄÄfile: / C: / WebSphere / AppServer / profiles / AppSrv02 / ψÄÄψÄÄinstalledApps / kcgg1d8Node02Cell / ClassloaderExample.ear / ψÄÄψÄÄVersionCheckerV2.jar ψÄÄψÄÄ12εQ?εQ?φ≠ΞιΣΛ4εQöδ΄…γî®εÖ±δΚΪεΚ™εÖΉÉμnεΖΞεÖΖJAR ψÄÄψÄÄε€®φ≠ΛδΙ΄εâçεQ¨εèΣφ€âδΗÄδΗΣεΚîγî®γ®΄εΚèδ΄…γî®VersionCheckerV2.jarφ•΅δögψIJφ‰·εêΠεΗ¨φ€¦εΛöδΗΣεΚîγî®γ®΄εΚèηÉΫεΛüεÖ±δΚΪε°ÉεQüεΫ™γ³”ûΦ¨δΫ†εè·δΜΞε€®φ·èδΗΣEARφ•΅δögδΗ≠φää‰qôδΗΣφ•΅δögφâ™ε¨Ö‰q¦εéΜψIJδΫÜφ‰·εΠ²φû€ι€ÄηΠ¹δΩ°φîΙηΩôδΗΣεΖΞεÖΖJARεQ¨ι²Θι€ÄηΠ¹ι΅çφ•ΑιÉ®Ψ|≤φâÄφ€âγö³εΚîγî®ΫE΄εΚèψÄ²δΊ™δΚÜι¹ΩεÖçηΩôδΗΣιΚΜγÉΠοΦ¨δΫ†εè·δΜΞδ΄…γî®εÖ±δΚΪεΚ™εÖ®ε±ÄεÖΉÉμn‰qôδΗΣJARφ•΅δögψÄ?/p> ψÄÄψÄÄεÖΉÉμnεΚ™εè·δΜΞε°öδΙâε€®εçïεÖÉψĹηä²γ²èVĹεΚîγî®γ®΄εΚèφ€çεäΓεô®ε£¨ι¦ÜΨüΛψIJδΗÄφ½ΠδΫ†ε°öδΙâδΚÜεÖ±δΚΪεΚ™εQ¨εΩÖôε’dΑÜε°ÉηΖüεΚîγî®ΫE΄εΚèφ€çεäΓεô®γö³Ψc’dä†ηΫΫεô®φà•ηÄÖεçï㴧γö³Webφ®Γεù½εÖ¨ô¹îηΒδhùΞψIJφ†Ιφç°εÖ±δΚΪεΚ™φ¨΅φ¥Ψγö³γ¦°γö³ε€ΑδΗçεê¨εQ¨WebSphereδΦöδ΄…γî®ε¨ΙιÖçγö³Ψc’dä†ηΫΫεô®εä†ηù≤εÖΉÉμnεΚ™ψÄ?/p> ψÄÄψÄÄεèΣηΠ¹φ³Ωφ³èεQ¨εè·δΜΞε°öδΙâεΛöδΗΣεÖ±δΚΪεΚ™ψIJδΙüεè·δΜΞδΗΚεΚîγî®γ®΄εΚèψĹWebφ®Γεù½φà•ηÄÖεΚîγî®γ®΄εΚèφ€çεäΓεô®φ¨΅φ¥ΨεΛöδΗΣεÖΉÉμnεΚ™ψÄ?/p> ψÄÄψÄÄε€®εΚîγî®γ®΄εΚèγώîεàΪδ΄…γî®εÖ±δΚΪεΚ™ ψÄÄψÄÄε°öδΙâδΗÄδΗΣεêçδΗΚVersionCheckerV2_SharedLibγö³εÖ±δΚΪεΚ™εQ¨εΤàφääε°ÉηΖüClassloaderTestεΚîγî®ΫE΄εΚèεÖ¨ô¹îηΒδhùΞεQ¨φ≠ΞιΣΛεΠ²δΗ΄οΦö ψÄÄψÄÄ1. ε€®γ°ΓγêÜφéßεàΕεèΑεQ¨ιÄâφ΄©Environment→Shared LibrariesεQ?/p> ψÄÄψÄÄ2. ιÄâφ΄©εÖΉÉμnεΚ™γö³δΫ€γî®εüüοΦ¨φ·îεΠ²εçïεÖÉεQ¨εçïε΅ΜNewεQ?/p> ψÄÄψÄÄ3. εΠ²ε¦Ψ12-10εQ?/p> ψÄÄψÄÄε¦?2-10εÖΉÉμnεΚ™ιÖçΨ|?/p> ψÄÄψÄÄ–Name: ηΨ™εÖΞVersionCheckerV2_SharedLibεQ?/p> ψÄÄψÄÄ–Class path: ηΨ™εÖΞΨcΜηΒ\εΨ³δΗ≠γö³φùΓγ¦°οΦ¨φ·èδΗΣφùΓγ¦°δΙ΄ι½¥γî®ε¦ûηΫΠιöîεΦÄψIJεΠ²φû€φèêδΨ¦γΜùε·ΙηΒ\εΨ³οΦ¨εΜχô°°φ‰·γî®WebSphereγé·εΔÉεè‰ι΅èεQ¨φ·îεΠ?FRAMEWORK_JARS%/VersionCheckerV2.jarεQ¨γΓ°ε°öδΫ†εΖ≤γΜèε°öδΙâδΚÜδΗÄδΗΣ壨εÖΉÉμnεΚ™γ¦Ηεê¨δΫ€γî®εüüγö³εè‰ι΅èψÄ?/p> ψÄÄψÄÄ–Native library path: ηΨ™εÖΞJNIδΜΘγ†¹δΫΩγî®γö³DLLsε£?soφ•΅δögεà½ηΓ®ψÄ?/p> ψÄÄψÄÄ4. εçïε΅ΜOKεQ?/p> ψÄÄψÄÄ5.ιÄâφ΄©Applications → Enterprise ApplicationsεQ?/p> ψÄÄψÄÄ6. ιÄâφ΄©εΚîγî®ΫE΄εΚèClassloadersExample εQ?/p> ψÄÄψÄÄ7. ε€®εΦïγî®ιÄâιΓΙεQ¨ιÄâφ΄©Shared library references εQ?/p> ψÄÄψÄÄ8. ε€®εΚîγî®γ®΄εΚèεà½ιÄâφ΄©ClassloaderExample εQ?/p> ψÄÄψÄÄ9. εçïε΅ΜReference shared librariesεQ?/p> ψÄÄψÄÄ10. ιÄâφ΄©VersionCheckerV2_SharedLibεQ¨εçïε΅?gt;>φ¨âι£°û°ÜιÄâδΗ≠γö³γßΜεä®εàΑSelectedεà½οΦ¨εΠ²δΗ΄ε¦?2-11εQ?/p> ψÄÄψÄÄε¦?2-11φ¨΅ε°öδΗÄδΗΣεÖ±δΚΪεΚ™ ψÄÄψÄÄ11.εçïε΅ΜOK εQ?/p> ψÄÄψÄÄ12.ClassloaderExampleεΚîγî®ΫE΄εΚèεÖΉÉμnεΚ™ιÖçΨ|°γΣ½εèΘεΠ²δΗ΄ε¦Ψ12-12εQ?/p> ψÄÄψÄÄε¦?2-12û°ÜεÖ±δΚΪεΚ™φ¨΅φ¥ΨΨlôεΚîγî®γ®΄εΚèClassloaderExample ψÄÄψÄÄ13.εçïε΅ΜOKεQ¨δΩùε≠‰ιÖçΨ|°ψÄ?/p> ψÄÄψÄÄεΠ²φû€φàëδΜ§γéΑε€®δΜéEARφ•΅δögγö³φ†Ιγ¦°εΫïû°ÜVersionCheckerV2.jarεà†ιôΛεQ¨ε€®EJBφ®Γεù½γö³manifestφ•΅δögδΗ≠δΙüφääεΦïγî®εà†ιôΛοΦ¨ι΅çφ•Αεê·εä®εΚîγî®φ€çεäΓεô®ο֨〴εàΑδΨ?2-12γö³γΜ™φû€ψIJη°ΑδΫèοΦ¨Webφ®Γεù½γö³γ±Μεä†ηù≤ôεΚεΚèδΨùγ³Εφ‰·εΚîγî®γ®΄εΚèγ±Μεä†ηù≤δΦ‰εÖà(PARENT_LAST)ψÄ?/p> ψÄÄψÄÄδΨ?2-12Ψc’dä†ηΫΫδΨ΄4 ψÄÄψÄÄVersionChecker called from Servlet ψÄÄψÄÄVersionChecker is v1.0. ψÄÄψÄÄLoaded bycom.ibm.ws.classloader.CompoundClassLoader@2e602e60 ψÄÄψÄÄLocal ClassPath: ψÄÄψÄÄC:\WebSphere\AppServer\profiles\AppSrv02\installedApps\kcgg1d8Node02Cel l\ClassloaderExample.ear\ClassloaderExampleWeb.war\WEB-INF\classes;C:\W ψÄÄψÄÄebSphere\AppServer\profiles\AppSrv02\installedApps\kcgg1d8Node02Cell\Cl ψÄÄψÄÄassloaderExample.ear\ClassloaderExampleWeb.war\WEB-INF\lib\VersionCheck ψÄÄψÄÄerV1.jar;C:\WebSphere\AppServer\profiles\AppSrv02\installedApps\kcgg1d8 ψÄÄψÄÄDelegation Mode: PARENT_LAST ψÄÄψÄÄVersionChecker called from EJB ψÄÄψÄÄVersionChecker is v2.0. ψÄÄψÄÄLoaded bycom.ibm.ws.classloader.CompoundClassLoader@19141914 Local ClassPath: ψÄÄψÄÄC:\WebSphere\AppServer\profiles\AppSrv02\installedApps\kcgg1d8Node02Cel l\ClassloaderExample.ear\ClassloaderExampleEJB.jar;C:\henrik\VersionChe ckerV2.jar ψÄÄψÄÄDelegation Mode: PARENT_FIRST ψÄÄψÄÄφ≠ΘεΠ²ιΔ³φ•ôγö³οΦ¨γîΉÉΚéWebφ®Γεù½γö³εßîφâ‰φ®ΓεΦèοΦ¨εΫ™servletι€ÄηΠ¹VersionCheckerΨcΜοΦ¨VersionCheckerV1.jarφ•΅δögηΔΪεä†ηΫΫψIJεΫ™EJBι€ÄηΠ¹VersionCheckerγö³γ±Μγö³φ½ΕεÄôοΦ¨û°ΉÉΦöδΜéφ¨΅εêëC:\henrik\VersionCheckerV2.jarγö³εÖ±δΚΪεΚ™δΗ≠εä†ηΫΫε°ÉψIJεΠ²φû€δΫ†εΗ¨φ€¦Webφ®Γεù½δΙüδ΄…γî®εÖ±δΚΪεΚ™εQ¨εèΣι€ÄηΠ¹εΑÜΨc’dä†ηΫΫιΓΚεΚèφ¹ΔεΛçφàêΨ~Κγ€¹εÄϊ|Φ¨Webφ®Γεù½γö³γ±Μεä†ηù≤φ‰·γàΕΨc’dä†ηΫΫδΦ‰εÖàψÄ?/p> ψÄÄψÄÄε€®εΚîγî®γ®΄εΚèφ€çεäΓεô®ΨUßεàΪδΫΩγî®εÖΉÉμnεΚ?/strong> ψÄÄψÄÄεÖΉÉμnεΚ™δΙüεè·δΜΞηΖüεΚîγî®γ®΄εΚèφ€çεäΓεô®εÖ¨ô¹îηΒδhùΞψÄ²ε€®‰qôδΗΣφ€çεäΓεô®δΗäγö³ιÉ®Ψ|≤γö³φâÄφ€âεΚîγî®γ®΄εΚèιÉΫηÉΫεΛü〴εàΑεÖΉÉμnεΚ™γö³δΜΘγ†¹εà½ηΓ®ψIJηΠ¹φääεÖ±δΚΪεΚ™ηΖüεΚîγî®γ®΄εΚèφ€çεäΓεô®εÖ¨ô¹îηΒδhùΞεQ¨ιΠ•εÖàηΠ¹δΗΚεΚîγî®γ®΄εΚèφ€çεäΓεô®εà¦εΨèδΗÄδΗΣιô³εä†γö³Ψc’dä†ηΫΫεô®εQ¨φ≠ΞιΣΛεΠ²δΗ΄οΦö ψÄÄψÄÄ1. ιÄâφ΄©εΚîγî®ΫE΄εΚèφ€çεäΓεô®οΦ¦ ψÄÄψÄÄ2. ε€®εΚîγî®γ®΄εΚèεüΚΦ΄ÄΨl™φû³ιÉ®εàÜεQ¨ε±ïεΦÄJava and Process ManagementεQ¨ιÄâφ΄©Class loaderεQ?/p> ψÄÄψÄÄ3. ιÄâφ΄©NewεQ¨δΊ™‰qôδΗΣΨc’dä†ηΫΫεô®ιÄâφ΄©Ψc’dä†ηΫΫιΓΚεΚèοΦ¨γàΕγ±Μεä†ηù≤δΦ‰εÖà(PARENT_FIRST)φà•ηÄÖεΚîγî®γ®΄εΚèγ±Μεä†ηù≤δΦ‰εÖà(PARENT_LAST)εQ¨εçïε΅ΜApplyεQ?/p> ψÄÄψÄÄ4. εçïε΅Μεàöεàöεà¦εΨèγö³γ±Μεä†ηù≤εô®οΦ¦ ψÄÄψÄÄ5. εçïε΅ΜShared library referencesεQ?/p> ψÄÄψÄÄ6. εçïε΅ΜAddεQ¨ιÄâφ΄©εΗ¨φ€¦ηΖüεΚîγî®γ®΄εΚèφ€çεäΓεô®εÖ¨ô¹îγö³εΚ™ψIJι΅çεΛçιÄâφ΄©φ™çδΫ€εQ¨εΑÜεΛöδΗΣεΚ™ηΖü‰qôδΗΣΨc’dä†ηΫΫεô®εÖ¨ô¹îψIJφ·îεΠ²ιÄâφ΄©VersionCheckerV2_SharedLibφùΓγ¦°εQ?/p> ψÄÄψÄÄ7. εçïε΅ΜOKεQ?/p> ψÄÄψÄÄ8. δΩùε≠‰ιÖçγΫ°εQ?/p> ψÄÄψÄÄ9. ι΅çφ•Αεê·εä®εΚîγî®ΫE΄εΚèφ€çεäΓεô®οΦ¨δΩ°φîΙφâçδΦöγîüφïàψÄ?/p> ψÄÄψÄÄû°ÜVersionCheckerV2εÖΉÉμnεΚ™ηΖüεΚîγî®ΫE΄εΚèφ€çεäΓεô®εÖ≥η¹îη™vφùΞοΦ¨û°±εΨ½εàνCΨ΄12-13γö³γΜ™φû€ψÄ?/p> ψÄÄψÄÄδΨ?2-13Ψc’dä†ηΫΫδΨ΄5 ψÄÄψÄÄVersionChecker called from Servlet ψÄÄψÄÄVersionChecker is v1.0. ψÄÄψÄÄLoaded bycom.ibm.ws.classloader.CompoundClassLoader@40c240c2 ψÄÄψÄÄLocal ClassPath: ψÄÄψÄÄC:\WebSphere\AppServer\profiles\AppSrv02\installedApps\kcgg1d8Node02Cel l\ClassloaderExample.ear\ClassloaderExampleWeb.war\WEB-INF\classes;C:\W ebSphere\AppServer\profiles\AppSrv02\installedApps\kcgg1d8Node02Cell\Cl assloaderExample.ear\ClassloaderExampleWeb.war\WEB-INF\lib\VersionCheck erV1.jar;C:\WebSphere\AppServer\profiles\AppSrv02\installedApps\kcgg1d8 Node02Cell\ClassloaderExample.ear\ClassloaderExampleWeb.war VersionChecker called from EJB VersionChecker is v2.0. ψÄÄψÄÄLoaded bycom.ibm.ws.classloader.ExtJarClassLoader@7dee7dee ψÄÄψÄÄLocal ClassPath: C:\henrik\VersionCheckerV2.jar ψÄÄψÄÄDelegation Mode: PARENT_FIRST ψÄÄψÄÄφàëδΜ§ε°öδΙâγö³φ•Αγö³εêçδΗΚExtJarClassLoaderΨc’dä†ηΫΫεô®εQ¨ε€®EJBφ®Γεù½η·δh±²φ½”ûΦ¨ε°ÉηΘÖεÖΞVersionCheckerV2.jarφ•΅δögψIJγî±δΚéεßîφâ‰φ®ΓεΦèοΦ¨WARΨc’dä†ηΫΫεô®Ψlßγ°΄ηΘÖεÖΞη΅ΣεΖ±γö³versionψÄ?/p> ψÄÄψÄÄ12εQ?Ψc’dä†ηΫΫεô®ι½°ιΔ‰η·äφ•≠ ψÄÄψÄÄJVM 5.0φèêδΨ¦δΚÜδΗÄδΚ¦ιÖçΨ|°οΦ¨εè·δΜΞη°©φàëδΜ§φüΞ〴η·ΠΨlÜγö³ΨcΜηΘÖεÖΞοΦ¨φ·îεΠ²JVMεè²φïΑ -verbose:dynloadψÄ?Dibm.cl.verbose=<name>ψÄ?/p> ψÄÄψÄÄε€®ε°ûιôÖεΦÄεèëηΩ΅ΫE΄δΗ≠εQ¨εΠ²φû€δ΄…γî®δΗçεΫ™οΦ¨δΦöε΅ΚγéΑεΨàεΛöγ±Μεä†ηù≤γ¦ΗεÖ≥γö³ι½°ιΔ‰ψIJεΫ™ι¹΅εàΑΨc’dä†ηΫΫι½°ιΔ‰φ½ΕεQ¨εè·δΜΞφüΞ〴WASγö³γ¦ΗεÖœx½ΞεΩ½οΦ¨ε€®φ½ΞεΩ½δΗ≠ε΅ΚγéΑεΠ²δΗ΄εΦ²εΗΗεQ¨εè·δΜΞη°ΛδΗΚφ‰·Ψc’dä†ηΫΫεô®ε΅ΚγéΑδΚÜι½°ιΔ‰οΦö ψÄÄψÄÄClassCastException ψÄÄψÄÄClassNotFoundException ψÄÄψÄÄNoClassDefFoundError ψÄÄψÄÄNoSuchMethodError ψÄÄψÄÄIllegalArgumentException ψÄÄψÄÄUnsatisfiedLinkError ψÄÄψÄÄVerifyError ψÄÄψÄÄεÖ≥δΚéι½°ιΔ‰η·äφ•≠εQ¨εΑÜε€®δΗ΄δΗÄΫ΄΅φ•΅γΪ†ψÄäWAS 6.1Ψc’dä†ηΫΫι½°ιΔ‰η·äφ•≠ψÄ΄η·ΠΨlÜι‰ê‰qΑψÄ?/p> ψÄÄψÄÄφÄ»ùΜ™ ψÄÄψÄÄφ€§φ•΅ι£àε·ΙWAS6.1γâàφ€§εQ¨η·ΠΨlÜδΜ΄ΨlçδΚÜΨc’dä†ηΫΫγö³φΠ²εΩΒδΜΞεèäεΠ²δΫïε°ΔφàΖ娕οΦ¨ρqâôÄöη١塆δΗΣδΨ΄ε≠êεêëεΛßε°Εη°≤‰qνCΚÜεΫ±ε™çΨc’dä†ηΫΫγö³ιÄâιΓΙγö³δ΄…γî®ψIJηôΫγ³ΕWAS 6.1εÖ¹η°Ηφ†“éç°ι€ÄηΠ¹δΩ°φîΙγ±Μεä†ηù≤Ϋ{•γïΞεQ¨φ·îεΠ²εΑÜγàΕγ±ΜδΦ‰εÖàφî“éàêεΚîγî®ΫE΄εΚèδΦ‰εÖàεQ¨δΫÜφ‰·δΗçφé®ηçê‰qôδΙàδΫΩγî®ψIJγ§îηÄÖφ¦ΨΨlèεΑ±ι¹΅εàΑ妆亙δΩ°φîΙΫ{•γïΞεQ¨ε·Φη΅¥εΚîγî®γ®΄εΚèφ½†φ≥ïεê·εä®ψIJεéü妆φ‰·WASδΗ?γö³γΜ³δΜΕ壨εΚîγî®ΫE΄εΚèδΫΩγî®γö³φüêδΚ¦γ±Μφ‰·δΗÄη΅¥γö³εQ¨εä†ηΫΫγ≠•γïΞιÄâφ΄©δΗçφ≠ΘΦ΄°οΦ¨û°ΉÉΦöε·ΤD΅¥Ψc’dä†ηΫΫιîôη··ψÄ?/p>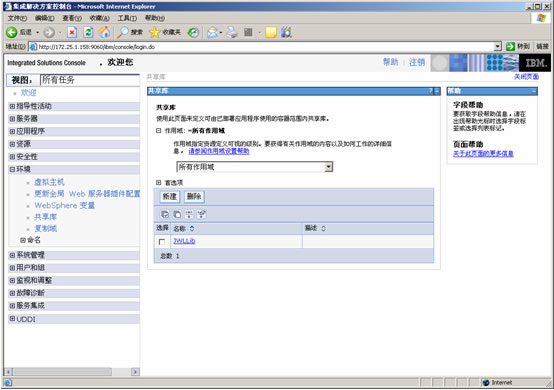

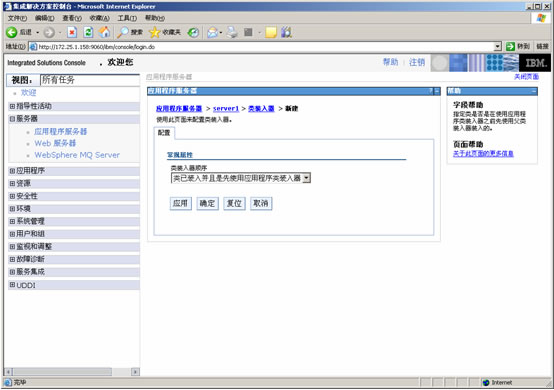
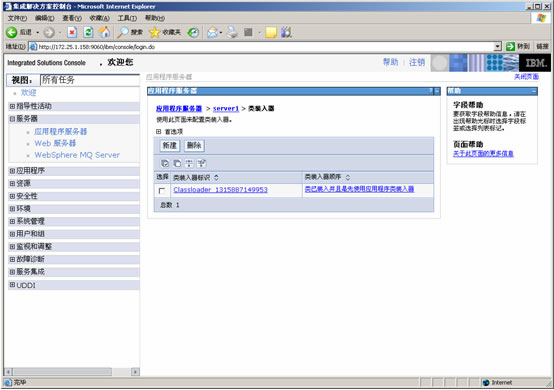
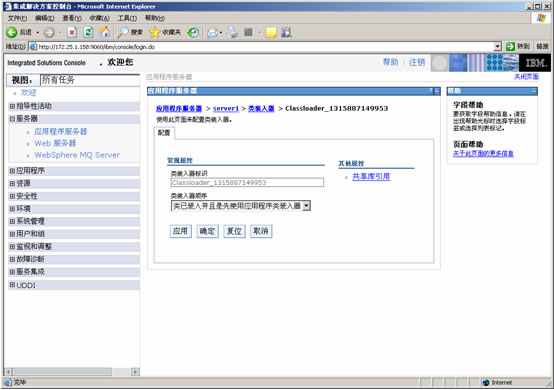
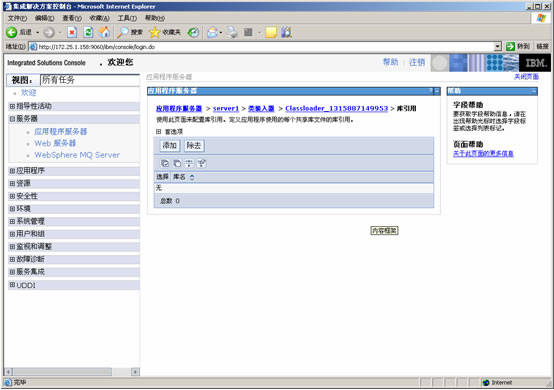


γêÜηßΘWAS 6.1γö³γ±Μεä†ηù≤εQ?εQ?/h2>
ψÄÄψÄÄη°³ΓΫ°εßîφâ‰φ®ΓεΦèδΗΚPARENT_LASTεQ¨δ΄…γî®εΠ²δΗ΄φ≠ΞιΣΛοΦö


ψÄÄ
ψÄÄψÄÄNode02Cell\ClassloaderExample.ear\ClassloaderExampleWeb.war
Assuming you are familiar with the basic concepts of XMLAccess, the following refinements to the process should be straightforward. Instead of taking a full export from your production environment, suppose you wish to only export the portlets? In XMLAccess, the portlet is represented by the object type "web-app." Naturally you could generate an export of the portlets using the following XML (which is included in the samples shipped with Portal):
<?xml version="1.0" encoding="UTF-8"?>
<request xmlns:xsi=" <portal action="locate">
<web-app action="export"
objectid="*"/>
</portal>
</request>
By importing this xml file, we direct the portal to export only the web-app object called '*' which is a wildcard for all web-apps. The command would be as follows:
xmlaccess.bat -in C:\temp\export_all_portlets.xml -user wpsadmin -pwd wpsadminpwd -url http://portal.example.com/wps/config -out C:\temp\outputfile_all_portlets.xml
Right, so very easy. However, this sort of thing is useful only if we already have a portal configured with all of the portlets. If we're exporting all "web-app" objects, this assumes we have some to export in the first place. Suppose you have 50 new portlets that all need to be installed, but you have no existing portal that has all of them in place. Are you going to use the portal admin interface and click-click-click your way through installing 50 portlets, assigning permissions, creating pages, putting the portlets on the pages, etc. etc. etc.? Probably not - at least, I know I wouldn't.
How can we use XMLAccess to build a portal configuration if we are deploying portal elements for the very first time? This task won't involve exporting a config from somewhere, since we don't have things configured in any environment yet. Instead we're going to construct our XML files from scratch and import them into a blank portal in order to build our configuration.
The various XML files referred to from this point forward are printed at the end of this article.
The Blank Portal
When installing WPS, it is often desirable to deploy the portal without the sample pages and labels and portlets; it is simply too much clutter. To install a blank portal, use the following command when invoking the installation program:
install.bat -W installPortlets Sequence.active="false"
Proceed through the portal install sequence as you normally would. When complete, start the portal and go the portal home page. You should now see the blank portal.
Before continuing, be sure to have all of your necessary files in place. That is, if you are installing a theme, place the folder containing the theme on the PortalServer in the correct location. The same goes for skins, portlet WARs, etc.
Theme folders go into:
C:\WebSphere\AppServer\installedApps\<nodename>\wps.ear\wps.war\themes\html\
Skin folders go into:
C:\WebSphere\AppServer\installedApps\<nodename>\wps.ear\wps.war\skins\html\
By default, portlet WAR files need to be placed in:
C:\WebSphere\PortalServer\installableApps
With our blank portal installed, and with our component files in place, let's begin constructing our new portal. We'll start with the skins and themes.
Install Skins and Themes
The XML to install the theme will of course include the standard XML header for WPS 5.1. After that, we will do the required locate action on the "portal" object. After this we will instruct XMLAccess to perform an "update" on our skin with the parameters that we specify as show in Listing 1.
The skin object we specified includes the objectid, uniquename, and resourceroot parameters. Objectid will be the skin's referential id within the portal database. For ease of use, we also have a uniquename specified for this skin so that we can easily refer to the skin from this point forward. The resourceroot indicates the case-sensitive folder name of our skin that we placed in the skins\html\ directory.
Let's save this file as import_skins.xml. Once we import this file, we will have installed the skins into our portal:
xmlaccess.bat -in C:\temp\import_skins.xml -user wpsadmin -pwd wpsadminpwd -url http://portal.example.com/wps/config
To install our themes, we need an XML file with similar information
Since a theme has default and allowed skins assigned to it, we first have to find these skins before we can assign them to the theme. So we do a 'locate' on our two skins that were added in Listing 1. Once we find them, we perform an "update" on the theme object.
The update uses defaultskinref to define the default skin for the theme. For the first theme, we used Skin_A as the default skin. The objectid and uniquename for the theme are defined (and can be different, as indicated). The resourceroot is the case-sensitive folder name of the themes\html\ directory.
Notice that in addition to defining the default skin for each theme, we can also define the other skins that can be used with this theme. Notice that for Theme_Blue we are using Skin_A as the default, but we allow Skin_A as well as Skin_B. This is defined in the <allowed-skin skin="..."> section. Notice that for Theme_Green we are using Skin_B as the default and we only allow that skin. After all, Skin_A is red. Mixing a red skin with a green theme is just plain ugly.
Now let's save the xml file as import_themes.xml and import our themes into the portal configuration:
xmlaccess.bat -in C:\temp\import_themes.xml -user wpsadmin -pwd wpsadminpwd -url http://portal.example.com/wps/config
Install Portlets
We have our themes and skins imported, now let's put those pesky portlets in place.
Constructing the XML file for portlet install is a little trickier. It involves knowing some key information about the portlets. This information is found in the portlet.xml and web.xml inside the portlet.war file. For this step Winzip is especially useful, as you will need to be able to open the portlet WAR file (see Listing 3). You may also be able to get this info from the portlet developer. After all, he can see this info in his portal toolkit inside WebSphere Studio. However, developers being as busy as they usually are, good luck extracting this info from them.
Okay. This is slightly more complex. Here we have 3 portlets that we're installing. You can see we're locating the portal (of course), and then we do an update on object "web-app" which represents the WAR file.
The next parameter is the web-app uid parameter. The uid must match the uid attribute of portlet-app in portlet.xml in the portlet WAR file.
Following the uid, we have to specify the location of the portlet WAR file. When we transferred our portlet WARs to the server, we placed them in C:\WebSphere\PortalServer\installableApps. To refer to this location, we can use the $server_root$ variable which gets set when the XMLAccess interface is invoked.
Next, we have to perform an update on the portlet-app object. This represents the portlet application and is the parent of all the portlets contained within. The next parameter is the portlet-app uid parameter. The uid must match the uid attribute of concrete-portlet-app in portlet.xml in the portlet WAR file.
Finally we have the update to be performed on each portlet in the portlet application. In this example we only have one portlet in each WAR file, but we could potentially have several in each one. If this were the case, we'd have multiple "portal" objects defined within the "portal-app" object. We give the portlet an objectid and we define the name. The portlet name parameter must match the content of the portlet-name subtag of concrete-portlet in portlet.xml in the portlet WAR file.
So let's go ahead and save the xml file as import_portlets.xml and execute:
xmlaccess.bat -in C:\temp\import_portlets.xml -user wpsadmin -pwd wpsadminpwd -url http://portal.example.com/wps/config
We should now have deployed skins, themes, and portlets. Let's create a page and drop some portlets on it.
Create Pages
This is very straightforward. We need pages on which to place our portlets. Pages and labels are represented in the XML files as "content-node." Seems pretty logical if you think about it. A node of content. A content-node. Brilliant.
Our XML will look like Listing 4. Think of it logically. We first locate the resources we need (themes, portlets) and then we create our pages using those resources. Piece of cake. In this example, we'll create a label in the Content Root called Home (Content Root is the highest node of the content hierarchy. It exists by default). Hanging off this label is a single page called Welcome. On this Welcome page is single row containing our portlet, PortletCharlie.
You can see that we start off by locating the necessary resources - first the theme, Theme_Blue and then the portlet, PortletCharlie. Finally we have to locate the Content Root.
The next step in the process is to create the Home label. We give it an objectid and a uniquename. We define the content-parentref to be this label's immediate parent. In our case, this is the objectid of Content Root. Because we're creating a label at this point and not a page, we can assign a theme to the label. So we define themeref to be Theme_Blue.
Once created, we must immediately "locate" the new label before it can be used in the rest of the XML file. Next, we want to create the page called Welcome that is on the label called Home. You can see the values we use to define this page. With a page, however, we can also define the columns and rows containers that compose the structure of a portal page. Within these containers, we place the portlets.
The rows and columns on the page are defined in the "component" section in that page. In this example, within the page definition for the content-node Welcome, we define a component with an orientation of "H," which stands for horizontal, which is therefore a row. Setting the orientation to "V" would of course create a column. Rows can contain columns and vice versa. Tweaking these settings is how you could create an incredibly complex nested row/column page structure, if you so chose.
There are other parameters you can tinker with. Changing "ordinal" will change the order in which this content-node appears (since we only have one content-node at this level, it doesn't matter, but if we had a whole row of pages on the toolbar, we could order them using the ordinal parameter). Setting the "active" parameter to false would de-activate this content-node; and on and on...
<component action="update" active="true" objectid="container1" ordinal="-1" orientation="H" type="container" width="300">
<portletinstance action="update" handle="" objectid="portletinstance1"portletref="Portlet_Charlie"></portletinstance>
</component>
Inside the component definition for the row on our page, you can see that we have put a portletinstance object with portletref set to Portlet_Charlie. This value must match the uid of the portlet that you wish to put in this container.
So here it is. Let's save this file as import_pages.xml and execute:
xmlaccess.bat -in C:\temp\import_pages.xml -user wpsadmin -pwd wpsadminpwd -url http://portal.example.com/wps/config
Once our import is complete, fire up a browser and go check out your brand new portal! Wunderbar! You should see your label with a page that has a portlet on it. Experiment.
Of course you can also go further and assign permissions to your objects using XML, or you could create XML files to remove portlets but leave the pages and so forth and so on.
Make liberal use of the example files in C:\WebSphere\PortalServer\doc\xml-samples, or the InfoCenter documents regarding XML Access. These pages are currently located at http://publib.boulder.ibm.com/infocenter/wp51help/topic/com.ibm.wp.ent.doc/wps/admxmlai.html.
δΗ΄ιùΔφ‰·δΗΛδΗΣjavaη·’dè•JKSφ•΅δögδΗ≠ε·Üι£Ξγö³φ•“é≥ï
εΫ™γ³Ε倮〴φ΅²δΗ΄ιùΔδΗΛδΗΣφ•Ιφ≥ïδΙ΄εâçηΠ¹ε·ΙJKSφ•΅δögγö³γΜ™φû³φ€âφâÄδΚÜηßΘεQ?/p>
JKSφ•΅δögû°±εΞΫεÉèδΗÄδΗΣδΜ™εΚ™ο֨顨ιùΔεè·δΜΞφîë÷ΨàεΛöγö³δΗ€ηΞΩεQ¨ηΩô顨εèΣε≠‰φîΨδΗÄΨc÷MΗ€ηΞΩεΑ±φ‰·ε·Üι£ΞοΦ¨δΜ™εΚ™εΫ™γ³ΕδΦöφ€âδΗÄφääιî¹εQ¨ι‰≤η¨ÉεàΪδΚΚιöèδΨΩδΊïφ΄ΩοΦ¨‰qôδΗΣû°±φ‰·JKSφ•΅δögγö³ε·Üγ†¹ψÄ²ι΅¨ιùΔε≠‰φî³Γö³ε·Üι£ΞδΙüεê³φ€âδΗçεê¨οΦ¨φ·èδΗΣε·Üι£ΞιÉΫφ€âδΗÄδΗΣεêçε≠½οΦàε€®δΗ΄ιùΔεèΪεàΪεêçεQâοΦ¨δΗÄΨc’dΑ±ε·Üι£Ξε·ΙοΦ¨δΗÄΨc’dèΪεÖ§ι£ΞεQ¨δΗÄΨc’dèΪΩU¹ι£ΞεQ¨ε·Üι£Ξε·Ιû°±φ‰·ε¨ÖεêΪεÖ§ι£Ξ壨γß¹ι£Ξγö³ψIJηΩô顨γö³εÖ§ι£ΞεèΣηΠ¹δΫ†ηÉΫ‰q¦εÖΞδΜ™εΚ™δΫ†εΑ±εè·δΜΞιöèδΨΩφüΞ〴φ΄ΩηΒΑεQ¨γß¹ι£Ξεàôφ‰·φ€âε·Üγ†¹γö³οΦ¨εèΣεÖ¹η°Ηφ€âφùÉιôêγö³δùhφüΞ〴φ΄ΩηΒΑψIJφâÄδΜΞε€®δΗ΄ιùΔη·’dè•ε·Üι£Ξφ½ΕδΙüû°±φ€âγ²ΙγΜÜεΨ°γö³δΗçεê¨δΙ΄εΛ³εQ¨ε·ΙδΚéη·Μεè•εÖ§ι£ΞεèΣι€ÄηΠ¹γüΞι¹™JKSφ•΅δögεQàδΜ™εΚ™οΦâγö³ε·Üγ†¹εΑ±εè·δΜΞδΚÜοΦ¨δΫÜφ‰·ε€®η·Μεè•γß¹ι£Ξφ½ΕεàôεΩÖôεάL€âΩU¹ι£Ξγö³ε·Üγ†¹δΙüû°±φ‰·δΫ†εΩÖôεΜηΠ¹φ€âφùÉιôêοΦ¨ε€®δΗ΄ιùΔδΫ†δΦöεèëγééΆΦ¨ε€®η·Μεè•γß¹ι£Ξφ½ΕεΛöδΚÜδΗÄδΗΣεè²φïéΆΦ¨ε·ΙεΚîγö³εΑ±φ‰·γß¹ι£Ξγö³ε·Üγ†¹ψÄ?/p>
 import java.io.FileInputStream;import java.io.FileNotFoundException;import java.io.IOException;import java.security.KeyStore;import java.security.KeyStoreException;import java.security.NoSuchAlgorithmException;import java.security.PrivateKey;import java.security.PublicKey;import java.security.UnrecoverableKeyException;import java.security.cert.CertificateException;import javax.security.cert.Certificate;
 public class JKSTesting {

 public static PublicKey getPublicKey(String keyStoreFile,
 String storeFilePass, String keyAlias) {
 String storeFilePass, String keyAlias) // η·’dè•ε·Üι£Ξφ‰·φâÄηΠ¹γî®εàΑγö³εΖΞεÖΖΨc?/span> KeyStore ks; // εÖ§ι£ΞΨcάLâÄε·ΙεΚîγö³γ±Μ PublicKey pubkey = null; try { // εΨ½εàΑε°ûδΨ΄ε·Ιη±Γ ks = KeyStore.getInstance("JKS"); FileInputStream fin; try { // η·’dè•JKSφ•΅δög fin = new FileInputStream(keyStoreFile); try { // η·’dè•εÖ§ι£Ξ ks.load(fin, storeFilePass.toCharArray()); java.security.cert.Certificate cert = ks .getCertificate(keyAlias); pubkey = cert.getPublicKey(); } catch (NoSuchAlgorithmException e) { e.printStackTrace(); } catch (CertificateException e) { e.printStackTrace(); } catch (IOException e) { e.printStackTrace();
 } } catch (FileNotFoundException e) { e.printStackTrace(); } } catch (KeyStoreException e) { e.printStackTrace(); } return pubkey; } /** * εΨ½εàΑΩU¹ι£Ξ * * @param keyStoreFile * ΩU¹ι£Ξφ•΅δög * @param storeFilePass * ΩU¹ι£Ξφ•΅δögγö³ε·Üγ†?br /> * @param keyAlias * εàΪεêç * @param keyAliasPass * ε·Üγ†¹ * @return */ public static PrivateKey getPrivateKey(String keyStoreFile, String storeFilePass, String keyAlias, String keyAliasPass) { KeyStore ks; PrivateKey prikey = null; try { ks = KeyStore.getInstance("JKS"); FileInputStream fin; try { fin = new FileInputStream(keyStoreFile); try { try { ks.load(fin, storeFilePass.toCharArray()); // εÖàφâ™εΦÄφ•΅δög prikey = (PrivateKey) ks.getKey(keyAlias, keyAliasPass .toCharArray()); // ιÄöηΩ΅εàΪεêç壨ε·Üγ†¹εΨ½εàΑγß¹ι£?/span> } catch (UnrecoverableKeyException e) { e.printStackTrace(); } catch (CertificateException e) { e.printStackTrace(); } catch (IOException e) { e.printStackTrace(); } } catch (NoSuchAlgorithmException e) { e.printStackTrace(); } } catch (FileNotFoundException e) { e.printStackTrace(); } } catch (KeyStoreException e) { e.printStackTrace(); } return prikey; } public static void main(String[] args) { PublicKey publicKey; PrivateKey privateKey; publicKey=getPublicKey("C:\\aaa.jks","AAAAAAAA", "ibmwebspheremq"); privateKey=getPrivateKey("C:\\aaa.jks","AAAAAAAA", "ibmwebspheremq","AAAAAAAA"); System.out.println(publicKey.toString()); System.out.println(privateKey.toString()); }
 }
}
Action events: generated when an HTTP request is received by the portlet container that is associated with an action, such as when the user clicks a link.
Message events: generated when another portlet within the portlet application sends a message.
A portlet has a different processing and rendering sequence than a servlet. A servlet does all of its processing in the service() method. A portlet, on the other hand, uses a two phase processing that is split between an event phase and a render phase. This split is necessary to accommodate communication between portlets before rendering output in the service stage. The event phase is guaranteed to complete before a portlet is called to render.
During the event phase, the portlet implements an ActionListener interface. The ActionListener interface provides the actionPerformed() method, to which an ActionEvent object is passed. When a user clicks on a link or a submit button, an ActionEvent can be generated. The portlet action can be obtained from the ActionEvent, which describes the triggering event. When the actionPerformed() method is invoked, a response object is not available because this is not a rendering step. All state changes should be handled during action processing.
Portlets should use the render phase only to render portlet output. The service() method is not only called following the actionPerformed() processing when a user clicks on a link or button in a portlet, but is also called when the portal page is refreshed. Thus, given a page with two portlets, A and B, when the user clicks on a link in portlet A, actionPerformed() and doView() is called for portlet A, but only the doView() method is called for portlet B. Once the content generation phase has started, no further events will be delivered. For example, messages cannot be sent from within the beginPage(), service() and endPage() methods. The resulting message event would not be delivered and essentially discarded.
The event listener is implemented directly in the portlet class. The listener can access the PortletRequest from the event and respond using the PortletRequest or PortletSession attributes.
Action events
An ActionEvent is sent to the portlet when an HTTP request is received that is associated with a portlet action. To receive action events, the portlet class must implement the ActionListener interface and a portlet action. A portlet action can be one of the following types:
Simple portlet action String
PortletAction object
These actions are explained below. See Using persistence for code examples that show how to add a portlet action and create an ActionListener .
Simple portlet action String
Actions created as simple actions can be executed multiple times, enabling a user's back button to work. Links created with simple portlet actions are represented in the URL rather than in the session. Therefore, portlets with simple actions can be placed on an anonymous page where no session exists. Simple portlet actions are associated with action events by using the getActionString() method.
PortletURI.addAction(String simpleAction);
String ActionEvent.getActionString();
Simple portlet actions are not available in the Portlet API prior to WebSphere Portal Version 4.2. A portlet can determine if the portal server it is running on supports simple actions or not by checking the Portlet API version. The version of the Portlet API on servers that support simple actions has changed from 1.1 to 1.2. Here is example code that illustrates how to check for simple action support:
if ( (portletContext.getMajorVersion() <= 1 ) && (portletContext.getMinorVersion() <= 1) )
{
// cannot use simple actions
} else {
// simple action support is present on this server
}
Note: Some portlets should be designed so that their actions are not executed every time a user refreshes their browser. In this case, set the following parameter and value either as an <init-param/> or <config-param/> in the appropriate descriptor.
com.ibm.wps.portlet.action.redirect = true
This allows the page and portlet to be reloaded without the action parameters in the URL.
PortletAction object
The PortletAction object has been deprecated in favor of simple portlet action strings. It is maintained in the Portlet API to support existing portlets that use PortletActions. You should always use simple portlet actions instead of PortletAction objects.
Message events
IBM portlets that either implement the PortletMessage interface or extend the DefaultPortletMessage class can send information to other portlets on the page. Portlets receiving the message must implement the MessageListener interface and an object with the type PortletMessage. However, it is recommended that you use the property broker service for interportlet communication. See Cooperative portlets for more information.
Message events can be sent from one portlet to others if the recipient portlets are members of the same portlet application and are placed on the same page as the sending portlet. Additionally, a DefaultPortletMessage can cross portlet application boundaries and may be send to all portlets on a page. A MessageEvent can be sent actively to other portlets only when the portlet is in the event processing cycle of the portlet container, otherwise an exception is thrown. There are two different types of messages:
Single addressed messages: Messages sent to a specific portlet by specifying the portlet name on the send() method.
Broadcast messages: Messages sent to all portlets on the page.
Message events are useful when changes in one portlet should be reflected in another one. An object with the type PortletMessage has to be implemented which is passed via the MessageEvent. The portlet receiving the message must implement the MessageListener interface and an object with the type PortletMessage.
session stores transient data associated with an individual use of the portlet.
The PortletSession object extends from HttpSession and serves much the same
purpose. The PortletSession is intended to represent an ongoing conversation between the client and the portlet. To this end, the PortletSession can be used to store information needed between requests. The PortletSession is intended to store data between requests, not between portlets. As such, data stored in the session by one portlet is not accessible by another. The PortletSession is retrieved from the request object.
Well both Portlets and Servlets are loaded using the same classloader.So it's a plain fact that session can be made available in both the contexts.
As far as the portlets are concerned,
The PortletSession is namespaced :
1) PORTLET_SCOPE : Only available to the particular portlet.
2) APPLICATION_SCOPE: Available to all Portlets and also available in Servlets/JSP etc
So, if you really want to share sessions among Servlets and Portlets...
1) Define the scope of the session attributes as APPLICATION_SCOPE in Portlets....
2) Access the session attributes defined or set in servlets by specifying APPLICATION_SCOPE.. else you will get null.
As far as retrieving the PortletSession from HttpRequest is concerned.. You can get them via the APIs available..
For JSR168 Struts Portlets we have WpsStrutsUtil package that will return you the PortletSession...
configuration -- the way the internal parts of WebSphere Application Server come to life when we start them
control -- the way those internal parts behave after we start them
monitoring -- reports and alerts we get
In order to understand how IBM administers the large network of servers that compose WebSphere Application Server, you have to understand some terms
profile
cell
node
server
IBM goes to great lengths to separate the actual code that executes from the settings that configure and control how that code behaves. Anything information that influences the way WebSphere Application Server behaves is isolated in something that IBM calls a profile. There is one profile for every node in the network of servers that we call WebSphere Application Server. Every time you create a profile, you have created a node. That node and the servers it contains might stand alone or it might be part of a collection of nodes that IBM calls a cell.
A node contains a collection of application servers and web servers that all happen to live on the same physical computer. One physical computer can contain many nodes as long as it has enough memory and enough CPU to power all the servers in all the nodes it contains. Every server in a node is guaranteed to live on the same physical computer.
An application server in the network of servers and services that we call WebSphere Application Server is Java Enterprise Edition platform code running on a Java Virtual Machine. That code produces dynamic content. This article describes how WebSphere Application Server produces dynamic content. Each application server has its own separate Java Virtual Machine. Sometimes, application servers are just called servers. Notice that any one application server is just a very small part of the product we call WebSphere Application Server. In the competing products, that application server is the entire product. Notice the difference in scale
A web server is a computer program that serves up static content. Sometimes, web servers are just called servers.
A cell is a collection on nodes. All the nodes could be on the same physical computer, but more likely, they will be on a network of physical computers
Configuration determines how all the application servers, web servers, message queues, and various internal services of WebSphere Application Server come to life. The configuration information that system administrators are allowed to modify is stored in a collection of XML files and properties files in the config directory of a profile.
XML files and properties files in the config directory of a profile define how the various servers and services in a node come to life. But those configuration files only get read once. They get read when a server or service is initializing. The moment initialization is complete, the XML files and the properties files are ignored. The only way to get a server to pay attention to changes you make in an XML file or a properties file is to stop the server and then start it again.
A network of JMX beans called MBeans control the way the network servers and services behave once they are running. Those same JMX beans also monitor the behavior of the servers and services while they execute.
Two kinds of specialized application servers enable us to configure, control, and monitor the behavior of the distributed network of servers and services that IBM calls WebSphere Application Server
deployment manager
node agent
A deployment manager is an application server that runs exactly one application -- an application that manages the configuration and behavior of an entire cell. There is only one deployment manager in any cell. The deployment manager holds the official configuration records for every server and service in the entire distributed network that is part of a cell. When a deployment manager orders a node agent to change the configuration of its servers and services to match this master record, we say the deployment manager has performed a synchronization. Deployment managers only talk to node agents
A node agent controls, configures and monitors all the servers and services in a node. Node agents talk to a deployment manager and node agents talk to the servers in their node. They relay administrative traffic from the deployment manager to the individual servers in their node. They relay status from the servers in their node to the deployment manager.
MBeans do several things
They simple pieces of Java code that can represent an application, a service, a server, or almost anything else in your enterprise.
They can report the status of anything in the enterprise
They can generate alerts concerning anything in the enterprise
They can be created automatically by WebSphere Application Server on behalf of anything installed in a cell
This thing we call WebSphere's admin service is really a network consisting of the various MBeans, the node agents, and the deployment manager. There are three fairly thin facades to the admin service
a web browser based graphic user interface called the admin console
a command line shell called wsadmin. This shell has a very powerful scripting language
any JMX clients that you might choose to write
If you have never used WebSphere Application Server before, the web browser based admin console is a very good way to learn basic setup and administration. There are limits to what you can do from the admin console. Depending on what you want to do, navigation can either be very easy or very hard. The admin console page that allows you to change JVM heap size is burried deep in the navigation tree of each server. If you want to change heap size for ten servers, you must navigate that tree for each of your ten servers. That can be a lot of tedious mouse clicks.
Once you know what you are doing, wsadmin becomes more attractive than the admin console for many administrative tasks. For one thing, the script language of wsadmin allows you to automate tasks. Once your network reaches a certain size, the admin console becomes a source of errors because of the large number of mouse clicks you must make and the amount of text entry you must provide. Again, the script language provides ways to automate tasks
The most powerful way to control the network of servers and services we call WebSphere Application Server is to write a JMX client. JMX clients have complete unfettered access to the entire admin service and everything that happens across the entire network.
English U.S.
2007-12-06
WebSphere Application Server V6.1 for Windows
was.cd.6100.trial.base.windows.ia32.zip (518.6MB)
δΜΞδΗ΄δΗ΄ηù≤εù΅ι€ÄIBM ε°‰φ•Ιη¥ΠεèΖγôΜιôÜ
IBM Download directorεQ?/p>
Download director is required when downloading Common Criteria certified products.
HTTP δΗ΄ηù≤εQ?/p>
φ€§φ•΅ε¹΅η°Ψη·ΜηÄÖε·ΙWEB壨portalεèäportletφ€âεüΚφ€§γö³δΚÜηßΘψÄ?/p>
δΗÄψĹεΦÄεèëγé·εΔ?/p>
RAD 7.5 + Websphere Portal Server 7.0
δΚ¨ψĹεΦÄεèëγ¦°γö?/p>
εΦÄεèëδΗÄδΗΣε€ΑεùÄη•³οΦ¨γî®φùΞη°ΑεΫïεß™εêç壨ε€ΑεùÄψÄ?/p>
δΗâψĹεΦÄεèëηΩ΅ΫE?/p>
1. εà¦εΨèδΗÄδΗΣportletôεΙγ¦°
ιÄâφ΄©File->New->Portlet ProjectεQ¨εΦΙε΅ΚεΠ²δΗ΄φâÄΫCΚγö³ε·Ιη·ùφΓÜοΦö

ηΨ™εÖΞφà•ιÄâφ΄©δΜΞδΗäδΩΓφ¹·εêéοΦ¨εçïε΅ΜNextφ¨âι£°εQ¨εΦΙε΅ΚεΠ²δΗ΄φâÄΫCΚγö³γï¨ιùΔεQ?/p>

δΗΚγ°ÄδΨΩη™vηß¹οΦ¨εèΣιÄâφ΄©δΚÜview壨editδΗΛδΗΣφ®ΓεΦèψIJγëτΨl≠γ²Ιε΅ΜNextφ¨âι£°εΦΙε΅ΚεΠ²δΗ΄γï¨ιùΔεQ?/p>

εè•φΕàΫW§δΗÄδΗΣεΛçιÄâφ¨âι£°γö³ιΜ‰η°ΛιÄâφ΄©εQ¨γ²Ιε΅ΜFinishφ¨âι£°ε°¨φàêôεΙγ¦°γö³εà¦εΜΚψÄ?/p>
ôεΙγ¦°εà¦εΨèε°¨φàêεêéοΦ¨ôεΙγ¦°δΗ≠δΦöγîüφàêεΠ²δΗ΄4δΗΣεÖ≥ιî°φ•΅δΜ”ûΦö
AddressBookPortlet.javaφ‰·portletγö³εΛ³γêÜφ•΅δΜ”ûΦ¦
AddressBookPortletEdit.jspε·ΙεΚîportletγö³γΦ•ηΨëγäΕφĹοΦ¦
AddressBookPortletView.jspε·ΙεΚîportletγö³ηßÜ妳ΓäΕφĹοΦ¦
portlet.xmlφ‰·portletγö³ιÉ®Ψ|≤φèè‰qΑφ•΅δΜΕψÄ?/p>

2. εΔûεä†εß™εêçε€ΑεùÄδΩΓφ¹·
δΩ°φîΙΨ~•ηΨëφ®ΓεΦèφâÄε·ΙεΚîγö³AddressBookPortletEdit.jspφ•΅δögεQ¨φèêδΨ¦γî®φà·²Ψ™εÖΞγï¨ιùΔψÄ?/p>

δΩ°φîΙAddressBookPortlet.javaδΗ≠γö³processActionφ•“é≥ï εQ?br />
Ψ~•ηΨëγï¨ιùΔφèêδΚΛγö³εß™εêç壨ε€ΑεùÄδΫ€δΊ™εêçγßΑ/εÄΦε·Ιγö³ε≈ûεΦèδΩùε≠‰ε€®PortletPreferencesε·Ιη±ΓδΗ≠ψÄ?/p>
response.setPortletMode(PortletMode.VIEW)ηΓ®γΛΚεΛ³γêÜε°¨editφ®ΓεΦèεêéηΩ¹ΩU’dàΑviewφ®ΓεΦèδΜΞφ‰ΨΫCΚφ€Äφ•Αγö³ε€ΑεùÄδΩΓφ¹·ψÄ?/p>
3. φ‰³ΓΛΚε€ΑεùÄη•³δΗ≠γö³εêçΩUΑε€ΑεùÄδΩΓφ¹·
γîΉÉΚéεêçγßΑ/ε€ΑεùÄδΩΓφ¹·εΖ≤γΜèδΩùε≠‰ε€®PortletPreferencesε·Ιη±ΓδΗ≠ο֨妆φ≠ΛεèΣι€ÄηΠ¹δΜéη·Ξε·Ιη±ΓδΗ≠εè•ε΅ΚφâÄφ€âγö³εêçγßΑ/ε€ΑεùÄδΩΓφ¹·ρqΕφ‰ΨΫCΚε΅ΚφùΞεç≥εè·ψIJδΩ°φîΙAddressBookPortletView.jspεQ?/p>

4. ιÉ®γ÷v
εê·εä®PortServerεQ¨εè·ηÉΫι€ÄηΠ¹ηΨÉιïΩγö³φ½âô½¥ψÄ?/p>
ιÄâδΗ≠φ€çεäΓεô®WebSphere Portal V7.0 at localhostεQ¨εΦΙε΅ΚεΠ²δΗ΄φâÄΫCΚγö³ηè€εçïεQ?/p>

γ²Ιε΅ΜAdd and Remove Projects…εQ¨εΦΙε΅ΚεΠ²δΗ΄φâÄΫCΚγö³γï¨ιùΔεQ?/p>

û°ÜAddressBookPortletEARφΖ’dä†εàΑεè≥ηΨΙεà½ηΓ®φΓÜδΗ≠ψIJγ²Ιε΅ΜFinishφ¨âι£°ε°¨φàêιÉ®γ÷vψÄ?/p>
5. ‰qêηΓ¨
δΜéφΒèηßàεô®ε€ΑεùÄφ†èηΨ™εÖΞURLεQ?a href="http://localhost:10039/wps/myportal">http://localhost:10039/wps/myportalεQ¨ηΨ™εÖΞγî®φàΖεêç壨ε·Üγ†¹εêé‰q¦εÖΞεΠ²δΗ΄φâÄΫCΚγö³γï¨ιùΔεQ?/p>

γ²Ιε΅Μη·ΞportletφâÄε€®ιΓΒιùΔεè≥δΗäηߣεΛ³οΦàγî®η™ùηâ≤φΛ≠ε€Üφ†΅ε΅όZΚÜεQâοΦ¨εΦΙε΅Κηè€εçïεQ¨εΠ²δΗ΄ε¦ΨφâÄΫCΚοΦö

γ²Ιε΅ΜδΗΣφÄß娕ηè€εçïφùΓοΦ¨εΦΙε΅ΚεΔûεä†ε€ΑεùÄγï¨ιùΔεQ?/p>

ηΨ™εÖΞεß™εêç壨ε€ΑεùÄεQ¨γ²Ιε΅÷MΩùε≠‰φ¨âι£°οΦ¨εàôηü©ηΫ§εàΑφ‰³ΓΛΚôεΒιùΔεQ?/p>

η΅œx≠ΛεQ¨δΗÄδΗΣεÖΖφ€âε€ΑεùÄΫêΩεäüηÉΫγö³portletεΦÄεèëιÉ®Ψ|≤ε°¨φàêοΦ¨ε€®δΜΞεêéγö³portalôεΒιùΔδΗ≠εΑ±εè·δΜΞδΫΩγî®η·ΞportletδΚÜψÄ?/p>