|
2013年10月18日
#
如果是Servlet , Action , Controller, 或則Filter , Listener , 攔截器等相關類時, 我們只需要獲得ServletContext, 然后通過ServletContext.getRealPath("/")來獲取當前應用在服務器上的物理地址如果在類中取不到ServletContext時, 有兩種方式可以做到1) 利用Java的類加載機制 調用 XXX.class.getClassLoader().getResource(""); 方法來獲取到ClassPath , 然后處理獲得WebRoot目錄,這種方式只能是該class在WebRoot/WEB-INF/classes下才能生效, 如果該class被打包到一個jar文件中, 則該方法失效。這時就應該用下面一種方式
2) spring框架的思路, 在WEB-INF/web.xml中 , 創建一個webAppRootKey的param, 指定一個值(默認為webapp.root)作為鍵值, 然后通過Listener , 或者Filter , 或者Servlet 執行String webAppRootKey = getServletContext().getRealPath("/"); 并將webAppRootKey對應的webapp.root 分別作為Key , Value寫到System Properties系統屬性中。之后在程序中通過System.getProperty("webapp.root")來獲得WebRoot的物理路徑
下面是一些得到classpath和當前類的絕對路徑的一些方法。你可使用其中的一些方法來得到你需要的資源的絕對路徑: 1.DebitNoteAction.class.getResource("") 得到的是當前類FileTest.class文件的URI目錄。不包括自己! 如:file:/D:/eclipse/springTest/WebRoot/WEB-INF/classes/atacarnet/src/com/evi/modules/atacarnet/action/ 2.DebitNoteAction.class.getResource("/") 得到的是當前的classpath的絕對URI路徑。 如:file:/D:/eclipse/springTest/WebRoot/WEB-INF/classes/ 3.Thread.currentThread().getContextClassLoader().getResource("") 得到的也是當前ClassPath的絕對URI路徑 如:file:/D:/eclipse/springTest/WebRoot/WEB-INF/classes/ 4.DebitNoteAction.class.getClassLoader().getResource("") 或ClassLoader.getSystemResource("") 得到的也是當前ClassPath的絕對URI路徑。 如:file:/D:/eclipse/springTest/WebRoot/WEB-INF/classes/ 5.取得服務器相對路徑 System.getProperty("user.dir") 例如:E:\apache-tomcat-5.5.16\apache-tomcat-5.5.16\bin 我推薦使用Thread.currentThread().getContextClassLoader().getResource("")來得到當前的classpath的絕對路徑的URI表示法 6.取得項目中的絕對路徑 一般用request.getRealPath("/")或request.getRealPath("/config/") 但現在不提倡使用request.getRealPath("/")了,大家可試用ServletContext.getRealPath("/")方法得到Web應用程序的根目錄的絕對路徑 要取得src的文件非常容易,因為src是默認的相對目錄,比如你說要取得src下com目錄的test.java文件,你只需要這樣就夠了 File f = new File(com/test.java); 但如果我要取得不在src目錄或者WebRoot目錄下的文件呢,而是要從src或者WebRoot同級的目錄中取呢,比如說doc吧 我的硬方法是這樣實現的: String path = this.getServletContext().getRealPath("/"); Properties p = new Properties(); p.load(new FileInputStream(new File(path.substring(0,(path.lastIndexOf("\\WebRoot") + 1)) + "doc/db.properties"))); System.out.println(p.getProperty("driverName"));
2012年4月18日
#
Description這個包增強了標準jdk的java.lang包,重用性很高。 頂層的包里面包含了一些工具類,同時一些子包里面,包含了math,concurrent和builder。使用這些工具類很方便。子包中可能包含一些需要實現的借口和類。他們更像了全局的功能實現。
Lang 3.0 is JDK 1.5+; before that Lang was JDK 1.2+. In both cases you can find features of later JDKs being maintained by us and likely to be removed or modified in favour of the JDK in the next major version. Note that Lang 3.0 uses a different package than its predecessors, allowing it to be used at the same time as an earlier version.
Lang 3.0需要jdk 1.5+,之前的版本只需要1.2+。
You will find deprecated methods as you stroll through the Lang documentation. These are removed in the next major version. Before we begin, it's a good time to mention the Utils classes. They all contain empty public constructors with warnings not to use. This may seem an odd thing to do, but it allows tools like Velocity to access the class as if it were a bean. In other words, yes we know about private constructors and have chosen not to use them. lang3.* String manipulation - StringUtils, StringEscapeUtils, RandomStringUtils, Tokenizer, WordUtils Lang has a series of String utilities. The first is StringUtils, oodles and oodles of functions which tweak, transform, squeeze and cuddle java.lang.Strings. In addition to StringUtils, there are a series of other String manipulating classes; RandomStringUtils, StringEscapeUtils and Tokenizer. RandomStringUtils speaks for itself. It's provides ways in which to generate pieces of text, such as might be used for default passwords. StringEscapeUtils contains methods to escape and unescape Java, JavaScript, HTML, XML and SQL. Tokenizer is an improved alternative to java.util.StringTokenizer. These are ideal classes to start using if you're looking to get into Lang. StringUtils' capitalize, substringBetween/Before/After, split and join are good methods to begin with. If you use java.sql.Statements a lot, StringEscapeUtils.escapeSql might be of interest. In addition to these classes, WordUtils is another String manipulator. It works on Strings at the word level, for example WordUtils.capitalize will capitalize every word in a piece of text. WordUtils also contains methods to wrap text. Character handling - CharSetUtils, CharSet, CharRange, CharUtils In addition to dealing with Strings, it's also important to deal with chars and Characters. CharUtils exists for this purpose, while CharSetUtils exists for set-manipulation of Strings. Be careful, although CharSetUtils takes an argument of type String, it is only as a set of characters. For example, CharSetUtils.delete("testtest", "tr") will remove all t's and all r's from the String, not just the String "tr". CharRange and CharSet are both used internally by CharSetUtils, and will probaby rarely be used. JVM interaction - SystemUtils, CharEncoding SystemUtils is a simple little class which makes it easy to find out information about which platform you are on. For some, this is a necessary evil. It was never something I expected to use myself until I was trying to ensure that Commons Lang itself compiled under JDK 1.2. Having pushed out a few JDK 1.3 bits that had slipped in (Collections.EMPTY_MAP is a classic offender), I then found that one of the Unit Tests was dying mysteriously under JDK 1.2, but ran fine under JDK 1.3. There was no obvious solution and I needed to move onwards, so the simple solution was to wrap that particular test in a if(SystemUtils.isJavaVersionAtLeast(1.3f)) {, make a note and move on. The CharEncoding class is also used to interact with the Java environment and may be used to see which character encodings are supported in a particular environment. Serialization - SerializationUtils, SerializationException Serialization doesn't have to be that hard! A simple util class can take away the pain, plus it provides a method to clone an object by unserializing and reserializing, an old Java trick. Assorted functions - ObjectUtils, ClassUtils, ArrayUtils, BooleanUtils Would you believe it, ObjectUtils contains handy functions for Objects, mainly null-safe implementations of the methods on java.lang.Object. ClassUtils is largely a set of helper methods for reflection. Of special note are the comparators hidden away in ClassUtils, useful for sorting Class and Package objects by name; however they merely sort alphabetically and don't understand the common habit of sorting java and javax first. Next up, ArrayUtils. This is a big one with many methods and many overloads of these methods so it is probably worth an in depth look here. Before we begin, assume that every method mentioned is overloaded for all the primitives and for Object. Also, the short-hand 'xxx' implies a generic primitive type, but usually also includes Object. - ArrayUtils provides singleton empty arrays for all the basic types. These will largely be of use in the Collections API with its toArray methods, but also will be of use with methods which want to return an empty array on error.
- add(xxx[], xxx) will add a primitive type to an array, resizing the array as you'd expect. Object is also supported.
- clone(xxx[]) clones a primitive or Object array.
- contains(xxx[], xxx) searches for a primitive or Object in a primitive or Object array.
- getLength(Object) returns the length of any array or an IllegalArgumentException if the parameter is not an array. hashCode(Object), equals(Object, Object), toString(Object)
- indexOf(xxx[], xxx) and indexOf(xxx[], xxx, int) are copies of the classic String methods, but this time for primitive/Object arrays. In addition, a lastIndexOf set of methods exists.
- isEmpty(xxx[]) lets you know if an array is zero-sized or null.
- isSameLength(xxx[], xxx[]) returns true if the arrays are the same length.
- Along side the add methods, there are also remove methods of two types. The first type remove the value at an index, remove(xxx[], int), while the second type remove the first value from the array, remove(xxx[], xxx).
- Nearing the end now. The reverse(xxx[]) method turns an array around.
- The subarray(xxx[], int, int) method splices an array out of a larger array.
- Primitive to primitive wrapper conversion is handled by the toObject(xxx[]) and toPrimitive(Xxx[]) methods.
Lastly, ArrayUtils.toMap(Object[]) is worthy of special note. It is not a heavily overloaded method for working with arrays, but a simple way to create Maps from literals. Using toMap
       Map colorMap = MapUtils.toMap(new String[][] {{
           {"RED", "#FF0000"},
           {"GREEN", "#00FF00"},
           {"BLUE", "#0000FF"}
       });
Our final util class is BooleanUtils. It contains various Boolean acting methods, probably of most interest is the BooleanUtils.toBoolean(String) method which turns various positive/negative Strings into a Boolean object, and not just true/false as with Boolean.valueOf. Flotsam - BitField, Validate On reaching the end of our package, we are left with a couple of classes that haven't fit any of the topics so far. The BitField class provides a wrapper class around the classic bitmask integer, whilst the Validate class may be used for assertions (remember, we support Java 1.2). lang3.builder.* When you write a hashcode, do you check Bloch's Effective Java? No? You just hack in a quick number? Well HashCodeBuilder will save your day. It, and its buddies (EqualsBuilder, CompareToBuilder, ToStringBuilder), take care of the nasty bits while you focus on the important bits, like which fields will go into making up the hashcode. lang3.math.* Although Commons-Math also exists, some basic mathematical functions are contained within Lang. These include classes to a Fraction class, various utilities for random numbers, and the flagship class, NumberUtils which contains a handful of classic number functions. There are two aspects of this package I would like to highlight. The first is NumberUtils.createNumber(String), a method which does its best to convert a String into a Number object. You have no idea what type of Number it will return, so you should call the relevant xxxValue method when you reach the point of needing a number. NumberUtils also has a related isNumber method. lang3.mutable.* New in 2.1, the mutable package provides mutable wrappers for primitive values (such as int, long, etc.) and Object. These wrappers are simiar to the wrappers provided by the Java API, but allow the wrapped value to be changed without needing to create a separate wrapper object. lang3.text.* The text package was added in Lang 2.2. It provides, amongst other classes, a replacement for StringBuffer named StrBuilder, a class for substituting variables within a String named StrSubstitutor and a replacement for StringTokenizer named StrTokenizer. While somewhat ungainly, the Str prefix has been used to ensure we don't clash with any current or future standard Java classes. lang3.time.* Lang 2.0 saw the arrival of a time package. It contains some basic utilities for manipulating time (a delorean, police box and grandfather clock?). These include a StopWatch for simple performance measurements and an optimised FastDateFormat class. New in Lang 2.1 is the DurationFormatUtils class, which provides various methods for formatting durations. lang3.concurrent.* In Lang 3.0 a new concurrent package was introduced containing interfaces and classes to support programming with multiple threads. Its aim is to serve as an extension of the java.util.concurrent package of the JDK. Concurrent initializers A group of classes deals with the correct creation and initialization of objects that are accessed by multiple threads. All these classes implement the ConcurrentInitializer interface which provides just a single method: public interface ConcurrentInitializer<T> {
T get() throws ConcurrentException;
}
A ConcurrentInitializer produces an object. By calling the get() method the object managed by the initializer can be obtained. There are different implementations of the interface available addressing various use cases: ConstantInitializer is a very straightforward implementation of the ConcurrentInitializer interface: An instance is passed an object when it is constructed. In its get() method it simply returns this object. This is useful, for instance in unit tests or in cases when you want to pass a specific object to a component which expects a ConcurrentInitializer. The LazyInitializer class can be used to defer the creation of an object until it is actually used. This makes sense, for instance, if the creation of the object is expensive and would slow down application startup or if the object is needed only for special executions. LazyInitializer implements the double-check idiom for an instance field as discussed in Joshua Bloch's "Effective Java", 2nd edition, item 71. It uses volatile fields to reduce the amount of synchronization. Note that this idiom is appropriate for instance fields only. For static fields there are superior alternatives. We provide an example use case to demonstrate the usage of this class: A server application uses multiple worker threads to process client requests. If such a request causes a fatal error, an administrator is to be notified using a special messaging service. We assume that the creation of the messaging service is an expensive operation. So it should only be performed if an error actually occurs. Here is where LazyInitializer comes into play. We create a specialized subclass for creating and initializing an instance of our messaging service. LazyInitializer declares an abstract initialize() method which we have to implement to create the messaging service object: public class MessagingServiceInitializer
extends LazyInitializer<MessagingService> {
protected MessagingService initialize() throws ConcurrentException {
// Do all necessary steps to create and initialize the service object
MessagingService service = ...
return service;
}
}
Now each server thread is passed a reference to a shared instance of our new MessagingServiceInitializer class. The threads run in a loop processing client requests. If an error is detected, the messaging service is obtained from the initializer, and the administrator is notified: public class ServerThread implements Runnable {
/** The initializer for obtaining the messaging service. */
private final ConcurrentInitializer<MessagingService> initializer;
public ServerThread(ConcurrentInitializer<MessagingService> init) {
initializer = init;
}
public void run() {
while (true) {
try {
// wait for request
// process request
} catch (FatalServerException ex) {
// get messaging service
try {
MessagingService svc = initializer.get();
svc.notifyAdministrator(ex);
} catch (ConcurrentException cex) {
cex.printStackTrace();
}
}
}
}
}
The AtomicInitializer class is very similar to LazyInitializer. It serves the same purpose: to defer the creation of an object until it is needed. The internal structure is also very similar. Again there is an abstract initialize() method which has to be implemented by concrete subclasses in order to create and initialize the managed object. Actually, in our example above we can turn the MessagingServiceInitializer into an atomic initializer by simply changing the extends declaration to refer to AtomicInitializer<MessagingService> as super class. The difference between AtomicInitializer and LazyInitializer is that the former uses classes from the java.util.concurrent.atomic package for its implementation (hence the name). This has the advantage that no synchronization is needed, thus the implementation is usually more efficient than the one of the LazyInitializer class. However, there is one drawback: Under high load, if multiple threads access the initializer concurrently, it is possible that the initialize() method is invoked multiple times. The class guarantees that get() always returns the same object though; so objects created accidently are immideately discarded. With AtomicSafeInitializer there is yet another variant implementing the lazy initializing pattern. Its implementation is close to AtomicInitializer; it also uses atomic variables internally and therefore does not need synchronization. The name "Safe" is derived from the fact that it implements an additional check which guarantees that the initialize() method is called only once. So it behaves exactly in the same way as LazyInitializer. Now, which one of the lazy initializer implementations should you use? First of all we have to state that is is problematic to give general recommendations regarding the performance of these classes. The initializers make use of low-level functionality whose efficiency depends on multiple factors including the target platform and the number of concurrent threads. So developers should make their own benchmarks in scenarios close to their specific use cases. The following statements are rules of thumb which have to be verified in practice. AtomicInitializer is probably the most efficient implementation due to its lack of synchronization and further checks. Its main drawback is that the initialize() method can be called multiple times. In cases where this is not an issue AtomicInitializer is a good choice. AtomicSafeInitializer and LazyInitializer both guarantee that the initialization method is called only once. Because AtomicSafeInitializer does not use synchronization it is probably slightly more efficient than LazyInitializer, but the concrete numbers might depend on the level of concurrency. Another implementation of the ConcurrentInitializer interface is BackgroundInitializer. It is again an abstract base class with an initialize() method that has to be defined by concrete subclasses. The idea of BackgroundInitializer is that it calls the initialize() method in a separate worker thread. An application creates a background initializer and starts it. Then it can continue with its work while the initializer runs in parallel. When the application needs the results of the initializer it calls its get() method. get() blocks until the initialization is complete. This is useful for instance at application startup. Here initialization steps (e.g. reading configuration files, opening a database connection, etc.) can be run in background threads while the application shows a splash screen and constructs its UI. As a concrete example consider an application that has to read the content of a URL - maybe a page with news - which is to be displayed to the user after login. Because loading the data over the network can take some time a specialized implementation of BackgroundInitializer can be created for this purpose: public class URLLoader extends BackgroundInitializer<String> {
/** The URL to be loaded. */
private final URL url;
public URLLoader(URL u) {
url = u;
}
protected String initialize() throws ConcurrentException {
try {
InputStream in = url.openStream();
// read content into string
...
return content;
} catch (IOException ioex) {
throw new ConcurrentException(ioex);
}
}
}
An application creates an instance of URLLoader and starts it. Then it can do other things. When it needs the content of the URL it calls the initializer's get() method: URL url = new URL("http://www.application-home-page.com/");
URLLoader loader = new URLLoader(url);
loader.start(); // this starts the background initialization
// do other stuff
...
// now obtain the content of the URL
String content;
try {
content = loader.get(); // this may block
} catch (ConcurrentException cex) {
content = "Error when loading URL " + url;
}
// display content
Related to BackgroundInitializer is the MultiBackgroundInitializer class. As the name implies, this class can handle multiplie initializations in parallel. The basic usage scenario is that a MultiBackgroundInitializer instance is created. Then an arbitrary number of BackgroundInitializer objects is added using the addInitializer() method. When adding an initializer a string has to be provided which is later used to obtain the result for this initializer. When all initializers have been added the start() method is called. This starts processing of all initializers. Later the get() method can be called. It waits until all initializers have finished their initialization. get() returns an object of type MultiBackgroundInitializer.MultiBackgroundInitializerResults. This object provides information about all initializations that have been performed. It can be checked whether a specific initializer was successful or threw an exception. Of course, all initialization results can be queried. With MultiBackgroundInitializer we can extend our example to perform multiple initialization steps. Suppose that in addition to loading a web site we also want to create a JPA entity manager factory and read a configuration file. We assume that corresponding BackgroundInitializer implementations exist. The following example fragment shows the usage of MultiBackgroundInitializer for this purpose: MultiBackgroundInitializer initializer = new MultiBackgroundInitializer();
initializer.addInitializer("url", new URLLoader(url));
initializer.addInitializer("jpa", new JPAEMFInitializer());
initializer.addInitializer("config", new ConfigurationInitializer());
initializer.start(); // start background processing
// do other interesting things in parallel
...
// evaluate the results of background initialization
MultiBackgroundInitializer.MultiBackgroundInitializerResults results =
initializer.get();
String urlContent = (String) results.getResultObject("url");
EntityManagerFactory emf =
(EntityManagerFactory) results.getResultObject("jpa");
...
The child initializers are added to the multi initializer and are assigned a unique name. The object returned by the get() method is then queried for the single results using these unique names. If background initializers - including MultiBackgroundInitializer - are created using the standard constructor, they create their own ExecutorService which is used behind the scenes to execute the worker tasks. It is also possible to pass in an ExecutorService when the initializer is constructed. That way client code can configure the ExecutorService according to its specific needs; for instance, the number of threads available could be limited. Utility classes Another group of classes in the new concurrent package offers some generic functionality related to concurrency. There is the ConcurrentUtils class with a bunch of static utility methods. One focus of this class is dealing with exceptions thrown by JDK classes. Many JDK classes of the executor framework throw exceptions of type ExecutionException if something goes wrong. The root cause of these exceptions can also be a runtime exception or even an error. In typical Java programming you often do not want to deal with runtime exceptions directly; rather you let them fall through the hierarchy of method invocations until they reach a central exception handler. Checked exceptions in contrast are usually handled close to their occurrence. With ExecutionException this principle is violated. Because it is a checked exception, an application is forced to handle it even if the cause is a runtime exception. So you typically have to inspect the cause of the ExecutionException and test whether it is a checked exception which has to be handled. If this is not the case, the causing exception can be rethrown. The extractCause() method of ConcurrentUtils does this work for you. It is passed an ExecutionException and tests its root cause. If this is an error or a runtime exception, it is directly rethrown. Otherwise, an instance of ConcurrentException is created and initialized with the root cause. (ConcurrentException is a new exception class in the o.a.c.l.concurrent package.) So if you get such a ConcurrentException, you can be sure that the original cause for the ExecutionException was a checked exception. For users who prefer runtime exceptions in general there is also an extractCauseUnchecked() method which behaves like extractCause(), but returns the unchecked exception ConcurrentRuntimeException instead. In addition to the extractCause() methods there are corresponding handleCause() methods. These methods extract the cause of the passed in ExecutionException and throw the resulting ConcurrentException or ConcurrentRuntimeException. This makes it easy to transform an ExecutionException into a ConcurrentException ignoring unchecked exceptions: Future<Object> future = ...;
try {
Object result = future.get();
...
} catch (ExecutionException eex) {
ConcurrentUtils.handleCause(eex);
}
There is also some support for the concurrent initializers introduced in the last sub section. The initialize() method is passed a ConcurrentInitializer object and returns the object created by this initializer. It is null-safe. The initializeUnchecked() method works analogously, but a ConcurrentException throws by the initializer is rethrown as a ConcurrentRuntimeException. This is especially useful if the specific ConcurrentInitializer does not throw checked exceptions. Using this method the code for requesting the object of an initializer becomes less verbose. The direct invocation looks as follows: ConcurrentInitializer<MyClass> initializer = ...;
try {
MyClass obj = initializer.get();
// do something with obj
} catch (ConcurrentException cex) {
// exception handling
}
Using the initializeUnchecked() method, this becomes: ConcurrentInitializer<MyClass> initializer = ...;
MyClass obj = ConcurrentUtils.initializeUnchecked(initializer);
// do something with obj
Another utility class deals with the creation of threads. When using the Executor framework new in JDK 1.5 the developer usually does not have to care about creating threads; the executors create the threads they need on demand. However, sometimes it is desired to set some properties of the newly created worker threads. This is possible through the ThreadFactory interface; an implementation of this interface has to be created and pased to an executor on creation time. Currently, the JDK does not provide an implementation of ThreadFactory, so one has to start from scratch. With BasicThreadFactory Commons Lang has an implementation of ThreadFactory that works out of the box for many common use cases. For instance, it is possible to set a naming pattern for the new threads, set the daemon flag and a priority, or install a handler for uncaught exceptions. Instances of BasicThreadFactory are created and configured using the nested Builder class. The following example shows a typical usage scenario: BasicThreadFactory factory = new BasicThreadFactory.Builder()
.namingPattern("worker-thread-%d")
.daemon(true)
.uncaughtExceptionHandler(myHandler)
.build();
ExecutorService exec = Executors.newSingleThreadExecutor(factory);
The nested Builder class defines some methods for configuring the new BasicThreadFactory instance. Objects of this class are immutable, so these attributes cannot be changed later. The naming pattern is a string which can be passed to String.format(). The placeholder %d is replaced by an increasing counter value. An instance can wrap another ThreadFactory implementation; this is achieved by calling the builder's wrappedFactory() method. This factory is then used for creating new threads; after that the specific attributes are applied to the new thread. If no wrapped factory is set, the default factory provided by the JDK is used. Synchronization objects The concurrent package also provides some support for specific synchronization problems with threads. TimedSemaphore allows restricted access to a resource in a given time frame. Similar to a semaphore, a number of permits can be acquired. What is new is the fact that the permits available are related to a given time unit. For instance, the timed semaphore can be configured to allow 10 permits in a second. Now multiple threads access the semaphore and call its acquire() method. The semaphore keeps track about the number of granted permits in the current time frame. Only 10 calls are allowd; if there are further callers, they are blocked until the time frame (one second in this example) is over. Then all blocking threads are released, and the counter of available permits is reset to 0. So the game can start anew. What are use cases for TimedSemaphore? One example is to artificially limit the load produced by multiple threads. Consider a batch application accessing a database to extract statistical data. The application runs multiple threads which issue database queries in parallel and perform some calculation on the results. If the database to be processed is huge and is also used by a production system, multiple factors have to be balanced: On one hand, the time required for the statistical evaluation should not take too long. Therefore you will probably use a larger number of threads because most of its life time a thread will just wait for the database to return query results. On the other hand, the load on the database generated by all these threads should be limited so that the responsiveness of the production system is not affected. With a TimedSemaphore object this can be achieved. The semaphore can be configured to allow e.g. 100 queries per second. After these queries have been sent to the database the threads have to wait until the second is over - then they can query again. By fine-tuning the limit enforced by the semaphore a good balance between performance and database load can be established. It is even possible to change the number of available permits at runtime. So this number can be reduced during the typical working hours and increased at night. The following code examples demonstrate parts of the implementation of such a scenario. First the batch application has to create an instance of TimedSemaphore and to initialize its properties with default values: TimedSemaphore semaphore = new TimedSemaphore(1, TimeUnit.SECONDS, 100);
Here we specify that the semaphore should allow 100 permits in one second. This is effectively the limit of database queries per second in our example use case. Next the server threads issuing database queries and performing statistical operations can be initialized. They are passed a reference to the semaphore at creation time. Before they execute a query they have to acquire a permit. public class StatisticsTask implements Runnable {
/** The semaphore for limiting database load. */
private final TimedSemaphore semaphore;
public StatisticsTask(TimedSemaphore sem, Connection con) {
semaphore = sem;
...
}
/**
* The main processing method. Executes queries and evaluates their results.
*/
public void run() {
try {
while (!isDone()) {
semaphore.acquire(); // enforce the load limit
executeAndEvaluateQuery();
}
} catch (InterruptedException iex) {
// fall through
}
}
}
The important line here is the call to semaphore.acquire(). If the number of permits in the current time frame has not yet been reached, the call returns immediately. Otherwise, it blocks until the end of the time frame. The last piece missing is a scheduler service which adapts the number of permits allowed by the semaphore according to the time of day. We assume that this service is pretty simple and knows only two different time slots: working shift and night shift. The service is triggered periodically. It then determines the current time slot and configures the timed semaphore accordingly. public class SchedulerService {
/** The semaphore for limiting database load. */
private final TimedSemaphore semaphore;
...
/**
* Configures the timed semaphore based on the current time of day. This
* method is called periodically.
*/
public void configureTimedSemaphore() {
int limit;
if (isWorkshift()) {
limit = 50; // low database load
} else {
limit = 250; // high database load
}
semaphore.setLimit(limit);
}
}
With the setLimit() method the number of permits allowed for a time frame can be changed. There are some other methods for querying the internal state of a timed semaphore. Also some statistical data is available, e.g. the average number of acquire() calls per time frame. When a timed semaphore is no more needed, its shutdown() method has to be called.
2012年4月16日
#
Maven的功能 - 遵循最佳實踐,簡單的建立項目-在分秒之間建立一個新的項目或者模塊。
- 在多個項目之間統一使用。
- 依附環境的管理,包括自動的升級。
- 方便地在同一時間參加多個項目。
- 大且不斷增長的庫和元數據可供食用。
- 可擴展,用java或腳本語言開發插件
- 加入新的功能只需要很少或不需要額外的配置
- Ant任務支持依附環境管理,在Maven之外進行發布。
- 在大多數情況下,maven不需要腳本就可以編譯多個項目,打包成jar, war或基于元數據進行項目發布
- 清晰的項目信息:Maven能夠建立一個站點或PDF文檔,其中包括項目的一些基本信息和報表。
- 版本管理和項目發布:不需要太多的額外配置,maven會和你的代碼管理器整合,然后基于一定的tag,來幫助管理你的版本。它也可以為其他的項目發布到一個地方。maven也支持發布成jar或其他歸檔的文件或是源代碼。
- 依附管理:maven建議集中管理jar庫。項目客戶可以到集中的jar庫中下載任何包。這允許maven用戶可以在多個項目中公用jar,并鼓勵項目之間的交流。
通過標準的約定和實踐Maven對你的build流程提供幫助,加速你的開發周期并同時幫助你的項目成功。 下面我們提供一些例子讓你來運行maven!
基本上,maven默認的配置已經足夠面對大部分情況了,但是如果你需要修改緩存策略或者設置http代理,你就需要自己建立一個配置。詳細請參考Guide to Configuring Maven。 我們會使用maven的archetype 機制來建立我們的第一個maven項目。maven中,archetype是項目模版,在加上一些用戶的輸入來建立一個maven的項目。我們會向你展示archetype機制如何工作。更多請參考 創建最簡單的maven項目,只需要執行下面的命令就可以了
mvn archetype:generate \ -DarchetypeGroupId=org.apache.maven.archetypes \ -DgroupId=com.mycompany.app \ -DartifactId=my-app 執行命令后,首先,你會發現一個叫my-app的文件夾建立了,其中有pom.xml文件,內容如下:
<project xmlns="http://maven.apache.org/POM/4.0.0"
xmlns:xsi="http://www.w3.org/2001/XMLSchema-instance"
xsi:schemaLocation="http://maven.apache.org/POM/4.0.0
http://maven.apache.org/xsd/maven-4.0.0.xsd">
  <modelVersion>4.0.0</modelVersion>
  <groupId>com.mycompany.app</groupId>
  <artifactId>my-app</artifactId>
  <packaging>jar</packaging>
  <version>1.0-SNAPSHOT</version>
  <name>Maven Quick Start Archetype</name>
  <url>http://maven.apache.org</url>
  <dependencies>
    <dependency>
      <groupId>junit</groupId>
      <artifactId>junit</artifactId>
      <version>3.8.1</version>
      <scope>test</scope>
    </dependency>
  </dependencies>
</project>
pom.xml里有項目的project object model。pom是maven的基本工作單元。This is important to remember because Maven is inherently project-centric in that everything revolves around the notion of a project. 簡單的說,pom包含了所有項目的重要信息。更多請參考Introduction to the POM.
This is a very simple POM but still displays the key elements every POM contains, so let's walk through each of them
to familiarize you with the POM essentials: - project This is the top-level element in all Maven pom.xml files.
- modelVersion This element indicates what version of the object model this POM is using. The version of the model itself changes very infrequently but it is mandatory in order to ensure stability of use if and when the Maven developers deem it necessary to change the model.
- groupId This element indicates the unique identifier of the organization or group that created the project. The groupId is one of the key identifiers of a project and is typically based on the fully qualified domain name of your organization. For example org.apache.maven.plugins is the designated groupId for all Maven plug-ins.
- artifactId This element indicates the unique base name of the primary artifact being generated by this project. The primary artifact for a project is typically a JAR file. Secondary artifacts like source bundles also use the artifactId as part of their final name. A typical artifact produced by Maven would have the form <artifactId>-<version>.<extension> (for example, myapp-1.0.jar).
- packaging This element indicates the package type to be used by this artifact (e.g. JAR, WAR, EAR, etc.). This not only means if the artifact produced is JAR, WAR, or EAR but can also indicate a specific lifecycle to use as part of the build process. (The lifecycle is a topic we will deal with further on in the guide. For now, just keep in mind that the indicated packaging of a project can play a part in customizing the build lifecycle.) The default value for the packaging element is JAR so you do not have to specify this for most projects.
- version This element indicates the version of the artifact generated by the project. Maven goes a long way to help you with version management and you will often see the SNAPSHOT designator in a version, which indicates that a project is in a state of development. We will discuss the use of snapshots and how they work further on in this guide.
- name This element indicates the display name used for the project. This is often used in Maven's generated documentation.
- url This element indicates where the project's site can be found. This is often used in Maven's generated documentation.
- description This element provides a basic description of your project. This is often used in Maven's generated documentation.
For a complete reference of what elements are available for use in the POM please refer to our POM Reference. Now let's get back to the project at hand. After the archetype generation of your first project you will also notice that the following directory structure has been created: my-app |-- pom.xml `-- src |-- main | `-- java | `-- com | `-- mycompany | `-- app | `-- App.java `-- test `-- java `-- com `-- mycompany `-- app `-- AppTest.java As you can see, the project created from the archetype has a POM, a source tree for your application's sources and a source tree for your test sources. This is the standard layout for Maven projects (the application sources reside in ${basedir}/src/main/java and test sources reside in ${basedir}/src/test/java, where ${basedir} represents the directory containing pom.xml). If you were to create a Maven project by hand this is the directory structure that we recommend using. This is a Maven convention and to learn more about it you can read our Introduction to the Standard Directory Layout. Now that we have a POM, some application sources, and some test sources you are probably asking ...
2012年4月6日
#
摘要: JQGrid是一個在jquery基礎上做的一個表格控件,以ajax的方式和服務器端通信。JQGrid Demo 是一個在線的演示項目。在這里,可以知道jqgrid可以做什么事情。下面是轉自其他人blog的一個學習資料,與其說是學習資料,說成查詢幫助文檔更加合適。 jqGrid學習之 ------------- 安裝 jqGrid安裝很簡單,只需把相應的css、js文件加入到頁面中即可。 按照... 閱讀全文
2012年2月20日
#
1. http://download.eclipse.org/windowbuilder/WB/integration/3.7/
1.http://code.google.com/p/visualswing4eclipse/
2個用于J2SE swing之類的桌面編程。
2. doxygen http://www.stack.nl/~dimitri/doxygen/
能根據項目的源文件,自動生成比較完整的文檔,包括類層次圖
3. open explorer http://blog.samsonis.me/2009/02/open-explorer-plugin-for-eclipse/
可以在eclipse中比較方便的打開本地文件夾
2011年8月23日
#
svn作為一個代碼版本管理工具,適合團隊使用。 1. 服務端架設 平臺選windows. 軟件下載: http://subversion.tigris.org/servlets/ProjectDocumentList?expandFolder=91&folderID=91相關命令 sc create svn binpath= "\"E:\SVN\svn-win32-1.4.3\bin\svnserve.exe\" --service -r E:\SVN\MyRePos" displayname= "Subversion Server" depend= Tcpip start= auto 建立svn服務器 net stop svn 停止svn服務 net start svn 啟動svn服務 sc delete svn 刪除svn服務,可能需要重啟 SVNADMIN CREATE E:\SVN\MyRePos 建立版本庫 svn import -m "MyProject" LoginDemo file:///E:\SVN\MyRePos\LoginDemo 導入項目LoginDemo在當前目錄下 2.客戶端插件 eclipse安裝插件,在eclipse上打開資源庫,就可以將資源庫中的工程檢出了。
因為只有在自己的機器上進行操作,所以沒有涉及到用戶權限設置之類的問題.
Issue:
使用svn:協議連接server出現無法連接,首先需要查看服務有沒有啟動。
遇到錯誤消息‘object expected’,可能是配置文件的鍵值對有空格。
2011年8月7日
#
項目通過JASPER跑報表,有幾個報表牽涉的數據量比較大,導致響應時間超過1個小時,此時頁面會提示“頁面無法顯示”。 開始以為是session的超時,于是在頁面中添加了ajax去定期發送請求給服務器的代碼來維持session, 問題無法解決。 然后以為是頁面緩存的問題,在請求中加了隨機的數字,查看每次請求回來的響應頭狀態都是200的,問題仍舊無法解決。 繼續百度,繼續谷歌。 搜索到microsoft的一篇文章,如下
2011年7月20日
#
JsonConfig config = new JsonConfig();
config.setJsonPropertyFilter(new PropertyFilter() {
public boolean apply(Object source, String name, Object value) {
if (name.equals("form") || name.equals("formElm") ) {
return true;
} else {
return false;
}
}
});
JSONObject jsonObject = JSONObject.fromObject( form, config );
2011年6月29日
#
下面的方法提供了比較好的數據庫分割字符串的方法。不要在每次需要這種功能的地方各寫一個,統一的工具類非常重要。更能排除以下低級的錯誤。
create or replace
PACKAGE pk_genutilitypkg
AS
/*
Generic String Parser: provide a delimiter and it returns an
index-by table of the individual elements of the string that are
separated by the specified delimiter.
Author: "GAUTHAM CHANDRASEKARAN" <gautha@hotmail.com>
*/
TYPE t_string IS TABLE OF VARCHAR2(2000)
INDEX BY BINARY_INTEGER;
m_ctr NUMBER(5);
m_pos NUMBER(5);
PROCEDURE sp_parsestring (
p_string IN VARCHAR2,
delimiter IN VARCHAR2,
p_t_string OUT t_string);
END pk_genutilitypkg;
create or replace
PACKAGE BODY pk_genutilitypkg
AS
PROCEDURE sp_parsestring (
p_string IN VARCHAR2,
delimiter IN VARCHAR2,
p_t_string OUT t_string)
IS
m_string VARCHAR2(4000);
BEGIN
/* Raise a Error if the length of the delimiter is not 1 */
IF LENGTH (delimiter) != 1
THEN
raise_application_error (-20001,
'Delimiter should be of only one character');
RETURN;
END IF;
m_string := p_string;
m_ctr := 1;
LOOP
m_pos := INSTR (m_string, delimiter);
IF m_pos > 1
THEN
p_t_string (m_ctr) := LTRIM(RTRIM( SUBSTR (m_string, 1, m_pos - 1) ));
IF (m_pos < LENGTH (m_string))
THEN
m_string := SUBSTR (
m_string,
m_pos + 1,
LENGTH (m_string) - m_pos
);
ELSIF m_pos = LENGTH (m_string)
THEN
m_ctr := m_ctr + 1;
p_t_string (m_ctr) := NULL;
EXIT;
END IF;
ELSIF m_pos = 1
THEN
p_t_string (m_ctr) := NULL;
IF m_pos < LENGTH (m_string)
THEN
m_string := SUBSTR (
m_string,
m_pos + 1,
LENGTH (m_string) - m_pos
);
ELSIF m_pos = LENGTH (m_string)
THEN
m_ctr := m_ctr + 1;
p_t_string (m_ctr) := NULL;
EXIT;
END IF;
ELSIF m_pos = 0
THEN
p_t_string (m_ctr) := LTRIM(RTRIM( m_string ));
EXIT;
END IF;
m_ctr := m_ctr + 1;
END LOOP;
END;
END pk_genutilitypkg;
使用方法如下:
PROCEDURE UseStringParse(
user_list IN VARCHAR2
)IS
userid_list VARCHAR2 (1000) := user_list;
userlistarray pk_genutilitypkg.t_string;
vuserid VARCHAR2 (100);
BEGIN
pk_genutilitypkg.sp_parsestring(userid_list, ',', userlistarray);
FOR userindex IN 1 .. userlistarray.COUNT
loop
vuserid:=userlistarray(userindex);
END LOOP;
END UseStringParse;
Actuate 簡單報表的建立過程 1. 1. 打開 e.report 選擇new report 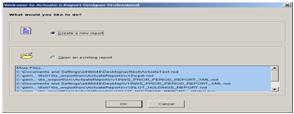
2. 2.選擇空白報表 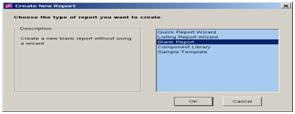
3. 3. 建立數據庫連接。Toolsà Database Connection 
4. 4. 填寫參數 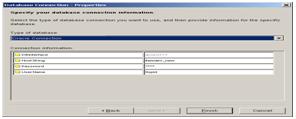
5. 5. 雙擊datasource , 填寫查詢參數 
6. 6. 選中Content, Tool--〉 Grouping, 設置整個報表的group,1層or n層。 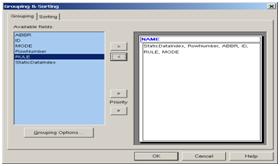
7. 7. 單擊grouping option,設置group的顯示,是否需要befer,after等,每個group需要單獨設置。 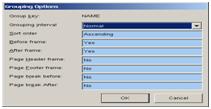
8. 8. 設置各種頁面的控件 
9. 9. 設置參數,這些參數可以用在報表控制上或是查詢的參數Tools -- Parameters 
修改后的查詢字段 select fund_id,fund_name,fund_abbreviation,fund_mode,rule_id from te_fund where fund_mode=:fundmode 參數10. 用來控制頁面顯示 已label為例子,重寫OnRow方法
Sub OnRow( row As AcDataRow )
Super::OnRow( row )
if fundmode="M" then
me.Text = "Manual Fund Name"
else
me.Text = "Auto Fund Name"
end if
End Sub 11. 用datasource中的數據控制頁面 Sub OnRow( row As AcDataRow )
Super::OnRow( row )
If row.GetValue("DR_SHORT_FLAG") =0 Then
me.Text = "BUY BACK"
ElseIf row.GetValue("DR_SHORT_FLAG") =1 Then
me.Text = "Sell to Open"
End if
End Sub
|