A MapReduce job is a unit of work that the client wants to be performed: it consists of the input data, the MapReduce program, and configuration information. Hadoop runs the job by dividing it into tasks, of which there are two types: map tasks and reduce tasks.
There are two types of nodes that control the job execution process: a jobtracker and a number of tasktrackers. The jobtracker coordinates all the jobs run on the system by
scheduling tasks to run on tasktrackers. Tasktrackers run tasks and send progress reports to the jobtracker, which keeps a record of the overall progress of each job. If a
task fails, the jobtracker can reschedule it on a different tasktracker.
Hadoop split input into small fix-size pieces called input splits, and create one map task for each input split. Thus processing the splits in parallel.
Hadoop does its best to run the map task on a node where the input data resides in HDFS. This is called the data locality optimization. To avoid to transfer the blocks across the network to the node running the map task to save bandwidth.
Map tasks write their output to the local disk, not to HDFS.
Reduce tasks donãt have the advantage of data localityãthe input to a single reduce task is normally the output from all mappers.
The map task outputs have to be transferred across the network to the node where the reduce task is running, where they are merged and then passed to the user-defined reduce function
The output of the reduce is normally stored in HDFS for reliability. Each HDFS block of the reduce output, the first replica is stored on the local node, with other replicas being stored on off-rack nodes. Thus, writing the reduce output does consume network bandwidth, but only as much as a normal HDFS write pipeline consumes.

The numbers of reduce task can be specified independently.
When there are multiple reducers, the map tasks partition their output, each creating one partition for each reduce task. There can be many keys (and their associated values)
in each partition, but the records for any given key are all in a single partition. The partitioning can be controlled by a user-defined partitioning function, but normally the
default partitionerãwhich buckets keys using a hash functionãworks very well.

Rounded Border JPanel (JPanel graphics improvements) ã?CodeProject
Rounded Border JPanel (JPanel graphics improvements)
By b4rc0ll0 | 10 Oct 2010
JavaWindowsLinuxDesignIntermediateSwing
Reusable extension of JPanel with rounded borders, shadow and antialiasing
Sponsored Links
Introduction
Swing Framework extensibility allows us to create very advanced graphics component for a better view of our Jframes more than directly Look&Feel management, and more simply.
Basically a JComponent is a void Bounded Box that can be added into swing containers.
It can be extended by a simple plain class, and overriding paintComponent method, we can draw everything we need in a Bounded Box. In this way we can re-create all basic swing components like Buttons, Labels, Panels... with relative events.
Using the Code
In this case, we will review a JPanel extension (instead of JComponent extension) because we want to create a Container component (like JPanel!) but with some graphics improvements:
![]() Collapse
Collapse
public class RoundedPanel extends JPanel {

    /** Stroke size. it is recommended to set it to 1 for better view */
    protected int strokeSize = 1;
    /** Color of shadow */
    protected Color shadowColor = Color.black;
    /** Sets if it drops shadow */
    protected boolean shady = true;
    /** Sets if it has an High Quality view */
    protected boolean highQuality = true;
    /** Double values for Horizontal and Vertical radius of corner arcs */
    protected Dimension arcs = new Dimension(20, 20);
    /** Distance between shadow border and opaque panel border */
    protected int shadowGap = 5;
    /** The offset of shadow.  */
    protected int shadowOffset = 4;
    /** The transparency value of shadow. ( 0 - 255) */
    protected int shadowAlpha = 150;

	//FOLLOWING CODES GOES HERE
}
We have created a simple class extending JPanel. It has some properties for the improvements (see inline comments for properties descriptions).
Attention!! If you want to use this class directly in a visual GUI editor, like integrated Netbeans Editor, we must write a void constructor, because Editor can't directly know constructor parameter of our components:
![]() Collapse
Collapse
 public RoundedPanel() {
        super();
        setOpaque(false);
    }
We call super() father constructor and setOpaque(false) to create a transparent void bounded box, where we can freely draw custom component.
Now we can override the paintComponent method:
![]() Collapse
Collapse
 @Override
    protected void paintComponent(Graphics g) {
        super.paintComponent(g);
        int width = getWidth();
        int height = getHeight();
        int shadowGap = this.shadowGap;
        Color shadowColorA = new Color(shadowColor.getRed(),
	shadowColor.getGreen(), shadowColor.getBlue(), shadowAlpha);
        Graphics2D graphics = (Graphics2D) g;

        //Sets antialiasing if HQ.
        if (highQuality) {
            graphics.setRenderingHint(RenderingHints.KEY_ANTIALIASING,
			RenderingHints.VALUE_ANTIALIAS_ON);
        }

        //Draws shadow borders if any.
        if (shady) {
            graphics.setColor(shadowColorA);
            graphics.fillRoundRect(
                    shadowOffset,// X position
                    shadowOffset,// Y position
                    width - strokeSize - shadowOffset, // width
                    height - strokeSize - shadowOffset, // height
                    arcs.width, arcs.height);// arc Dimension
        } else {
            shadowGap = 1;
        }

        //Draws the rounded opaque panel with borders.
        graphics.setColor(getBackground());
        graphics.fillRoundRect(0, 0, width - shadowGap,
		height - shadowGap, arcs.width, arcs.height);
        graphics.setColor(getForeground());
        graphics.setStroke(new BasicStroke(strokeSize));
        graphics.drawRoundRect(0, 0, width - shadowGap,
		height - shadowGap, arcs.width, arcs.height);

        //Sets strokes to default, is better.
        graphics.setStroke(new BasicStroke());
    }
The method has five macro sections. The header section calls super overridden method and declares main variables: (width, height) are the current size of our component; shadowGap is an override of homonymous property, we will see later why; shadowColor is the color property with transparency added; and graphics is the Graphics object passed by method parameters that represent the canvas where we can paint on (Graphics2D cast is more powerful, see antialiasing).
The next section checks if highQuality is true, so enable antialiasing on canvas for all shapes drawn after.
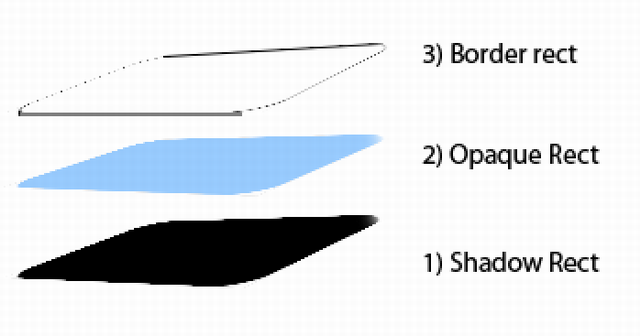
Alike shady determinates if component draws shadow. Shadow is a simple roundRect, usually black, with left-top and right-bottom corners parameterized by shadowOffset value.
Above a possible shadow, the component draws the opaque panel with a thin edge. Here the right-top and right bottom positions are parameterized by shadowGap.
Graphically the order 1) -> 2) -> 3) of layer must be this, due to overlap:
The footer section is used to reset parameters that we have distorted. In fact, if we will not reset strokes, the next component added to this panel will have a distorted border.
Conclusions
With these simple few lines, we have created a solid redestributable swing component that look like this:
We can see tree RoundedPanel here: violet, green and blue one, each with a different arcs dimension that determinates the curvature of corners. The best size is [10,10] like blue panel, because an excessive curve (like violet) can cut out upper-inner components (try set [80,80] .. ).
License
This article, along with any associated source code and files, is licensed under The Apache License, Version 2.0
About the Author
ImageIcon (Java 2 Platform SE v1.4.2)
setImageObserver
public void setImageObserver(ImageObserver observer)
- Sets the image observer for the image. Set this property if the ImageIcon contains an animated GIF, so the observer is notified to update its display. For example:
icon = new ImageIcon(...) button.setIcon(icon); icon.setImageObserver(button);- Parameters:
observer- the image observer
The synchronized keyword in Java
What does variable "synchronization with main memory" mean?
For the sake of keeping descriptions short, I'm going to refer a few times to "synchronizing" cached copies of variables with "main memory". Firstly, by "main memory" we mean 'the Java heap, as seen by the JVM'. We don't meanã?and don't need to refer toã?anything more technical, such as physical RAM as opposed to a CPU cache. We make a distinction between this main memory and other places where we can put values, notably (a) processor registers, in native code produced by a JIT compiler; (b) the set of 'local variable space' that is allocated to every method call; (c) other areas of working memory, not part of the Java heap, that may be allocated locally to a particular thread or thread stack. Now, we've just said that under normal circumstances, the JVM can do a couple of interesting things with variables. Chapter 17 of the Java Language Specification states these and related conditions in more formal terms, albeit in a profoundly incomprehensible way. I'll try and summarise them informally here:
- The JVM is generally free to work on a local copy of a variable. For example, a JIT compiler could create code that loads the value of a Java variable into a register and then works on that register. If this happens, other threads will never see the updated value in the register unless we tell the JVM that they need to.
- A JIT compiler (or, for that matter, the bytecode compiler) is generally free to re-order bytecodes or instructions for optimisation purposes, provided that the overall logic of the program is not affected. So, for example, it could delay writing the value from a register back to the "main" copy of a variable belonging to a Java object.
The JVM specification effectively says that entering and exiting synchronized blocks and methods has to be a "safe barrier" to these operations. If we read and write to variables inside synchronized blocks from different threads, we do always expect Thread 1 to see the value set by Thread 2; just seeing a locally cached copy in a register isn't correct. So on entry to and exit from a synchronized block, the relevant reads/writes to main memory have to take place, and they have to take place in the correct sequence. We can't re-order the write to take place after we exit the synchronized block, and we can't re-order the read to take place before we enter. In other words, the JVM is not allowed to do this:
LOAD R0, [address of some Java variable]   ; Cache a copy of the variable
enter-synchronization
ADD R0, #1                                 ; Do something with the (cached copy) of the variable
or this:
enter-synchronized-block
LOAD R0, [address of some Java variable]      ; Cache a copy of the variable
MUL R0, #2                                    ; Do something with it
leave-synchronized-block
STORE R0, [address of variable]               ; Write the new value back to the variable
It's possible to say all this in a very obtuse way (as I say, see Chapter 17 of the language spec). But at the end of the day it's kind of common sense: if the whole point of synchronization is to make sure all threads see the updated "master" copy of variables, it's no use updating them after you've left the synchronized block.
In some of the descriptions that follow, we'll refer to "synchronizing cached variables with main memory" and sometimes refer to this as being the source of an overhead. But in fact, some of the overhead is more subtle than this as we've just seen, and comes from the synchronization "barrier" preventing optimisation (code re-ordering). The notion of "synchronization with main memory" is kept essentially to keep our descriptions shorter, but it's important to have seen what's really going on.
Looking at these details also shows us why without them, we may think that removing synchronization in some cases will work when it's actually incorrect. A common, but incorrect, "optimisation" is to synchronize when writing to a variable but not on the read. But this is incorrect because without synchronization: (a) the reading thread is not guaranteed to update its working copy of the variable with that in main memory, so may never actually read an updated value of the variable; and (b) even if it does read from main memory, there is nothing to stop it reading while the write method is still in the middle of executing, before it has flushed the value back to main memory.
The synchronized keyword in Java: synchronization with main memory
Itãs often used to set up a hierarchical inheritance relationship.
Most Swing components have models. A button (
JButton), for example, has a model (aButtonModelobject) that stores the button's state ã?what its keyboard mnemonic is, whether it's enabled, selected, or pressed, and so on. Some components have multiple models. A list (JList), for example, uses aListModelto hold the list's contents, and aListSelectionModelto track the list's current selection.You often don't need to know about the models that a component uses. For example, programs that use buttons usually deal directly with the
JButtonobject, and don't deal at all with theButtonModelobject.Why then do models exist? The biggest reason is that they give you flexibility in determining how data is stored and retrieved. For example, if you're designing a spreadsheet application that displays data in a sparsely populated table, you can create your own table model that is optimized for such use.
Models have other benefits, too. They mean that data isn't copied between a program's data structures and those of the Swing components. Also, models automatically propagate changes to all interested listeners, making it easy for the GUI to stay in sync with the data.[Itãs very important] For example, to add items to a list you can invoke methods on the list model. When the model's data changes, the model fires events to the
JListand any other registered listeners, and the GUI is updated accordingly.Also, use model to share the application data and sync state automatically between different components.
Although Swing's model architecture is sometimes referred to as a Model-View-Controller (MVC) design, it really isn't. Swing components are generally implemented so that the view and controller are indivisible, implemented by a single UI object provided by the look and feel. The Swing model architecture is more accurately described as a separable model architecture. If you're interested in learning more about the Swing model architecture, see A Swing Architecture Overview, an article in The Swing Connection.
How to Use Models (The Javaã?Tutorials > Creating a GUI With JFC/Swing > Using Swing Components)
http://download.oracle.com/javase/6/docs/api/java/awt/Rectangle2D
 When an application asks to place a character at the position (x, y), the character is placed so that its reference point (shown as the dot in the accompanying image) is put at that position. The reference point specifies a horizontal line called the baseline of the character. In normal printing, the baselines of characters should align.
fm.getStringBounds(String, Graphics)
Returns the bounds of the specified String in the specified Graphics context. The bounds is used to layout the String.
This method can be used to get text location information.
Note: The returned bounds is in baseline-relative coordinates
Sample, HyperLink Button, the important code:
@Override
    public void paintComponent(Graphics g) {
        if(getAction() == null){
            super.paintComponent(g);
            setFocusable(false);
            return;
        }
        setForeground(Color.BLUE);
        super.paintComponent(g);

        Font f = getFont();
        FontMetrics fm = g.getFontMetrics(f);
        Rectangle2D b1 = fm.getStringBounds(getText(), g);
        // Get the line location.
        double baseY = getHeight() - (getHeight() - b1.getHeight())/2 -1 ;
        double baseX = (getWidth() - b1.getWidth())/2;
        int length =(int)b1.getWidth();
        g.setColor(UISetting.HYPER_LINK_COLOR);
        g.drawLine((int)baseX, (int)baseY, (int)baseX+ length, (int)baseY);
        if (onFocus) {
            g.setColor(UISetting.SELECTED_FOCUS_COLOR);
            double recY = getHeight()/2 - fm.getAscent()/2;
            GraphicUtil.drawDashedRect(g,(int)baseX, (int)recY-1, length, (int)b1.getHeight());
        }

    }
Submitted by Dan Dyer on Mon, 2009/02/09 - 9:25am
How do you attach a debugger to a Java Web Start application? Normally you probably wouldnãt bother, just start the application without Web Start and debug as normal. However, if you have a bug that shows up only when running in the Web Start sandbox, as I did today, that wonãt help.
The SecurityManager restrictions were causing a different branch of my code to be executed than when launching the application from IDEA or the command line. It was not immediately obvious how to attach the debugger to the Web-Started VM.
In IDEA, to remotely attach a debugger to the JVM, you should start the VM with following set of switches (or similar):
-Xdebug -Xnoagent -Djava.compiler=NONE
-Xrunjdwp:transport=dt_socket,server=y,suspend=n,address=5005
Where do these switches go when launching a Web Start application? Normally you launch the application by just clicking a JNLP link in your browser. One option, which doesnãt work, is to specify the JVM arguments in JNLP file. You can already do something like this:
<j2se version="1.5+" java-vm-args="-ea -server"/>
Adding the debug switches is trivialã?and futile. The problem is that remote debugging requires the VM to open up a socket to accept connections from the debugger. Rather sensibly, Web Start does not permit untrusted applications to open sockets on usersã?machines. I donãt know if it would work if the application was signed, I was too lazy to go through the hassle of signing the code.
If you want to open a socket on the client machine for debugging purposes, you are going to have to do it from the client machine rather than the JNLP file. The solution is to set the JAVAWS_VM_ARGS environment variable to include the debug switches and then to launch the javaws executable and point it at the unmodified JNLP file. From a bash shell it looks like this:
export JAVAWS_VM_ARGS="-Xdebug -Xnoagent blah blah" javaws http://www.example.com/path_to/application.jnlp
You can then attach the debugger as normal.
From http://blog.uncommons.org/
Both applets and Java Web Start applications are considered Rich Internet Applications (RIAs). Evaluate the following characteristics of applets and Java Web Start applications to decide how to deploy your RIA.
Applets
- Applets run in the context of a browser.
- Applets have access to session cookies and persistent cookies.
- Applets can interact with the web page that they are embedded in. Applets can traverse and manipulate the Document Object Model of the web page and interact with JavaScript that is in the web page. JavaScript code can access public methods and variables of an applet.
- Applets can be launched using Java Network Launch Protocol (JNLP). When launched using JNLP, unsigned applets are allowed access to persistent storage, download control, file I/O, and more. Applets launched using JNLP have capabilities that are comparable to that of a Java Web Start application.
Applets can also be launched without JNLP, in which case, their capabilities might be limited.- Applets can request a particular version of the Java Runtime Environment software for execution.
Java Web Start applications
- Java Web Start applications are launched from a web page the first time. Subsequently, they may be re-launched from the web page or from a desktop shortcut.
- Java Web Start applications do not run in the context of a browser. The applications cannot interact with HTML and JavaScript in a web page and have access to persistent cookies only.
- Java Web Start applications are allowed access to persistent storage, file I/O, and other client related services.
- Java Web Start applications can request a particular version of the Java Runtime Environment software for execution.
Java Web Start software provides Java developers and users with many deployment advantages:
- With Java Web Start software, you can place a single Java application on a web server for deployment to a wide variety of platforms, including Windows 2003/Vista/2000/XP, Linux, and Solaris.
- Java Web Start software supports multiple, simultaneous versions of the Java platform. An application can request a specific version of the Java Runtime Environment (JRE) software without conflicting with the needs of other applications. Java Web Start software automatically downloads and installs the correct version of the Java platform as necessary based on the application's needs and the user's environment.
- Users can create a desktop shortcut to launch a Java Web Start application outside a browser.
- Java Web Start software takes advantage of the inherent security of the Java platform. By default, applications have restricted access to local disk and network resources. Users can safely run applications from sources that are not trusted.
- Applications launched with Java Web Start software are cached locally for improved performance.
- Updates to a Java Web Start application are automatically downloaded when the application is run standalone from the user's desktop.
Java web start guide: http://download.oracle.com/javase/6/docs/technotes/guides/javaws/developersguide/contents.html
Java web start lesson:
http://download.oracle.com/javase/tutorial/deployment/webstart/index.html
JNLP(Java network launching protocol):
http://download.oracle.com/javase/tutorial/deployment/deploymentInDepth/jnlpFileSyntax.html
This topic illustrates the best practices to improve performance in JDBC with the following sections:
JDBC defines how a Java program can communicate with a database. This section focuses mainly on JDBC 2.0 API. JDBC API provides two packages they are java.sql and javax.sql . By using JDBC API, you can connect virtually any database, send SQL queries to the database and process the results.
JDBC architecture defines different layers to work with any database and java, they are JDBC API interfaces and classes which are at top most layer( to work with java ), a driver which is at middle layer (implements the JDBC API interfaces that maps java to database specific language) and a database which is at the bottom (to store physical data). The following figure illustrates the JDBC architecture.

JDBC API provides interfaces and classes to work with databases. Connection interface encapsulates database connection functionality, Statement interface encapsulates SQL query representation and execution functionality and ResultSet interface encapsulates retrieving data which comes from execution of SQL query using Statement.
The following are the basic steps to write a JDBC program
1. Import java.sql and javax.sql packages
2. Load JDBC driver
3. Establish connection to the database using Connection interface
4. Create a Statement by passing SQL query
5. Execute the Statement
6. Retrieve results by using ResultSet interface
7. Close Statement and Connection
We will look at these areas one by one, what type of driver you need to load, how to use Connection interface in the best manner, how to use different Statement interfaces, how to process results using ResultSet and finally how to optimize SQL queries to improve JDBC performance.
Note1: Your JDBC driver should be fully compatible with JDBC 2.0 features in order to use some of the suggestions mentioned in this section.
Note2: This Section assumes that reader has some basic knowledge of JDBC.
Here we will walk through initially about the types of drivers, availability of drivers, use of drivers in different situations, and then we will discuss about which driver suits your application best.
Driver is the key player in a JDBC application, it acts as a mediator between Java application and database. It implements JDBC API interfaces for a database, for example Oracle driver for oracle database, Sybase driver for Sybase database. It maps Java language to database specific language including SQL.
JDBC defines four types of drivers to work with. Depending on your requirement you can choose one among them.
Here is a brief description of each type of driver :
Type of driver
Tier
Driver mechanism
Description
1
Two
JDBC-ODBC
This driver converts JDBC calls to ODBC calls through JDBC-ODBC Bridge driver which in turn converts to database calls. Client requires ODBC libraries.
2
Two
Native API - Partly - Java driver
This driver converts JDBC calls to database specific native calls. Client requires database specific libraries.
3
Three
JDBC - Net -All Java driver
This driver passes calls to proxy server through network protocol which in turn converts to database calls and passes through database specific protocol. Client doesn't require any driver.
4
Two
Native protocol - All - Java driver
This driver directly calls database. Client doesn't require any driver.
Obviously the choice of choosing a driver depends on availability of driver and requirement. Generally all the databases support their own drivers or from third party vendors. If you don't have driver for your database, JDBC-ODBC driver is the only choice because all most all the vendors support ODBC. If you have tiered requirement ( two tier or three tier) for your application, then you can filter down your choices, for example if your application is three tiered, then you can go for Type three driver between client and proxy server shown below. If you want to connect to database from java applet, then you have to use Type four driver because it is only the driver which supports that feature. This figure shows the overall picture of drivers from tiered perspective.

This figure illustrates the drivers that can be used for two tiered and three tiered applications. For both two and three tiered applications, you can filter down easily to Type three driver but you can use Type one, two and four drivers for both tiered applications. To be more precise, for java applications( non-applet) you can use Type one, two or four driver. Here is exactly where you may make a mistake by choosing a driver without taking performance into consideration. Let us look at that perspective in the following section.
Type 3 & 4 drivers are faster than other drivers because Type 3 gives facility for optimization techniques provided by application server such as connection pooling, caching, load balancing etc and Type 4 driver need not translate database calls to ODBC or native connectivity interface. Type 1 drivers are slow because they have to convert JDBC calls to ODBC through JDBC-ODBC Bridge driver initially and then ODBC Driver converts them into database specific calls. Type 2 drivers give average performance when compared to Type 3 & 4 drivers because the database calls have to be converted into database specific calls. Type 2 drivers give better performance than Type 1 drivers.
Finally, to improve performance
1. Use Type 4 driver for applet to database communication.
2. Use Type 2 driver for two tiered applications for communication between java client and the database that gives better performance when compared to Type1 driver
3. Use Type 1 driver if your database doesn't support a driver. This is rare situation because almost all major databases support drivers or you will get them from third party vendors.
4.Use Type 3 driver to communicate between client and proxy server ( weblogic, websphere etc) for three tiered applications that gives better performance when compared to Type 1 & 2 drivers.
java.sql package in JDBC provides Connection interface that encapsulates database connection functionality. Using Connection interface, you can fine tune the following operations :
1. Set optimal row pre-fetch value
2. Use Connection pool
3. Control transaction
4. Choose optimal isolation level
5. Close Connection when finished
Each of these operations effects the performance. We will walk through each operation one by one.
1. Set optimal row pre-fetch value
We have different approaches to establish a connection with the database, the first type of approach is :
1. DriverManager.getConnection(String url)
2. DriverManager.getConnection(String url, Properties props)
3. DriverManager.getConnection(String url, String user, String password)
4. Driver.connect(String url, Properties props)
When you use this approach, you can pass database specific information to the database by passing properties using Properties object to improve performance. For example, when you use oracle database you can pass default number of rows that must be pre-fetched from the database server and the default batch value that triggers an execution request. Oracle has default value as 10 for both properties. By increasing the value of these properties, you can reduce the number of database calls which in turn improves performance. The following code snippet illustrates this approach.
java.util.Properties props = new java.util.Properties();
props.put("user","scott");
props.put("password","tiger");
props.put("defaultRowPrefetch","30");
props.put("defaultBatchValue","5");
Connection con = DriverManger.getConnection("jdbc:oracle:thin:@hoststring", props);
You need to figure out appropriate values for above properties for better performance depending on application's requirement. Suppose, you want to set these properties for search facility, you can increase defaultRowPrefetch so that you can increase performance significantly.
The second type of approach is to get connection from DataSource.
You can get the connection using javax.sql.DataSource interface. The advantage of getting connection from this approach is that the DataSource works with JNDI. The implementation of DataSource is done by vendor, for example you can find this feature in weblogic, websphere etc. The vendor simply creates DataSource implementation class and binds it to the JNDI tree. The following code shows how a vendor creates implementation class and binds it to JNDI tree.
DataSourceImpl dsi = new DataSourceImpl();
dsi.setServerName("oracle8i");
dsi.setDatabaseName("Demo");
Context ctx = new InitialContext();
ctx.bind("jdbc/demoDB", dsi);
This code registers the DataSourceImpl object to the JNDI tree, then the programmer can get the DataSource reference from JNDI tree without knowledge of the underlying technology.
Context ctx = new InitialContext();
DataSource ds = (DataSource)ctx.lookup("jdbc/demoDB");
Connection con = ds.getConnection();
By using this approach we can improve performance. Nearly all major vendor application servers like weblogic, webshpere implement the DataSource by taking connection from connection pool rather than a single connection every time. The application server creates connection pool by default. We will discuss the advantage of connection pool to improve performance in the next section.
Creating a connection to the database server is expensive. It is even more expensive if the server is located on another machine. Connection pool contains a number of open database connections with minimum and maximum connections, that means the connection pool has open connections between minimum and maximum number that you specify. The pool expands and shrinks between minimum and maximum size depending on incremental capacity. You need to give minimum, maximum and incremental sizes as properties to the pool in order to maintain that functionality. You get the connection from the pool rather directly .For example, if you give properties like min, max and incremental sizes as 3, 10 and 1 then pool is created with size 3 initially and if it reaches it's capacity 3 and if a client requests a connection concurrently, it increments its capacity by 1 till it reaches 10 and later on it puts all its clients in a queue.
There are a few choices when using connection pool.
1. You can depend on application server if it supports this feature, generally all the application servers support connection pools. Application server creates the connection pool on behalf of you when it starts. You need to give properties like min, max and incremental sizes to the application server.
2. You can use JDBC 2.0 interfaces, ConnectionPoolDataSource and PooledConnection if your driver implements these interfaces
3. Or you can create your own connection pool if you are not using any application server or JDBC 2.0 compatible driver.
By using any of these options, you can increase performance significantly. You need to take care of properties like min, max and incremental sizes. The maximum number of connections to be given depends on your application's requirement that means how many concurrent clients can access your database and also it depends up on your database's capability to provide maximum number of connections.
In general, transaction represents one unit of work or bunch of code in the program that executes in it's entirety or none at all. To be precise, it is all or no work. In JDBC, transaction is a set of one or more Statements that execute as a single unit.
java.sql.Connection interface provides some methods to control transaction they are
public interface Connection {
boolean getAutoCommit();
void setAutoCommit(boolean autocommit);
void commit();
void rollback();
}
JDBC's default mechanism for transactions:
By default in JDBC transaction starts and commits after each statement's execution on a connection. That is the AutoCommit mode is true. Programmer need not write a commit() method explicitly after each statement.
Obviously this default mechanism gives good facility for programmers if they want to execute a single statement. But it gives poor performance when multiple statements on a connection are to be executed because commit is issued after each statement by default, that in turn reduces performance by issuing unnecessary commits. The remedy is to flip it back to AutoCommit mode as false and issue commit() method after a set of statements execute, this is called as batch transaction. Use rollback() in catch block to rollback the transaction whenever an exception occurs in your program. The following code illustrates the batch transaction approach.
try{
connection.setAutoCommit(false);
PreparedStatement ps = connection.preareStatement( "UPDATE employee SET Address=? WHERE name=?");
ps.setString(1,"Austin");
ps.setString(2,"RR");
ps.executeUpdate();
PreparedStatement ps1 = connection.prepareStatement( "UPDATE account SET salary=? WHERE name=?");
ps1.setDouble(1, 5000.00);
ps1.setString(2,"RR");
ps1.executeUpdate();
connection.commit();
connection.setAutoCommit(true);
}catch(SQLException e){ connection.rollback();}
finally{
if(ps != null){ ps.close();}
if(ps1 != null){ps1.close();}
if(connection != null){connection.close();}
}
This batch transaction gives good performance by reducing commit calls after each statement's execution.
4. Choose optimal isolation level
Isolation level represent how a database maintains data integrity against the problems like dirty reads, phantom reads and non-repeatable reads which can occur due to concurrent transactions. java.sql.Connection interface provides methods and constants to avoid the above mentioned problems by setting different isolation levels.
public interface Connection {
public static final int TRANSACTION_NONE = 0
public static final int TRANSACTION_READ_COMMITTED = 2
public static final int TRANSACTION_READ_UNCOMMITTED = 1
public static final int TRANSACTION_REPEATABLE_READ = 4
public static final int TRANSACTION_SERIALIZABLE = 8
int getTransactionIsolation();
void setTransactionIsolation(int isolationlevelconstant);
}
You can get the existing isolation level with getTransactionIsolation() method and set the isolation level with setTransactionIsolation(int isolationlevelconstant) by passing above constants to this method.
The following table describes isolation level against the problem that it prevents :
Transaction Level
Permitted Phenomena
Performance impact
Dirty reads
Non Repeatable reads
Phantom reads
TRANSACTION_NONE
N/A
N/A
N/A
FASTEST
TRANSACTION_READ_UNCOMMITED
YES
YES
YES
FASTEST
TRANSACTION_READ_COMMITED
NO
YES
YES
FAST
TRANSACTION_REPEATABLE_READ
NO
NO
YES
MEDIUM
TRANSACTION_SERIALIZABLE
NO
NO
NO
SLOW
YES means that the Isolation level does not prevent the problem
NO means that the Isolation level prevents the problem
By setting isolation levels, you are having an impact on the performance as mentioned in the above table. Database use read and write locks to control above isolation levels. Let us have a look at each of these problems and then look at the impact on the performance.
Dirty read problem :
The following figure illustrates Dirty read problem :

Step 1: Database row has PRODUCT = A001 and PRICE = 10
Step 2: Connection1 starts Transaction1 (T1) .
Step 3: Connection2 starts Transaction2 (T2) .
Step 4: T1 updates PRICE =20 for PRODUCT = A001
Step 5: Database has now PRICE = 20 for PRODUCT = A001
Step 6: T2 reads PRICE = 20 for PRODUCT = A001
Step 7: T2 commits transaction
Step 8: T1 rollbacks the transaction because of some problem
The problem is that T2 gets wrong PRICE=20 for PRODUCT = A001 instead of 10 because of uncommitted read. Obviously it is very dangerous in critical transactions if you read inconsistent data. If you are sure about not accessing data concurrently then you can allow this problem by setting TRANSACTION_READ_UNCOMMITED or TRANSACTION_NONE that in turn improves performance otherwise you have to use TRANSACTION_READ_COMMITED to avoid this problem.
Unrepeatable read problem :
The following figure illustrates Unrepeatable read problem :

Step 1: Database row has PRODUCT = A001 and PRICE = 10
Step 2: Connection1 starts Transaction1 (T1) .
Step 3: Connection2 starts Transaction2 (T2) .
Step 4: T1 reads PRICE =10 for PRODUCT = A001
Step 5: T2 updates PRICE = 20 for PRODUCT = A001
Step 6: T2 commits transaction
Step 7: Database row has PRODUCT = A001 and PRICE = 20
Step 8: T1 reads PRICE = 20 for PRODUCT = A001
Step 9: T1 commits transaction
Here the problem is that Transaction1 reads 10 first time and reads 20 second time but it is supposed to be 10 always whenever it reads a record in that transaction. You can control this problem by setting isolation level as TRANSACTION_REPEATABLE_READ.
Phantom read problem :
The following figure illustrates Phantom read problem :

Step 1: Database has a row PRODUCT = A001 and COMPANY_ID = 10
Step 2: Connection1 starts Transaction1 (T1) .
Step 3: Connection2 starts Transaction2 (T2) .
Step 4: T1 selects a row with a condition SELECT PRODUCT WHERE COMPANY_ID = 10
Step 5: T2 inserts a row with a condition INSERT PRODUCT=A002 WHERE
COMPANY_ID= 10
Step 6: T2 commits transaction
Step 7: Database has 2 rows with that condition
Step 8: T1 select again with a condition SELECT PRODUCT WHERE COMPANY_ID=10
and gets 2 rows instead of 1 row
Step 9: T1 commits transaction
Here the problem is that T1 gets 2 rows instead of 1 row up on selecting the same condition second time. You can control this problem by setting isolation level as TRANSACTION_SERIALIZABLE
Choosing a right isolation level for your program:
Choosing a right isolation level for your program depends upon your application's requirement. In single application itself the requirement generally changes, suppose if you write a program for searching a product catalog from your database then you can easily choose TRANSACTION_READ_UNCOMMITED because you need not worry about the problems that are mentioned above, some other program can insert records at the same time, you don't have to bother much about that insertion. Obviously this improves performance significantly.
If you write a critical program like bank or stocks analysis program where you want to control all of the above mentioned problems, you can choose TRANSACTION_SERIALIZABLE for maximum safety. Here it is the tradeoff between the safety and performance. Ultimately we need safety here.
If you don't have to deal with concurrent transactions your application, then the best choice is TRANSACTION_NONE to improve performance.
Other two isolation levels need good understanding of your requirement. If your application needs only committed records, then TRANSACTION_READ_COMMITED isolation is the good choice. If your application needs to read a row exclusively till you finish your work, then TRANSACTION_REPEATABLE_READ is the best choice.
Note: Be aware of your database server's support for these isolation levels. Database servers may not support all of these isolation levels. Oracle server supports only two isolation levels, TRANSACTION_READ_COMMITED and TRANSACTION_SERIALIZABLE isolation level, default isolation level is TRANSACTION_READ_COMMITED.
5. Close Connection when finished
Closing connection explicitly allows garbage collector to recollect memory as early as possible. Remember that when you use the connection pool, closing connection means that it returns back to the connection pool rather than closing direct connection to the database.
Statement interface represents SQL query and execution and they provide number of methods and constants to work with queries. They also provide some methods to fine tune performance. Programmer may overlook these fine tuning methods that result in poor performance. The following are the tips to improve performance by using statement interfaces
1. Choose the right Statement interface
2. Do batch update
3. Do batch retrieval using Statement
2. Close Statement when finished
1. Choose right Statement interface
There are three types of Statement interfaces in JDBC to represent the SQL query and execute that query, they are Statement, PreparedStatement and CallableStatement.
Statement is used for static SQL statement with no input and output parameters, PreparedStatement is used for dynamic SQL statement with input parameters and CallableStatement is used for dynamic SQL satement with both input and output parameters, but PreparedStatement and CallableStatement can be used for static SQL statements as well. CallableStatement is mainly meant for stored procedures.
PreparedStatement gives better performance when compared to Statement because it is pre-parsed and pre-compiled by the database once for the first time and then onwards it reuses the parsed and compiled statement. Because of this feature, it significantly improves performance when a statement executes repeatedly, It reduces the overload incurred by parsing and compiling.
CallableStatement gives better performance when compared to PreparedStatement and Statement when there is a requirement for single request to process multiple complex statements. It parses and stores the stored procedures in the database and does all the work at database itself that in turn improves performance. But we loose java portability and we have to depend up on database specific stored procedures.
You can send multiple queries to the database at a time using batch update feature of statement objects this reduces the number of JDBC calls and improves performance. Here is an example of how you can do batch update,
statement.addBatch( "sql query1");
statement.addBatch(" sql query2");
statement.addBatch(" sql query3");
statement.executeBatch();
All three types of statements have these methods to do batch update.
3. Do batch retrieval using Statement
You can get the default number of rows that is provided by the driver. You can improve performance by increasing number of rows to be fetched at a time from database using setFetchSize() method of the statement object.
Initially find the default size by using
Statement.getFetchSize(); and then set the size as per your requirement
Statement.setFetchSize(30);
Here it retrieves 30 rows at a time for all result sets of this statement.
4. Close Statement when finished
Close statement object as soon as you finish working with that, it explicitly gives a chance to garbage collector to recollect memory as early as possible which in turn effects performance.
Statement.close();
ResultSet interface represents data that contains the results of executing an SQL Query and it provides a number of methods and constants to work with that data. It also provides methods to fine tune retrieval of data to improve performance. The following are the fine tuning tips to improve performance by using ResultSet interface.
1. Do batch retrieval using ResultSet
2. Set up proper direction for processing the rows
3. Use proper get methods
4. Close ResultSet when finished
1. Do batch retrieval using ResultSet
ResultSet interface also provides batch retrieval facility like Statement as mentioned above. It overrides the Statement behaviour.
Initially find the default size by using
ResultSet.getFetchSize(); and then set the size as per requirement
ResultSet.setFetchSize(50);
This feature significantly improves performance when you are dealing with retrieval of large number of rows like search functionality.
2. Setup proper direction of processing rows
ResultSet has the capability of setting the direction in which you want to process the results, it has three constants for this purpose, they are
FETCH_FORWARD, FETCH_REVERSE, FETCH_UNKNOWN
Initially find the direction by using
ResultSet.getFetchDirection(); and then set the direction accordingly
ResultSet.setFetchDirection(FETCH_REVERSE);
3. Use proper getxxx() methods
ResultSet interface provides lot of getxxx() methods to get and convert database data types to java data types and is flexibile in converting non feasible data types. For example,
getString(String columnName) returns java String object.
columnName is recommended to be a VARCHAR OR CHAR type of database but it can also be a NUMERIC, DATE etc.
If you give non recommended parameters, it needs to cast it to proper java data type that is expensive. For example consider that you select a product's id from huge database which returns millions of records from search functionality, it needs to convert all these records that is very expensive.
So always use proper getxxx() methods according to JDBC recommendations.
4. Close ResultSet when finished
Close ResultSet object as soon as you finish working with ResultSet object even though Statement object closes the ResultSet object implicitly when it closes, closing ResultSet explicitly gives chance to garbage collector to recollect memory as early as possible because ResultSet object may occupy lot of memory depending on query.
ResultSet.close();
This is one of the area where programmers generally make a mistake
If you give a query like
Statement stmt = connection.createStatement();
ResultSet rs = stmt.executeQuery("select * from employee where name=RR");
The returned result set contains all the columns data. you may not need all the column data and want only salary for RR.
The better query is "select salary from employee where name=RR"
It returns the required data and reduces unnecessary data retrieval.
Cache the read-only and read-mostly data
Every database schema generally has read-only and read-mostly tables. These tables are called as lookup tables. Read-only tables contain static data that never changes in its life time. Read-mostly tables contain semi dynamic data that changes often. There will not be any sort of writing operations in these tables.
If an application reads data from these tables for every client request, then it is redundant, unnecessary and expensive. The solution for this problem is to cache the read-only table data by reading the data from that table once and caching the read-mostly table data by reading and refreshing with time limit. This solution improves performance significantly. See the following link for source code of such caching mechanism.
http://www.javaworld.com/javaworld/jw-07-2001/jw-0720-cache.html
You can tweak this code as per application requirement. For read-only data, you need not refresh data in its life time. For read-mostly data, you need to refresh the data with time limit. It is better to set this refreshing time limit in properties file so that it can be changed at any time.
Fetch small amount of data iteratively instead of fetching whole data at once
Applications generally require to retrieve huge data from the database using JDBC in operations like searching data. If the client request for a search, the application might return the whole result set at once. This process takes lot of time and has an impact on performance. The solution for the problem is
1. Cache the search data at the server-side and return the data iteratively to the client. For example, the search returns 1000 records, return data to the client in 10 iterations where each iteration has 100 records.
2. Use Stored procedures to return data iteratively. This does not use server-side caching rather server-side application uses Stored procedures to return small amount of data iteratively.
Out of these solutions the second solution gives better performance because it need not keep the data in the cache (in-memory). The first procedure is useful when the total amount of data to be returned is not huge.
- Use Type two driver for two tiered applications to communicate from java client to database that gives better performance than Type1 driver.
- Use Type four driver for applet to database communication that is two tiered applications and three tiered applications when compared to other drivers.
- Use Type one driver if you don't have a driver for your database. This is a rare situation because all major databases support drivers or you will get a driver from third party vendors.
- Use Type three driver to communicate between client and proxy server ( weblogic, websphere etc) for three tiered applications that gives better performance when compared to Type 1 &2 drivers.
- Pass database specific properties like defaultPrefetch if your database supports any of them.
- Get database connection from connection pool rather than getting it directly
- Use batch transactions.
- Choose right isolation level as per your requirement. TRANSACTION_READ_UNCOMMITED gives best performance for concurrent transaction based applications. TRANSACTION_NONE gives best performance for non-concurrent transaction based applications.
- Your database server may not support all isolation levels, be aware of your database server features.
- Use PreparedStatement when you execute the same statement more than once.
- Use CallableStatement when you want result from multiple and complex statements for a single request.
- Use batch update facility available in Statements.
- Use batch retrieval facility available in Statements or ResultSet.
- Set up proper direction for processing rows.
- Use proper getXXX() methods.
- Close ResultSet, Statement and Connection whenever you finish your work with them.
- Write precise SQL queries.
- Cache read-only and read-mostly tables data.
- Fetch small amount of data iteratively rather than whole data at once when retrieving large amount of data like searching database etc.
Feed back
We appreciate and welcome your comments on this section. Email commentsZZZ@precisejavaZZZ.com (remove ZZZ which is placed to prevent spam). Please note that we may not be able to reply to all the emails due to huge number of emails that we receive but we appreciate your comments and feedback.
jmap.exe -dump:format=b,file=HeapDump.hprof <pid>, pid can be found from system task manager or ps(linux)
Generate automatically when Java heap space out of memory
Add JVM options, -XX:-HeapDumpOnOutOfMemoryError
Where the file loaction?
After that, you can use visualVM or MAT(Eclipse), or other tools to open it.
VisualVM heap memory setting
on Windows, if you want to increase the memory for the Visual VM tool, you must can do it from in the file
%JDK_HOME%\lib\visualvm\etc\visualvm.conf
changing the default_options property
Normally, when a Redirect is encountered by the Server, then the current request is terminated, the control is directed back to the browser and the Browser makes the request (which will be available as a URL in the Redirect instruction). The same happens here also. For example, consider the following code snippet,
<navigation-case>
    <from-outcome>loginFailure</from-outcome>
    <to-view-id>/loginFailure.jsp</to-view-id>
    <redirect/>
</navigation-case>
Specifying wild-cards
It is also possible to specify wild-card character (*) in the 'from-view-id' element. For example, say that we want to handle the navigation mechanism for all jsf files within the folder 'registration', then we can have something like the following,
<navigation-rule>
    <from-view-id>/registration/*</from-view-id>
    <navigation-case>
        ...
    </navigation-case>
</navigation-rule>
Other
The from-outcome element for the second navigation-case is missing. This means that all outcomes except sayHello, will be forwarded to /pages/goodbye.jsp
<navigation-rule>
   <from-view-id>/pages/inputname.jsp</from-view-id>
    <navigation-case>
      <from-outcome>sayHello</from-outcome>
      <to-view-id>/pages/greeting.jsp</to-view-id>
    </navigation-case>
    <navigation-case>
      <to-view-id>/pages/goodbye.jsp</to-view-id>
    </navigation-case>
  </navigation-rule>
"Global" Outcomes
<navigation-rule>
    <from-view-id>*</from-view-id>
    <navigation-case>
      <from-outcome>globalhelp</from-outcome>
      <to-view-id>/menu/generalHelp.jsp</to-view-id>
    </navigation-case>
</navigation-rule>
or
<navigation-rule>
    <navigation-case>
      <from-outcome>globalhelp</from-outcome>
      <to-view-id>/menu/generalHelp.jsp</to-view-id>
    </navigation-case>
  </navigation-rule>
Navigation Rules in Action
<h:commandButton id="submit" action="sayHello" value="Submit" />
The action attribute will be used as an outcome.
Or, here is another variation:
<h:commandButton id="submit" action="#{GetNameBean.helloAction}" value="Submit" /> The JSF configuration file contains the following code:
<navigation-rule>
   <from-view-id>/pages/inputname.jsp</from-view-id>
    <navigation-case>
      <from-outcome>sayHello</from-outcome>
      <to-view-id>/a.jsp</to-view-id>
    </navigation-case>
  </navigation-rule>

<navigation-rule>
   <from-view-id>/pages/*</from-view-id>
    <navigation-case>
      <from-action>#{GetNameBean.helloAction}</from-action>
      <from-outcome>sayHello</from-outcome>
      <to-view-id>/b.jsp</to-view-id>
    </navigation-case>
  </navigation-rule>
http://www.mulesoft.com/tomcat-context
http://www.cnblogs.com/daition/archive/2010/05/18/1737876.html
http://www.xinotes.org/notes/note/690/
You might think that creating a context.xml under META-INF of the WAR file would also work, it doesn't. The path attribute is ignored unless specified in server.xml.
http://blog.csdn.net/leesphone/archive/2008/03/03/2143954.aspx
Ò¯ÂÒ¯Âqð§Í Í¥Ð?/p>


Re-use of previous work: using implementation inheritance and object composition.
Real mapping to the problem domain: Objects map to real world and represent vehicles, customers,
products etc: with encapsulation.
Modular Architecture: Objects, systems, frameworks etc are the building blocks of larger systems.
The increased quality and reduced development time are the by-products of the key benefits discussed above.
If 90% of the new application consists of proven existing components then only the remaining 10% of the code
have to be tested from scratch.
Posted January 8th, 2007 by Nazmul
Overview
Background
Strategy #1: Leverage Swing provided background threads (SwingWorker tasks) only
Strategy #2: Create your own threads to perform one-shot tasks, and coordinate with SwingWorker tasks
Strategy #3: Create your own threads to perform recurring/long running tasks, and coordinate with SwingWorker tasks
Overview
If youãve ever want to incorporate web services into your graphical applications/applets/widgets written in Java, then there are some threading issues that you have to be mindful of, and design around. This tutorial will guide you though some of the important threading issues you have to keep in mind when building such applications. The strategies outlined in this tutorial apply to accessing more than just web services from Swing apps; it also applies to loading information from databases, and performing any other kind of time consuming process that has to happen in the desktop app and interact with it, but canãt make the user interface unresponsive.
You can learn more about threads in this chapter of the Concurrency in Practice book (on Safari Books Online). You can learn more about the Event Dispatch Thread (EDT) in this chapter of the Filthy Rich Clients (on Safari Books Online).
Background
For some more background information on Swing applications and threading, read this article ã?Lesson: Concurrency in Swing. The Swing framework is essentially single threaded, as are most GUI toolkits. The main thread which updates the UI is called the Event Dispatch Thread (EDT). All the graphical components are created by this thread, all the action, event, etc. listeners run in this thread. So if your code performs a long running/time consuming or blocking task in the EDT, then the Swing UI will become frozen until your code is done. In order to prevent this situation, there are other threads that your tasks can use:
- You can leverage some worker threads that Swing itself creates so that background tasks can be performed outside of the EDT for long running/time consuming/blocking operations that your task must perform, or
- You can use threads that you explicitly create and then coordinate the output from these threads with the EDT, or
- You can take a blended approach and do both of the things suggested above.
In this tutorial, I will cover all three strategies for making your Swing apps multithreaded, with code examples, and things to keep in mind when designing such systems.
Strategy #1: Leverage Swing provided background threads (SwingWorker tasks) only
Use case:
Perform a one-shot task, started from the user interface, that only needs to update the UI with the final result of the task. Use a Swing threadpool executor to perform this task (not the EDT).
Diagram:

Notes:
- You have to create a subclass of SwingWorker and launch it by calling execute(); this will probably happen in an ActionListener in your Swing code. Calling execute() submits this SwingWorker task to the threadpool that Swing keeps for running background tasks. The execute() method returns immediately; so your calling thread (which may be the EDT itself) will continue.
- Put the code for the background task in T doInBackground(). This is the code that performs the time consuming one-shot task. If exceptions are generated here, they can be caught by a call to T get(), so can the return value. Once this method completes (on the background thread), done() will be called on the EDT. The return value is of type ã?lt;T>ã?ã?this is whatever class you decide to make the doInBackground() method return. ã?lt;T>ã?is the result type returned by this SwingWorkerãs doInBackground and get methods. You can either implement this time consuming task in this method, or you can call an external web service, or other gateway or proxy class to request something.
- The done() method is called on the EDT when your doInBackground() method exits (by returning a value or throwing an exception). In the done() method, you can retrieve the thrown exception or return value by calling get(). In this method, you have to perform whatever GUI updates, or interactions that are necessary with the return value or exceptions generated by the call to get().
- In this case the thread is started by calling execute() on the SwingWorker task itself. This submits the task to a threadpool of background threads that Swing manages, and the task will be executed in one of these threads.
- Please make sure that the task is easily interruptible ã?there is no way to preemptively interrupt/stop a thread in Java, only cooperative cancellation is possible.
- So, if you are performing any wait operations (waiting on a lock or monitor) make sure to catch the InterruptedException and cancel out of the task.
- If you are performing blocking IO, make sure to catch IOException, to cancel out of it. The underlying stream that this task is blocking on has to be closed. Presumably, the object calling cancel(true) on your SwingWorker task will also have to call close() on the underlying Input/OutputStream in order for this to work. If you are unblocked due to to an IOException, you can always check for isCancelled() on the SwingWorker to see if itãs been cancelled.
- Also, make sure to check isCancelled() on the SwingWorker thread to see if the task has been cancelled, to end your task.
- If you donãt know what to do with the InterruptedException (if one is thrown), and if you catch it, make sure to call Thread.currentThread().interrupt() to maintain the interrupted flag, so that the executor running this thread will know what to do with the interruption. More on preserving thread interrupted state (if you donãt know what to do with the caught InterruptedException is explained here).
Strategy #2: Create your own threads to perform one-shot tasks, and coordinate with SwingWorker tasks
Use case:
Perform a one-shot task, started from the user interface (or not), that only needs to update the UI with the final result of the task. Use your own executor to perform the task (not the EDT, or a Swing threadpool executor).
Diagram:

Notes:
- The only differences between Strategy 1 and 2 are the following:
- In Strategy 2, instead of performing the time consuming task in the doInBackground(), you simply delegate this responsibility to another task being executed in a different executor (which has itãs own thread(s)). The reason for doing this is that you may have some multithreaded components/libraries/objects that youãve created that are not tied to Swing. You may have a proxy class that acts as a gateway to an external web service. Instead of having to link this code to Swingãs SwingWorker, you can use a generic Executor or Callable or Runnable to implement this. Then you have the task of tying this underlying threaded component to a SwingWorker, basically by creating an SwingWorker adapter for your underlying threaded component. All the processing happens in your underlying component, and the results are trasmitted to the SwingWorker task. So how do you pass a return value in case your underlying component implements Runnable? If the underlying component implements Callable, and you have a reference to a Future, itãs easy ã?you can just call get() and wait in the doInBackground method of your adapter. However, if you donãt have an reference to a Future, and you are dealing with Runnable implementation, then you will have pass the results back to doInBackgroundãs thread via a BlockingQueue<T>. So your SwingWorker adapter will have to get a reference to this BlockingQueue<T> when itãs created, and then in the doInBackground method, it will wait until it gets an object of type <T> from this queue. Your underlying threaded component will have to pass the results of its computation via this BlockingQueue<T> as well. This is a contract that must be honored by both your SwingWorker adapter class, and the underlying threaded component, in order for this strategy to work.
- If your underlying component uses Callable, instead of Runnable, then thereãs no need to use a BlockingQueue<T>. The doInBackground method of your SwingWorker adapter can simply call the get() method on the Future returned by the execution of the Callable. In this case, the blocking/waiting still happens in the doInBackground method, so that when everything is completed, done() is called on the EDT. In this scenario, Strategy 2 is very similar to Strategy 1, the only difference being that the doInBackground method doesnãt really implement anything, it just uses a Future to get a return value back from your underlying component (which is treaded).
- The similarities between Strategy 1 and 2 are the following:
- You donãt really use publish or process methods (which you will in Strategy 3).
- The SwingWorker subclass is very similar, you have to declare a subclass in both cases like this: MySwingWorkerTask <T, Void> extends SwingWorkerã?
Strategy #3: Create your own threads to perform recurring/long running tasks, and coordinate with SwingWorker tasks
Use case:
Perform a long running or recurring task, started from the user interface (or not), that needs to update the UI with intermediate/periodic results from the task. No final result has to be returned by the task (this is optional). Use your own executor to perform this long running/recurring task (not the EDT, or a Swing threadpool executor).
Diagram:

Notes:
- The SwingWorker subclass is defined as SwingWorker<Void, V> : The reason the first parameter type is Void, is due to the fact that the final result returned by doInBackground is not important. However, unlike the previous strategies, the 2nd type parameters is <V> ã?this is the type of the intermediate values that are passed from the background thread to the EDT via publish -> process.
- Once this SwingWorker task is started, it continually blocks on the BlockingQueue<V> object that the underlying threaded component uses to pass intermediate objects back to the SwingWorker adapter. The done() method isnãt used, and neither is get(); instead the publish() and process() methods are used in this strategy. As soon as an object is available on the BlockingQueue<V>, the SwingWorker task simply publishes that object. When objects are published, the EDT is notified of this, and it calls process() to get the objects that were published. Multiple calls to publish() are coalesed into one call to process() which is why the process method takes a List<V> chunks object as a parameter.
- The EDT actually runs the process method, so this is where you want to update your GUI and return.
Enjoy!
comboBox.putClientProperty("JComboBox.isTableCellEditor", Boolean.TRUE)Related question:Default when I press down or up key in combobox then popup list with items is show and when I move on this list (by keys) then items on list is selected and comnobox value is changed. Is there any way to keep this selection on the list, but remove auto combobox value changed ?
ƒ~ÍÍ₤¿GCÍÍ˧ÍQÍð¡Ì°Ì¥Óð£ÈÓ
How to Fix Memory Leaks in Java(very good)
Java SE 6 HotSpot[tm] Virtual Machine Garbage Collection Tuning
Java HotSpot Garbage Collection
import java.util.Arrays;

public class HeapSortV3 {
	public static int[] heap = {4, 1, 3, 2, 16,9,10,14,8,7 };

	public static void main(String[] args) {
		HeapSortV3 v = new HeapSortV3();
		v.heapSort(heap, heap.length);
	}

	/**
	 *
	 * @param a
	 * @param i, the indict of array, begin from 0
	 * @param n, the heap size
	 */
	private void heapify(int[] a, int i, int n) {
		int l = leftChild(i);
		int r = leftChild(i) + 1;
		int largest = -1;
		if(l< n && a[l]>a[i]) {
			largest = l;
		}else {
			largest = i;
		}

		if(r< n && a[r]> a[largest]) {
			largest = r;
		}

		// if largest is not the current node, swap them, recurs to subtree
		if(largest!=i) {
			swap(a,largest,i);
			heapify(a, largest, n);
		}
	}


	public void buildHeap(int[] a, int n) {
		// why begin from n/2?
		// becuase for complete binary tree, n/2 is last non-leaf node,i.e, n/2+1,n/2+2 ...n are all leaf nodes.
		for (int i = n/2; i >=0; i--) {
			heapify(a, i, n);
		}
	}

	private int leftChild(int i) {
		return 2*i + 1;
	}

	public void heapSort(int[] a,int n) {
		buildHeap(a, n);
		System.out.println(Arrays.toString(a));
		for (int i = n-1; i >= 1; i--) {
			// swap 0 and i(n-1,n-2,...1)
			swap(a, 0, i);
			// remove the last element, so heap size is i(n-1,n-2,n-3...1)
			heapify(a, 0, i);
		}
		System.out.println(Arrays.toString(a));
	}

	private void swap(int[] source, int dex1, int dex2) {
		int temp = source[dex1];
		source[dex1] = source[dex2];
		source[dex2] = temp;
	}
}
Architecture
MySQLãs most unusual and important feature is its storage-engine architecture, whose design separates query processing and other server tasks from data storage and retrieval.
This separation of concerns lets you choose, on a per-table basis, how your data is stored and what performance, features, and other characteristics you want.

MysqlÓð¡ð¡ˆÌ̃ÒÓӿ̓ͯÝÌ₤Í ÑÍÙÍ´Í¥ÌÌÑÌÍQÒ¢Ì ñð¡ð£ ð£ Í₤ð£ËͤÍÝÓ̯ÌÛÍÙÍð£serverð¡ÙÍË¥£ÿ¥ÍÌÑÍ₤ð£ËÍͯÍð¡ð¡ˆÌ¯ÌÛͤð¡ÍÒÀ´ÕÓ´ð¡ÍÓͤÍÝ̯ÌÛÍÙÍ´Ì ¥Í¥ÍQð£ËÌ£ÀÒ—ð¡ÍÓÌÏÒ§ð£ËÍͤӴÓÒÎÌÝÐ?
The optimizer does not really care what storage engine a particular table uses, but the storage engine does affect how the server optimizes query. The optimizer asks the storage engine about some of its capabilities and the cost of certain operations, and for statistics on the table data.
Mysql Í₤¿transactionÓÌ₤Ì?/h2>
MySQL AB provides three transactional storage engines: InnoDB, NDB Cluster, and Falcon.
MySQL doesnãt manage transactions at the server level. Instead, the underlying storage engines implement transactions themselves. This means you canãt reliably mix different engines in a single transaction. MySQL AB is working on adding a higher level transaction management service to the server, which will make it safe to mix and match transactional tables in a transaction.
Í ðÄÓÛÍmysqlÌ₤Í´storage engineÍÝÍÛÓŸC¤ÍÀÓÌ₤ÌÍQÌð£ËÍ´ð¡ð¡ˆð¤ÍÀð¡ÙÌð§ÍÊð¡ˆð¡ÍengineÓÒÀ´Ì₤ð¡Í₤Õ Óÿ¥ÒÎÍÛÓ¯Ò¢ð¡ˆÍÒ§ÕÒÎð¡ÍÝÓserverÓÌ₤ÌÐ?/p>
Implicit and explicit locking
InnoDB uses a two-phase locking protocol. It can acquire locks at any time during a transaction, but it does not release them until a COMMIT or ROLLBACK. It releases all the locks at the same time. The locking mechanisms described earlier are all implicit. InnoDB handles locks automatically, according to your isolation level.
However, InnoDB also supports explicit locking, which the SQL standard does not
mention at all:
ã?nbsp; SELECT ... LOCK IN SHARE MODE
ã?nbsp; SELECT ... FOR UPDATE
MySQLãs Storage Engines

Storage Engine Considerations
Here are the main elements you should take into account:
- Transactions
If your application requires transactions, InnoDB is the most stable, well integrated, proven choice.
MyISAM is a good choice if a task doesnãt require transactions and issues primarily either SELECT or INSERT queries. Sometimes specific components of an application (such as logging) fall into this category.
- Concurrency
How best to satisfy your concurrency requirements depends on your workload.If you just need to insert and read concurrently, believe it or not, MyISAM is a fine choice! If you need to allow a mixture of operations to run concurrently without interfering with each other, one of the engines with row-level locking should work well.
- Backups
The need to perform regular backups may also influence your table choices. If your server can be shut down at regular intervals for backups, the storage engines are equally easy to deal with. However, if you need to perform online backups in one form or another, the choices become less clear. Also bear in mind that using multiple storage engines increases the complexity of backups and server tuning.
- Crash recovery
If you have a lot of data, you should seriously consider how long it will take to recover from a crash. MyISAM tables generally become corrupt more easily and take much longer to recover than InnoDB tables, for example. In fact, this is one of the most important reasons why a lot of people use InnoDB when they donãt need transactions.
ÌÇÌ¿storage engine
- Alter table Ò₤ÙÍËÍQ?/li>
mysql> ALTER TABLE mytable ENGINE = Falcon;
ƒ~¤Ó¿Ì₤ÕͤÎÌ₤ÒƒÌ Âÿ¥MySQL will perform a row-by-row copy of your old table into a new table. During that time, youãll probably be using all of the serverãs disk I/O capacity, and the original table will be read-locked while the conversion runs.
- Dump and importÍQ?
Once youãve dumped the table, you can simply edit the dump file to adjust the CREATE TABLE statement it contains. Be sure to change the table name as well as its type, because you canãt have two tables with the same name in the same database even if they are of different typesãand mysqldump defaults to writing a DROP TABLE command before the CREATE TABLE, so you might lose your data if you are not careful!
- CREATE and SELECT
mysql> CREATE TABLE innodb_table LIKE myisam_table;
mysql> ALTER TABLE innodb_table ENGINE=InnoDB;
mysql> INSERT INTO innodb_table SELECT * FROM myisam_table;
qÓÏÌ¿Í¥ÌÍÛÍ ´ÍQÌ₤Ó¨ÍÎÌ̤ÒÀ´ÍÙÍ´ÍÊÏÕÓ̯ÌÛÍQÌÍ˧ÕÓ´ÍÂÕÌÍ ËÍÌð¤ÊÓÌ¿Í¥ÿ¥ð£ËÍ Í¢¨ÕͤÎÐÌ¿Ì°ÍÎð¡ÿ¥
mysql> START TRANSACTION;
mysql> INSERT INTO innodb_table SELECT * FROM myisam_table
-> WHERE id BETWEEN x AND y;
mysql> COMMIT;
Benchmarking and Profiling
Performance Measurements
- Transactions per time unit or throughput
The usual unit of measurement is transactions per second.
- Response time or latency
Maximum response time is rarely a useful metric, because the longer the bench-mark runs, the longer the maximum response time is likely to be. Itãs also not at all repeatable, as itãs likely to vary widely between runs. For this reason, many people use percentile response times instead. For example, if the 95th percentile response time is 5 milliseconds, you know that the task finishes in less than 5 milliseconds 95% of the time.
- Scalability
Scalability measurements are useful for systems that need to maintain performance under a changing workload.
ãPerformance under a changing workloadã?is a fairly abstract concept. Performance is typically measured by a metric such as throughput or response time, and the workload may vary along with changes in database size, number of con-current connections, or hardware.
Scalability measurements are good for capacity planning, because they can show weaknesses in your application that other benchmark strategies wonãt show.
- Concurrency
Benchmarking Tools
Full-Stack Tools:ab,http_load,jmeter
Single-Component Tools: mysqlslap,sysbench,Database Test Suite,MySQL Benchmark Suite (sql-bench),Super Smack
MySQL Profiling
- Which data MySQL accesses most
- What kinds of queries MySQL executes most
- What states MySQL threads spend the most time in
- What subsystems MySQL uses most to execute a query
- What kinds of data accesses MySQL does during a query
- How much of various kinds of activities, such as index scans, MySQL does
MySQL has two kinds of query logs: the general log and the slow log.
The general log writes out every query as the server receives it, so it contains queries that may not even be executed due to errors. You can enable it with a single configuration directive:
log = <file_name>
By design, the general log does not contain execution times or any other information thatãs available only after a query finishes. In contrast, the slow log contains only queries that have executed, it logs queries that take more than a specified amount of time to execute. Both logs can be helpful for profiling, but the slow log is the primary tool for catching problematic queries. We usually recommend
enabling it.
The following configuration sample will enable the log, capture all queries that take more than two seconds to execute, and log queries that donãt use any indexes. It will also log slow administrative statements, such as OPTIMIZE TABLE:
log-slow-queries = <file_name>
long_query_time = 2
log-queries-not-using-indexes
log-slow-admin-statements
You should customize this sample and place it in your my.cnf server configuration file.
In MySQL 5.1, the global slow_query_log and slow_query_log_file system variables provide runtime control over the slow query log, but in MySQL 5.0, you canãt turn the slow query log on or off without restarting the MySQL server. The usual workaround for MySQL 5.0 is the long_query_time variable, which you can change dynamically. The following command doesnãt really disable slow query logging, but it has practically the same effect (if any of your queries takes longer than 10,000 seconds to execute, you should optimize it anyway!):
mysql> SET GLOBAL long_query_time = 10000;
A related configuration variable, log_queries_not_using_indexes, makes the server log to the slow log any queries that donãt use indexes, no matter how quickly theyexecute. Although enabling the slow log normally adds only a small amount of log-ging overhead relative to the time it takes a ãslowã?query to execute, queries that donãt use indexes can be frequent and very fast (for example, scans of very small tables). Thus, logging them can cause the server to slow down, and even use a lot of disk space for the log.
Unfortunately, you canãt enable or disable logging of these queries with a dynamically settable variable in MySQL 5.0. You have to edit the configuration file, then restart MySQL. One way to reduce the burden without a restart is to make the log file a symbolic link to /dev/null when you want to disable it (in fact, you can use this trick for any log file). You just need to run FLUSH LOGS after making the change to ensure that MySQL closes its current log file descriptor and reopens the log to /dev/null.
In contrast to MySQL 5.0, MySQL 5.1 lets you change logging at runtime and lets you log to tables you can query with SQL. This is a great improvement.
Note:The minimum value for long_query_time in MySQL 5.0 is one second,for most interactive applications, this is way too long.
Slow logÌ₤Ìð¡ƒpídð¡Ò—Óÿ¥Í ̘ÌÛÍð§Ì₤ÍʈÍÊÏÍQ?¢Uÿ¥ÍQð¡Ò§log slave thread query
http://www.mysqlperformanceblog.com/mysql-patches/ Ìðƒð¤ð¡ð¡ˆÒÀËð¡ÿ¥Í₤ð£ËÍ¥ËÒÀËð¡Ò¢¯ð¡Ò—
When profiling, itãs a good idea to log all queries with long_query_time=0
Appearing in the log simply means the query took a long time then; it doesnãt mean it will take a long time now or in the future. There
are many reasons why a query can be slow sometimes and fast at other times:
ã?nbsp; A table may have been locked, causing the query to wait. The Lock_time indi-cates how long the query waited for locks to be released.
ã?nbsp; The data or indexes may not have been cached in memory yet. This is common when MySQL is first started or hasnãt been well tuned.
ã?nbsp; A nightly backup process may have been running, making all disk I/O slower.
ã?nbsp; The server may have been running other queries at the same time, slowing down this query.
As a result, you should view the slow query log as only a partial record of whatãs happened. You can use it to generate a list of possible suspects, but you need to investigate each of them in more depth.
The slow query log patches are specifically designed to try to help you understand why a query is slow. In particular, if youãre using InnoDB, the InnoDB statistics can help a lot: you can see if the query was waiting for I/O from the disk, whether it had to spend a lot of time waiting in the InnoDB queue, and so on.
Log analysis tools:mysqldumpslow,mysql_slow_log_filter,mysql_slow_log_parser,mysqlsla
In general, MySQL can apply a WHERE clause in three ways, from best to worst:
ã?nbsp; Apply the conditions to the index lookup operation to eliminate nonmatching rows. This happens at the storage engine layer.
ã?nbsp; Use a covering index (ãUsing indexã?in the Extra column) to avoid row accesses, and filter out nonmatching rows after retrieving each result from the index. This happens at the server layer, but it doesnãt require reading rows from the table.
ã?nbsp; Retrieve rows from the table, then filter nonmatching rows (ãUsing whereã?in the Extra column). This happens at the server layer and requires the server to read rows from the table before it can filter them.
- ð¡Ì?SQL Ò₤ÙÍË͈ҧð§¢Ó´ 1 ð¡ˆÓÎÍ¥?(5.0-)ÍQMySQL Ì ØÛÒÀ´ÓÓÑÌÿ¥ÕÌˋð¡ð¡ˆÍÛÒÛÊðÄÌÍ˧ÓÓÇÂÍ¥Ó´ð¤ð¥ÍÌËÒ₤Â
- ÒÍÓÇÂÍ¥ÍQ͈ҧÌð£ÍñÎͯͰÓÕÀ¤Í¤ðƒóÀðèÓ?
Ìà£ð¡ð¡ÿ¥
1.ð¡Ò˜Ìorder byÒ₤ÙÍËÍQÍ´ÓÇÂÍ¥Í Íƒð¡Í§ÓÌ
Íçð¡ÍQÕ§ÌÍ₤ҧͤӯUsing filesortÍQÒ¢ÌÑÍͯÝÒÎÍ₤¿SQLÒ₤ÙÍËÍÓÎÍ¥Ò¢ÒÀð¥Íð¤ÍQð§Ì₤ÿ¥·qÑð¡Ì₤Ò₤ÇͤӯUsing filesortÛÝÌ₤ð¡ˆð¡ËÕÓÕÛÕÂÍQð¡Ì₤Ò¢Ì ÿLÍQÌÙÊóÀðDÓðƒÍÙÌ₤ÒƒÌÓ¨₤ÿ¥Í ð¿ð¡ÍʈÍ₤ҧͤӯqð¿ÍàÓÌËÒ₤Âÿ¥ð¥ÍÍð¡ð¥ÍÍQÒÎÓÍÛÌ₤ð¡Ì₤͈Íð¤ð¡ÍÀÌÏÒ§Ð?br> 2. ð£ð¡ÕÂÍ₤ð£ËÓͯÒÍÓÎÍ¥ÿ¥ð¿Í₤ð£ËͨÍÊÍÓÇÂÍ¥ÍQÍéÍÎ?key ('A1','A2','A3' ,'A4')§{ÓÍQÌͤÓÌÒç\ð¡Ò˜Ì₤ÍQÍ
ÌÓ
ÏA1ÌËÌͤÿ¥A1Ó¡ÍÍQÓÑÍÌÓ
ÏA2ÌͤÍQð£ËÌÙÊÓݣ̴ÿ¥qÌ ñÍ₤¿ð¤ÍQA1ÍQ?(A1,A2), (A1,A2,A3)ÓÓÎÍ¥Õ§Ì₤ÌÌÓÍQð§Ì₤Í₤¿ð¤ÿ¥A2,A3ÍQÒ¢Ì ÿLÓÇÂÍ¥ÛÝÌ Ìð¤Ð?
Back in January 2000, while many people were arguing about whether the year 2000 was the last or first year of the century, life began for JSR 51 as an approved Java Specification Request (JSR). The name of that JSR is New I/O APIs for the Java Platform. Many people think of the new capabilities as just offering non-blocking I/O operations. However, the new features introduced into the JavaTM 2 Platform, Standard Edition (J2SETM), version 1.4 Beta, include many other new and interesting features. While the API certainly will offer support for scalable I/O operations for both sockets and files, you'll also find a regular expression package for pattern matching, encoders and decoders for character set conversions, and improved file system support like file locking and memory mapping. All four of these new features will be covered in this article.
Note: The Java Native Interface (JNI) changes made to support the New I/O operations will not be covered. For information on these changes, see the Resources section at the end of this article.
Buffers
Starting from the simplest and building up to the most complex, the first improvement to mention is the set of Buffer classes found in the java.nio package. These buffers provide a mechanism to store a set of primitive data elements in an in-memory container. Basically, imagine wrapping a combined DataInputStream/DataOutputStream around a fixed-size byte array and then only being able to read and write one data type, like char, int, or double. There are seven such buffers available:
ByteBufferCharBufferDoubleBufferFloatBufferIntBufferLongBufferShortBuffer
The ByteBuffer actually supports reading and writing the other six types, but the others are type specific. To demonstrate the use of a buffer, the following snippet converts a String to a CharBuffer and reads a character at a time. You convert the String to a CharBuffer with the wrap method, then get each letter with the get method.
CharBuffer buff = CharBuffer.wrap(args[0]);
for (int i=0, n=buff.length(); i<n; i++) {
  System.out.println(buff.get());
}
When using buffers, it is important to realize there are different sizing and positioning values to worry about. The length method is actually non-standard, specific to CharBuffer. There is nothing wrong with it, but it really reports the remaining length, so if the position is not at the beginning, the reported length will not be the buffer length, but the number of remaining characters within the buffer. In other words, the above loop can also be written as follows.
CharBuffer buff = CharBuffer.wrap(args[0]);
for (int i=0; buff.length() > 0; i++) {
  System.out.println(buff.get());
}
Getting back to the different sizing and positioning values, the four values are known as mark, position, limit, and capacity:
- mark -- setable position with
markmethod that can be used to reset the position withreset, <= position, >= 0 - position -- current read/write position within buffer, <= limit ÍQÓÝ£ð¥Õg¤zíd´Ì¡¡Ì ÍQð¡Ò˜Í¤Ò₤Ëð§ð¡½₤£ÌÒ
ÍÓð¡Õ?/strong>
- limit -- index of first element that should not be read, <= capacity Ò₤ídÓð¡Õ?/strong>
- capacity -- size of buffer, >= limit
- limit -- index of first element that should not be read, <= capacity Ò₤ídÓð¡Õ?/strong>
The position is an important piece of information to keep in mind when reading from and writing to a buffer. For instance, if you want to read what you just wrote you must move the position to where you want to read from, otherwise, you'll read past the limit and get whatever just happens to be there. This is where the flip method comes in handy, changing the limit to the current position and moving the current position to zero. You can also rewind a buffer to keep the current limit and move the position back to zero. For example, removing the flip call from the following snippet will get back a space, assuming nothing was put in the buffer originally.
buff.put('a');
buff.flip();
buff.get();
flip: changing the limit to the current position and moving the current position to zero
rewind:keep the current limit and move the position back to zero
The wrap mechanism shown above is an example of a non-direct buffer. Non-direct buffers can also be created and sized with the allocate method, essentially wrapping the data into an array. At a slightly higher creation cost, you can also create a contiguous memory block, also called a direct buffer, with the allocateDirect method. Direct buffers rely on the system's native I/O operations to optimize access operations.
Mapped Files
There is one specialized form of direct ByteBuffer known as a MappedByteBuffer. This class represents a buffer of bytes mapped to a file. To map a file to a MappedByteBuffer, you first must get the channel for a file. A channel represents a connection to something, such as a pipe, socket, or file, that can perform I/O operations. In the case of a FileChannel, you can get one from a FileInputStream, FileOutputStream, or RandomAccessFile through the getChannel method. Once you have the channel, you map it to a buffer with map, specifying the mode and portion of the file you want to map. The file channel can be opened with one of the FileChannel.MapMode constants: read-only (READ_ONLY), private/copy-on-write (PRIVATE), or read-write (READ_WRITE).
Here's the basic process for creating a read-only MappedByteBuffer from a file:
String filename = ...;
FileInputStream input = new FileInputStream(filename);
FileChannel channel = input.getChannel();
int fileLength = (int)channel.size();
MappedByteBuffer buffer =  channel.map(FileChannel.MapMode.READ_ONLY, 0, fileLength);
You'll find the channel-related classes in the java.nio.channels package.
Once the MappedByteBuffer has been created, you can access it like any other ByteBuffer. In this particular case though, it is read-only, so any attempt to put something will throw an exception, NonWritableChannelException in this case. If you need to treat the bytes as characters, you must convert the ByteBuffer into a CharBuffer through the use of a character set for the conversion. This character set is specified by the Charset class. You then decode the file contents through the CharsetDecoder class. There is also a CharsetEncoder to go in the other direction.
// ISO-8859-1  is ISO Latin Alphabet #1
Charset charset = Charset.forName("ISO-8859-1");
CharsetDecoder decoder = charset.newDecoder();
CharBuffer charBuffer = decoder.decode(buffer);
These classes are found in the java.nio.charset package.
Regular Expressions
Once you've mapped the input file to a CharBuffer, you can do pattern matching on the file contents. Think of running grep or wc on the file to do regular expression matching or word counting, respectively. That's where the java.util.regex package comes into play and the Pattern and Matcher classes get used.
The Pattern class provides a whole slew of constructs for matching regular expressions. Basically, you provide the pattern as a String. See the class documentation for full details of the patterns. Here are some samples to get you started:
- Line pattern, any number of characters followed by carriage return and/or line feed: .*\r?\n or .*$
- Series of numbers: [0-9]* or \d*
- A control character {cntrl}
- An upper or lowercase US-ASCII character, followed by white space, followed by punctuation: [\p{Lower}\p{Upper}]\s\p{Punct}
Note: Unfortunately, the beta 3 version of J2SE 1.4 broke just about everything that deals with character sequence views of character buffers (which are necessary for regular expressions). See Bug Parade for a description of the problem. Unfortunately, that means that you can't use the pattern matcher to read a word/line at a time.
For additional information about the regular expression library, see the Regular Expressions and the Java Programming Language article referenced in the Resources.
Socket Channels
Moving on from file channels takes us to channels for reading from and writing to socket connections. These channels can be used in a blocking or non-blocking fashion. In the blocking fashion, they just replace the call to connect or accept, depending on whether you are a client or a server. In the non-blocking fashion, there is no equivalent.
The new classes to deal with for basic socket reading and writing are the InetSocketAddress class in the java.net package to specify where to connect to, and the SocketChannel class in the java.nio.channels package to do the actual reading and writing operations.
Connecting with InetSocketAddress is very similar to working with the Socket class. All you have to do is provide the host and port:
String host = ...;
InetSocketAddress socketAddress = new  InetSocketAddress(host, 80);
Once you have the InetSocketAddress, that's where life changes. Instead of reading from the socket's input stream and writing to the output stream, you need to open a SocketChannel and connect it to the InetSocketAddress:
SocketChannel channel = SocketChannel.open();
channel.connect(socketAddress);
Once connected, you can read from or write to the channel with ByteBuffer objects. For instance, you can wrap a String in a CharBuffer with the help of an CharsetEncoder to send an HTTP request:
Charset charset = Charset.forName("ISO-8859-1");
CharsetEncoder encoder = charset.newEncoder();
String request = "GET / \r\n\r\n";
channel.write(encoder.encode(CharBuffer.wrap(request)));
You can then read the response from the channel. Since the response for this HTTP request will be text, you'll need to convert that response into a CharBuffer through a CharsetDecoder. By creating just a CharBuffer to start, you can keep reusing the object to avoid unnecessary garbage collection between reads:
ByteBuffer buffer = ByteBuffer.allocateDirect(1024);
CharBuffer charBuffer = CharBuffer.allocate(1024);
while ((channel.read(buffer)) != -1) {
  buffer.flip();
  decoder.decode(buffer, charBuffer, false);
  charBuffer.flip();
  System.out.println(charBuffer);
  buffer.clear();
  charBuffer.clear();
}
The following program connects all these pieces to read the main page of a Web site through an HTTP request. Feel free to save the output to a file to compare the results to viewing the page with a browser.
import java.io.*;
import java.net.*;
import java.nio.*;
import java.nio.channels.*;
import java.nio.charset.*;


public class ReadURL {
  public static void main(String args[]) {
    String host = args[0];
    SocketChannel channel = null;

    try {

      // Setup
      InetSocketAddress socketAddress =
        new InetSocketAddress(host, 80);
      Charset charset =
        Charset.forName("ISO-8859-1");
      CharsetDecoder decoder =
        charset.newDecoder();
      CharsetEncoder encoder =
        charset.newEncoder();

      // Allocate buffers
      ByteBuffer buffer =
        ByteBuffer.allocateDirect(1024);
      CharBuffer charBuffer =
        CharBuffer.allocate(1024);

      // Connect
      channel = SocketChannel.open();
      channel.connect(socketAddress);

      // Send request
      String request = "GET / \r\n\r\n";
      channel.write(encoder.encode(CharBuffer.wrap(request)));

      // Read response
      while ((channel.read(buffer)) != -1) {
        buffer.flip();
        // Decode buffer
        decoder.decode(buffer, charBuffer, false);
        // Display
        charBuffer.flip();
        System.out.println(charBuffer);
        buffer.clear();
        charBuffer.clear();
      }
    } catch (UnknownHostException e) {
      System.err.println(e);
    } catch (IOException e) {
      System.err.println(e);
    } finally {
      if (channel != null) {
        try {
          channel.close();
        } catch (IOException ignored) {
        }
      }
    }
  }
}
Non-Blocking Reads
Now comes the interesting part, and what people are most interested in in the new I/O packages. How do you configure the channel connection to non-blocking? The basic step is to call the configureBlocking method on the opened SocketChannel, and pass in a value of false. Once you call the connect method, the method now returns immediately.
String host = ...;
InetSocketAddress socketAddress =
  new InetSocketAddress(host, 80);
channel = SocketChannel.open();
channel.configureBlocking(false);
channel.connect(socketAddress);
Once you have a non-blocking channel, you then have to figure out how to actually work with the channel. The SocketChannel is an example of a SelectableChannel. These selectable channels work with a Selector. Basically, you register the channel with the Selector, tell the Selector what events you are interested in, and it notifies you when something interesting happens.
To get a Selector instance, just call the static open method of the class:
Selector selector = Selector.open();
Registering with the Selector is done through the register method of the channel. The events are specified by fields of the SelectionKey class. In the case of the SocketChannel class, the available operations are OP_CONNECT, OP_READ, and OP_WRITE. So, if you were interested in read and connection operations, you would register as follows:
channel.register(selector,
  SelectionKey.OP_CONNECT | SelectionKey.OP_READ);
At this point, you have to wait on the selector to tell you when events of interest happen on registered channels. The select method of the Selector will block until something interesting happens. To find this out, you can put a while (selector.select() > 0) loop in its own thread and then go off and do your own thing while the I/O events are being processed. The select method returns when something happens, where the value returned is the count of channels ready to be acted upon. This value doesn't really matter though.
Once something interesting happens, you have to figure out what happened and respond accordingly. For the channel registered here with the selector, you expressed interest in both the OP_CONNECT and OP_READ operations, so you know it can only be one of those events. So, what you do is get the Set of ready objects through the selectedKeys method, and iterate. The element in the Set is a SelectionKey, and you can check if it isConnectable or isReadable for the two states of interest.
Here's the basic framework of the loop so far:
while (selector.select(500) > 0) {
  // Get set of ready objects
  Set readyKeys = selector.selectedKeys();
  Iterator readyItor = readyKeys.iterator();

  // Walk through set
  while (readyItor.hasNext()) {

    // Get key from set
    SelectionKey key =
      (SelectionKey)readyItor.next();

    // Remove current entry
    readyItor.remove();

    // Get channel
    SocketChannel keyChannel =
      (SocketChannel)key.channel();

    if (key.isConnectable()) {

    } else if (key.isReadable()) {

    }
  }
}
The remove method call requires a little explanation. The ready set of channels can change while you are processing them. So, you should remove the one you are processing when you process it. Removal does not trigger a ConcurrentModificationException to be thrown. There's also a timeout setup here for the select call so it doesn't wait forever if there is nothing to do. There's also a call to get the channel from the key in there. You'll need that for each operation.
For the sample program here you're doing the equivalent of reading from an HTTP connection, so upon connection you need to send the initial HTTP request. Basically, once you know the connection is made, you send a GET request for the root of the site. When the selector reports that the channel is connectable, it may not have finished connecting yet. So, you should always check if the connection is pending through isConnectionPending and call finishConnect if it is. Once connected, you can write to the channel, but must use a ByteBuffer, not the more familiar I/O streams.
Here's what the connection code looks like:
// OUTSIDE WHILE LOOP
Charset charset =
     Charset.forName("ISO-8859-1");
CharsetEncoder encoder = charset.newEncoder();

// INSIDE if (channel.isConnectable())
// Finish connection
if (keyChannel.isConnectionPending()) {
  keyChannel.finishConnect();
}

// Send request
String request = "GET / \r\n\r\n";
keyChannel.write
     (encoder.encode(CharBuffer.wrap(request)));
The reading from a socket channel is just like from a file channel. There is one exception though. It is more likely that the buffer may not be full when reading from a socket. Not a big deal though, as you are just going to read what is ready.
// OUTSIDE WHILE LOOP
CharsetDecoder decoder = charset.newDecoder();
ByteBuffer buffer = ByteBuffer.allocateDirect(1024);
CharBuffer charBuffer = CharBuffer.allocate(1024);

// INSIDE if (channel.isReadable())
// Read what's ready in response
keyChannel.read(buffer);
buffer.flip();

// Decode buffer
decoder.decode(buffer, charBuffer, false);

// Display
charBuffer.flip();
System.out.print(charBuffer);

// Clear for next pass
buffer.clear();
charBuffer.clear();
Add in the necessary exception handling code and you have your socket reader. Be sure to close the channel in the finally clause to make sure its resources are released, even if there is an exception. Here's the complete client code:
import java.io.*;
import java.net.*;
import java.nio.*;
import java.nio.channels.*;
import java.nio.charset.*;
import java.util.*;


public class NonBlockingReadURL {
  static Selector selector;

  public static void main(String args[]) {
    String host = args[0];
    SocketChannel channel = null;

    try {

      // Setup
      InetSocketAddress socketAddress =
        new InetSocketAddress(host, 80);
      Charset charset =
        Charset.forName("ISO-8859-1");
      CharsetDecoder decoder =
        charset.newDecoder();
      CharsetEncoder encoder =
        charset.newEncoder();

      // Allocate buffers
      ByteBuffer buffer =
        ByteBuffer.allocateDirect(1024);
      CharBuffer charBuffer =
        CharBuffer.allocate(1024);

      // Connect
      channel = SocketChannel.open();
      channel.configureBlocking(false);
      channel.connect(socketAddress);

      // Open Selector
      selector = Selector.open();

      // Register interest in when connection
      channel.register(selector,
        SelectionKey.OP_CONNECT |
          SelectionKey.OP_READ);

      // Wait for something of interest to happen
      while (selector.select(500) > 0) {
        // Get set of ready objects
        Set readyKeys = selector.selectedKeys();
        Iterator readyItor = readyKeys.iterator();

        // Walk through set
        while (readyItor.hasNext()) {

          // Get key from set
          SelectionKey key =
            (SelectionKey)readyItor.next();

          // Remove current entry
          readyItor.remove();

          // Get channel
          SocketChannel keyChannel =
            (SocketChannel)key.channel();

          if (key.isConnectable()) {

            // Finish connection
            if (keyChannel.isConnectionPending()) {
              keyChannel.finishConnect();
            }

            // Send request
            String request =
                 "GET / \r\n\r\n";
            keyChannel.write(encoder.encode(
              CharBuffer.wrap(request)));

          } else if (key.isReadable()) {

            // Read what's ready in response
            keyChannel.read(buffer);
            buffer.flip();

            // Decode buffer
            decoder.decode(buffer,
              charBuffer, false);

            // Display
            charBuffer.flip();
            System.out.print(charBuffer);

            // Clear for next pass
            buffer.clear();
            charBuffer.clear();

          } else {
            System.err.println("Ooops");
          }
        }
      }
    } catch (UnknownHostException e) {
      System.err.println(e);
    } catch (IOException e) {
      System.err.println(e);
    } finally {
      if (channel != null) {
        try {
          channel.close();
        } catch (IOException ignored) {
        }
      }
    }
    System.out.println();
  }
}
Non-Blocking Servers
The final piece is having a Web server use the NIO package. With the new I/O capabilities, you can create a Web server that does not require one thread per connection. You can certainly pool threads for long processing tasks, but all you have to do is select and wait for something to do, not have all the threads waiting separately.
The basic setup of the server using channels involves you calling bind to connect a ServerSocketChannel to a InetSocketAddress.
ServerSocketChannel channel =
  ServerSocketChannel.open();
channel.configureBlocking(false);
InetSocketAddress isa =
  new InetSocketAddress(port);
channel.socket().bind(isa);
Everything else is nearly the same as the client reading, except this time you need to register the OP_ACCEPT key, check for isAcceptable when the selector notifies you of the event, and get a ServerSocketChannel instead of a SocketChannel. It is that simple.
The following code example shows just how simple this is. It is your basic single-threaded server, sending back a canned text message for each request. Just use telnet to connect to port 9999 and see the response.
import java.io.*;
import java.net.*;
import java.nio.*;
import java.nio.channels.*;
import java.util.*;

public class Server {
   private static int port = 9999;
   public static void main(String args[])
     throws Exception {
     Selector selector = Selector.open();

     ServerSocketChannel channel =
       ServerSocketChannel.open();
     channel.configureBlocking(false);
     InetSocketAddress isa = new InetSocketAddress(port);
     channel.socket().bind(isa);

     // Register interest in when connection
     channel.register(selector, SelectionKey.OP_ACCEPT);

     // Wait for something of interest to happen
     while (selector.select() > 0) {
       // Get set of ready objects
       Set readyKeys = selector.selectedKeys();
       Iterator readyItor = readyKeys.iterator();

       // Walk through set
       while (readyItor.hasNext()) {

         // Get key from set
         SelectionKey key =
           (SelectionKey)readyItor.next();

         // Remove current entry
         readyItor.remove();

         if (key.isAcceptable()) {
           // Get channel
           ServerSocketChannel keyChannel =
             (ServerSocketChannel)key.channel();

           // Get server socket
           ServerSocket serverSocket = keyChannel.socket();

           // Accept request
           Socket socket = serverSocket.accept();

           // Return canned message
           PrintWriter out = new PrintWriter
             (socket.getOutputStream(), true);
           out.println("Hello, NIO");
           out.close();
         } else {
           System.err.println("Ooops");
         }

       }
     }
     // Never ends
   }
}
After accepting the request, you could get the channel from the socket, make it non-blocking, and register that with the selector, too. This framework just provides the basics of using the NIO classes within a Web server. For additional information about creating a multi-threaded server, see the JavaWorld article referenced in the Resources section.
Conclusion
The New I/O features introduced to the J2SE version 1.4 Beta release provide exciting new ways to improve the performance of your programs. By taking advantage of the new capabilities, not only will they be faster but they can be much more scalable because you won't have to worry about tasks like one thread per connection. This is especially important on the server side, greatly increasing the possible number of simultaneous connections supported.
Note: If you look at the list of capabilities in JSR 51, you'll notice there is mention of scanning and formatting support, similar to C's printf. This feature didn't make the 1.4 beta release and will be saved for a later version.
Resources
- JSR 51 New I/O APIs for the Java Platform
- New I/O API Summary
- JNI Enhancements
- Regular Expressions and the Java Programming Language
- Character Sets
- Master Merlin's new I/O classes (JavaWorld)
- Non-Blocking Socket I/O in JDK 1.4
About the Author
John Zukowski conducts strategic Java consulting with JZ Ventures, Inc. His latest books are Java Collections and Definitive Guide to Swing for Java 2 (2nd ed) from Apress. Look for Learn Java with JBuilder 6 in 2002. Contact John at jaz@zukowski.net.
ÌÌÌ°Í
ÐÌÒÎÐ?ð¤ÎÍ°ÍÙÍÓ£ÕˆÌËÒÏÈÍ°ÕÛÕÂ, ð¿Óϯð¡¤Ó£ÕˆÌ°ÍÌÌÌÌ°Í( the rule of thumb) Ð?/p>