
2012年12月21日
http://mathias-kettner.de/checkmk_livestatus.html下載并解壓最新的包:
check_mk-1.2.1i3.tar.gz
再解壓其中的到livestatus目錄:
livestatus.tar.gz
進入:livestatus/src
再:make clean livestatus.o
會發現一堆錯誤,根據編譯NDO的選項:
ndoutils-1.4b7/src:
make clean ndomod-3x.o
gcc -fno-common -g -O2 -DHAVE_CONFIG_H -D BUILD_NAGIOS_3X -o ndomod-3x.o ndomod.c io.o utils.o -bundle -flat_namespace -undefined suppress -lz
在最后的編譯選項里添上:
-flat_namespace -undefined suppress -lz
就可以編譯出:
livestatus.o
--------------------------
livecheck編不過,報找不到n_short:
ip_icmp.h:92: error: expected specifier-qualifier-list before ‘n_short’
vi ./check_icmp.c
把這個調整到INCLUDE序列的最后即可:
#include "/usr/include/netinet/ip_icmp.h"
posted @
2012-12-21 07:00 我愛佳娃 閱讀(1557) |
評論 (0) |
編輯 收藏
2012年12月1日
摘要:
場景
想要用到的場景:用戶訪問WEB服務,WEB訪問非WEB服務1,服務1又再訪問2、3,合并計算后,把數據返回給WEB及前端用戶。想讓訪問鏈上的所有服務都能得到認證和鑒權,認為本次請求確實是來自用戶的。所以想到用CAS,讓用戶在一點登錄,所有服務都到此處認證和鑒權。
閱讀全文
posted @
2012-12-01 10:43 我愛佳娃 閱讀(9805) |
評論 (3) |
編輯 收藏
2012年11月12日
This tutorial will walk you through how to configure SSL (https://localhost:8443 access) on Tomcat in 5 minutes.

For this tutorial you will need:
- Java SDK (used version 6 for this tutorial)
- Tomcat (used version 7 for this tutorial)
The set up consists in 3 basic steps:
- Create a keystore file using Java
- Configure Tomcat to use the keystore
- Test it
- (Bonus ) Configure your app to work with SSL (access through https://localhost:8443/yourApp)
1 – Creating a Keystore file using Java
Fisrt, open the terminal on your computer and type:
Windows:
cd %JAVA_HOME%/bin
Linux or Mac OS:
cd $JAVA_HOME/bin
The $JAVA_HOME on Mac is located on “/System/Library/Frameworks/JavaVM.framework/Versions/{your java version}/Home/”
You will change the current directory to the directory Java is installed on your computer. Inside the Java Home directory, cd to the bin folder. Inside the bin folder there is a file named keytool. This guy is responsible for generating the keystore file for us.
Next, type on the terminal:
keytool -genkey -alias tomcat -keyalg RSA
When you type the command above, it will ask you some questions. First, it will ask you to create a password (My password is “password“):
loiane:bin loiane$ keytool -genkey -alias tomcat -keyalg RSA Enter keystore password: password Re-enter new password: password What is your first and last name? [Unknown]: Loiane Groner What is the name of your organizational unit? [Unknown]: home What is the name of your organization? [Unknown]: home What is the name of your City or Locality? [Unknown]: Sao Paulo What is the name of your State or Province? [Unknown]: SP What is the two-letter country code for this unit? [Unknown]: BR Is CN=Loiane Groner, OU=home, O=home, L=Sao Paulo, ST=SP, C=BR correct? [no]: yes Enter key password for (RETURN if same as keystore password): password Re-enter new password: password
It will create a .keystore file on your user home directory. On Windows, it will be on: C:\Documents and Settings\[username]; on Mac it will be on /Users/[username] and on Linux will be on /home/[username].
2 – Configuring Tomcat for using the keystore file – SSL config
Open your Tomcat installation directory and open the conf folder. Inside this folder, you will find the server.xml file. Open it.
Find the following declaration:
<!-- <Connector port="8443" protocol="HTTP/1.1" SSLEnabled="true" maxThreads="150" scheme="https" secure="true" clientAuth="false" sslProtocol="TLS" /> -->
Uncomment it and modify it to look like the following:
Connector SSLEnabled="true" acceptCount="100" clientAuth="false" disableUploadTimeout="true" enableLookups="false" maxThreads="25" port="8443" keystoreFile="/Users/loiane/.keystore" keystorePass="password" protocol="org.apache.coyote.http11.Http11NioProtocol" scheme="https" secure="true" sslProtocol="TLS" />
Note we add the keystoreFile, keystorePass and changed the protocol declarations.
3 – Let’s test it!
Start tomcat service and try to access https://localhost:8443. You will see Tomcat’s local home page.
Note if you try to access the default 8080 port it will be working too: http://localhost:8080
4 – BONUS - Configuring your app to work with SSL (access through https://localhost:8443/yourApp)
To force your web application to work with SSL, you simply need to add the following code to your web.xml file (before web-app tag ends):
<security-constraint> <web-resource-collection> <web-resource-name>securedapp</web-resource-name> <url-pattern>/*</url-pattern> </web-resource-collection> <user-data-constraint> <transport-guarantee>CONFIDENTIAL</transport-guarantee> </user-data-constraint> </security-constraint>
The url pattern is set to /* so any page/resource from your application is secure (it can be only accessed with https). The transport-guarantee tag is set to CONFIDENTIAL to make sure your app will work on SSL.
If you want to turn off the SSL, you don’t need to delete the code above from web.xml, simply changeCONFIDENTIAL to NONE.
Reference: http://tomcat.apache.org/tomcat-7.0-doc/ssl-howto.html (this tutorial is a little confusing, that is why I decided to write another one my own).
Happy Coding!
posted @
2012-11-12 23:17 我愛佳娃 閱讀(3180) |
評論 (0) |
編輯 收藏
2012年9月27日
EXTJS和D3都很強大,不解釋了,把D3繪的圖直接放到一個EXT的TAB里,直接上圖上代碼:
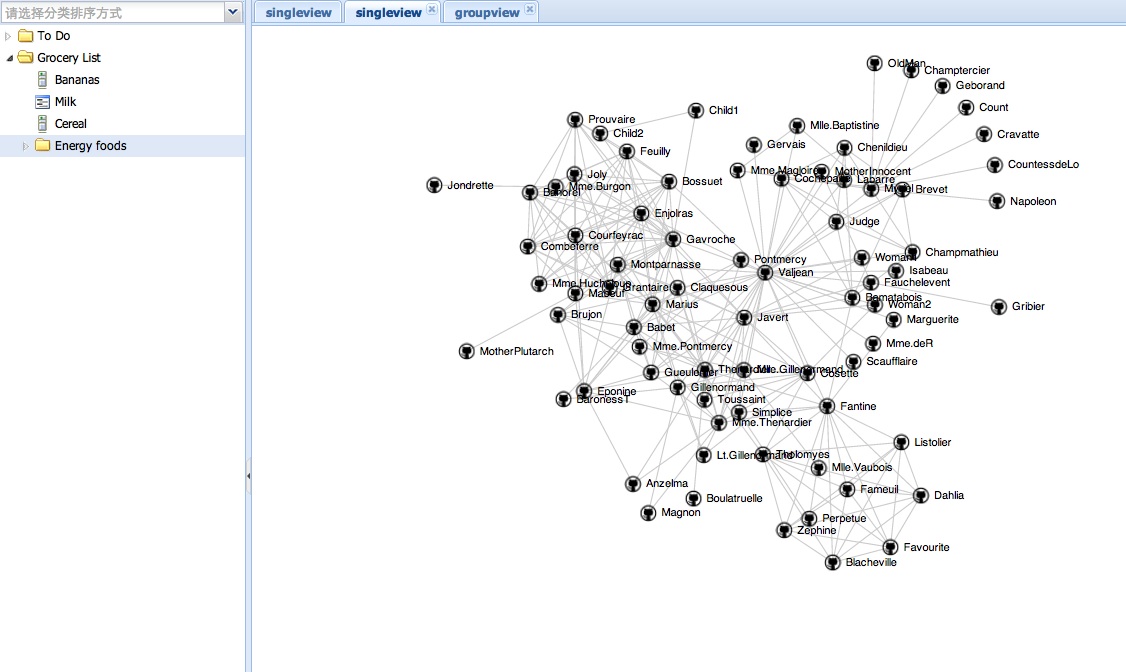
代碼中的D3例子來自:
https://github.com/mbostock/d3/wiki/Force-Layout
可用于繪制拓撲結構圖.
Ext.define('EB.view.content.SingleView', {
extend : 'Ext.panel.Panel',
alias : 'widget.singleview',
layout : 'fit',
title : 'single view',
initComponent : function() {
this.callParent(arguments);
},
onRender : function() {
var me = this;
me.doc = Ext.getDoc();
me.callParent(arguments);
me.drawMap();
},
drawMap : function() {
var width = 960, height = 500
var target = d3.select("#" + this.id+"-body");
var svg = target.append("svg").attr("width", width).attr("height",
height);
var force = d3.layout.force().gravity(.05).distance(100).charge(-100)
.size([width, height]);
// get from: https://github.com/mbostock/d3/wiki/Force-Layout
// example: force-directed images and labels
d3.json("graph.json", function(json) {
force.nodes(json.nodes).links(json.links).start();
var link = svg.selectAll(".link").data(json.links).enter()
.append("line").attr("class", "link");
var node = svg.selectAll(".node").data(json.nodes).enter()
.append("g").attr("class", "node").call(force.drag);
node.append("image").attr("xlink:href",
"https://github.com/favicon.ico").attr("x", -8).attr("y",
-8).attr("width", 16).attr("height", 16);
node.append("text").attr("dx", 12).attr("dy", ".35em").text(
function(d) {
return d.name
});
force.on("tick", function() {
link.attr("x1", function(d) {
return d.source.x;
}).attr("y1", function(d) {
return d.source.y;
}).attr("x2", function(d) {
return d.target.x;
}).attr("y2", function(d) {
return d.target.y;
});
node.attr("transform", function(d) {
return "translate(" + d.x + "," + d.y + ")";
});
});
});
}
});
posted @
2012-09-27 07:38 我愛佳娃 閱讀(4476) |
評論 (0) |
編輯 收藏
2012年8月5日
到這里下載最新PKG:
http://www.mysql.com/downloads/
下來后先裝:mysql-5.5.27-osx10.6-x86_64.pkg
它是裝到/usr/local/mysql,到此目錄運行下:
./scripts/mysql_install_db --user mysql
通過這個啟動:
./bin/mysqld_safe
排錯:
看下上面的LOG提示.
Can't find file: './mysql/host.frm' :一般是沒權限,把DATA目錄刪除,再用上面命令建一次
unknow option:把/etc/my.cnf刪除掉,里面有新版本不認識的上一版本遺留配置
說mysql.sock找不到,這個版本是在/tmp/目錄下哦!
再把剩下兩個包裝了,就可以通過配置面板啟動了:
MySQL.prefPane
MySQLStartupItem.pkg
下次升級可能要給下/usr/local/mysql/data目錄的權限posted @
2012-08-05 16:43 我愛佳娃 閱讀(2641) |
評論 (0) |
編輯 收藏
2011年10月3日
下面以MAC為例,如果是LINUX需要把DYLD發為LD
把下面代碼加到代碼開頭,它就可以自啟動了,不需要再EXPORT或者-I
BEGIN {
#需要加到LOADPATH的路徑
my $need = '/usr/local/nagios/pkg/ebase/';
push @INC, $need;
if ( $^O !~ /MSWin32/ ) {
my $ld = $ENV{DYLD_LIBRARY_PATH};
if ( !$ld ) {
$ENV{DYLD_LIBRARY_PATH} = $need;
}
elsif ( $ld !~ m#(^|:)\Q$need\E(:|$)# ) {
$ENV{DYLD_LIBRARY_PATH} .= ':' . $need;
}
else {
$need = "";
}
if ($need) {
exec 'env', $^X, $0, @ARGV;
}
}
}
@import url(http://www.tkk7.com/CuteSoft_Client/CuteEditor/Load.ashx?type=style&file=SyntaxHighlighter.css);@import url(/css/cuteeditor.css);
posted @
2011-10-03 21:37 我愛佳娃 閱讀(1767) |
評論 (0) |
編輯 收藏限制用戶在自己目錄下載文件:
建立nagiosdnld
指向軟鏈接:/usr/local/nagios/dnld -> /Users/nagiosdnld/dnld
編輯/etc/sshd_config
Match User nagiosdnld
X11Forwarding no
AllowTcpForwarding no
ForceCommand internal-sftp
ChrootDirectory /Users/nagiosdnld
重啟下服務:
launchctl stop org.openbsd.ssh-agent
launchctl start org.openbsd.ssh-agent
@import url(http://www.tkk7.com/CuteSoft_Client/CuteEditor/Load.ashx?type=style&file=SyntaxHighlighter.css);@import url(/css/cuteeditor.css);
posted @
2011-10-03 03:15 我愛佳娃 閱讀(1809) |
評論 (0) |
編輯 收藏